Microsoft Purview provides an overview of data lineage in the Data Catalog. It also details how data systems can integrate with the catalog to capture lineage of data.
Lineage is represented visually to show data moving from source to destination including how the data was transformed. Given the complexity of most enterprise data environments.
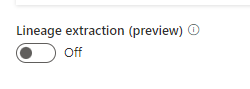
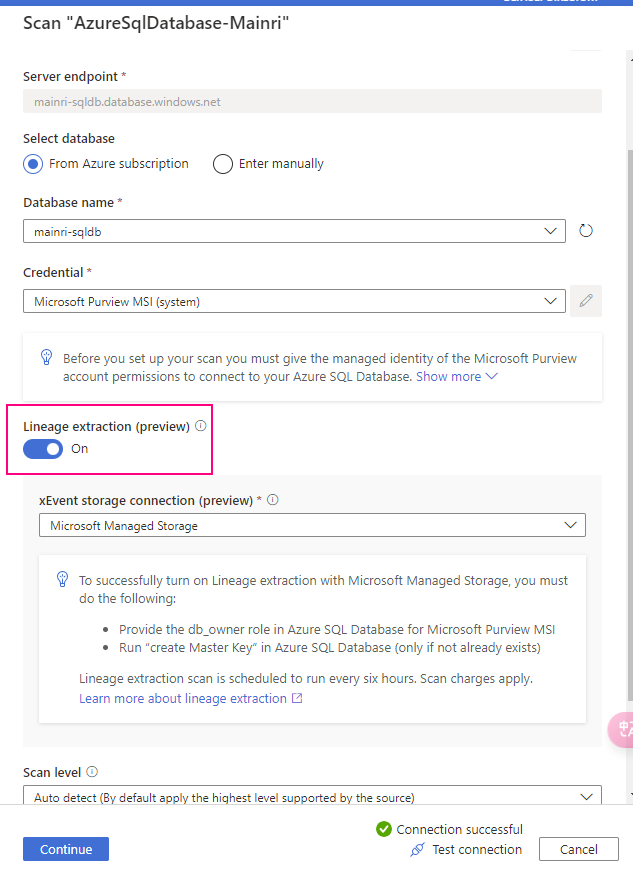
Microsoft Purview supports lineage for views and stored procedures from Azure SQL Database. While lineage for views is supported as part of scanning, you will need to turn on the Lineage extraction toggle to extract stored procedure lineage when you’re setting up a scan.
Lineage collection
Metadata collected in Microsoft Purview from enterprise data systems are stitched across to show an end to end data lineage. Data systems that collect lineage into Microsoft Purview are broadly categorized into following three types:
Data processing systems
Data storage systems
Data analytics and reporting systems
Each system supports a different level of lineage scope.
Data estate might include systems doing data extraction, transformation (ETL/ELT systems), analytics, and visualization systems. Each of the systems captures rich static and operational metadata that describes the state and quality of the data within the systems boundary. The goal of lineage in a data catalog is to extract the movement, transformation, and operational metadata from each data system at the lowest grain possible.
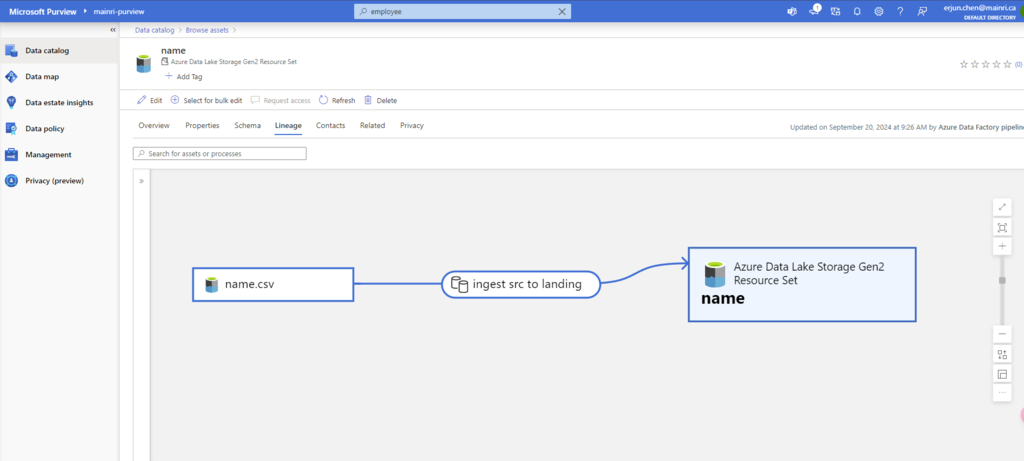
The following example is a typical use case of data moving across multiple systems, where the Data Catalog would connect to each of the systems for lineage.
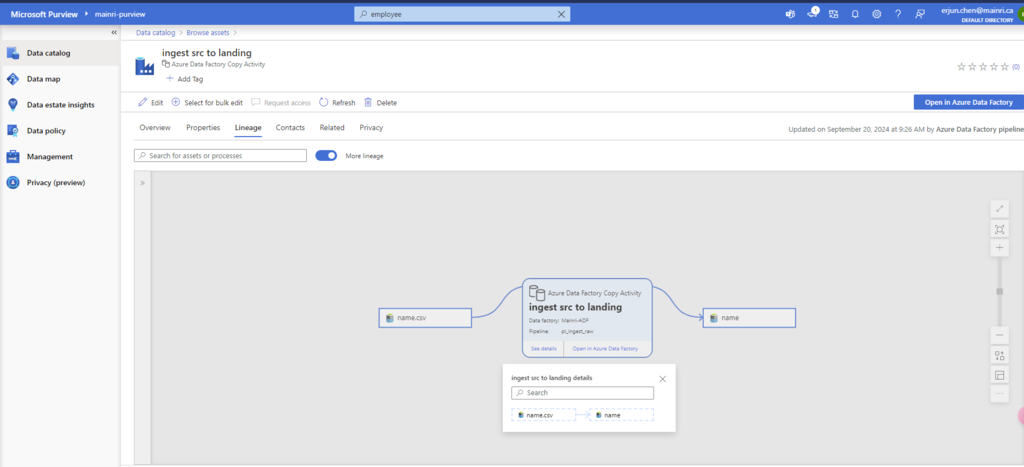
Data Factory copies data from on-prem/raw zone to a landing zone in the cloud.
Data processing systems like Synapse, Databricks would process and transform data from landing zone to Curated zone using notebooks.
Further processing of data into analytical models for optimal query performance and aggregation.
Data visualization systems will consume the datasets and process through their meta model to create a BI Dashboard, ML experiments and so on.
Lineage for SQL DB views
Starting 6/30/24, SQL DB metadata scan will include lineage extraction for views. Only new scans will include the view lineage extraction. Lineage is extracted at all scan levels (L1/L2/L3). In case of an incremental scan, whatever metadata is scanned as part of incremental scan, the corresponding static lineage for tables/views will be extracted.
Prerequisites for setting up a scan with Stored Procedure lineage extraction
<Purview-Account> can access SQL Database and in db_owner group
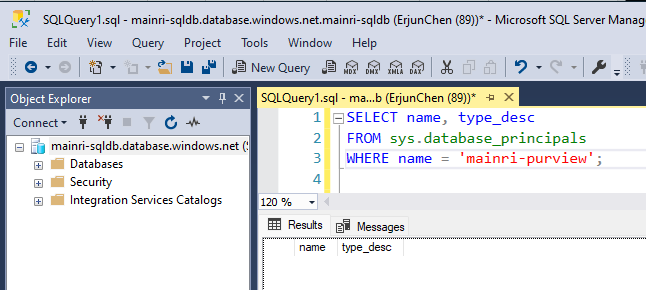
To check whether the Account Exists in the Database
SELECT name, type_desc
FROM sys.database_principals
WHERE name = 'YourUserName';
Replace ‘YourUserName’ with the actual username you’re checking for.
If the user exists, it will return the name and type (e.g., SQL_USER or WINDOWS_USER).
If it does not exist, create one.
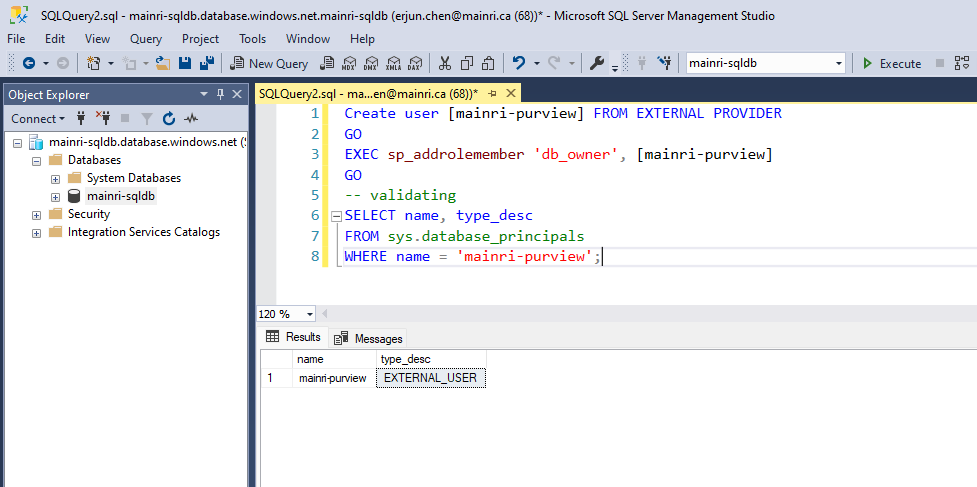
Sign in to Azure SQL Database with your Microsoft Entra account, create a <Purview-account> account and assign db_owner permissions to the Microsoft Purview managed identity.
Create user <purview-account> FROM EXTERNAL PROVIDER
GO
EXEC sp_addrolemember 'db_owner', <purview-account>
GO
replace <purview-account> with the actual purview account name.
Master Key
Check whether master exists or not.
To check if the Database Master Key (DMK) exists or not
SELECT * FROM sys.symmetric_keys
WHERE name = '##MS_DatabaseMasterKey##';Create master key
Go
if the query returns a result, it means the Database Master Key already exists.
If no rows are returned, it means the Database Master Key does not exist, and you may need to create one if required for encryption-related operations.
Create a master key
Create master key
Go
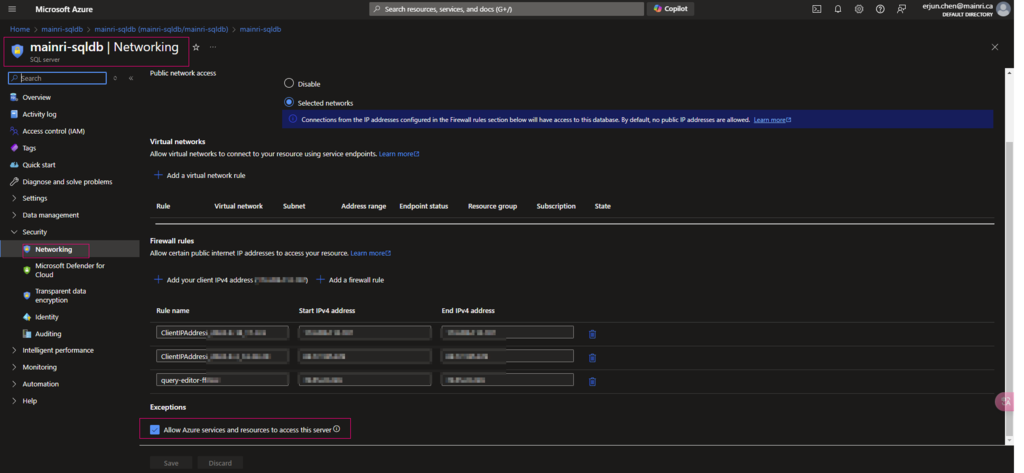
Allow Azure services and resources to access this server
Ensure that Allow Azure services and resources to access this server is enabled under networking/firewall for your Azure SQL resource.
To allow purview extract lineage, we need set to on
Extract Azure Data Factory/Synapse pipeline lineage
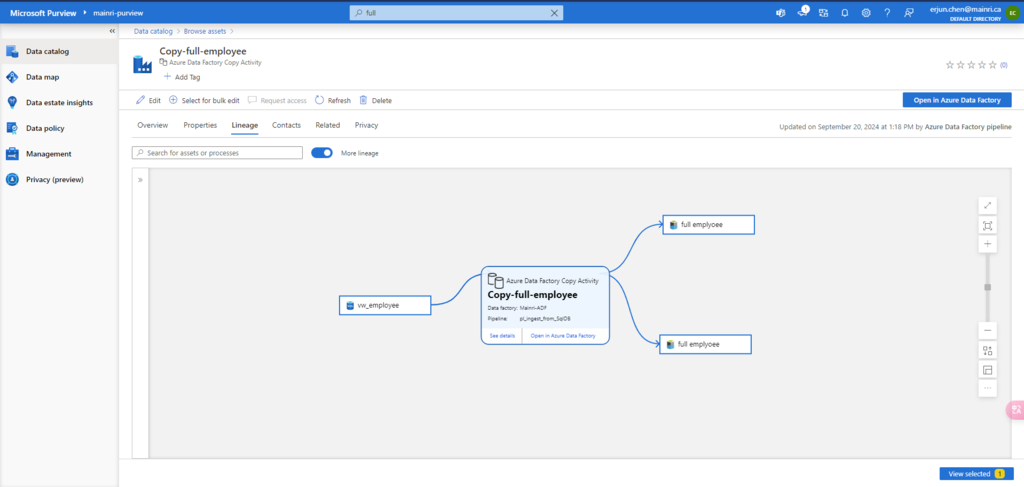
When we connect an Azure Data Factory to Microsoft Purview, whenever a supported Azure Data Factory activity is run, metadata about the activity’s source data, output data, and the activity will be automatically ingested into the Microsoft Purview Data Map.
Microsoft Purview captures runtime lineage from the following Azure Data Factory activities:
Copy Data
Data Flow
Execute SSIS Package
If a data source has already been scanned and exists in the data map, the ingestion process will add the lineage information from Azure Data Factory to that existing source. If the source or output doesn’t exist in the data map and is supported by Azure Data Factory lineage Microsoft Purview will automatically add their metadata from Azure Data Factory into the data map under the root collection.
This can be an excellent way to monitor your data estate as users move and transform information using Azure Data Factory.
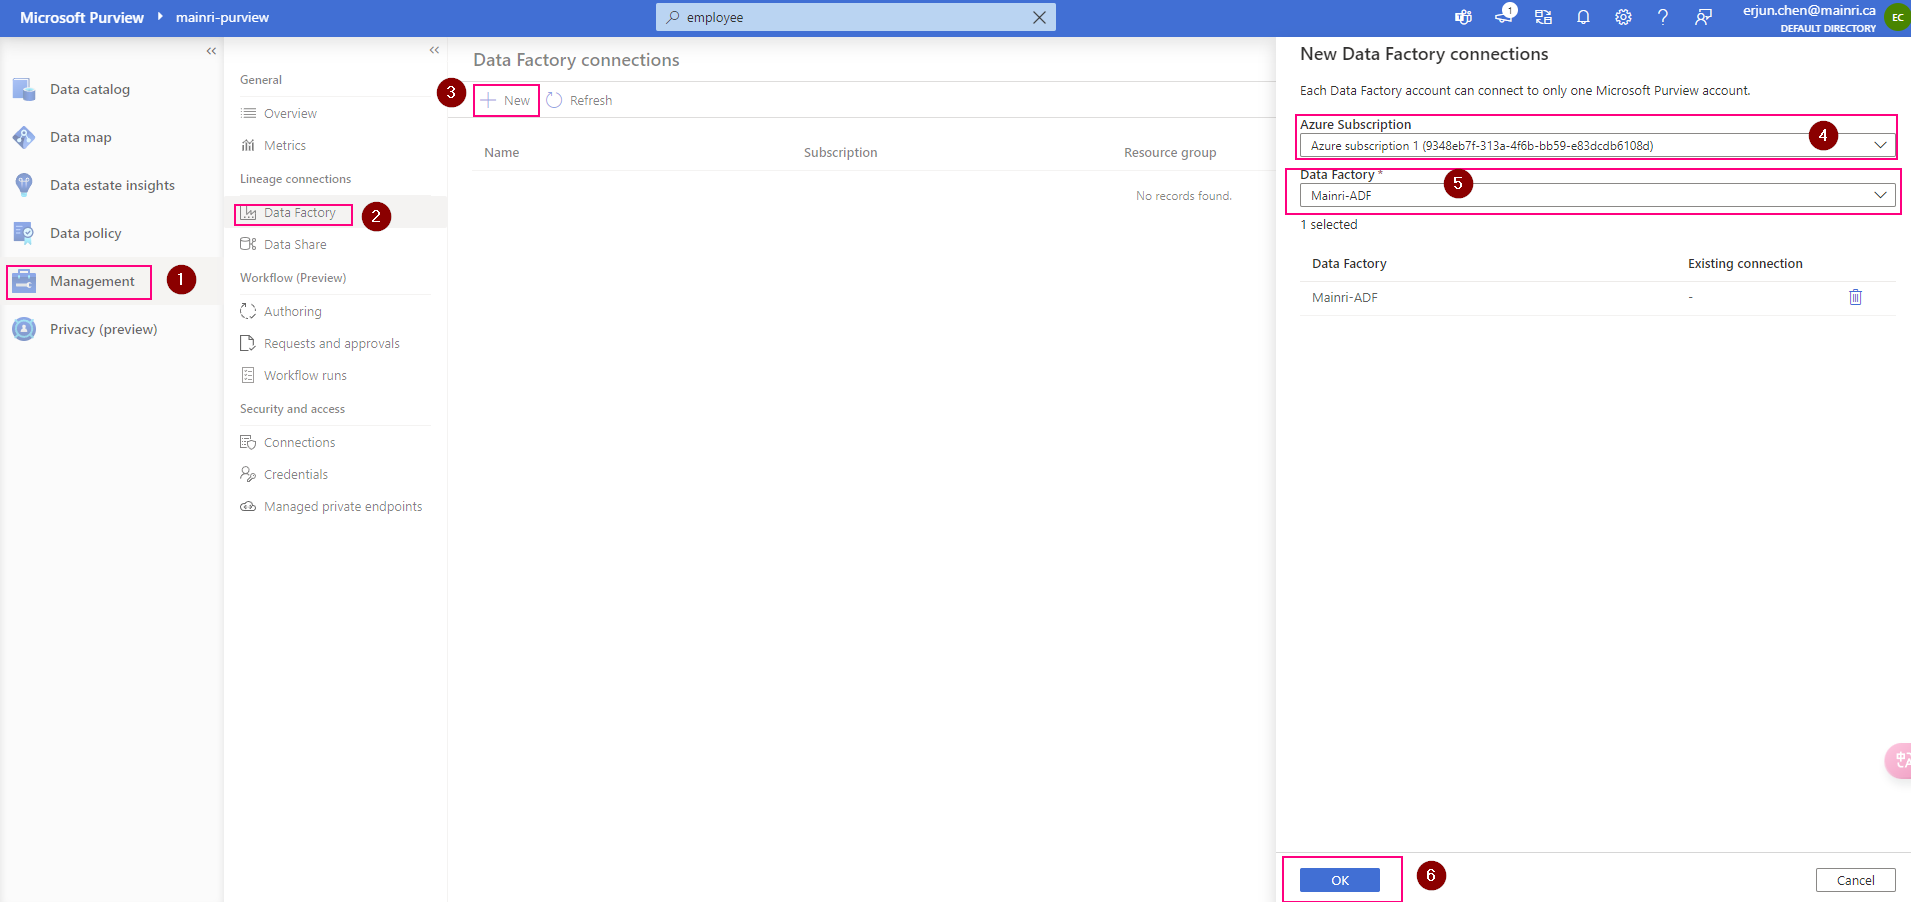
Connect to Microsoft Purview account in Data Factory
Set up authentication
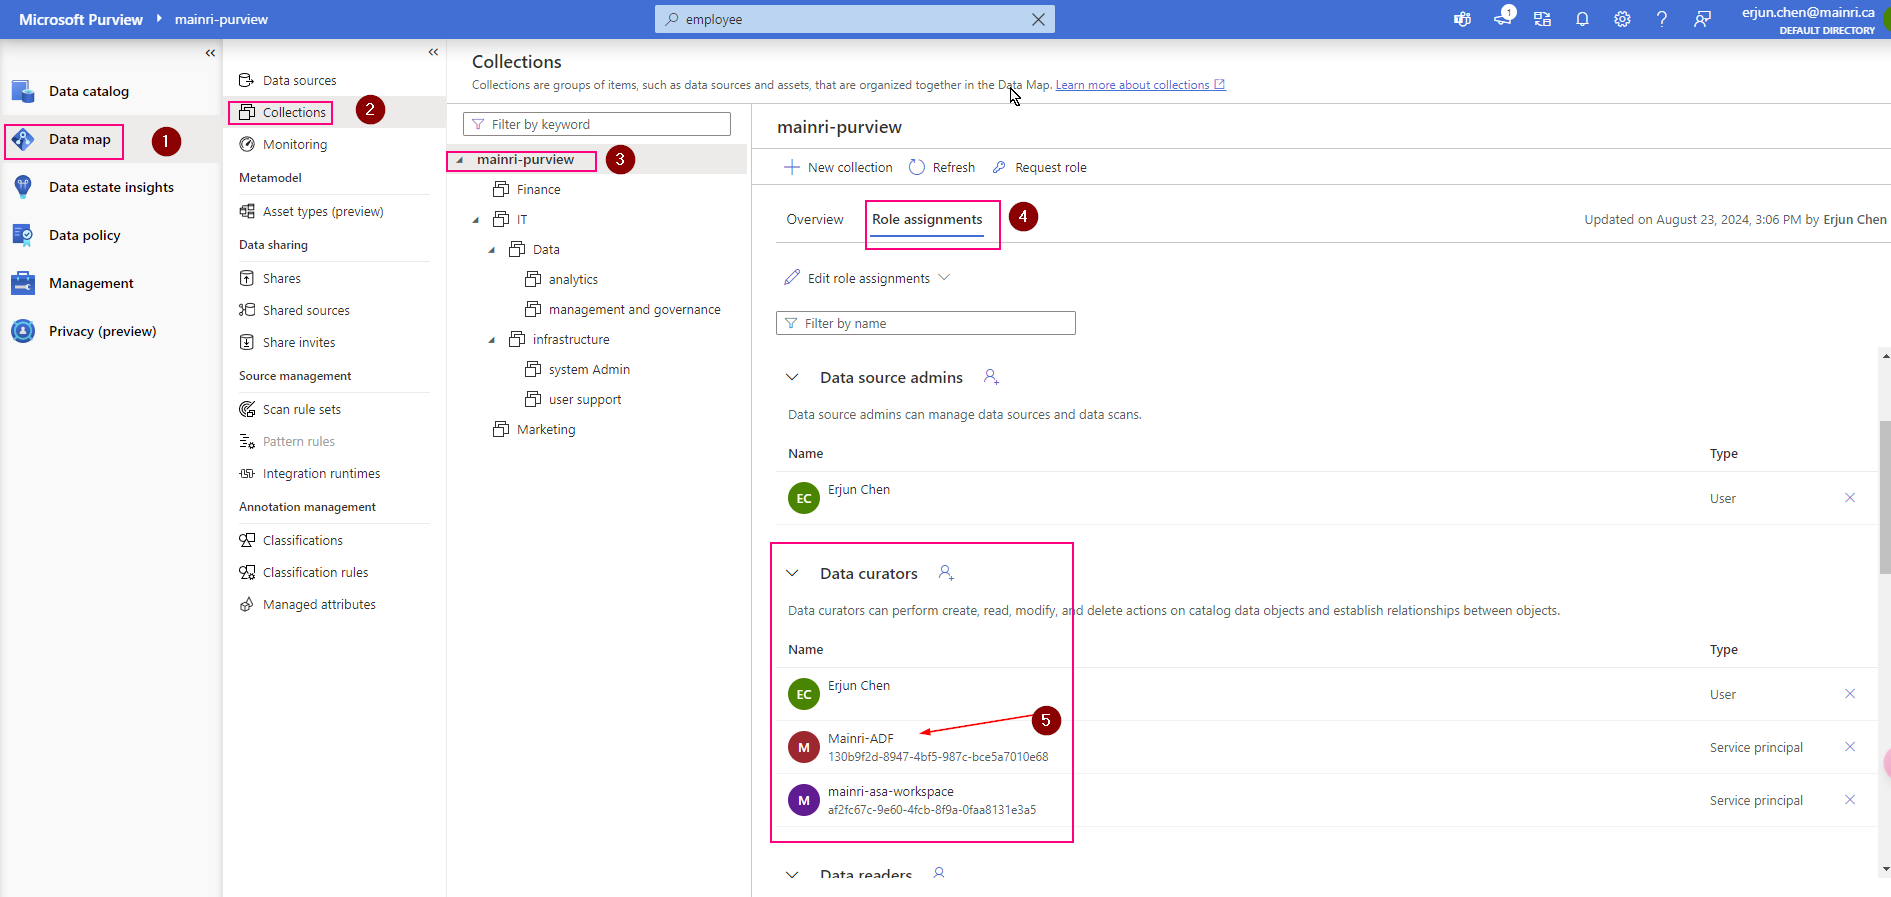
Data factory’s managed identity is used to authenticate lineage push operations from data factory to Microsoft Purview. Grant the data factory’s managed identity Data Curator role on Microsoft Purview root collection.
Purview > Management > Lineage connections > Data Factory > new
Validation: Purview > Data map > Collection > Root collection > Role assignments >
Check, the ADF is under “data Curators” section. That’s OK
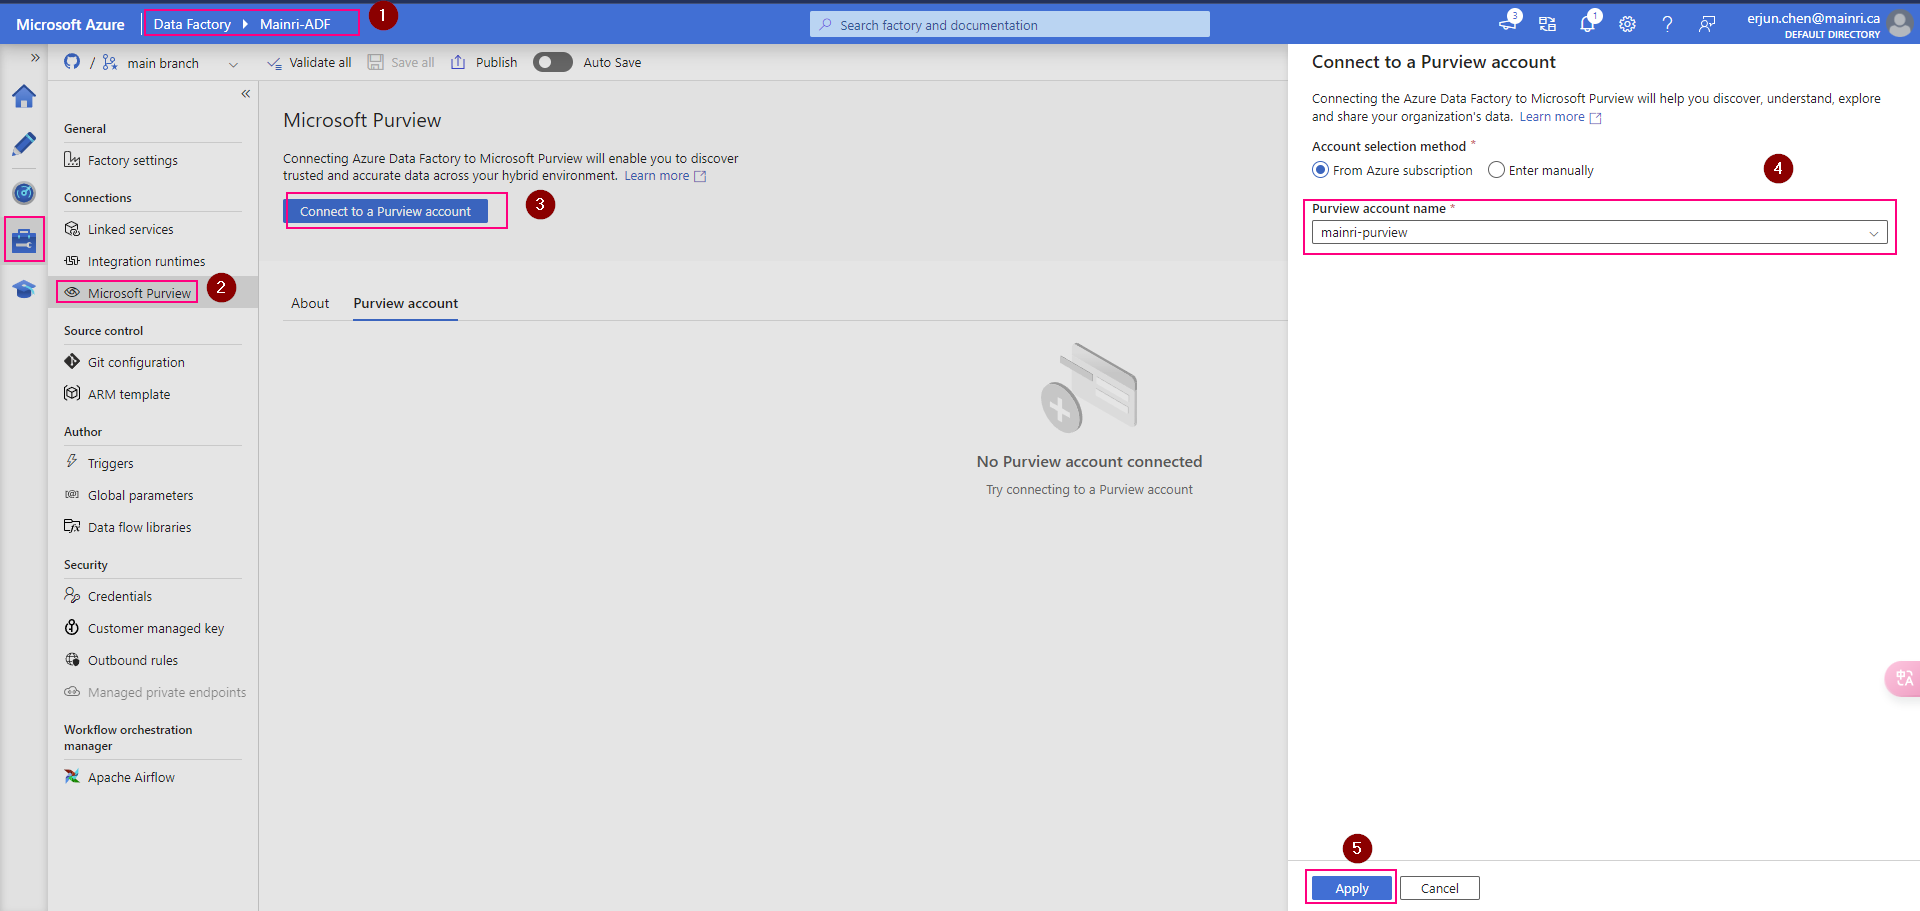
ADF connect to purview
In the ADF studio: Manage -> Microsoft Purview, and select Connect to a Microsoft Purview account
We will see this
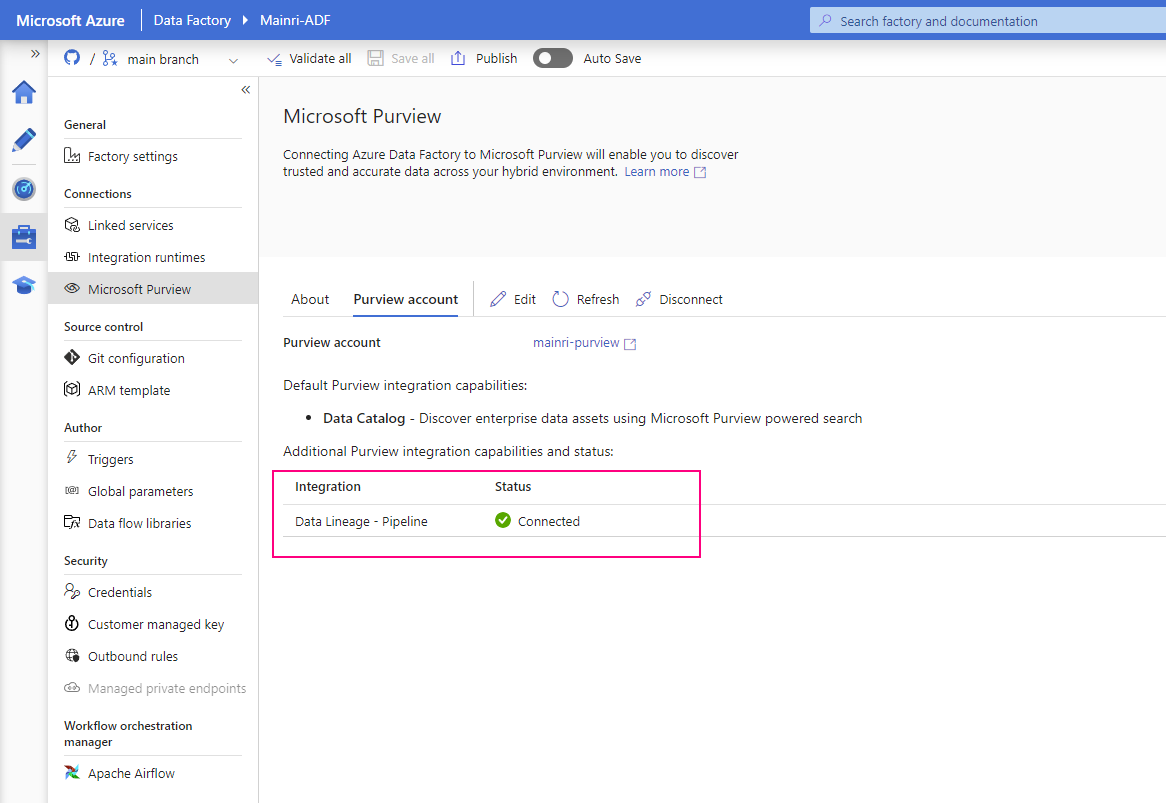
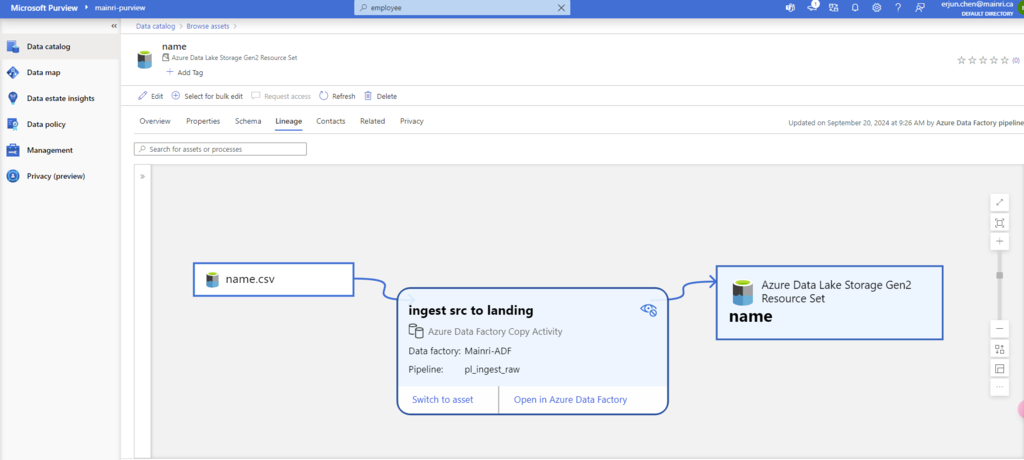
Once pipeline successfully runs, activity will be caught, extracted lineage look this.
Previously, we’ve talked about how Purview connect to ADLS and SQL Database, scan in Purview. Today, we focused on Azure Synapse Analytics with Purview.
A comprehensive data analytics solution can include many folders and files in a data lake, and multiple databases that each contain many tables, each with multiple fields. For a data analyst, finding and understanding the data assets associated with a Synapse Analytics workspace can present a significant challenge before any analysis or reporting can even begin.
As we know the Azure Synapse Analytics is a platform for cloud-scale analytics workloads that process data in multiple sources; including:
Relational databases in serverless and dedicated SQL pools
Files in Azure Data Lake Storage Gen2
Microsoft Purview can help in this scenario by cataloging the data assets in a data map, and enabling data stewards to add metadata, categorization, subject matter contact details, and other information that helps data analysts identify and understand data.
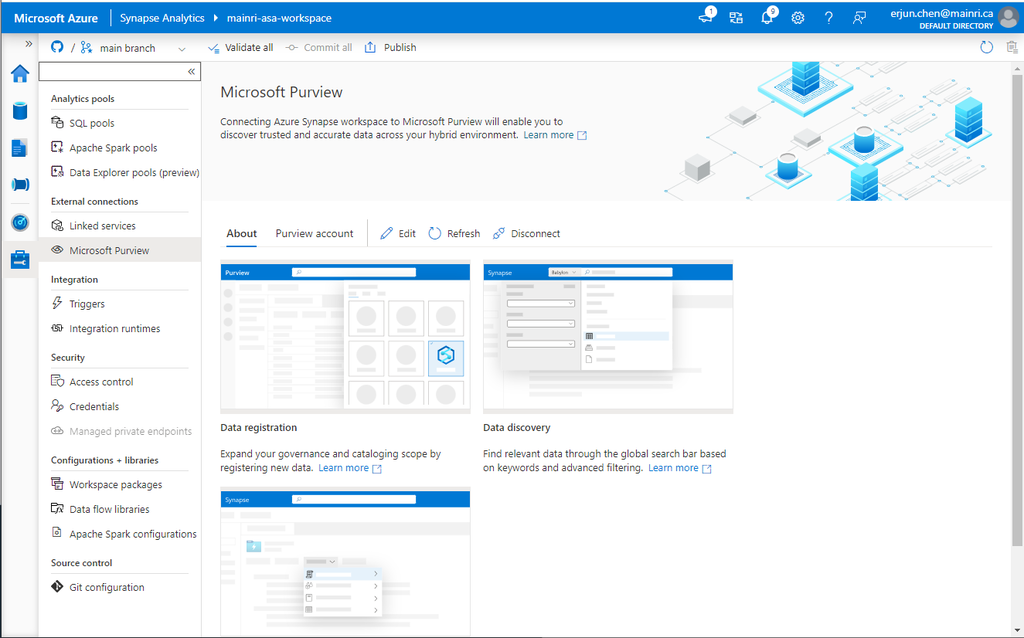
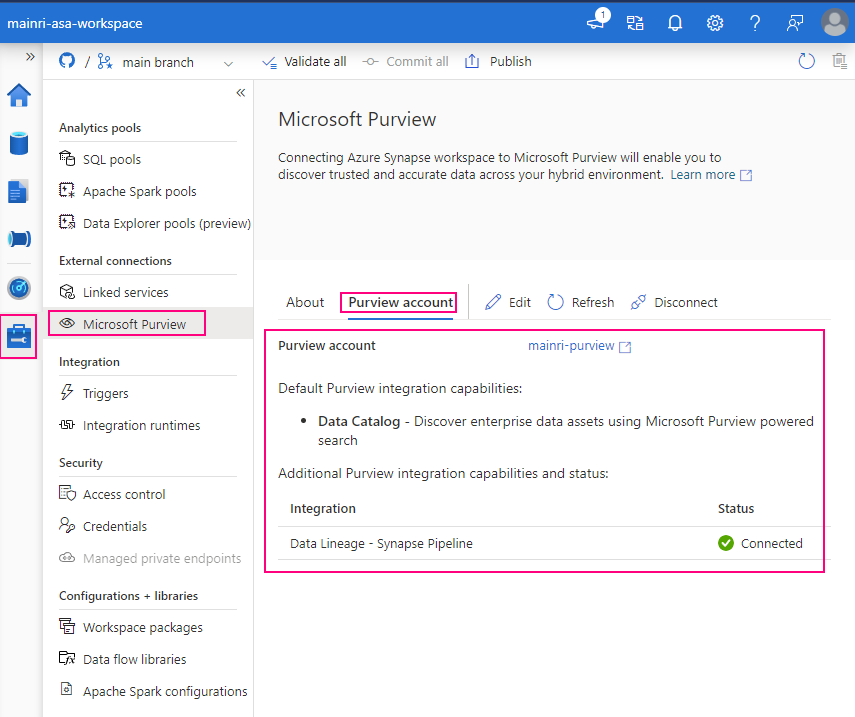
Before you scan Synapse workspace, you need Azure Synapse Analytics connects Purview account.
Azure Synapse Analytics connects to Purview account.
Synapse Studio > Manage > External connection > Microsoft Purview
after you click “apply” you will see:
Select “Purview account” tag
Successfully connected with Purview.
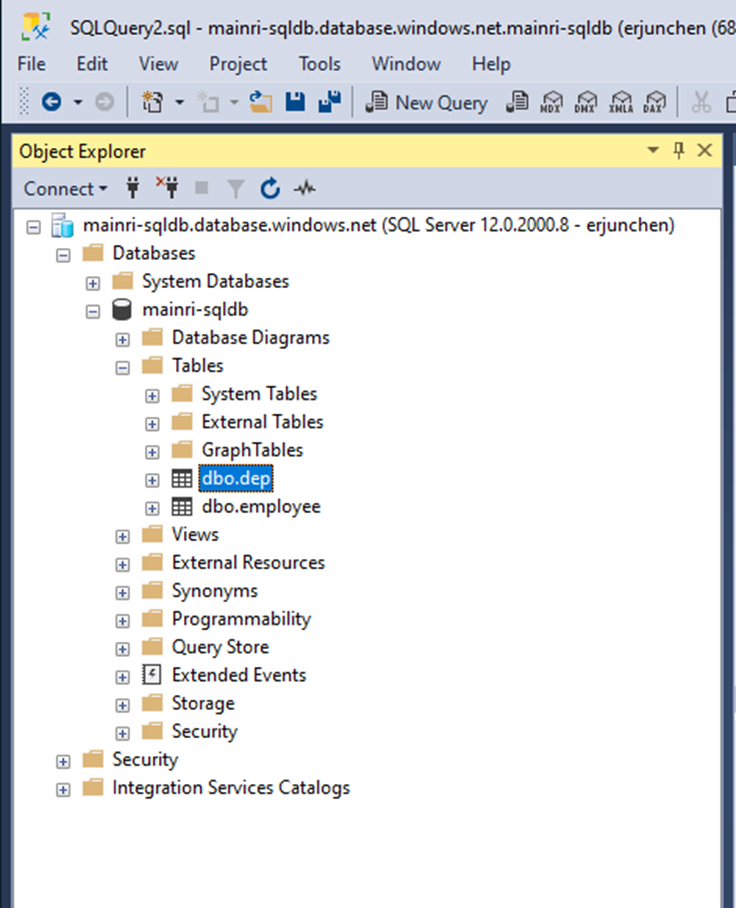
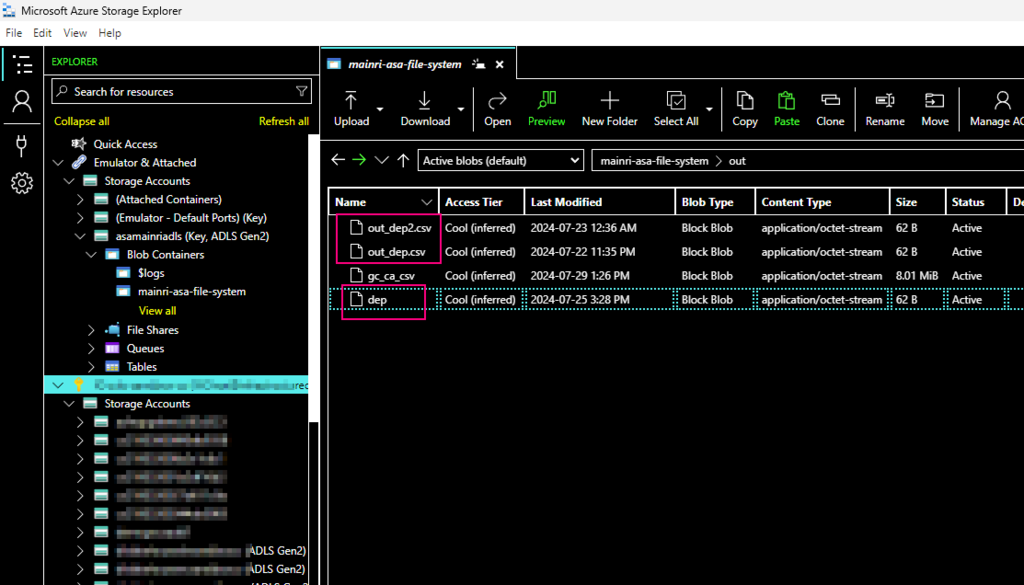
To validation, we check what we have in ADLS and SQL Database.
We have in ADLS and Azure SQL Database. There are one table called “dep” in the SQL Database, 3 files in the ADLS.
There is one table in SQL Database:
and there are 3 file related the key word “dep” in ADLS,
using Azure Storage Explore:
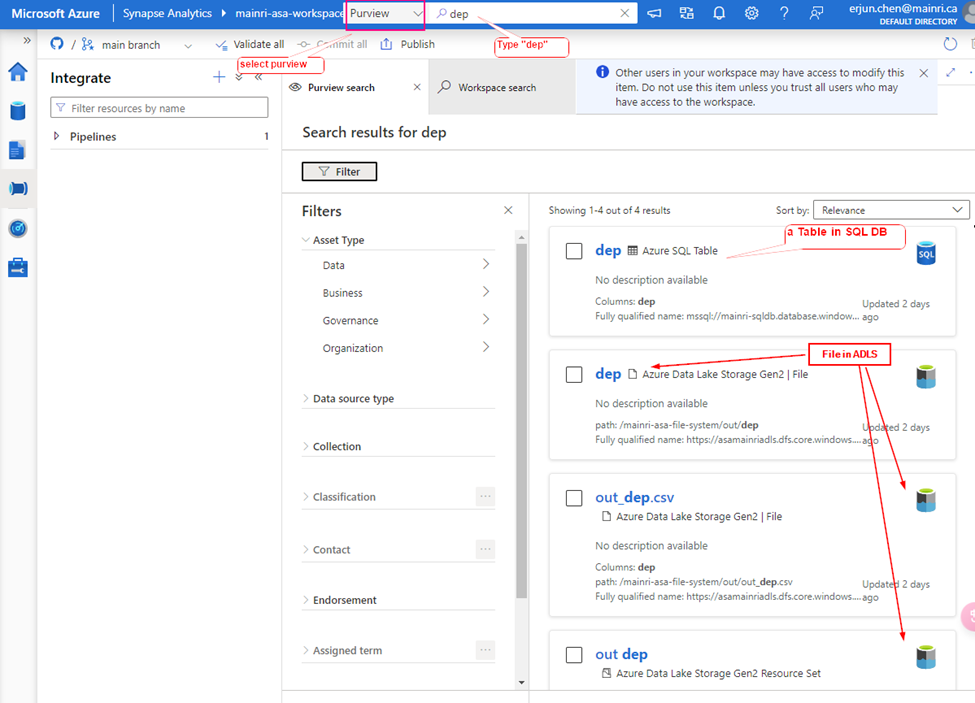
Let’s search “dep” the key from Synapse Studio.
Synapse Studio > from the dropdown > select “Purview” > type “dep”
We find out the objects related to the key words – “dep”
A table in SQL Database, 3 files in ADLS.
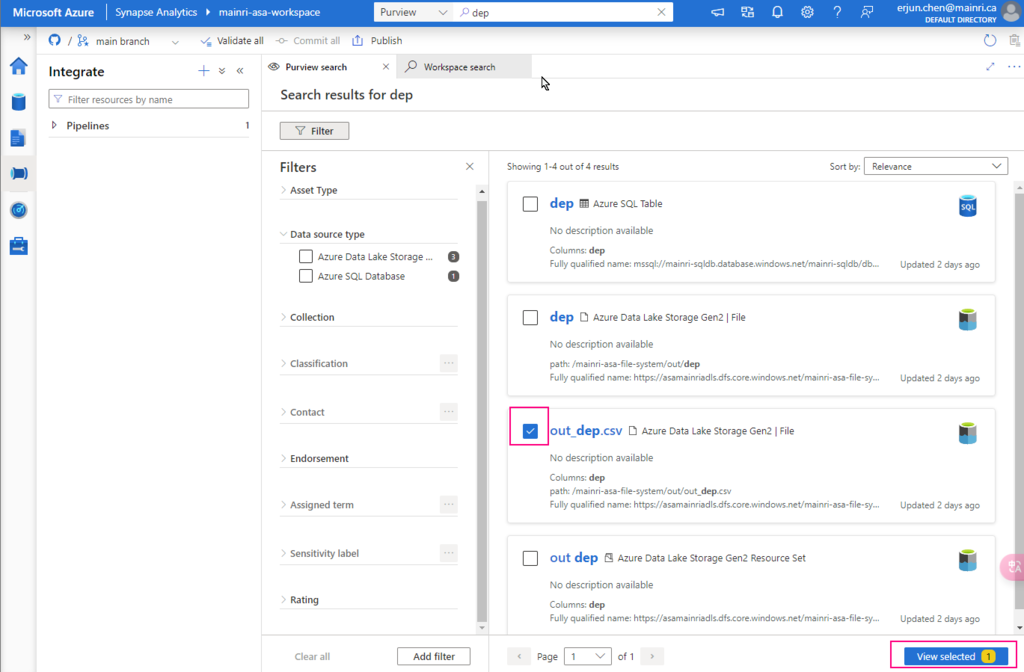
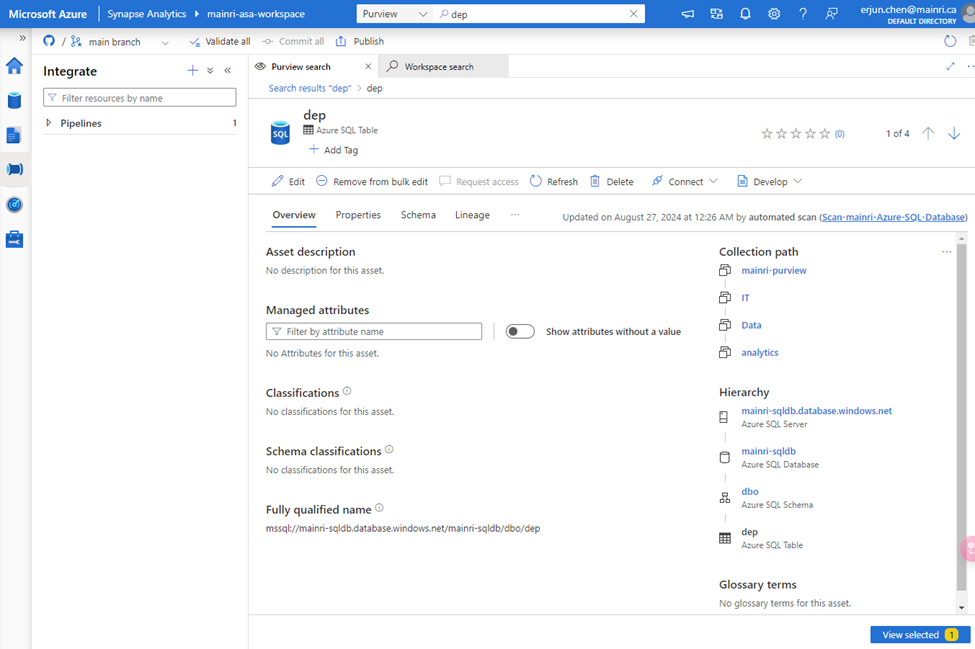
Great, we successfully connected to Purview.
choose either of them to view in detail
There are so many powerful and interesting functions regarding the “Searching”, “discovering”, we will talk about them late.
Now, let’s switch to Purview studio.
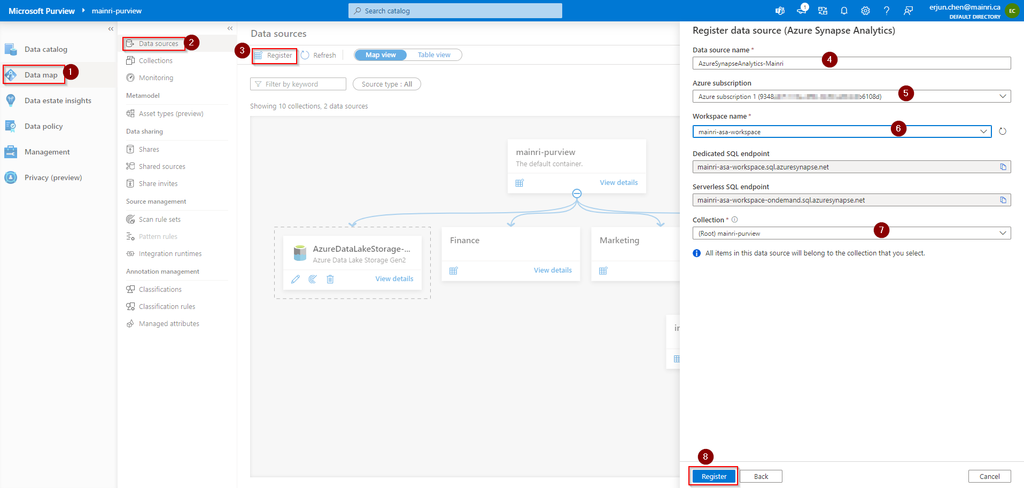
Register Synapse Analytics Workspace
Assuming you have created Collects, we directly jump into register Azure Synapse Analytics Workspace (ASA).
Purview Studio > Data Map > Data Source
After filling in above values, click “register”, you will this
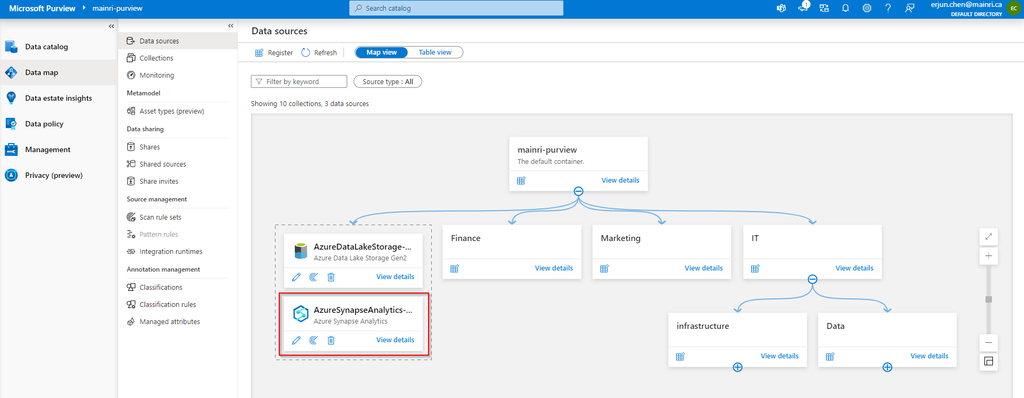
After registering the sources where your data assets are stored, you can scan each source to catalog the assets it contains. You can scan each source interactively, and you can schedule period scans to keep the data map up to date.
You may or may not see this error or alerts:
Read:
“Failed to load serverless databases from Synapse workspace, please give the managed identity of the Microsoft Purview account permissions or apply the correct credential to enumerate serverless databases.”
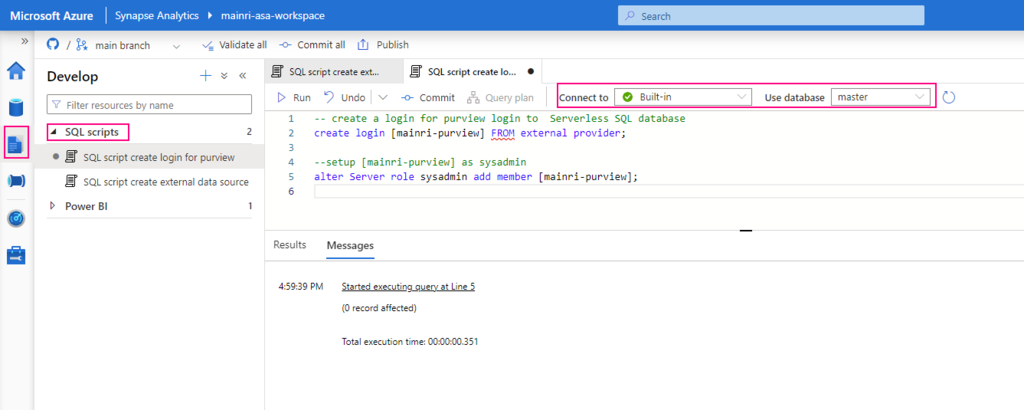
If you see it, you need create a login account for purview account to connect Serverless SQL:
Create Serverless SQL database login account for Purview
— create a login for purview login to Serverless SQL database
create login [mainri-purview] from external provider;
Synapse Studio > Develop > SQL Script > select: “connect to Built-in” and use database “master”
Grant purview login account Sysadmin privilege
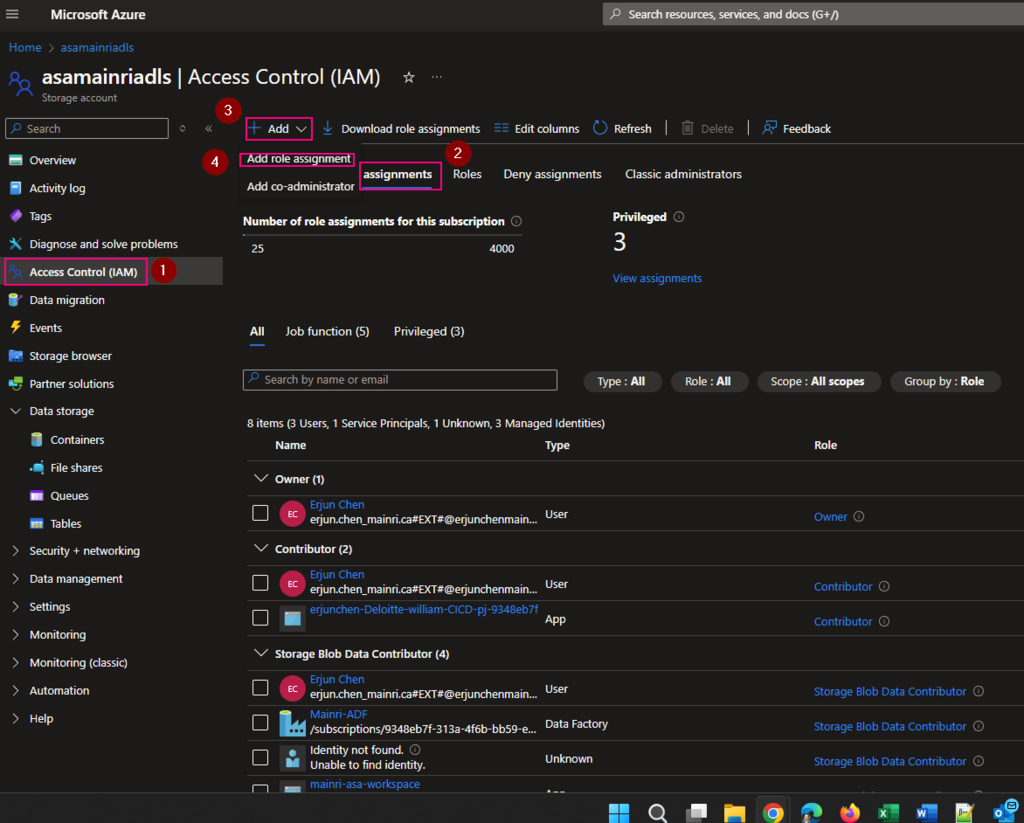
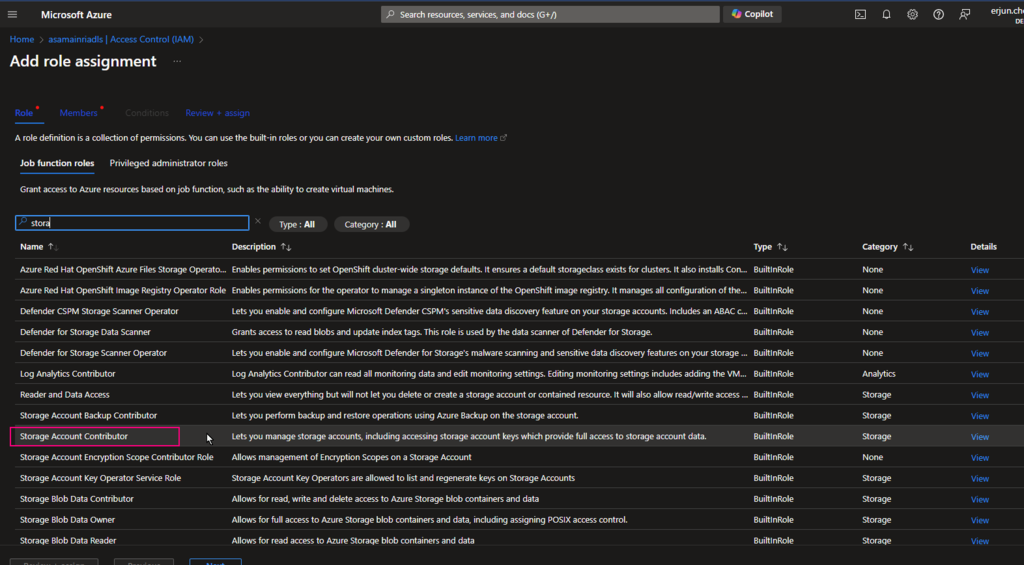
Add managed identity to the storage account
Then, add managed identity to the storage account.
From Azure portal > storage account > Access Control (IAM)
Select Role assignments tag
Add role assignments
Give the “Storage Account Contributor” role
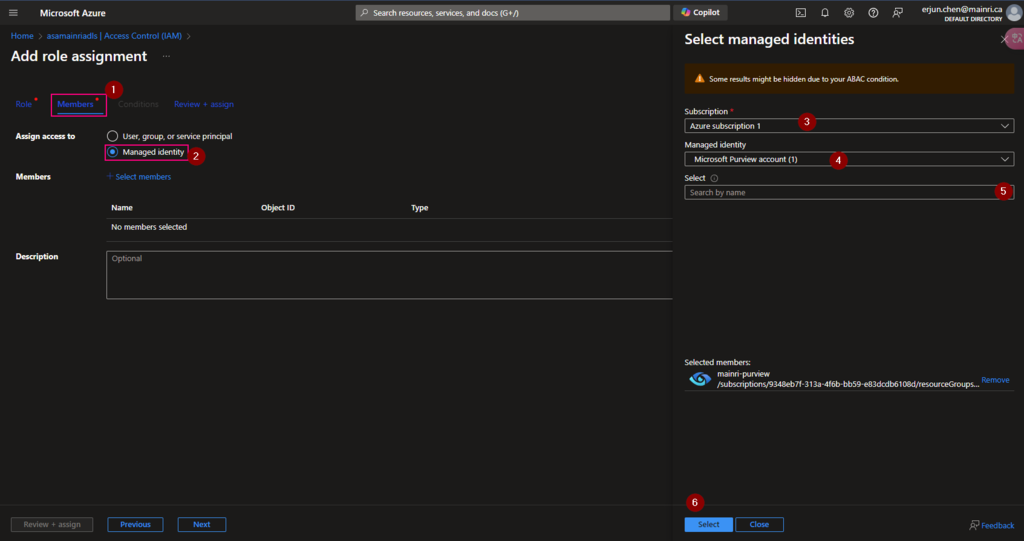
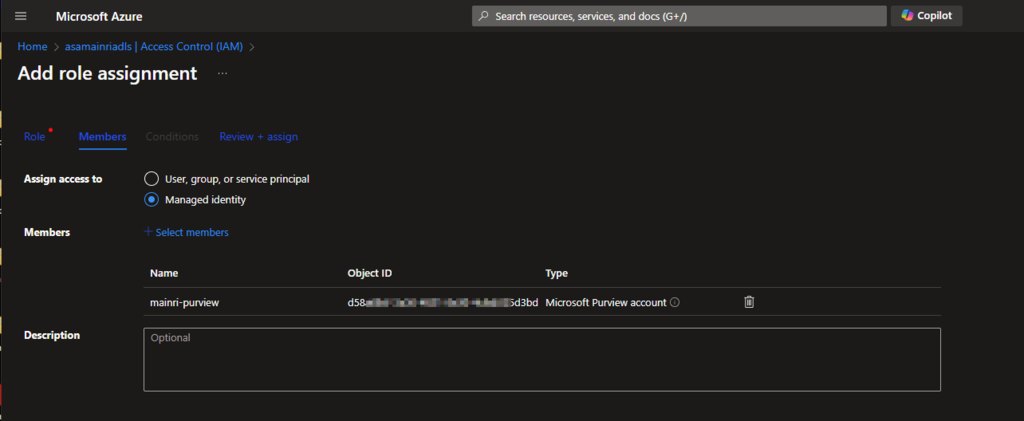
Then, select “Member” tag:
Select “Managed Identity”, fill in all properties, Find out the purview account
Now, the role assignments added.
If you have dedicated SQL pool, we need repeat these.
Create Serverless SQL database login account for Purview
Grant purview login account Sysadmin privilege
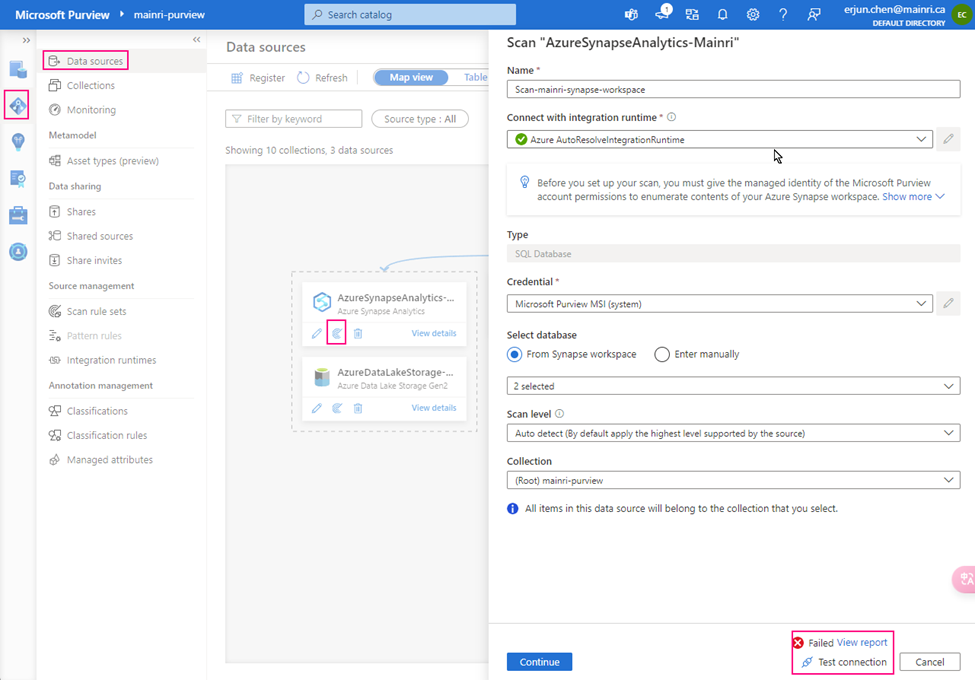
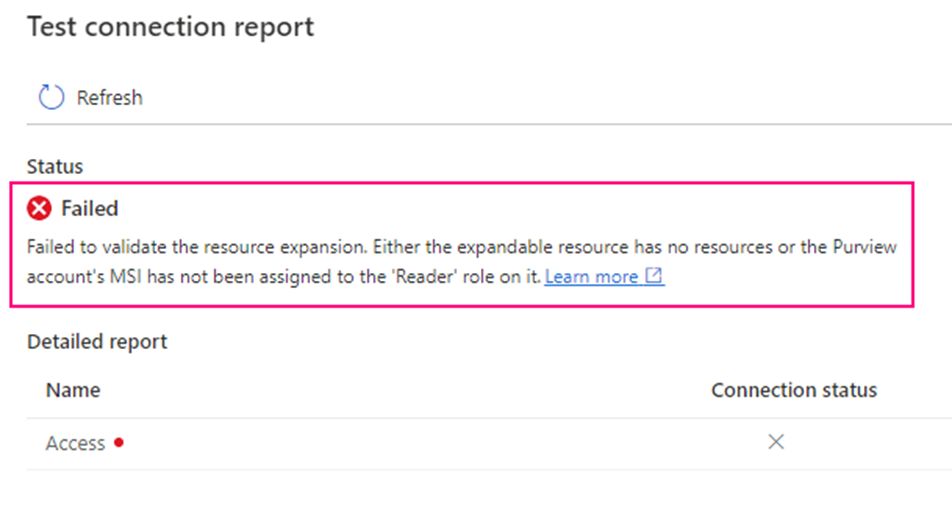
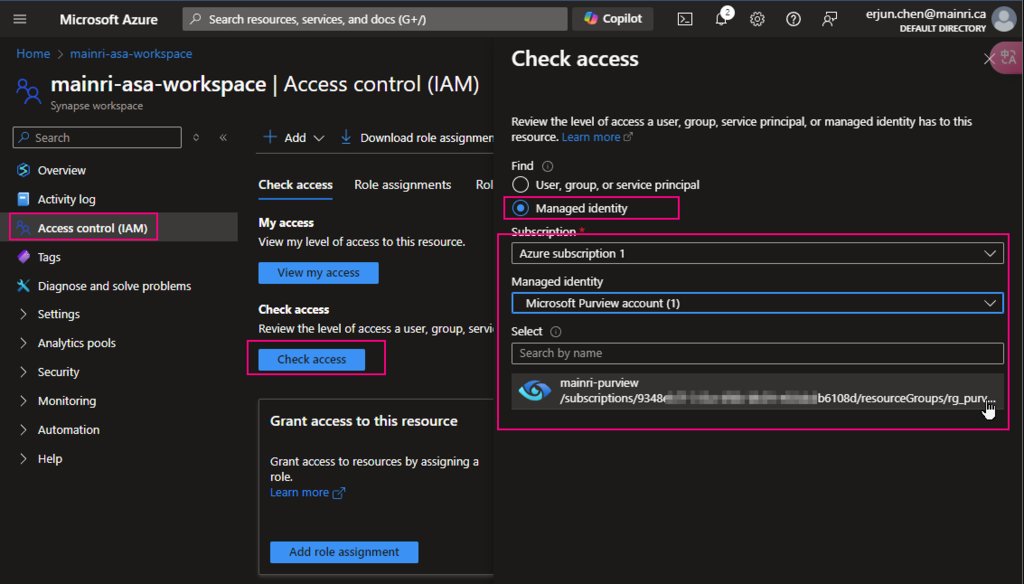
Let’s test the connection
From Purview studio > scan
we got failed alert.
“Failed to validate the resource expansion. Either the expandable resource has no resources or the Purview account’s MSI has not been assigned to the ‘Reader’ role on it.”
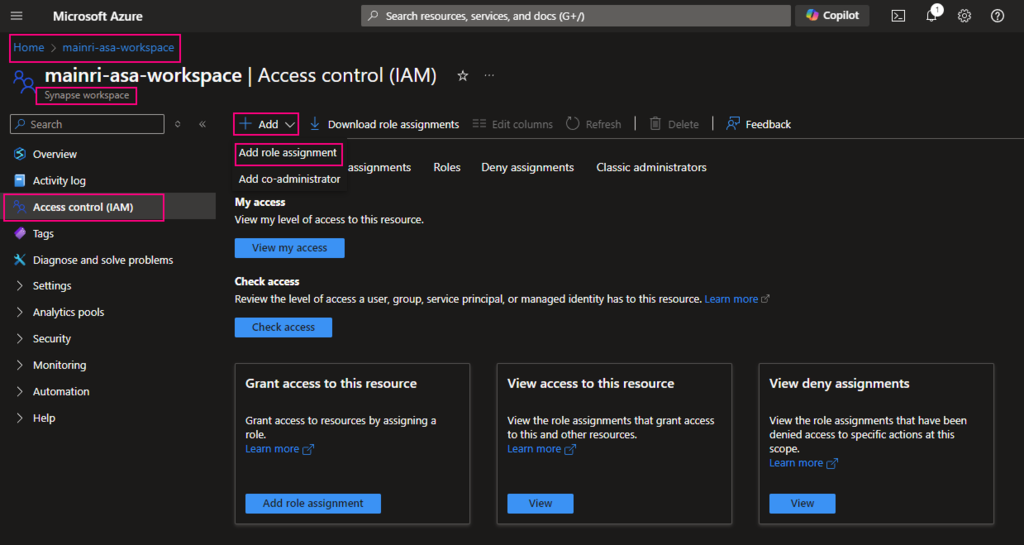
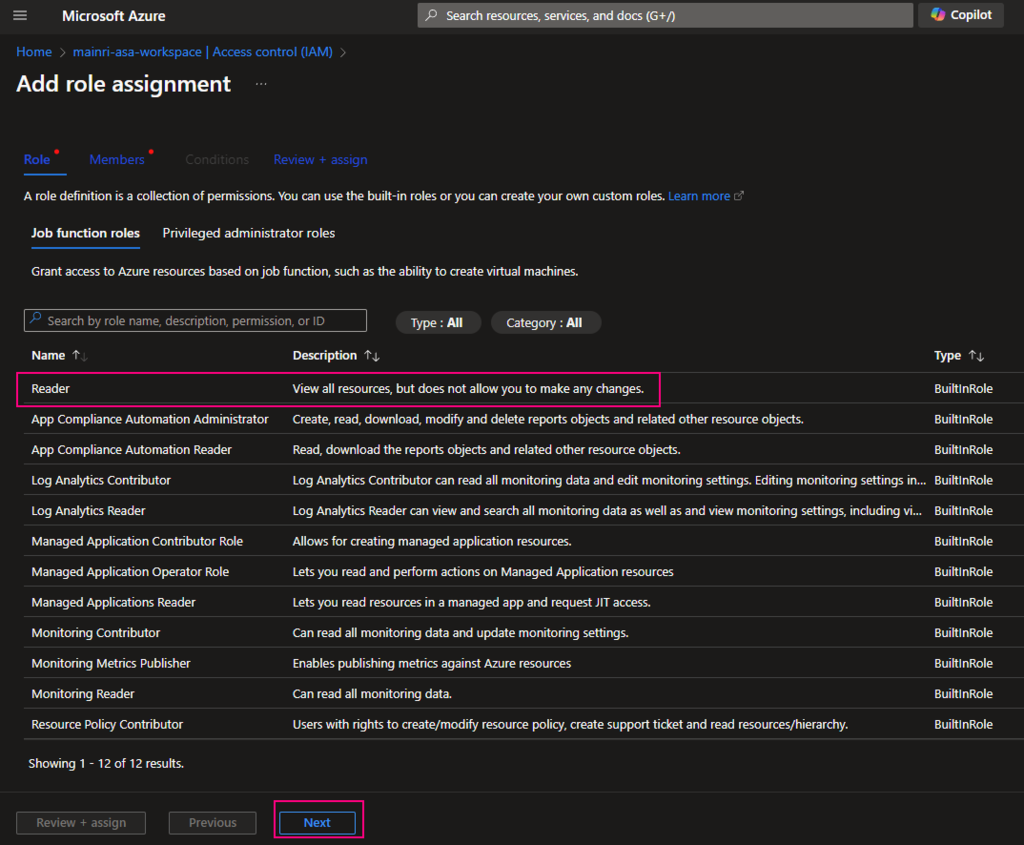
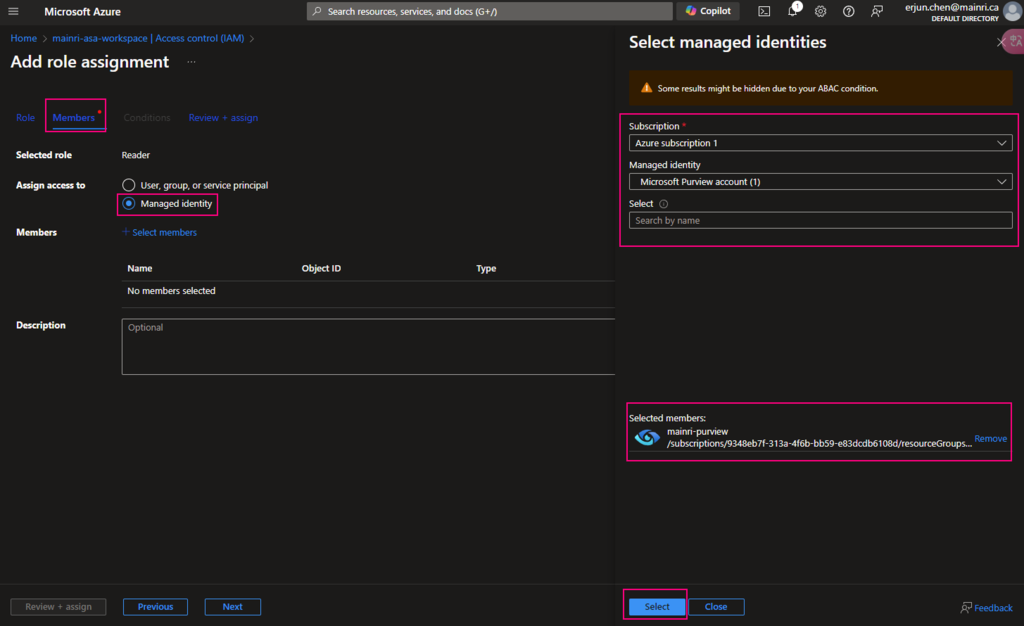
Go back to Synapse portal
Azure Portal > Synapse workspace > Access control (IAM) > Add role assignments
add “read” role
Add “managed Identity” member – Purview
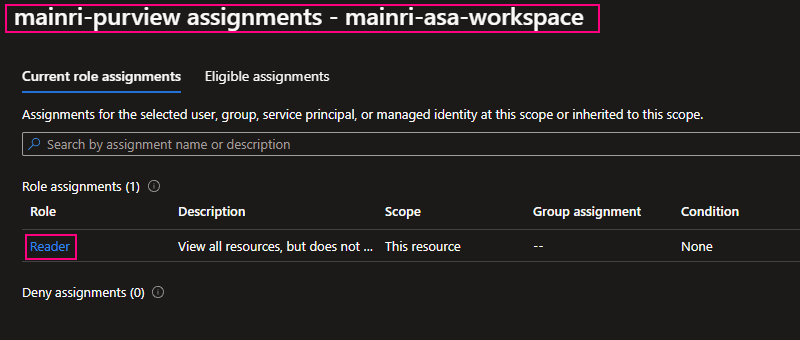
Check Purview access,
we can see Mainri-purview assignments – mainri-asa-workspace has “read” role (my Synapse workspace named “mainri-asa-workspace”)
Go to Purview Studio test connection again.
Great! We successful connect to Synapse workspace.
We have gotten access to SQL; we’ve got access to storage account. we have add “read” role assignment to Purview
Alright, we are ready to go – scan.
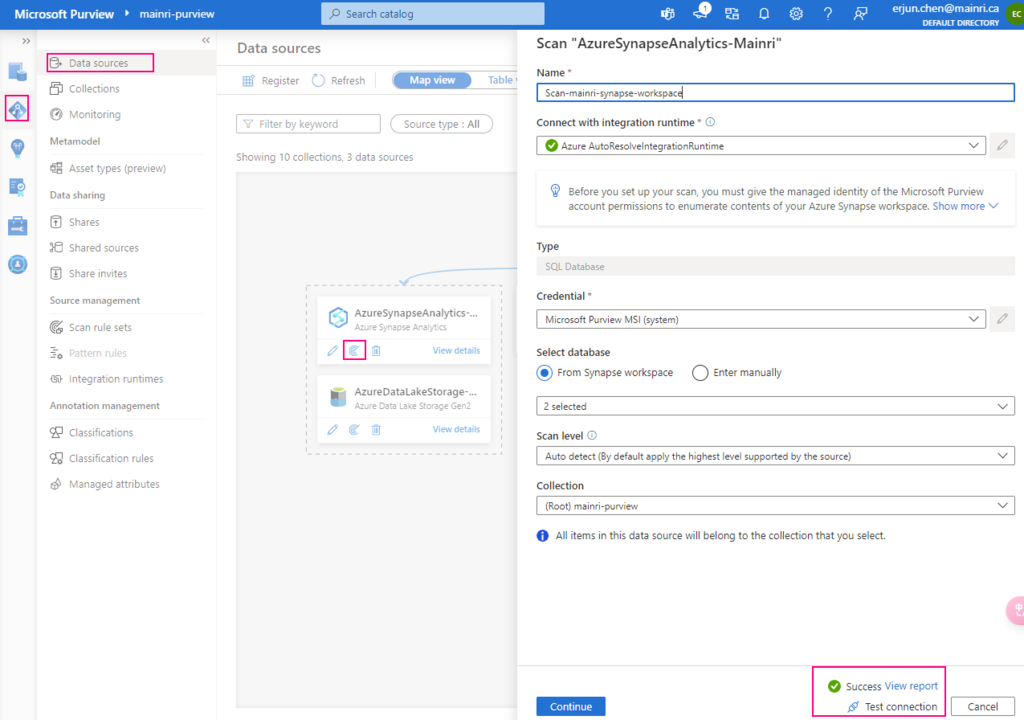
Scan Synapse workspace
After registering the sources where your data assets are stored, you can scan each source to catalog the assets it contains. You can scan each source interactively, and you can schedule period scans to keep the data map up to date.
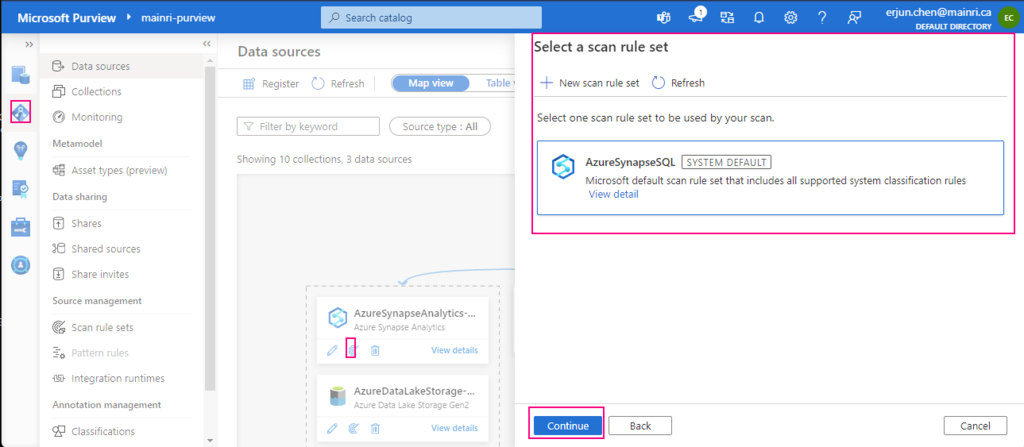
Select a scan rule set
If you like, you are able to add even more new scan rule set at this step.
For this demonstration, we select default scan rule set.
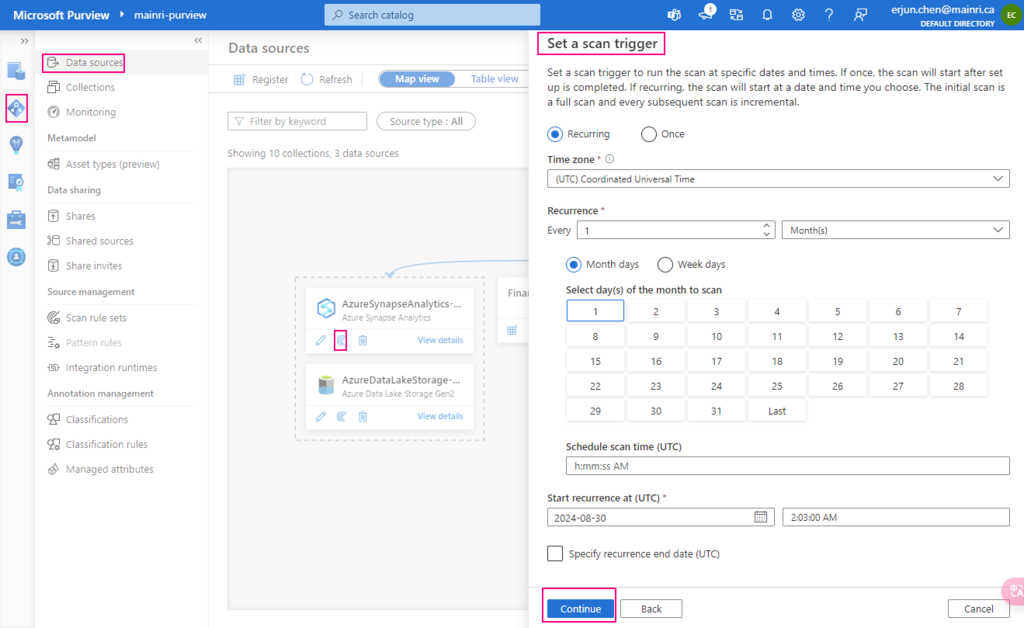
Set a scan trigger
We ca either scan once or schedule and recurring scan on schedule.
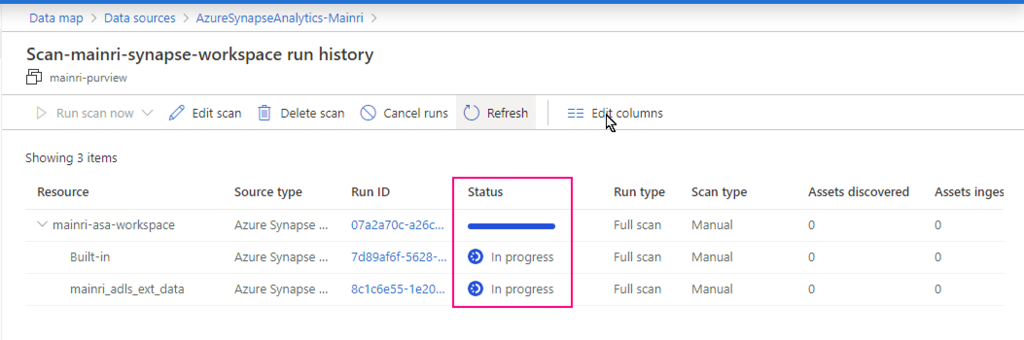
Monitoring the scan progress ….
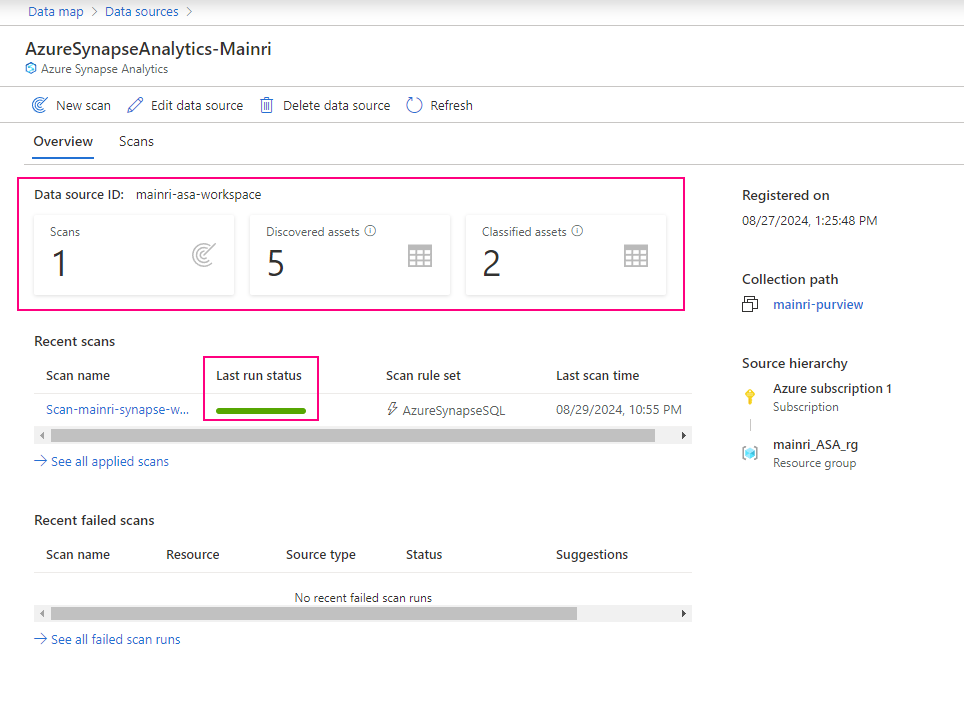
Once the process done, we will see this:
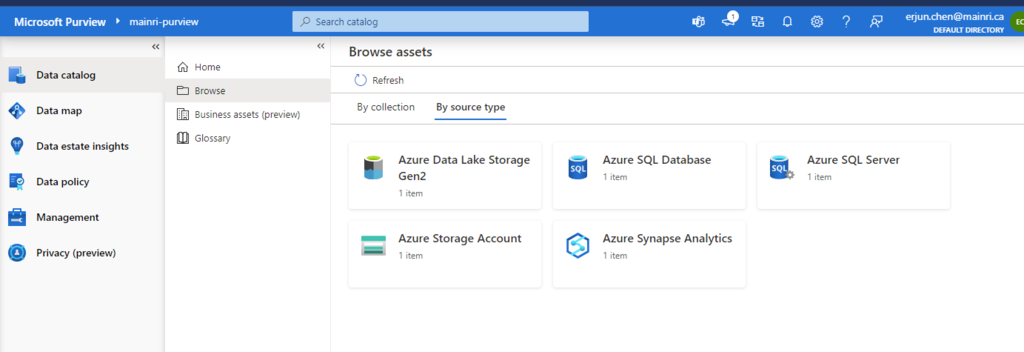
Alright, we have done the Purview for scanning Azure Synapse Workspace. Now, we have those source in our Azure purview.
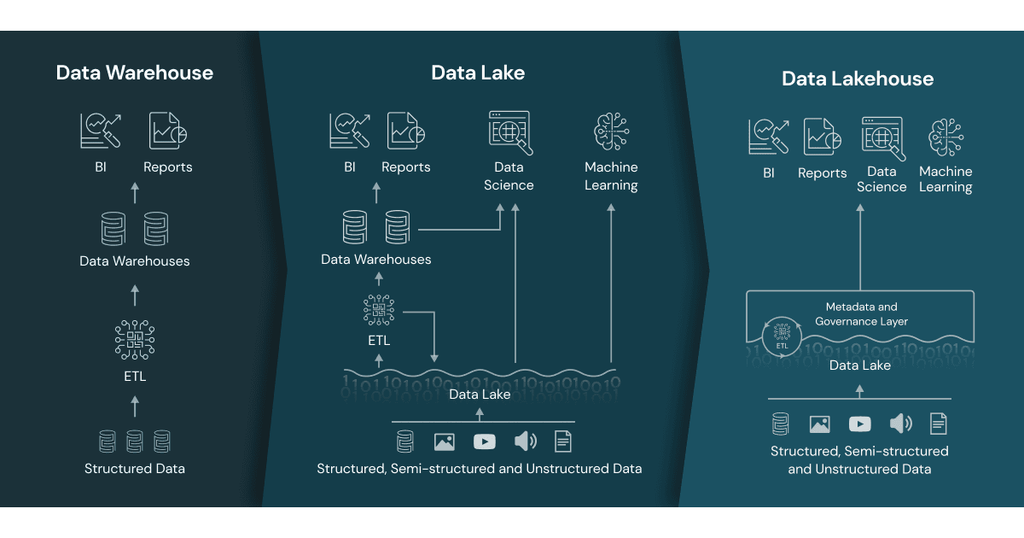
As a data engineer, we often hear terms like Data Lake, Delta Lake, Data Lakehouse, and data warehouse, which might be confusing at times. Today, we’ll explain these terms and talk about the differences of each of the technologies and concepts, along with scenarios of usage for each.
Delta Lake
Delta lake is an open-source technology, a storage layer, built on top of Apache Spark. We use Delta Lake to store data in Delta tables. Delta lake improves data storage by supporting ACID transactions, high-performance query optimizations, schema evolution, data versioning and many other features.
Delta Lake takes your existing Parquet data lake and makes it more reliable and performant by:
Storing all the metadata in a separate transaction log
Tracking all the changes to your data in this transaction log
Organizing your data for maximum query performance
Data Lakehouse
Data lakehouse is a new unified architecture, open data management architecture that combines the flexibility, cost-efficiency, and scale of data lakes with the data management and ACID transactions of data warehouses, enabling business intelligence (BI) and machine learning (ML) on all data.
Data Lake
A data lake is a centralized repository that allows organizations to store vast amounts of structured, semi-structured, and unstructured data. Unlike traditional data warehouses, a data lake retains data in its raw form until it is needed, which provides flexibility in how the data can be used.
Data Warehouse
A data warehouse is a centralized repository that stores structured data (database tables, Excel sheets) and semi-structured data (XML files, webpages) Its data is usually cleaned and standardized for the purposes of reporting and analysis.
Data lakes vs. data lakehouse vs. data warehouses
follow table simply compared what difference .
Data lake
Data lakehouse
Data warehouse
Types of data
All types: Structured data, semi-structured data, unstructured (raw) data
All types: Structured data, semi-structured data, unstructured (raw) data
Structured data only
Cost
$
$
$$$
Format
Open format
Open format
Closed, proprietary format
Scalability
Scales to hold any amount of data at low cost, regardless of type
Scales to hold any amount of data at low cost, regardless of type
Scaling up becomes exponentially more expensive due to vendor costs
Intended users
Limited: Data scientists
Unified: Data analysts, data scientists, machine learning engineers
Limited: Data analysts
Reliability
Low quality, data swamp
High quality, reliable data
High quality, reliable data
Ease of use
Difficult: Exploring large amounts of raw data can be difficult without tools to organize and catalog the data
Simple: Provides simplicity and structure of a data warehouse with the broader use cases of a data lake
Simple: Structure of a data warehouse enables users to quickly and easily access data for reporting and analytics
Performance
Poor
High
High
summary
Data lakes are a good technology that give you flexible and low-cost data storage. Data lakes can be a great choice for you if:
You have data in multiple formats coming from multiple sources
You want to use this data in many different downstream tasks, e.g. analytics, data science, machine learning, etc.
You want flexibility to run many different kinds of queries on your data and do not want to define the questions you want to ask your data in advance
You don’t want to be locked into a vendor-specific proprietary table format
Data lakes can also get messy because they do not provide reliability guarantees. Data lakes are also not always optimized to give you the fastest query performance.
Delta Lake is almost always more reliable, faster and more developer-friendly than a regular data lake. Delta lake can be a great choice for you because:
You have data in multiple formats coming from multiple sources
You want to use this data in many different downstream tasks, e.g. analytics, data science, machine learning, etc.
You want flexibility to run many different kinds of queries on your data and do not want to define the questions you want to ask your data in advance
You don’t want to be locked into a vendor-specific proprietary table format
Please do not hesitate to contact me if you have any questions at William . chen @mainri.ca
Understanding how failures in individual activities affect the pipeline as a whole is crucial for building robust data workflows.
Some people have used SSIS previously, when they switch from SSIS to the Azure Data Factory and Synapse, they might confuse in ADF or ASA ‘s “pipeline logical failure mechanisam” ADF or ASA’s pipeline orchestration allows conditional logic and enables the user to take a different path based upon outcomes of a previous activity. Using different paths allows users to build robust pipelines and incorporates error handling in ETL/ELT logic.
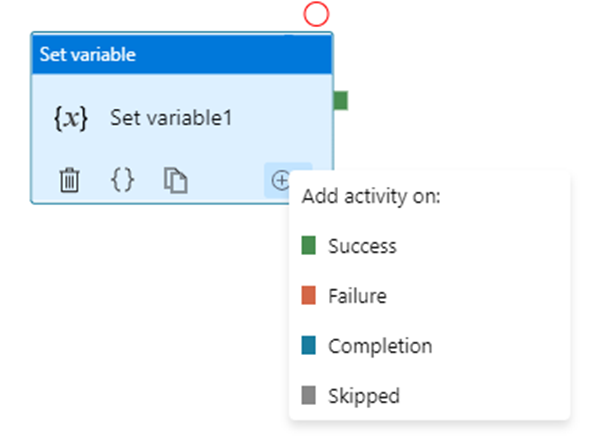
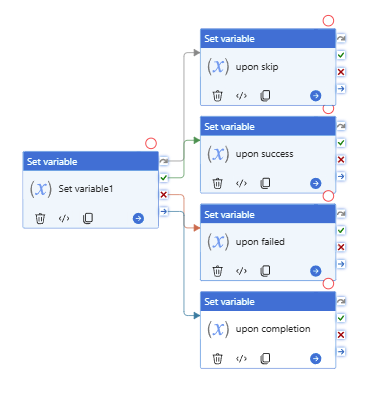
ADF or ASA activity outcomes path
ADF or ASA has 4 paths in total.
A pipeline can have multiple activities that can be executed in sequence or in parallel.
Sequential Execution: Activities are executed one after another.
Parallel Execution: Multiple activities run simultaneously.
You are able to add multiple branches following an activity, for each pipeline run, at most one path is activated, based on the execution outcome of the activity.
Error Handling Mechanism
When an activity fails within a pipeline, several mechanisms can be employed to handle the failure:
In most cases, pipelines are orchestrated in Parallel, Serial or Mixed model. The key point is understanding what will happen in Parallet or Serial model.
From upon activity point of view, the basic principles that are:
Multiple dependencies with the same source are logical “OR”
Multiple dependencies with different sources are logical “AND”
Different error handling mechanisms lead to different status for the pipeline: while some pipelines fail, others succeed. We determine pipeline success and failures as follows:
Evaluate outcome for all leaves activities. If a leaf activity was skipped, we evaluate its parent activity instead.
Pipeline result is success if and only if all nodes evaluated succeed
Let us discuss in detail.
Multiple dependencies with the same source
This seems like “Serial” or “sequence”
How “Serial” pipeline failure is determined
As we develop more complicated and resilient pipelines, it’s sometimes required to introduce conditional executions to our logic: execute a certain activity only if certain conditions are met. At this point, as long as one or more activities failed while one or other activities success in a pipeline, what is the status of the entire pipeline? Success? Failure? How are pipeline failure determined?
In fact, ADF/ASA has unique insight. Software engineers are used to customary form:
“if … then … else …”; try … catch …”, let’s use the developer’ idiom
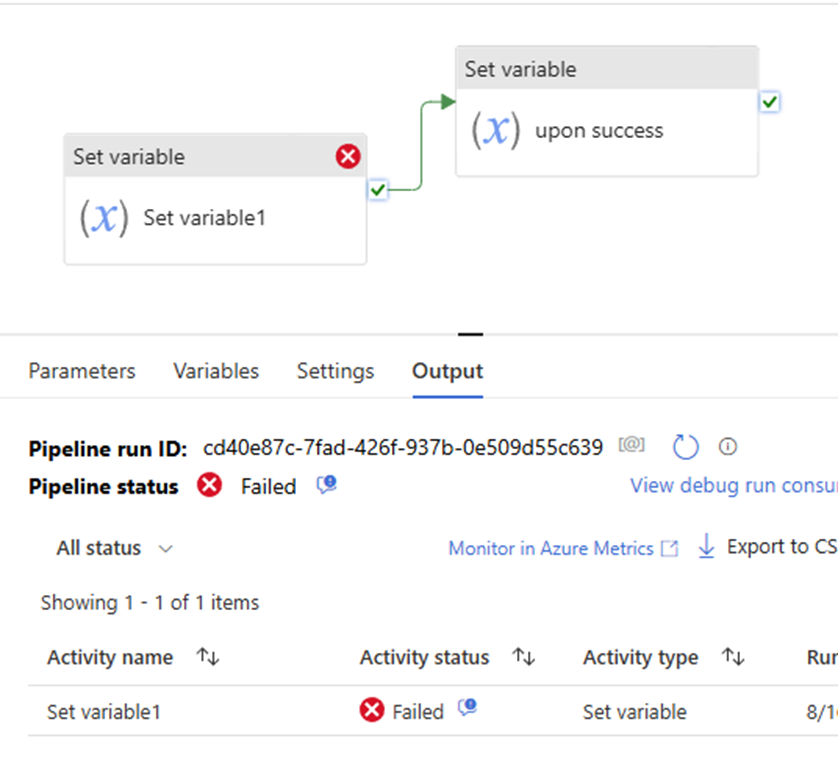
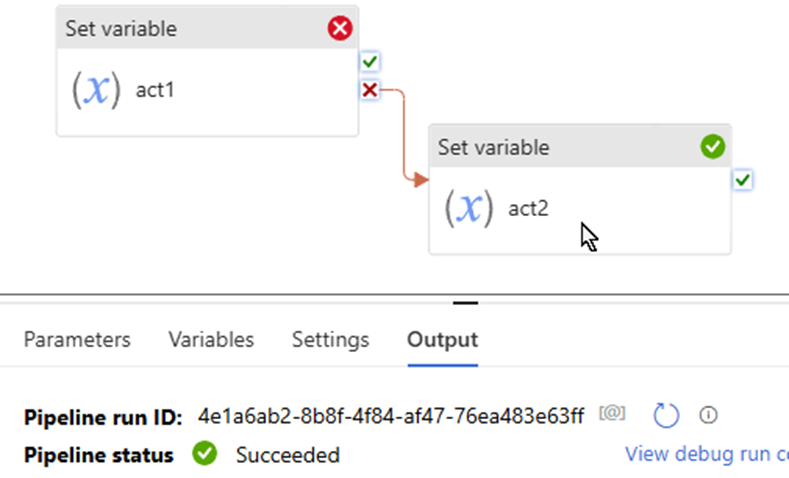
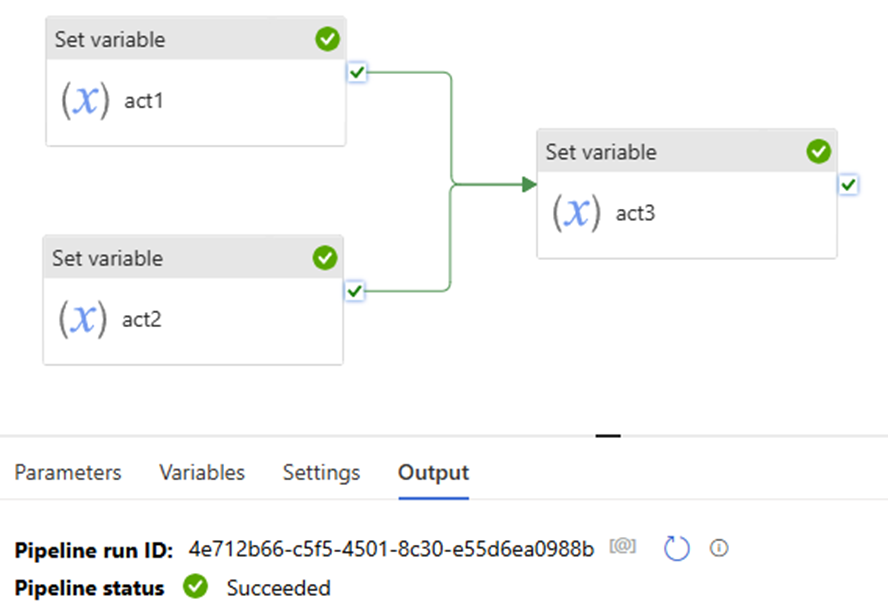
Single upon activity or Serial model, multiple downstream
upon act failed >> downstream act success >> pipeline success
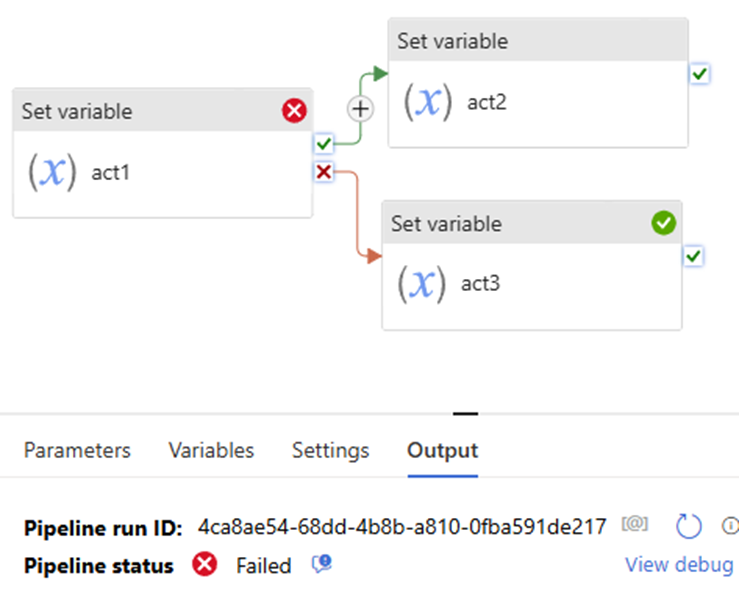
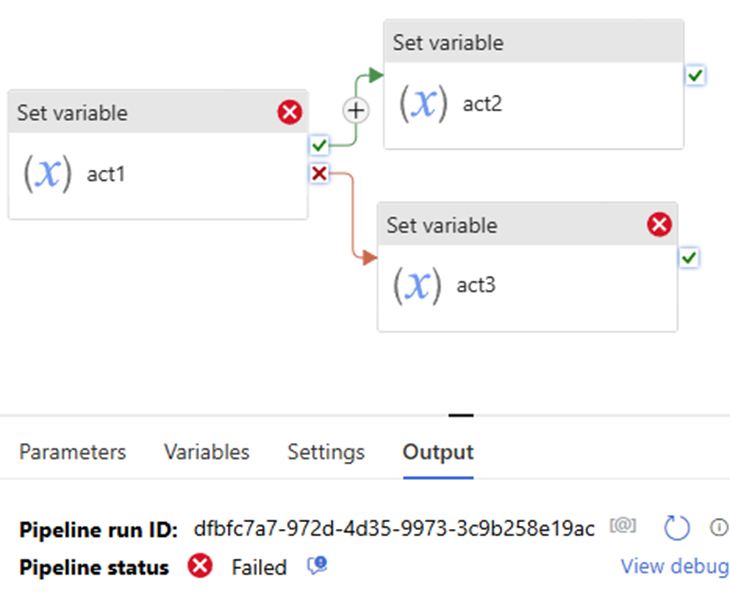
Scenario 2:
If … then … Else …
Pipeline defines both the Upon Failure and Upon Success paths. This approach renders pipeline fails, even if Upon Failure path succeeds.
Both success & failure path
upon act failed >> downstream act failed >> pipeline success
Both success & failure path
upon act failed >> downstream failed >> pipeline failed
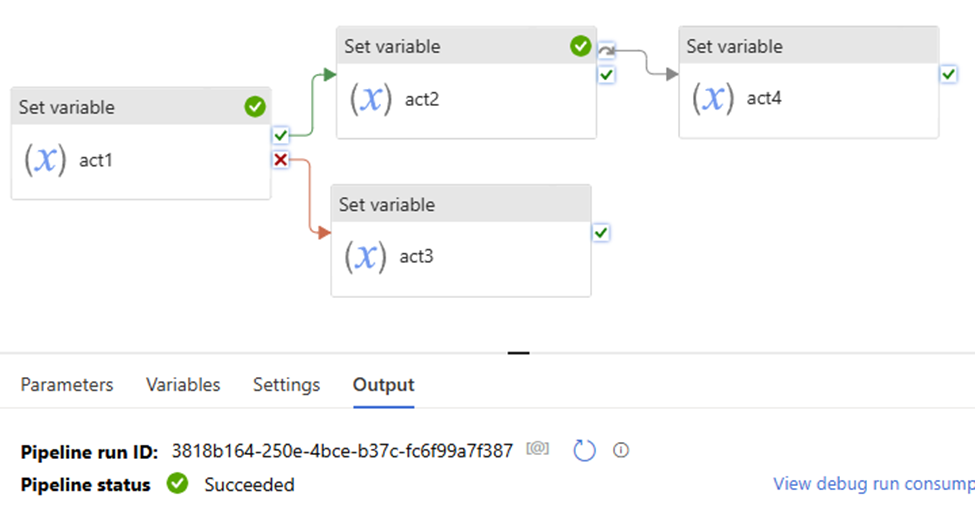
Scenario 3
If …Skip… Else ….
Both success & failure path, and skip path
upon act success >> downstream act success >> skip path is skipped >> pipeline success
Multiple dependencies with different sources
This seems like “Parallel”, its logical is “And”
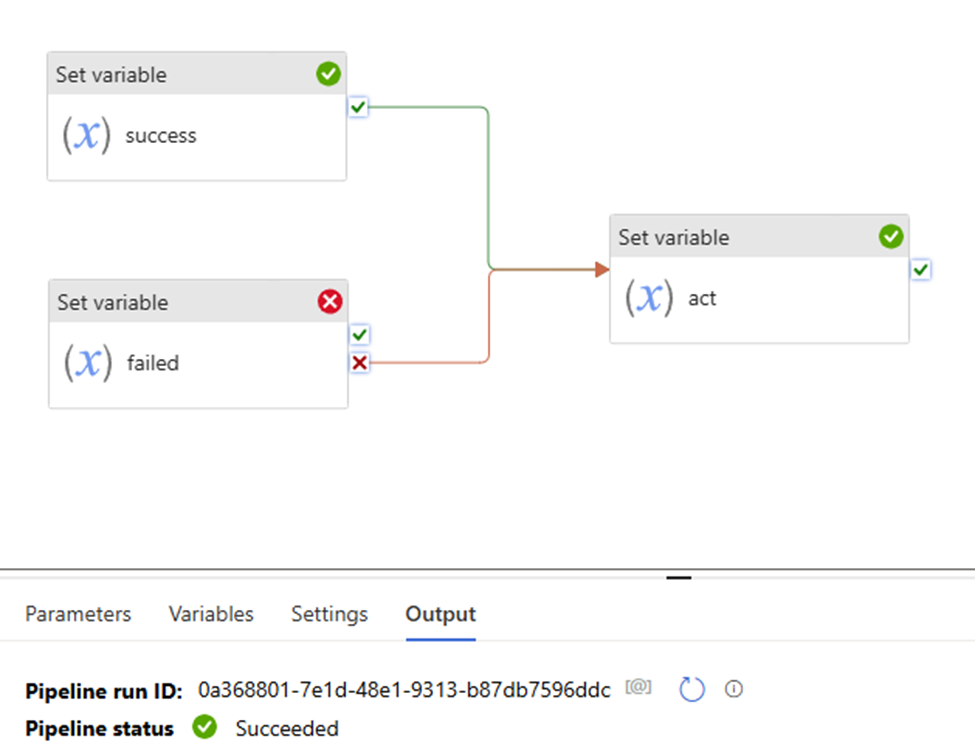
Scenario 4:
Upon act 1 success and upon act 2 success >> downstream act success >> pipeline success.
Upon act 1 success and upon act 2 failed >> downstream act success >> pipeline success.
pay attention to the “Set variable failed” uses “fail” path.
That mean:
“set variable success” the action is true
Although “set variable failed” activity failed, but “set variable failed” the action is true.
so both “set variable success” and “set variable failed” the two action true.
pipeline shows to “success”
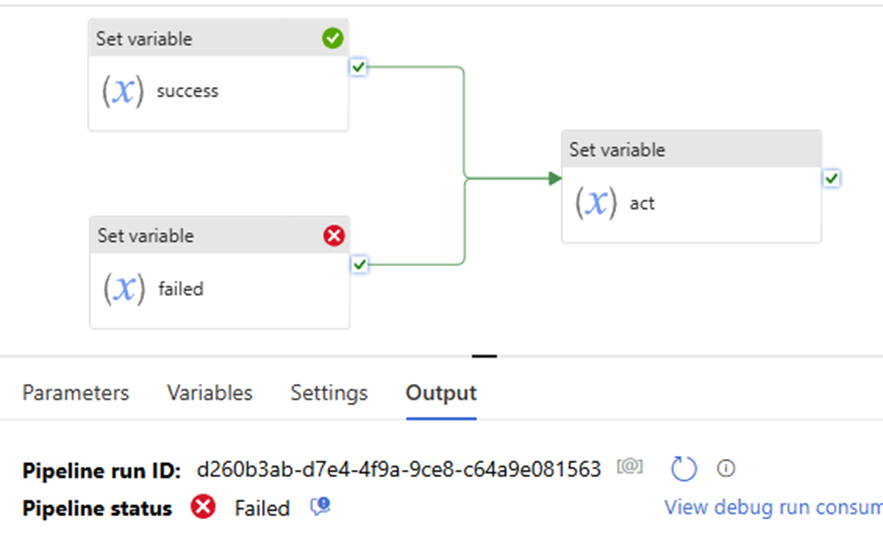
Now, let’s try this:
the “Set variable failed” uses “success” path, to see what pipeline shows, pipeline failed.
Why? since the “Set variable failed” action is not true. even if the “set variable success” action is True. True + False = False. follow activity – “set variable act” is skipped. will not execute, will not run! pipeline failed!
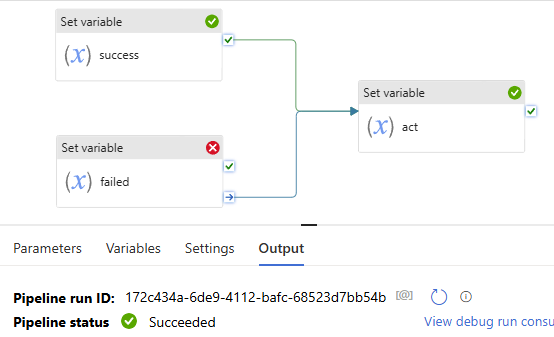
All right, you might immediately realize that once we let the “Set variable failed” path uses “complete”, that means no matter it true or false, the downstream activity “set variable act” will not be skipped. Pipeline will show success.
Error Handling
Sample error handling patterns
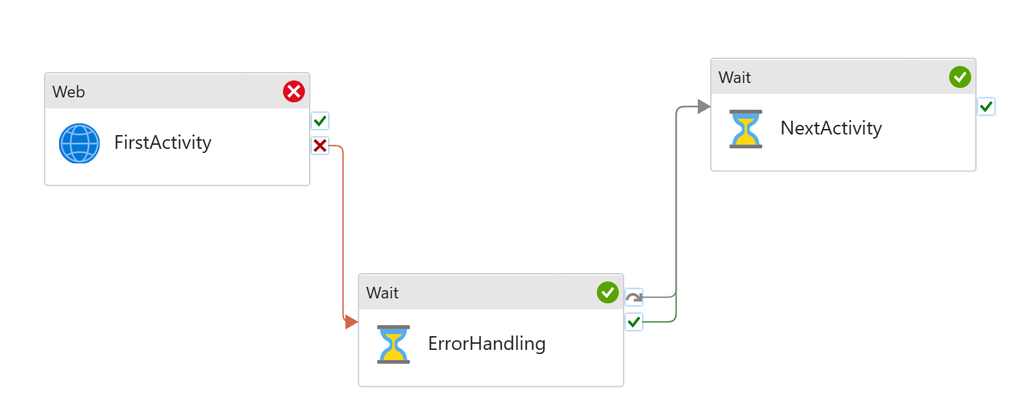
The pattern is equivalent to try catch block in coding. An activity might fail in a pipeline. When it fails, customer needs to run an error handling job to deal with it. However, the single activity failure shouldn’t block next activities in the pipeline. For instance, I attempt to run a copy job, moving files into storage. However it might fail half way through. And in that case, I want to delete the partially copied, unreliable files from the storage account (my error handling step). But I’m OK to proceed with other activities afterwards.
To set up the pattern:
Add first activity
Add error handling to the UponFailure path
Add second activity, but don’t connect to the first activity
Connect both UponFailure and UponSkip paths from the error handling activity to the second activity
Error Handling job runs only when First Activity fails. Next Activity will run regardless if First Activity succeeds or not.
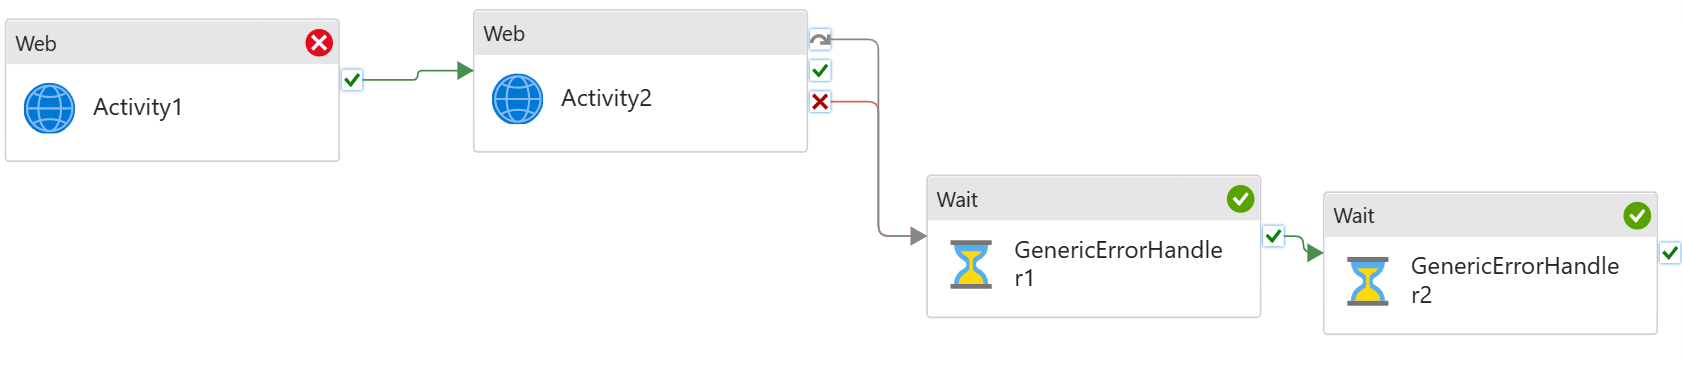
Generic error handling
We have multiple activities running sequentially in the pipeline. If any fails, I need to run an error handling job to clear the state, and/or log the error.
For instance, I have sequential copy activities in the pipeline. If any of these fails, I need to run a script job to log the pipeline failure.
To set up the pattern:
Build sequential data processing pipeline
Add generic error handling step to the end of the pipeline
Connect both Upon Failure and Upon Skip paths from the last activity to the error handling activity
The last step, Generic Error Handling, will only run if any of the previous activities fails. It will not run if they all succeed.
You can add multiple activities for error handling.
Summary
Handling activity failures effectively is crucial for building robust pipelines in Azure Data Factory. By employing retry policies, conditional paths, and other error-handling strategies, you can ensure that your data workflows are resilient and capable of recovering from failures, minimizing the impact on your overall data processing operations.
if you have any questions, please do not hesitate to contact me at william. chen @mainri.ca (remove all space from the email account 😊)
In this article I will provide a fully Metadata driven solution about using Azure Data Factory (ADF) or Synapse Analytics (ASA) incrementally copy multiple data sets one time from SharePoint Online (SPO) then sink them to ADSL Gen2.
Previously, I have published articles regarding ADF or ASA working with SPO. if you are interested in specifics matters, please look at related articles from here , or email me at william . chen @ mainri.ca (please remove spaces from email account 🙂 ).
Scenario and Requirements
Metadata driven. All metadata are save on SharePoint list, such as TenantID, ClientID, SPO site name, ADLS account, inspecting offset days for increment loading …. etc.
Initial full load, then monitor data set status, once it update, incrementally load, for example, on daily basis.
Solution
Retrieves metadata >> retrieves “client Secret” >> request access token >> insect and generate interests data list >> iteratively copy interest data sink to destination storage.
Prerequisite
Register SharePoint (SPO) application in Azure Active Directory (AAD).
Grant SPO site permission to registered application in AAD.
Provision Resource Group, ADF (ASA) and ADLS in your Azure Subscription.
I have other articles to talk those in detail. If you need review, please go to
Let us begin , Step by Step in detail, I will mention key points for every steps.
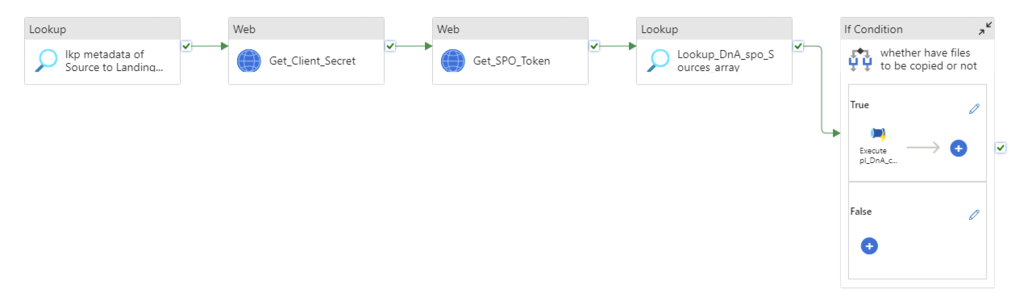
Step1:
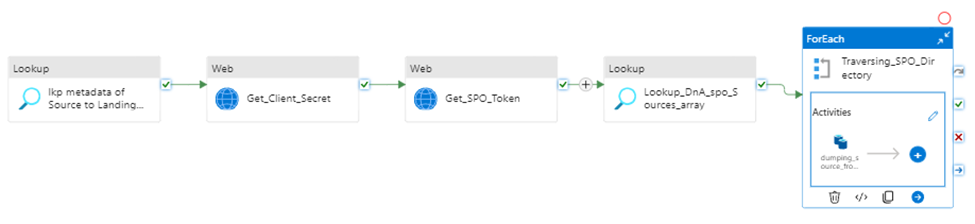
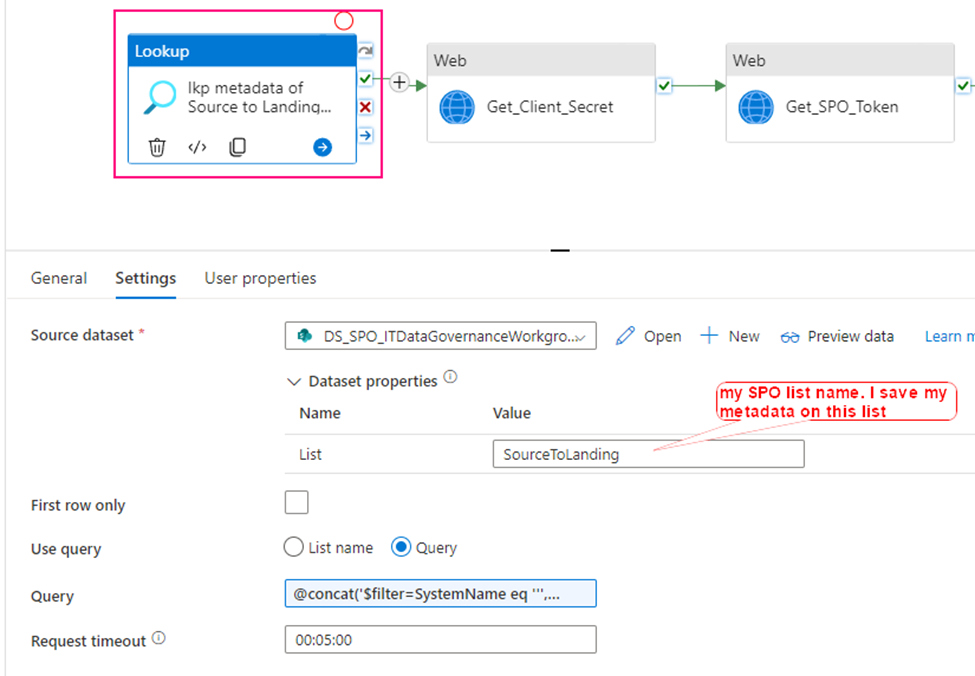
Using Lookup activity to retrieve all metadata from SharePoint Online
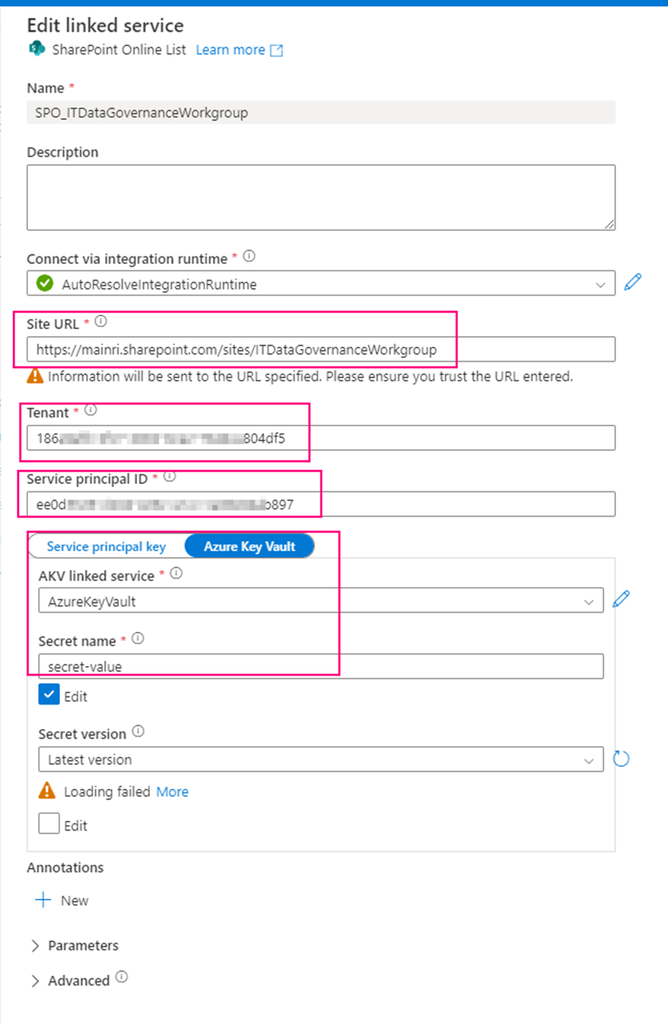
Firstly, create a SharePoint on Line List type Linked Service – SPO_ITDataGovernanceWorkgroup you need provide:
SharePoint site URL, you should replace it by using yours. it looks like htts://[your_domain].sharepoint.sites/[your_site_name]. mine is https://mainri.sharepoint.com/sites/ITDataGovernanceWorkgroup.
Tenant ID. The tenant ID under which your application resides. You can find it from Azure portal Microsoft Entra ID (formerly called Azure AD) overview page.
Service principal ID (Client ID) The application (client) ID of your application registered in Microsoft Entra ID. Make sure to grant SharePoint site permission to this application.
Service principal Key The client secret of your application registered in Microsoft Entra ID. mine is save in Azure Key Vault
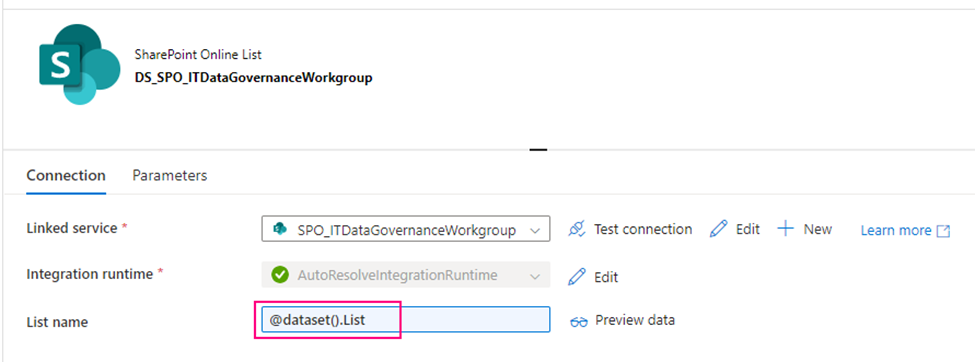
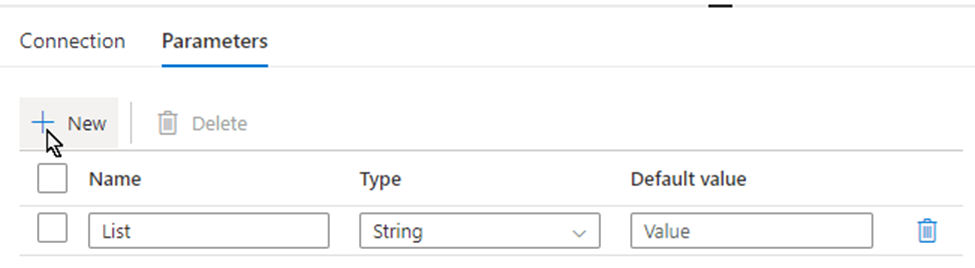
secondly, using above Linked Service create a SharePoint type Dataset – DS_SPO_ITDataGovernanceWorkgroup parametrize the dataset.
I name the parameter “List“, This parameter lets lookup activity knows where your metadata resides. (mine is called SourceToLanding)
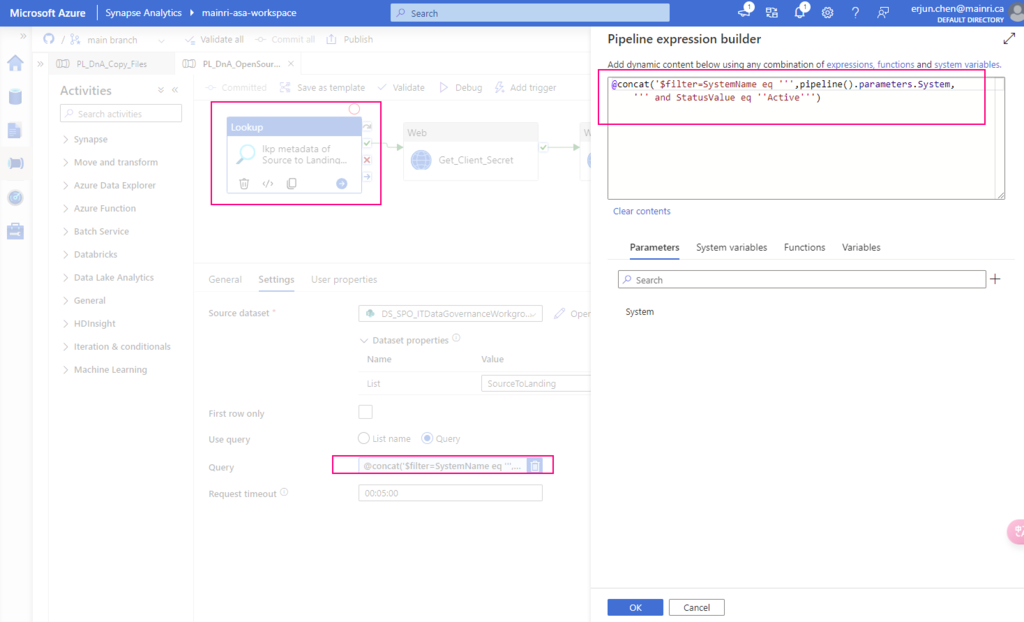
Now, we are ready to configure the Lookup activity
Source dataset: use above created dataset – DS_SPO_ITDataGovernanceWorkgroup
Query: @concat(‘$filter=SystemName eq ”’,pipeline().parameters.System,”’ and StatusValue eq ”Active”’)
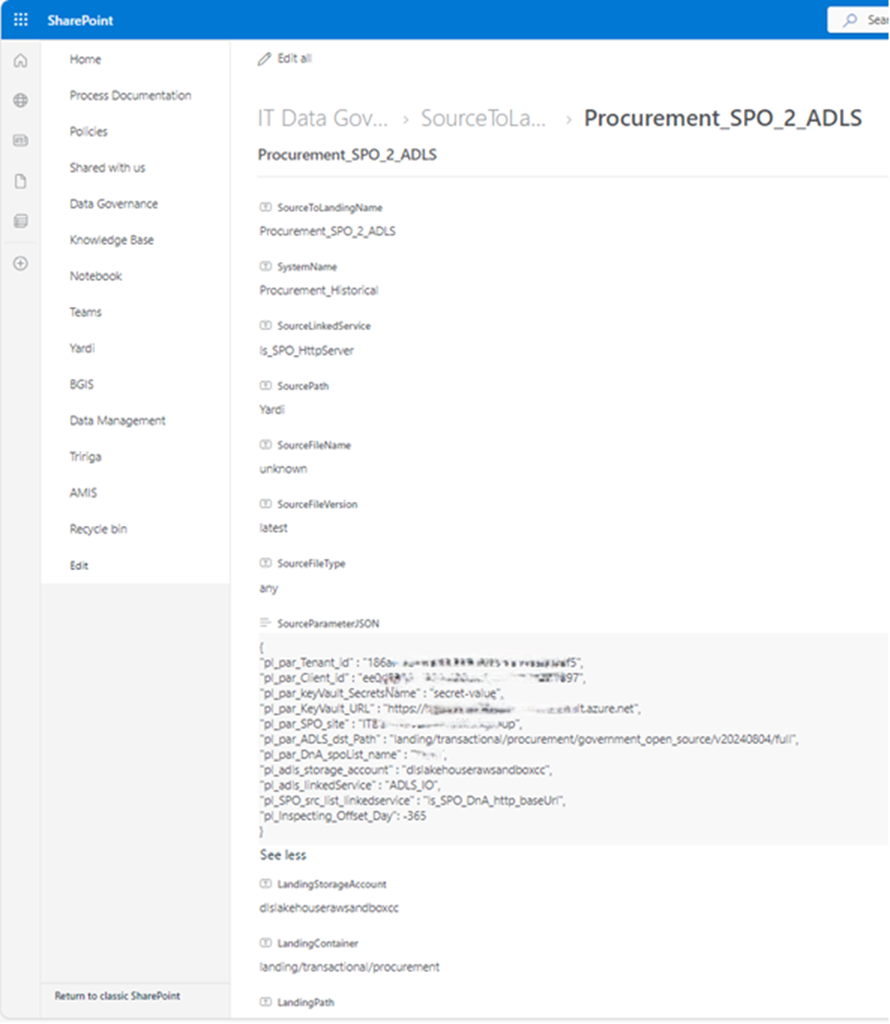
This query filters out my interest SPO list where my metadata saves. My metadata list in SPO looks like this
This lookup activity return metadata retrieved from SPO list. Looks like this.
response is json format. My “SourceParameterJSON” value is string, but it well match json format, could be covert to json.
Step 2:
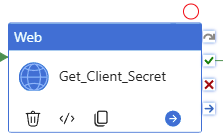
Get Client Secret
To get SPO access token, we need: Tenant ID, Client ID, and Client Secret
Tenant ID: You can get this from Azure Entra ID (former Azure active Directory)
Client ID: When you register your application at Azure Entra ID, azure Entra ID will generate one, called Application ID (Client ID). You can get this from Azure Portal >>Entra ID
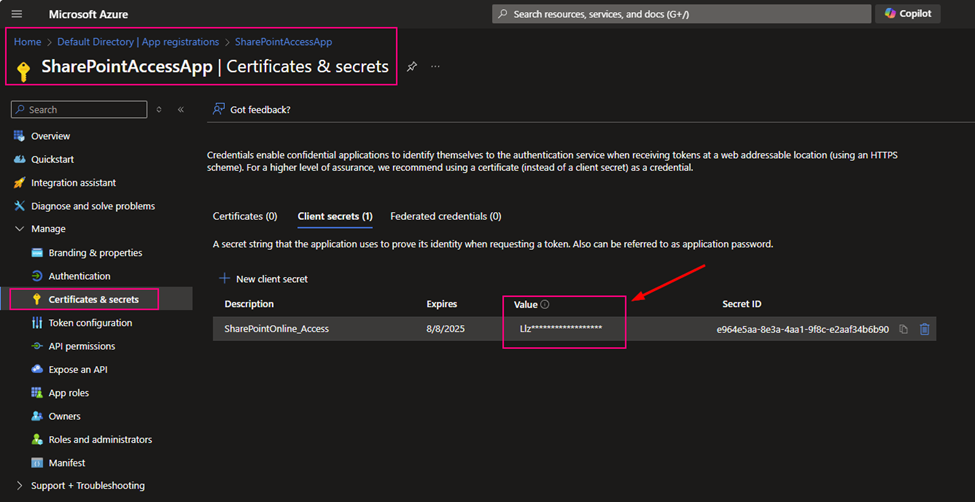
Client Secret: After you registered your application at Azure Entra ID, you build a certificate secret from Azure Entra ID, and you immediately copied and kept that value. The value will not reappear after that process anymore.
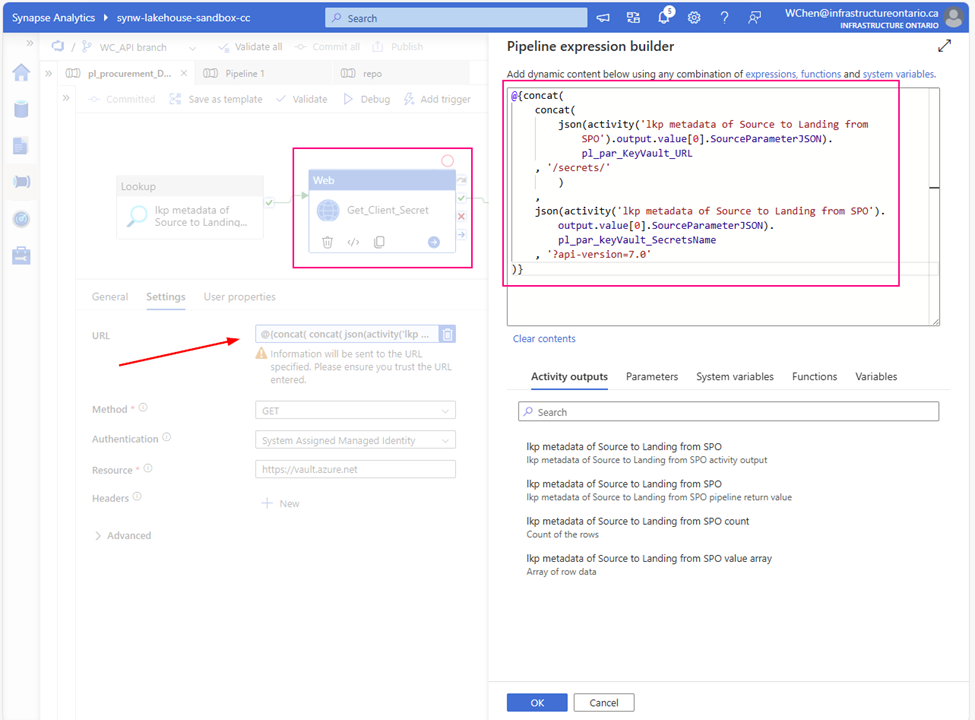
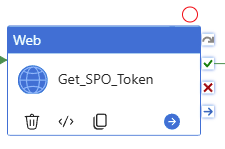
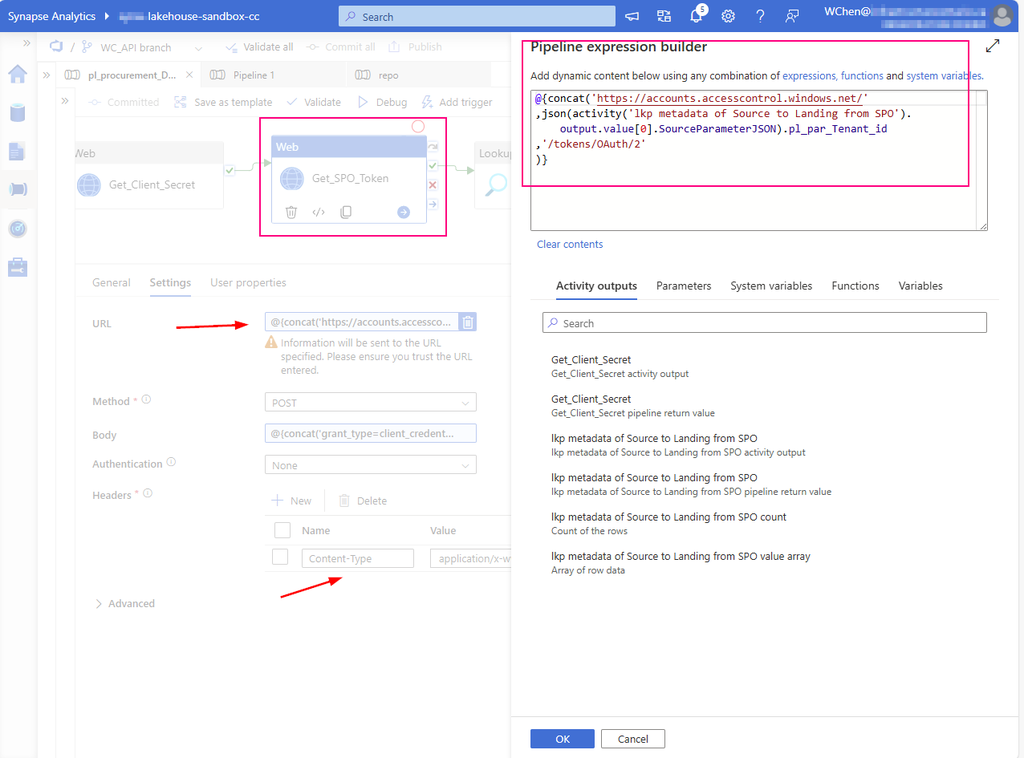
As I mentioned above, my client Secret is saved in azure Key-vault. To get Client Secret, use Web Activity to retrieve Client Secret (if you have the client Secret on hand, you can skip this activity, directly move to next activity Get SPO Token)
Method: GET
Authentication: System Assigned Managed Identity
Resource: https://vault.azure.net
URL:
@{concat( concat( json(activity(‘lkp metadata of Source to Landing from SPO’).output.value[0].SourceParameterJSON).pl_par_KeyVault_URL , ‘/secrets/’ ) , json(activity(‘lkp metadata of Source to Landing from SPO’).output.value[0].SourceParameterJSON).pl_par_keyVault_SecretsName , ‘?api-version=7.0′ )}
Attention: from above URL content, you can see. this SourceParameterJSON section matches well with json format. BUT it is NOT json, it is a string, so I convert the string to json. ?api-version=7.0 is another key point. You must add to your URL
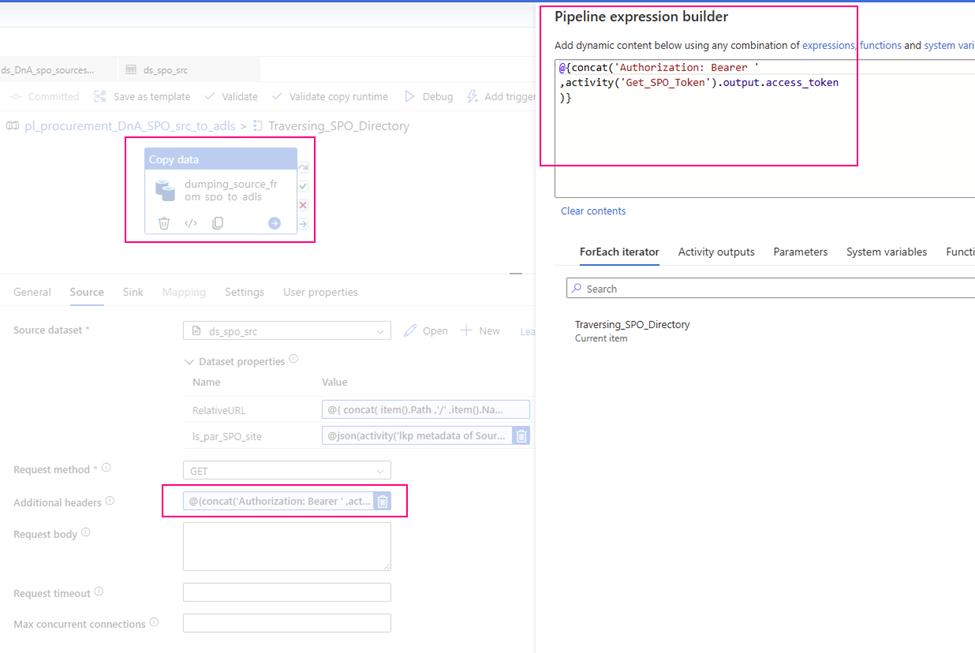
Create a Web Activity to get the access token from SharePoint Online:
URL: https://accounts.accesscontrol.windows.net/[Tenant-ID]/tokens/OAuth/2. Replace the tenant ID.
mine looks : @{concat(‘https://accounts.accesscontrol.windows.net/’ ,json(activity(‘lkp metadata of Source to Landing from SPO’).output.value[0].SourceParameterJSON).pl_par_Tenant_id ,’/tokens/OAuth/2′ )}
Replace the client ID (application ID), client secret (application key), tenant ID, and tenant name (of the SharePoint tenant).
mine looks: @{concat(‘grant_type=client_credentials&client_id=’ , json(activity(‘lkp metadata of Source to Landing from SPO’).output.value[0].SourceParameterJSON).pl_par_Client_id , ‘@’ , json(activity(‘lkp metadata of Source to Landing from SPO’).output.value[0].SourceParameterJSON).pl_par_Tenant_id ,’&client_secret=’ , activity(‘Get_Client_Secret’).output.value , ‘&resource=00000003-0000-0ff1-ce00-000000000000/infrastructureontario.sharepoint.com@’ , json(activity(‘lkp metadata of Source to Landing from SPO’).output.value[0].SourceParameterJSON).pl_par_Tenant_id )}
Attention: As mentioned at Step 2 , pay attention to json convert for section “SourceParameterJSON”
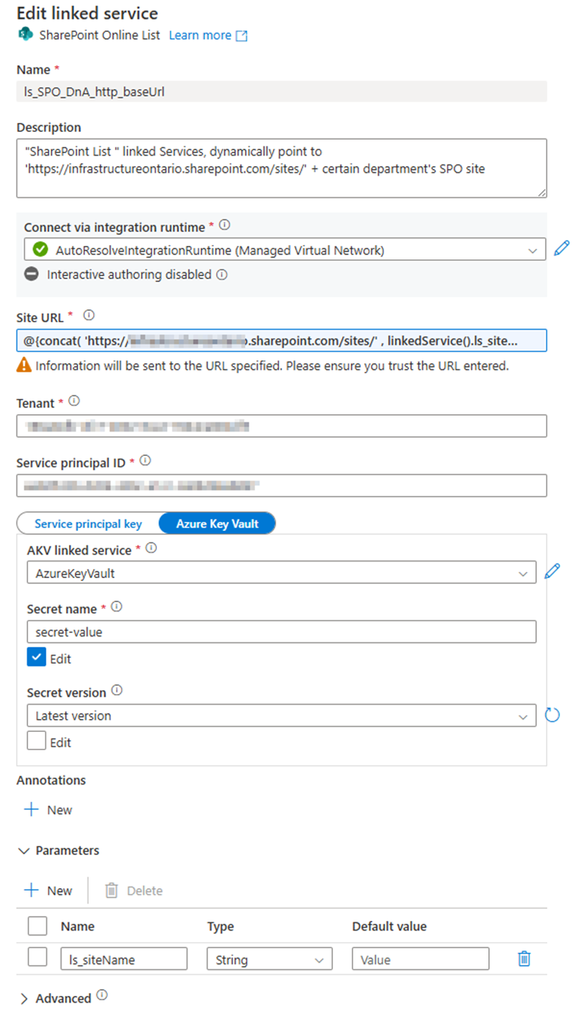
Called: “ls_SPO_DnA_http_baseUrl”, Parameteriz the Linked Service
Provide:
SharePoint site URL Pattern: https://<your domain>.sharepoint.com/sites/<SPO site Name> Replace <your domain> and <SPO site Name> Mine looks: https://mainri.sharepoint.com/sites/dataengineering
Tenant ID
Service principal (or says clientID, applicationID)
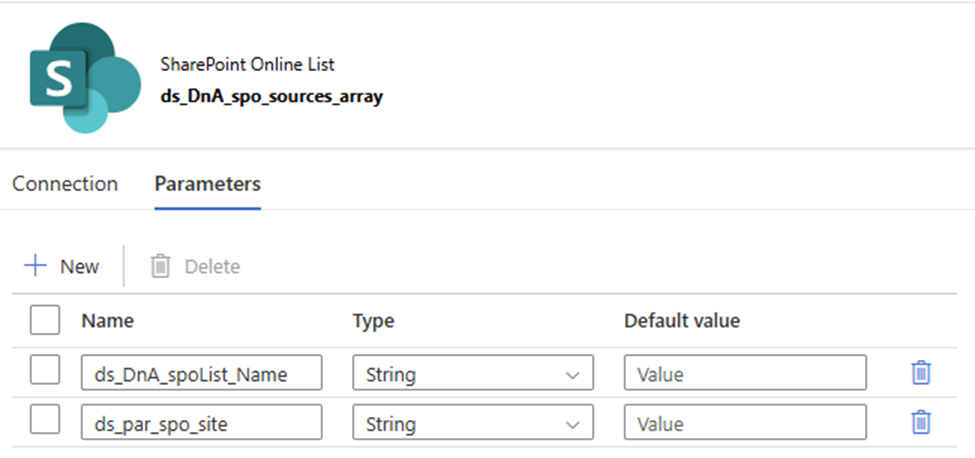
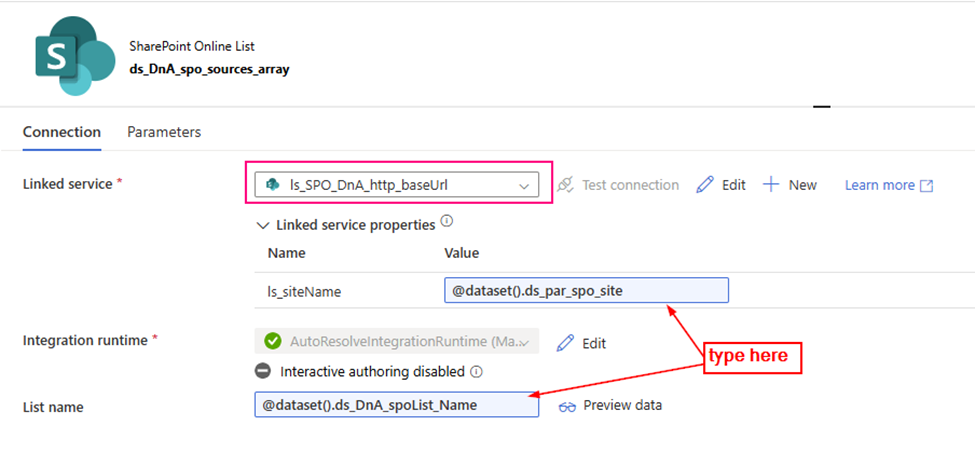
2. Create a SharePoint List type Dataset, Called “ds_DnA_spo_sources_array” and parameteriz the dataset.
Linked service: ls_SPO_DnA_http_baseUrl (you just created)
Parameter:
ds_DnA_spoList_Name
ds_par_spo_site
The dataset looks
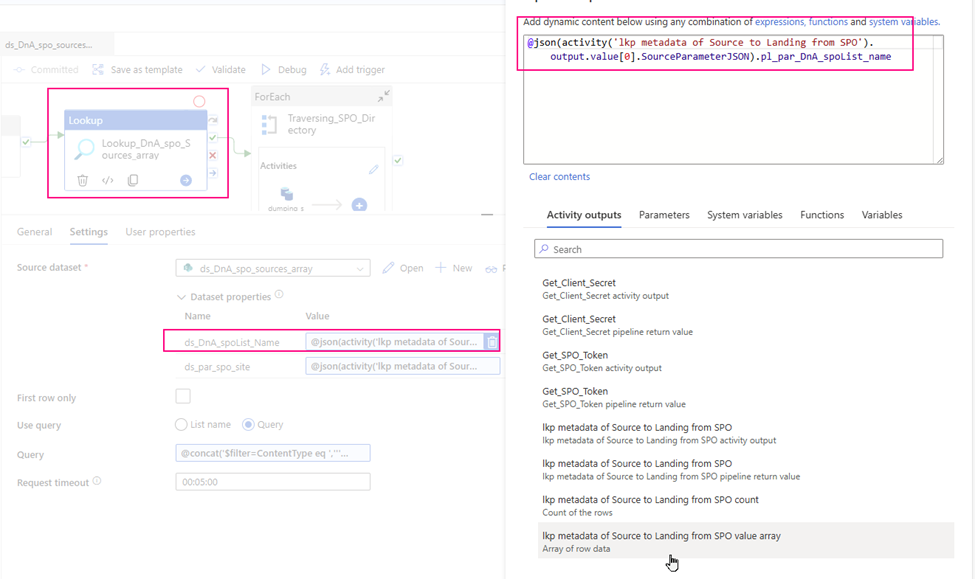
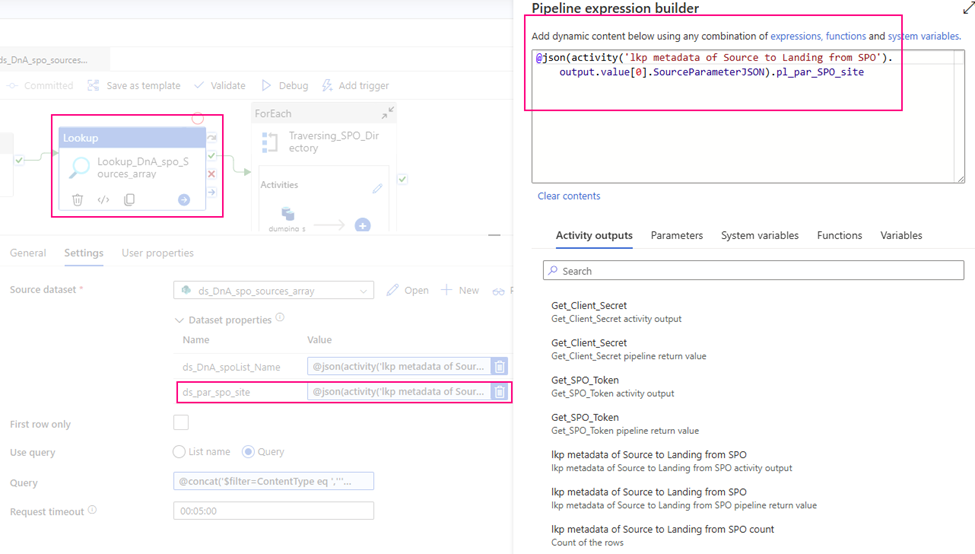
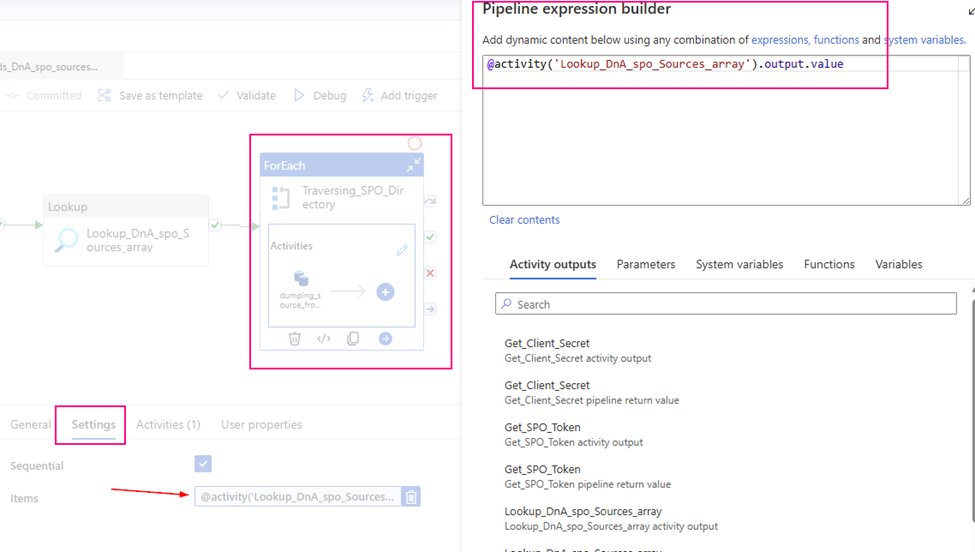
3. configure the Lookup Activity
Use up steam activities return results to configure lookup activity.
source dataset: ds_DnA_spo_sources_array
Dynamic content: ds_DnA_spoList_Name: @json(activity(‘lkp metadata of Source to Landing from SPO’).output.value[0].SourceParameterJSON).pl_par_DnA_spoList_name
ds_par_spo_site: @json(activity(‘lkp metadata of Source to Landing from SPO’).output.value[0].SourceParameterJSON).pl_par_SPO_site
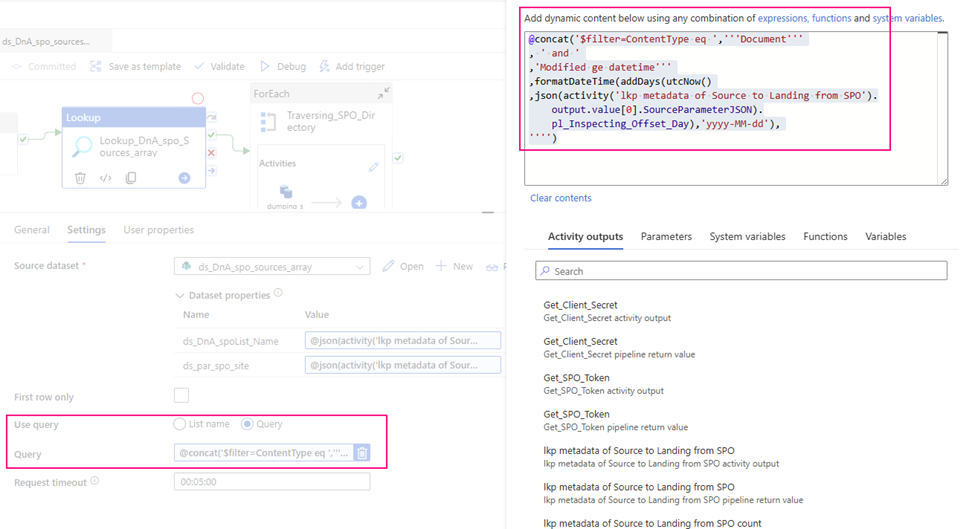
Query: I incrementally ingest data, so I use query to filter out interest items only.
@concat(‘$filter=ContentType eq ‘,”’Document”’ , ‘ and ‘ ,’Modified ge datetime”’ ,formatDateTime(addDays(utcNow() ,json(activity(‘lkp metadata of Source to Landing from SPO’).output.value[0].SourceParameterJSON).pl_Inspecting_Offset_Day),’yyyy-MM-dd’), ””)
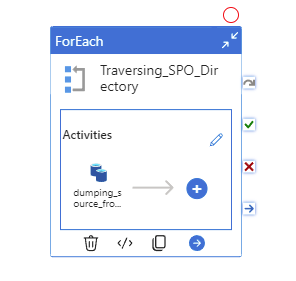
The value of ‘GetFileByServerRelativeUrl’ is our key point of work. It points to the specific URL location of the dataset. In fact, all upstream work efforts are aimed at generating specific content for this link item!
Cheers, we are almost there!
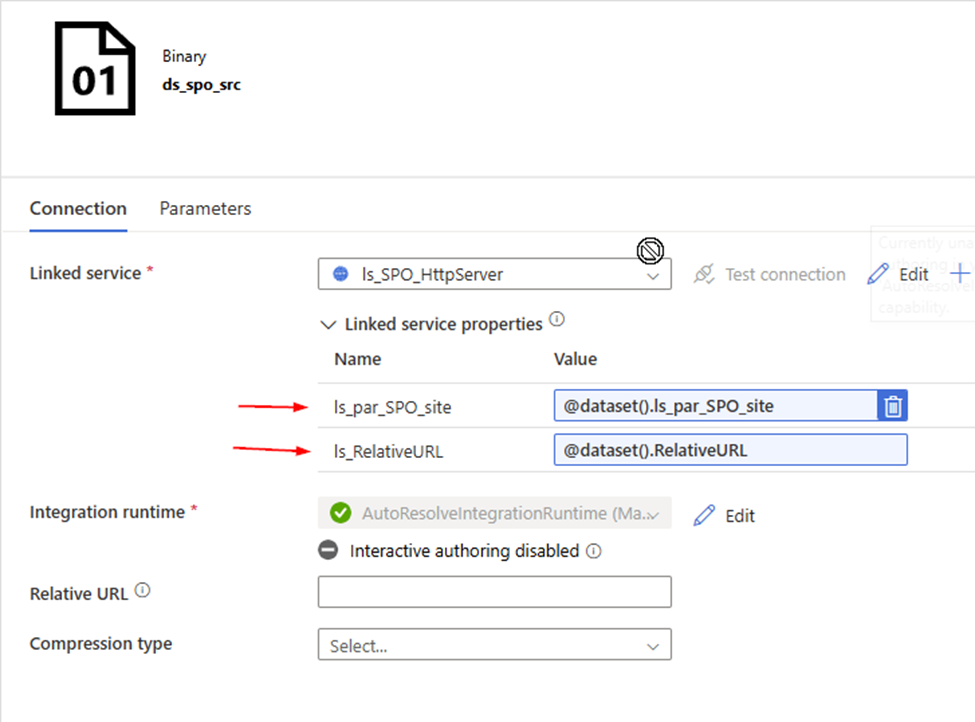
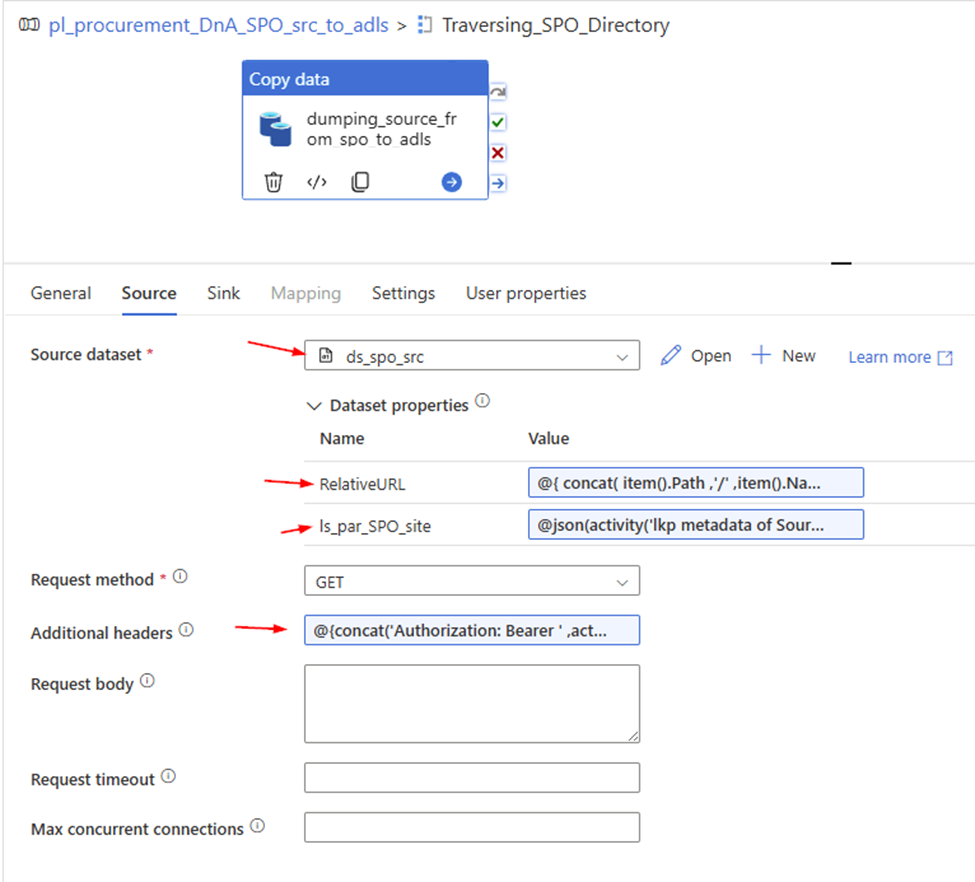
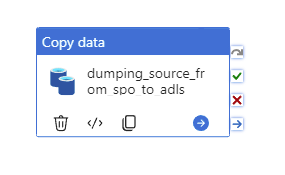
2. Create a Http Binary source dataset , called “ds_spo_src”, Parameterize it
Parameter: RelativeURL ls_par_SPO_site
Linked Service: ls_SPO_HttpServer , we just created.
3. Configure copy activity’s “Source”
Request method: GET
Source dataset: ds_spo_src
RelativeURL:
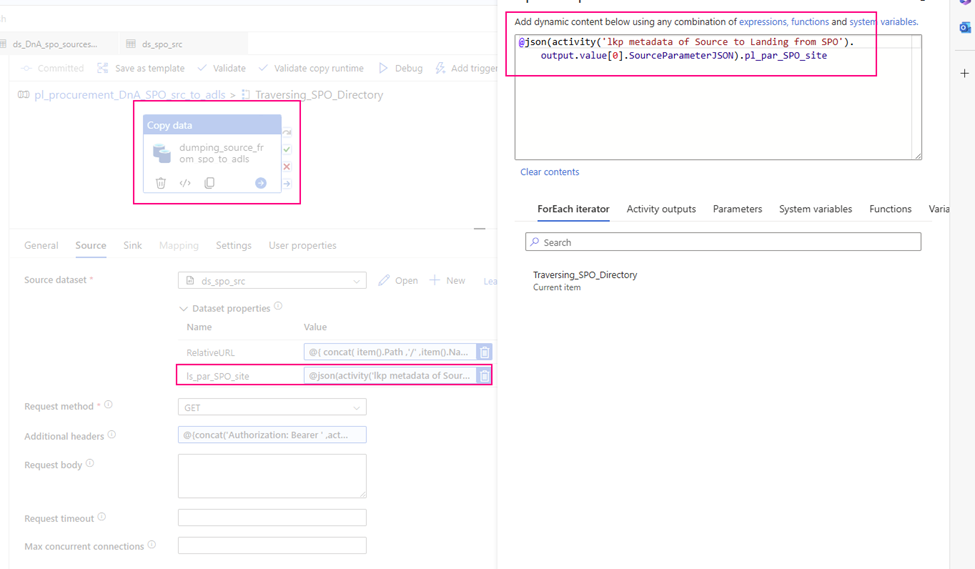
@{ concat( item().Path ,’/’ ,item().Name ) }
ls_par_SPO_site:
@json(activity(‘lkp metadata of Source to Landing from SPO’).output.value[0].SourceParameterJSON).pl_par_SPO_site
This article is focused on ADF or ASA lookup activity filter modified date, type, is Current version or not etc. query for SharePoint Online List.
Scenario:
Many organizations like to save data on SharePoint Online site, especially metadata. To incrementally extract the latest or certain date ranges modified data from SharePoint Online (SPO) we need to filter the modified date and inspect whether it is the latest version or not.
For example, there are items (documents, folders, ……) reside on SharePoint Online, items property looks like:
We want to know whether they are modified after a certain date, the latest version?, is it a document or folder etc. we need to check when we retrieve it from SharePoint Online we will get json response.
Let’s begin.
Solution:
In this article, we focus on the Lookup Activity only, especially on lookup query content. Not only I will ignore lookup’s other configurations, but also skip other activities steps from the pipeline. Such as how to access SPO, how to extract data SPO how to sink to destination ….
If you are interested in those and want to know more in detail, please review my previous articles:
2) Check items on SPO modified “DATE” and type is “document”
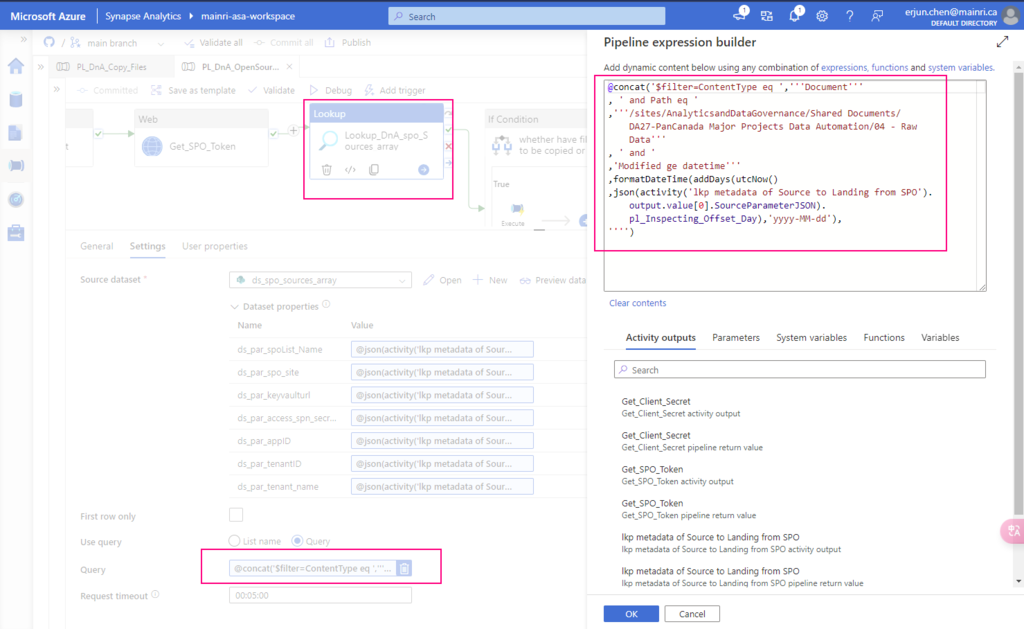
Copy Activity: Lookup_DnA_spo_Sources_array
This lookup activity filter items that save in SharePoint Library:
ContentTyep = Document;
FIle Saving Path = /sites/AnalyticsandDataGovernance/Shared Documents/DA27-PanCanada Major Projects Data Automation/04 – Raw Data that means, I look up the files save at this path only.
file’s Modified >= pre-set offset day
@concat('$filter=ContentType eq ','''Document''', ' and Path eq ','''/sites/AnalyticsandDataGovernance/Shared Documents/DA27-PanCanada Major Projects Data Automation/04 - Raw Data''', ' and ','Modified ge datetime''',formatDateTime(addDays(utcNow(),json(activity('lkp metadata of Source to Landing from SPO').output.value[0].SourceParameterJSON).pl_Inspecting_Offset_Day),'yyyy-MM-dd'),'''')
Here, I use “offset” conception, it is a poperty I save on SPO list. Of course, you can provide this offset value in many ways, such as pipeline parameter, save in SQL table, save in a file ….etc. wherever you like.
For example, you incrementally ingest data on daily basis,
the offset = -1 weekly basis, offset = -7 Ten days, customized period, offset = -10 ……… etc.
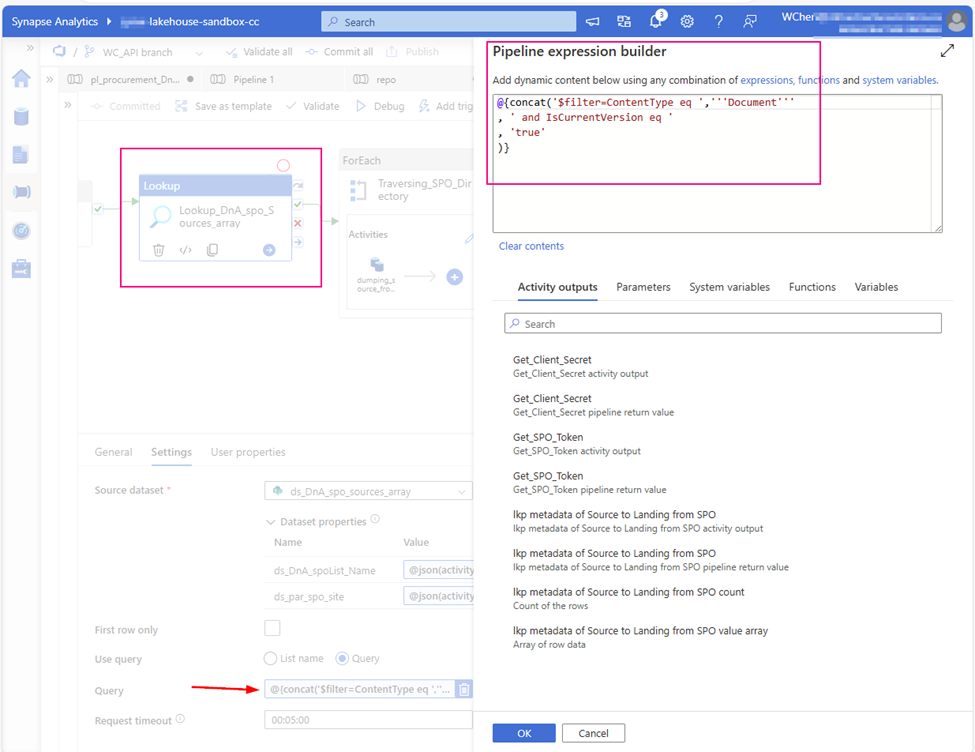
one more example. if you want to check items saved in SPO “isCurrentVersion” or not and type is “document”