Microsoft Fabric is an all-in-one SaaS analytics platform with integrated BI. Databricks is a Spark-based platform mainly used for large-scale data engineering and machine learning. Synapse is an enterprise analytics service combining SQL data warehousing and big data processing.
Platform
Description (English)
Microsoft Fabric
An all-in-one SaaS data platform that integrates data engineering, data science, warehousing, real-time analytics, and BI.
Azure Databricks
A Spark-based analytics and AI platform optimized for large-scale data engineering and machine learning.
Azure Synapse Analytics
An analytics service combining data warehousing and big data analytics.
Architecture
Microsoft Fabric: Fully integrated SaaS platform built around OneLake. single data lake, unified workspace, built-in Power BI
Databricks: Spark-native architecture optimized for big data processing. Delta Lake, Spark clusters, ML workloads
Synapse: Hybrid analytics platform integrating SQL data warehouse and big data tools.
The Aggregate transformation in Azure Data Factory (ADF) Data Flows is a powerful tool for performing calculations on groups of data. It’s analogous to the GROUP BY clause in SQL, allowing you to summarize data based on one or more grouping columns.
Purpose
The Aggregate transformation allows you to:
Group data: Group rows based on the values in one or more specified columns.
Perform aggregations: Calculate aggregate values (like sum, average, count, min, max, etc.) for each group.
Key Features and Settings:
Group By: This section defines the columns by which the data will be grouped. You can select one or more columns. Rows with the same values in these columns will be grouped together.
Aggregates: This section defines the aggregations to be performed on each group. You specify:
New column name: The name of the resulting aggregated column.
Expression: The aggregation function and the column to which it’s applied.
Available Aggregate Functions
ADF Data Flows support a wide range of aggregate functions, including:
avg(column): Calculates the average of a column.
count(column) or count(*): Counts the number of rows in a group. count(*) counts all rows, even if some columns are null. count(column) counts only non-null values in the specified column.
max(column): Finds the maximum value in a column.
min(column): Finds the minimum value in a column.
sum(column): Calculates the sum of a column.
collect(column): Collects all values within a group into an array.
first(column): Returns the first value encountered in the group.
last(column): Returns the last value encountered in the group.
stddev(column): Calculates the standard deviation of a column.
variance(column): Calculates the variance of a column.
Preparing test data
With assumed ADF/Synapse expertise, we will focus on aggregate transformation core concepts.
sample dataset
CustID Product Quantity Amount
C1,     A,      2,      20
C1,     B,      3,      30
C2,     C,      1,      10
C1,     A,      2,      20
C3,     A,      3,      30
C2,     B,      1,      10
C3,     C,      2,      20
C1,     C,      3,      30
C1,     A,      2,      20
C2,     A,      1,      30
C3,     C,      3,      10
Create Data Flow
Configure Source
Add Aggregate Transformation
he functionality of aggregate transformations is equivalent to that of the GROUP BY clause in T-SQL.
in SQL script, we write this query:
select product
, count(quantity) as sold_times
, sum(quantity) as sold_items
, sum(amount) as sold_amount
, avg(amount) as Avg_price
from sales group by product;

get this result
product	sold_times  sold_items  sold_amount   Avg_price
A	   10		6	 120	      24.0
B	   4		12	 40	      20.0
C	   9		3	 70	      17.5
Using Aggregate transformation in this way.
we can use “expression builder” to write the expression
It performs the same grouping and aggregation operations as TSQL’s GROUP BY.
Important Considerations
Null Handling: Pay attention to how aggregate functions handle null values. For example, sum() ignores nulls, while count(column) only counts non-null values.
Data Types: Ensure that the data types of the columns you’re aggregating are compatible with the chosen aggregate functions.
Performance: For large datasets, consider partitioning your data before the Aggregate transformation to improve performance.
Distinct Count: For calculating distinct counts, use the countDistinct(column) function.
Conclusion
By using the Aggregate transformation effectively, you can efficiently summarize and analyze your data within ADF Data Flows. Remember to carefully consider the appropriate aggregate functions and grouping columns to achieve your desired results.
Please do not hesitate to contact me if you have any questions at William . chen @ mainri.ca
In this article, I will discuss on the Exists Transformation of Data Flow. The exists transformation is a row filtering transformation that checks whether your data exists in another source or stream. The output stream includes all rows in the left stream that either exist or don’t exist in the right stream. The exists transformation is similar to SQL WHERE EXISTS and SQL WHERE NOT EXISTS.
I use the Exists transformation in Azure Data Factory or Synapse data flows to compare source and target data.” (This is the most straightforward and generally preferred option.
Create a Data Flow
Create a Source
Create a DerivedColumn Transformation
expression uses : sha2(256, columns())
Create target and derivedColumn transformation
The same way of source creates target. To keep the data type are the same so that we can use hash value to compare, I add a “Cast transformation”;
then the same as source setting, add a derivedColumn transformation.
Exists Transformation to compare Source and target
add a Exists to comparing source and target.
The Exists function offers two options: Exists and Doesn’t Exist. It supports multiple criteria and custom expressions.
Configuration
Choose which data stream you’re checking for existence in the Right stream dropdown.
Specify whether you’re looking for the data to exist or not exist in the Exist type setting.
Select whether or not your want a Custom expression.
Choose which key columns you want to compare as your exists conditions. By default, data flow looks for equality between one column in each stream. To compare via a computed value, hover over the column dropdown and select Computed column.
“Exists” option
Now, let use “Exists” option
we got this depid = 1004 exists.
Doesn’t Exist
use “Doesn’t Exist” option
we got depid = 1003. wholessale exists in Source side, but does NOT exist in target.
Recap
The “Exists Transformation” is similar to SQL WHERE EXISTS and SQL WHERE NOT EXISTS.
It is very convenient to compare in data engineering project, e.g. ETL comparison.
Please do not hesitate to contact me if you have any questions at William . chen @ mainri.ca
When we perform data integration and ETL processes, the most effective way is only read the source data that has changed since the last time the pipeline ran, rather than always querying an entire dataset on each run.
We will explore the different Change Data Capture (CDC) capabilities (CDC in Mapping Data flow, Top level CDC in ADF, Synapse link) available in Azure Data Factory and Azure Synapse Analytics.
Support data source and target
currently, ADF support the following data source and target
Supported data sources
Avro
Azure Cosmos DB (SQL API)
Azure SQL Database
Azure SQL Managed Instance
Delimited Text
JSON
ORC
Parquet
SQL Server
XML
Snowflake
Supported targets
Avro
Azure SQL Database
SQL Managed Instance
Delimited Text
Delta
JSON
ORC
Parquet
Azure Synapse Analytics
Azure Synapse Analytics as Target
When using Azure Synapse Analytics as target, the Staging Settings is available on the main table canvas. Enabling staging is mandatory when selecting Azure Synapse Analytics as the target.
Staging Settings can be configured in two ways: utilizing Factory settings or opting for a Custom settings. Factory settings apply at the factory level. For the first time, if these settings aren’t configured, you’ll be directed to the global staging setting section for configuration. Once set, all CDC top-level resources will adopt this configuration. Custom settings is scoped only for the CDC resource for which it is configured and overrides the Factory settings.
Known limitations
Currently, when creating source/target mappings, each source and target is only allowed to be used once.
Complex types are currently unsupported.
Self-hosted integration runtime (SHIR) is currently unsupported.
CDC ADLS to SQL Database
Create a CDC artifact
Go to the Author pane in data factory. Below Pipelines, a new top-level artifact called Change Data Capture (preview) appears.
Configuring Source properties
Use the dropdown list to choose your data source. For this demo, select DelimitedText.
To support Change Data Capture (CDC), it’s recommended to create a dedicated Linked Service, as current implementations use a single Linked Service for both source and target.
You can choose to add multiple source folders by using the plus (+) button. The other sources must also use the same linked service that you already selected.
Configuring target
This demo uses a SQL database and a dedicated Linked Service for CDC.
configuring the target table
If existing tables at the target have matching names, they’re selected by default under Existing entities. If not, new tables with matching names are created under New entities. Additionally, you can edit new tables by using the Edit new tables button.
capturing change data studio appears
let’s click the “columns mapping”
If you want to enable the column mappings, select the mappings and turn off the Auto map toggle. Then, select the Column mappings button to view the mappings. You can switch back to automatic mapping anytime by turning on the Auto map toggle.
Configure CDC latency
After your mappings are complete, set your CDC latency by using the Set Latency button.
Publish and starting CDC
After you finish configuring your CDC, select Publish all to publish your changes, then Start to start running your change data capture.
Monitoring CDC
For monitoring CDC, we can either from ADF’s studio’s monitor or from CDC studio
Once data changed, CDC will automatically detecting and tracking data changing, deliver to target
Please do not hesitate to contact me if you have any questions at William . chen @ mainri.ca
The Get Metadata activity in Azure Data Factory (ADF) is used to retrieve metadata about a file, folder, or database. This activity is particularly useful when you need to dynamically determine properties like file name, size, structure, or existence and use them in subsequent pipeline activities.
We can specify the following metadata types in the Get Metadata activity field list to retrieve the corresponding information:
Metadata type
Description
itemName
Name of the file or folder.
itemType
Type of the file or folder. Returned value is File or Folder.
size
Size of the file, in bytes. Applicable only to files.
created
Created datetime of the file or folder.
lastModified
Last modified datetime of the file or folder.
childItems
List of subfolders and files in the given folder. Applicable only to folders. Returned value is a list of the name and type of each child item.
contentMD5
MD5 of the file. Applicable only to files.
structure
Data structure of the file or relational database table. Returned value is a list of column names and column types.
columnCount
Number of columns in the file or relational table.
exists
Whether a file, folder, or table exists. If exists is specified in the Get Metadata field list, the activity won’t fail even if the file, folder, or table doesn’t exist. Instead, exists: false is returned in the output.
Metadata structure and columnCount are not supported when getting metadata from Binary, JSON, or XML files.
Wildcard filter on folders/files is not supported for Get Metadata activity.
Get Metadata activity on the canvas if it is not already selected, and its Settings tab, to edit its details.
Sample setting and output
Get a folder’s metadata
Setting
select a dataset or create a new
for folder’s metadata, in the Field list of setting, all we can select are:
The Get Metadata activity in Azure Data Factory (ADF) is a versatile tool for building dynamic, efficient, and robust pipelines. It plays a critical role in handling real-time scenarios by providing essential information about data sources, enabling smarter workflows.
Use Case Scenarios Recap
File Verification: Check if a file exists or meets specific conditions (e.g., size or modification date) before processing.
Iterative Processing: Use folder metadata to dynamically loop through files using the ForEach activity.
Schema Validation: Fetch table or file schema for use in dynamic transformations or validations.
Dynamic Path Handling: Adjust source/destination paths based on retrieved metadata properties.
Please do not hesitate to contact me if you have any questions at William . chen @ mainri.ca (remove all space from the email account 😊)
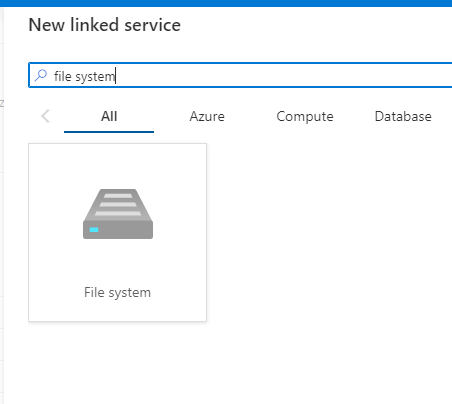
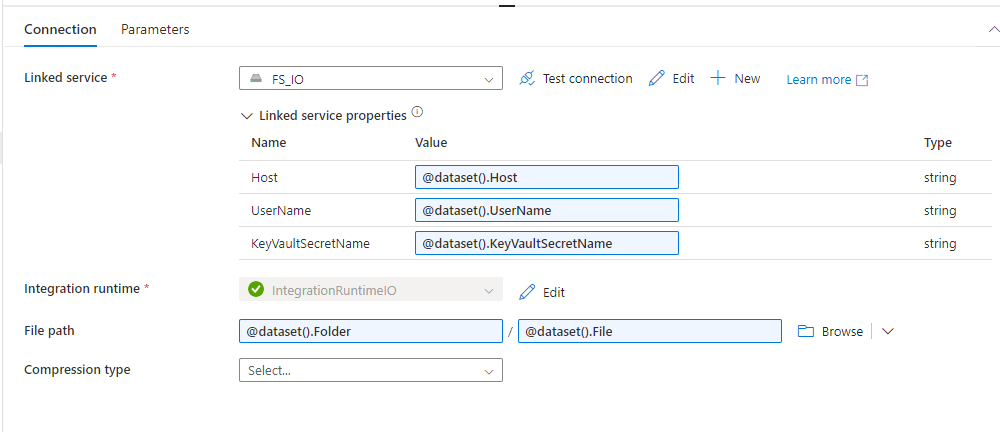
In Azure Data Factory (ADF) or Synapse, using Copy Activity with a File System as a source or sink is common when dealing with on-premises file systems, network file shares, or even cloud-based file storage systems. Here’s an overview of how it works, key considerations, and steps to set it up.
Key Components and setup with File System:
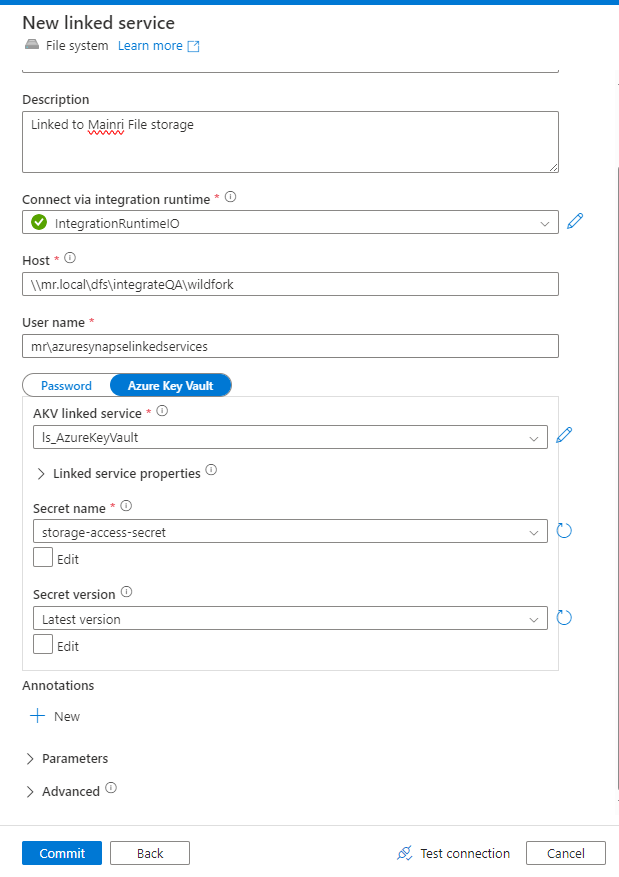
Create a File System Linked Service
Linked Service: For on-premises or network file systems, you typically need a Self-hosted Integration Runtime (SHIR).
Fill in the required fields:
Connection: Specify the file system type (e.g., network share or local path).
Authentication: Provide the appropriate credentials, such as username/password, or key-based authentication.
If the file system is on-premises, configure the Self-hosted Integration Runtime to access it.
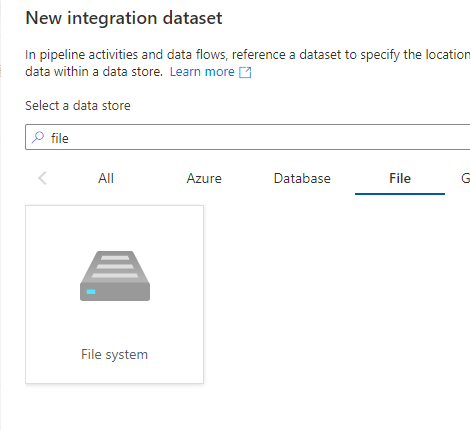
Create File System Dataset
Go to Datasets in ADF and create a new dataset. Select File System as the data source.
Configure the dataset to point to the correct file or folder:
Specify the File Path.
Define the file format (e.g., CSV, JSON, XML).
Set any schema information if required (for structured data like CSV).
Considerations:
Integration Runtime: For on-premises file systems, the Self-hosted Integration Runtime (SHIR) is essential to securely move data from private networks.
Performance: Data transfer speeds depend on network configurations (for on-prem) and ADF’s parallelism settings.
File Formats: Ensure proper handling of different file formats (e.g., CSV, JSON, Binary etc.) and schema mapping for structured files.
Security: Ensure credentials and network configurations are correctly set up, and consider encryption if dealing with sensitive data.
Common Errors:
Connection issues: If the SHIR is not correctly configured, or if there are issues with firewall or network settings, ADF may not be able to access the file system.
Permission issues: Ensure that the correct permissions are provided to access the file system (file share, SMB, FTP, etc.).
Please do not hesitate to contact me if you have any questions at William . chen @ mainri.ca
In Azure Data Factory (ADF), both the Copy Activity using wildcards (*.*) and the Get Metadata activity for retrieving a file list are designed to work with multiple files for copying or moving. However, they operate differently and are suited to different scenarios.
Copy Activity with Wildcard *.*
Purpose: Automatically copies multiple files from a source to a destination using wildcards.
Use Case: Used when you want to move, copy, or process multiple files in bulk that match a specific pattern (e.g., all .csv files or any file in a folder).
Wildcard Support: The wildcard characters (* for any characters, ? for a single character) help in defining a set of files to be copied. For example:
*.csv will copy all .csv files in the specified folder.
file*.json will copy all files starting with file and having a .json extension.
Bulk Copy: Enables copying multiple files without manually specifying each one.
Common Scenarios:
Copy all files from one folder to another, filtering based on extension or name pattern.
Copy files that were uploaded on a specific date, assuming the date is part of the file name.
Automatic File Handling: ADF will automatically copy all files matching the pattern in a single operation.
Key Benefit: Efficient for bulk file transfers with minimal configuration. You don’t need to explicitly get the file list; it uses wildcards to copy all matching files.
Example Scenario:
You want to copy all .csv files from a folder in Blob Storage to a Data Lake without manually listing them.
2. Get Metadata Activity (File List Retrieval)
Purpose: Retrieves a list of files in a folder, which you can then process individually or use for conditional logic.
Use Case: Used when you need to explicitly obtain the list of files in a folder to apply custom logic, processing each file separately (e.g., for-looping over them).
No Wildcard Support: The Get Metadata activity does not use wildcards directly. Instead, it returns all the files (or specific child items) in a folder. If filtering by name or type is required, additional logic is necessary (e.g., using expressions or filters in subsequent activities).
Custom Processing: After retrieving the file list, you can perform additional steps like looping over each file (with the ForEach activity) and copying or transforming them individually.
Common Scenarios:
Retrieve all files in a folder and process each one in a custom way (e.g., run different processing logic depending on the file name or type).
Check for specific files, log them, or conditionally process based on file properties (e.g., last modified time).
Flexible Logic: Since you get a list of files, you can apply advanced logic, conditions, or transformations for each file individually.
Key Benefit: Provides explicit control over how each file is processed, allowing dynamic processing and conditional handling of individual files.
Example Scenario:
You retrieve a list of files in a folder, loop over them, and process only files that were modified today or have a specific file name pattern.
Side-by-Side Comparison
Feature
Copy Activity (Wildcard *.*)
Get Metadata Activity (File List Retrieval)
Purpose
Copies multiple files matching a wildcard pattern.
Retrieves a list of files from a folder for custom processing.
Wildcard Support
Yes (*.*, *.csv, file?.json, etc.).
No, retrieves all items from the folder (no filtering by pattern).
File Selection
Automatically selects files based on the wildcard pattern.
Retrieves the entire list of files, then requires a filter for specific file selection.
Processing Style
Bulk copying based on file patterns.
Custom logic or per-file processing using the ForEach activity.
Use Case
Simple and fast copying of multiple files matching a pattern.
Used when you need more control over each file (e.g., looping, conditional processing).
File Count Handling
Automatically processes all matching files in one step.
Returns a list of all files in the folder, and each file can be processed individually.
Efficiency
Efficient for bulk file transfer, handles all matching files in one operation.
More complex as it requires looping through files for individual actions.
Post-Processing Logic
No looping required; processes files in bulk.
Requires a ForEach activity to iterate over the file list for individual processing.
Common Scenarios
– Copy all files with a .csv extension. – Move files with a specific prefix or suffix.
– Retrieve all files and apply custom logic for each one. – Check file properties (e.g., last modified date).
Control Over Individual Files
Limited, bulk operation for all files matching the pattern.
Full control over each file, allowing dynamic actions (e.g., conditional processing, transformations).
File Properties Access
No access to specific file properties during the copy operation.
Access to file properties like size, last modified date, etc., through metadata retrieval.
Execution Time
Fast for copying large sets of files matching a pattern.
Slower due to the need to process each file individually in a loop.
Use of Additional Activities
Often works independently without the need for further processing steps.
Typically used with ForEach, If Condition, or other control activities for custom logic.
Scenarios to Use
– Copying all files in a folder that match a certain extension (e.g., *.json). – Moving large numbers of files with minimal configuration.
– When you need to check file properties before processing. – For dynamic file processing (e.g., applying transformations based on file name or type).
When to Use Each:
Copy Activity with Wildcard:
Use when you want to copy multiple files in bulk and don’t need to handle each file separately.
Best for fast, simple file transfers based on file patterns.
Get Metadata Activity with File List:
Use when you need explicit control over each file or want to process files individually (e.g., with conditional logic).
Ideal when you need to loop through files, check properties, or conditionally process files.
Please do not hesitate to contact me if you have any questions at William . chen @ mainri.ca
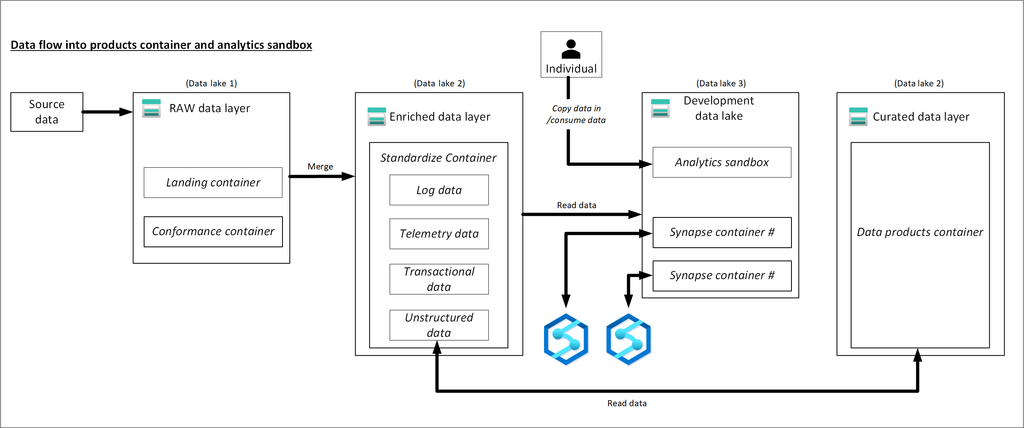
The Azure Data Lake is a massively scalable and secure data storage for high-performance analytics workloads. We can create three storage accounts within a single resource group.
Consider whether an organization needs one or many storage accounts and consider what file systems I require to build our logical data lake. (by the way, Multiple storage accounts or file systems can’t incur a monetary cost until data is accessed or stored.)
Each storage account within our data landing zone stores data in one of three stages:
Raw data
Enriched and curated data
Development data lakes
You might want to consolidate raw, enriched, and curated layers into one storage account. Keep another storage account named “development” for data consumers to bring other useful data products.
A data application can consume enriched and curated data from a storage account which has been ingested an automated data agnostic ingestion service.
we are going to Leveraged the medallion architecture to implement it. if you need more information about medallion architecture please review my previously articles – Medallion Architecture
It’s important to plan data structure before landing data into a data lake.
Data Lake Planning
When you plan a data lake, always consider appropriate consideration to structure, governance, and security. Multiple factors influence each data lake’s structure and organization:
The type of data stored
How its data is transformed
Who accesses its data
What its typical access patterns are
If your data lake contains a few data assets and automated processes like extract, transform, load (ETL) offloading, your planning is likely to be fairly easy. If your data lake contains hundreds of data assets and involves automated and manual interaction, expect to spend a longer time planning, as you’ll need a lot more collaboration from data owners.
Three data lakes are illustrated in each data landing zone. The data lake sits across three data lake accounts, multiple containers, and folders, but it represents one logical data lake for our data landing zone.
Lake number
Layers
Container number
Container name
1
Raw
1
Landing
1
Raw
2
Conformance
2
Enriched
1
Standardized
2
Curated
2
Data products
3
Development
1
Analytics sandbox
3
Development
#
Synapse primary storage number
Data Lake and container number with Layer
Depending on requirements, you might want to consolidate raw, enriched, and curated layers into one storage account. Keep another storage account named “development” for data consumers to bring other useful data products.
Enable Azure Storage with the hierarchical name space feature, which allows you to efficiently manage files.
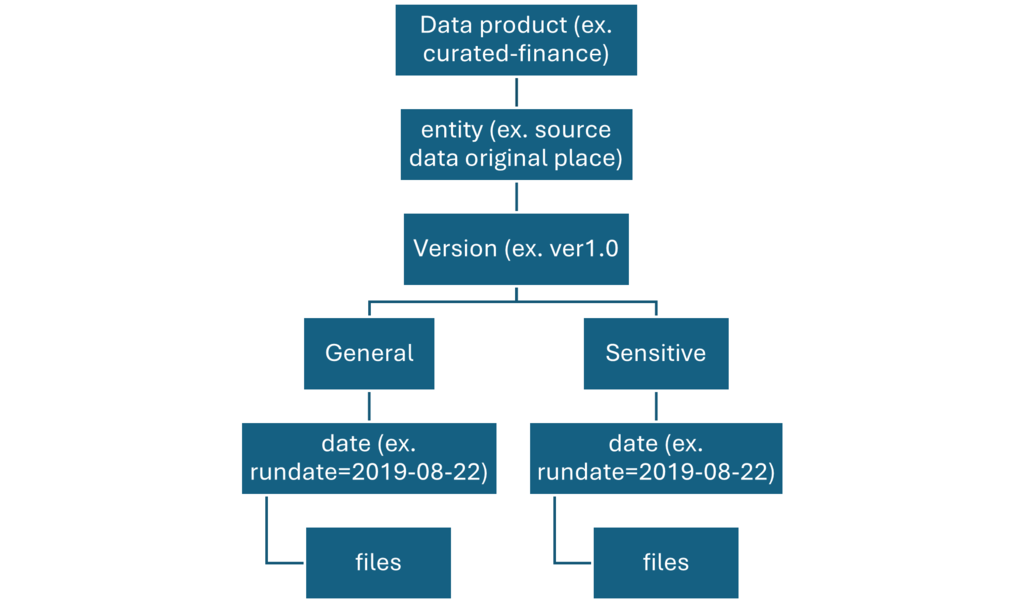
Each data product should have two folders in the data products container that our data product team owns.
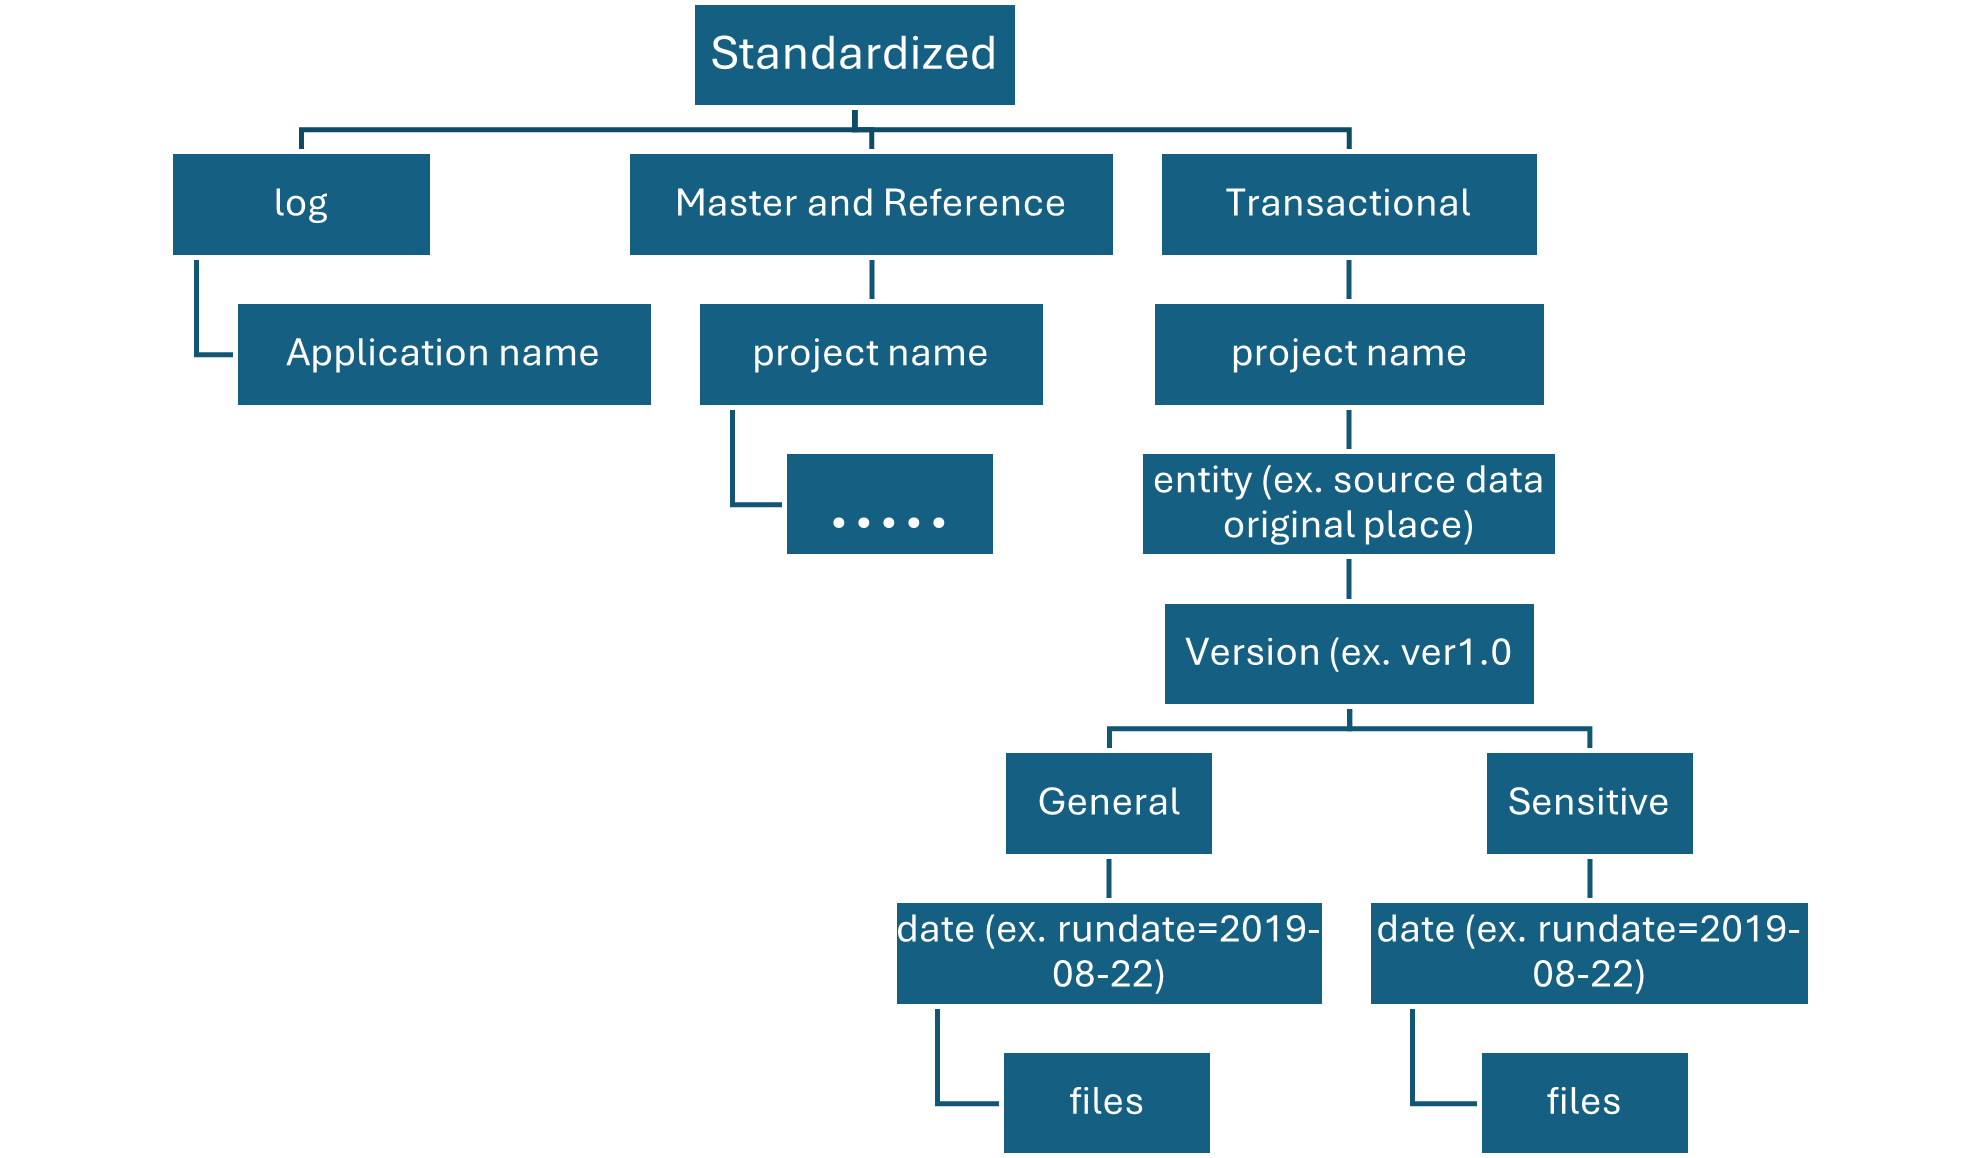
On enriched layer, standardized container, there are two folders per source system, divided by classification. With this structure, team can separately store data that has different security and data classifications and assign them different security access.
Our standardized container needs a general folder for confidential or below data and a sensitive folder for personal data. Control access to these folders by using access control lists (ACLs). We can create a dataset with all personal data removed, and store it in our general folder. We can have another dataset that includes all personal data in our sensitive personal data folder.
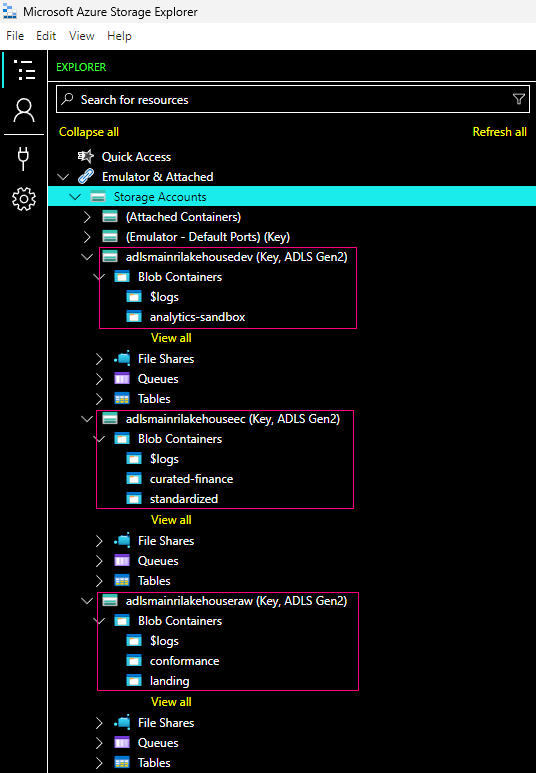
I created 3 accounts (Azure storage naming allows low case and number only. no dash, no underscore etc. allows)
adlsmainrilakehousedev — Development
adlsmainrilakehouseec — Enrich and Curated
adlsmainrilakehouseraw — Raw data
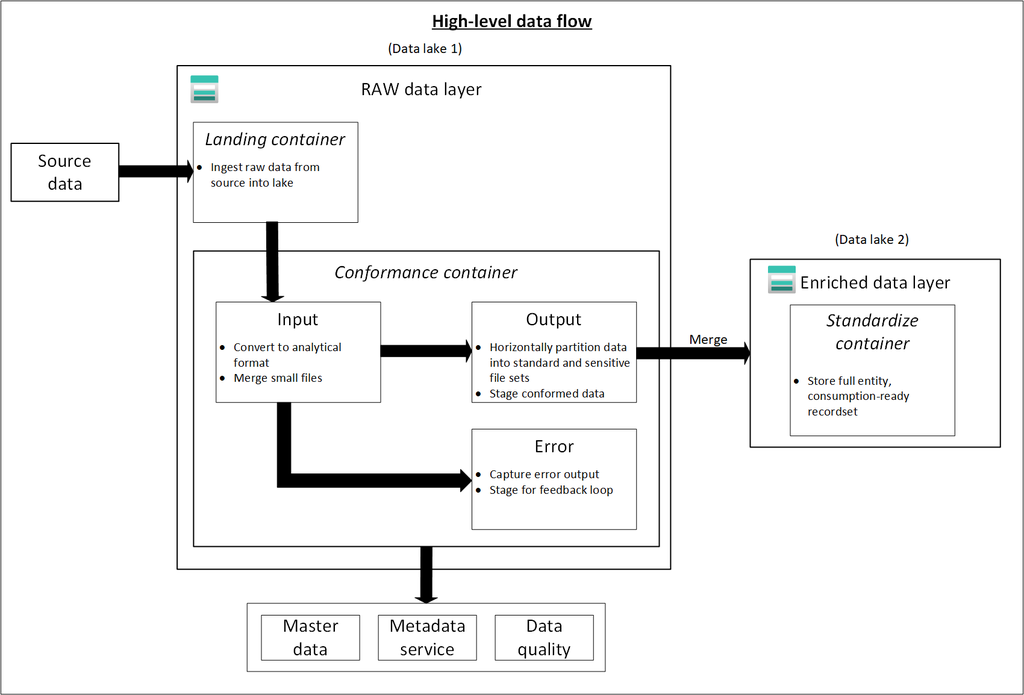
Raw layer (data lake one)
This data layer is considered the bronze layer or landing raw source data. Think of the raw layer as a reservoir that stores data in its natural and original state. It’s unfiltered and unpurified.
You might store the data in its original format, such as JSON or CSV. Or it might be cost effective to store the file contents as a column in a compressed file format, like Avro, Parquet, or Databricks Delta Lake.
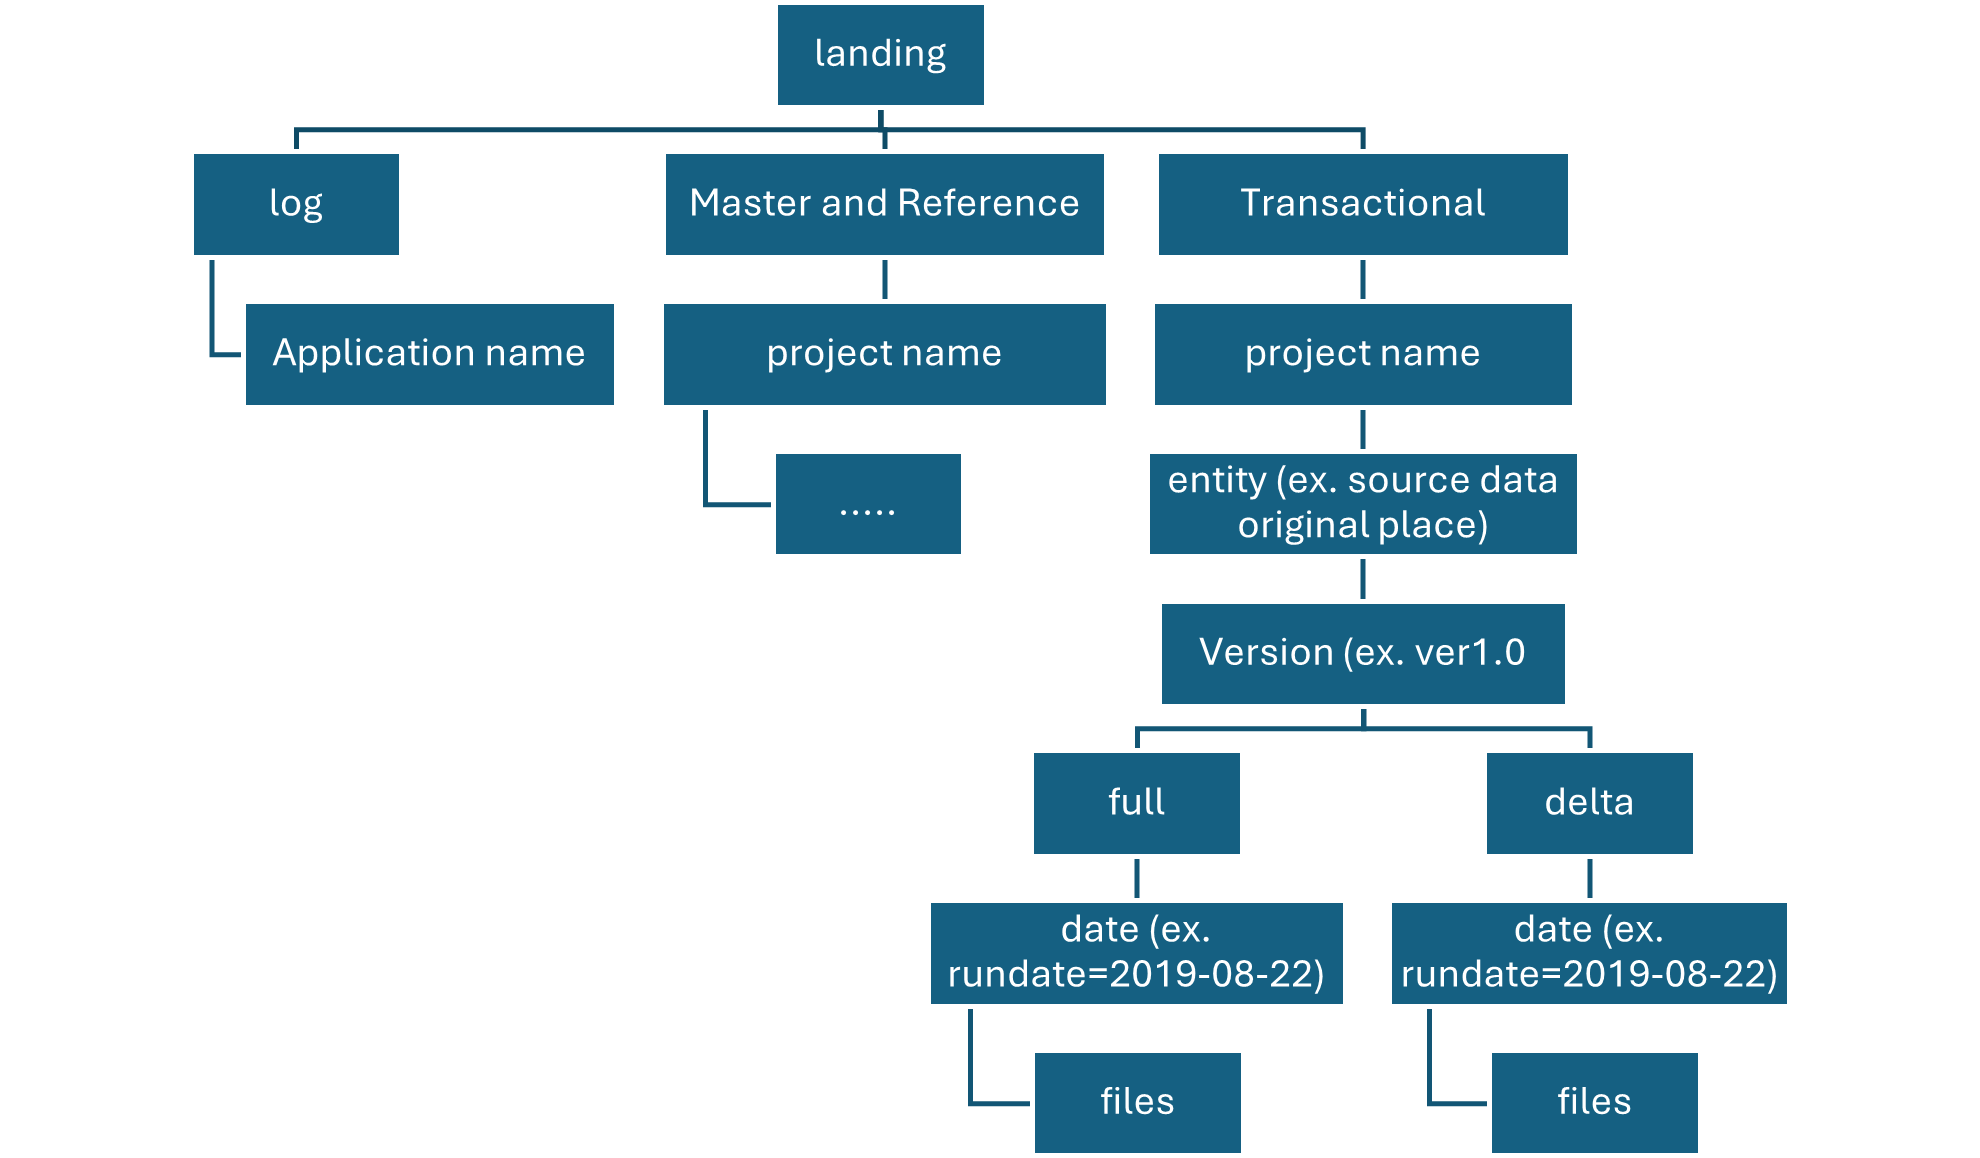
You can organize this layer by using one folder per source system. Give each ingestion process write access to only its associated folder.
Raw Layer Landing container
The landing container is reserved for raw data that’s from a recognized source system.
Our data agnostic ingestion engine or a source-aligned data application loads the data, which is unaltered and in its original supported format.
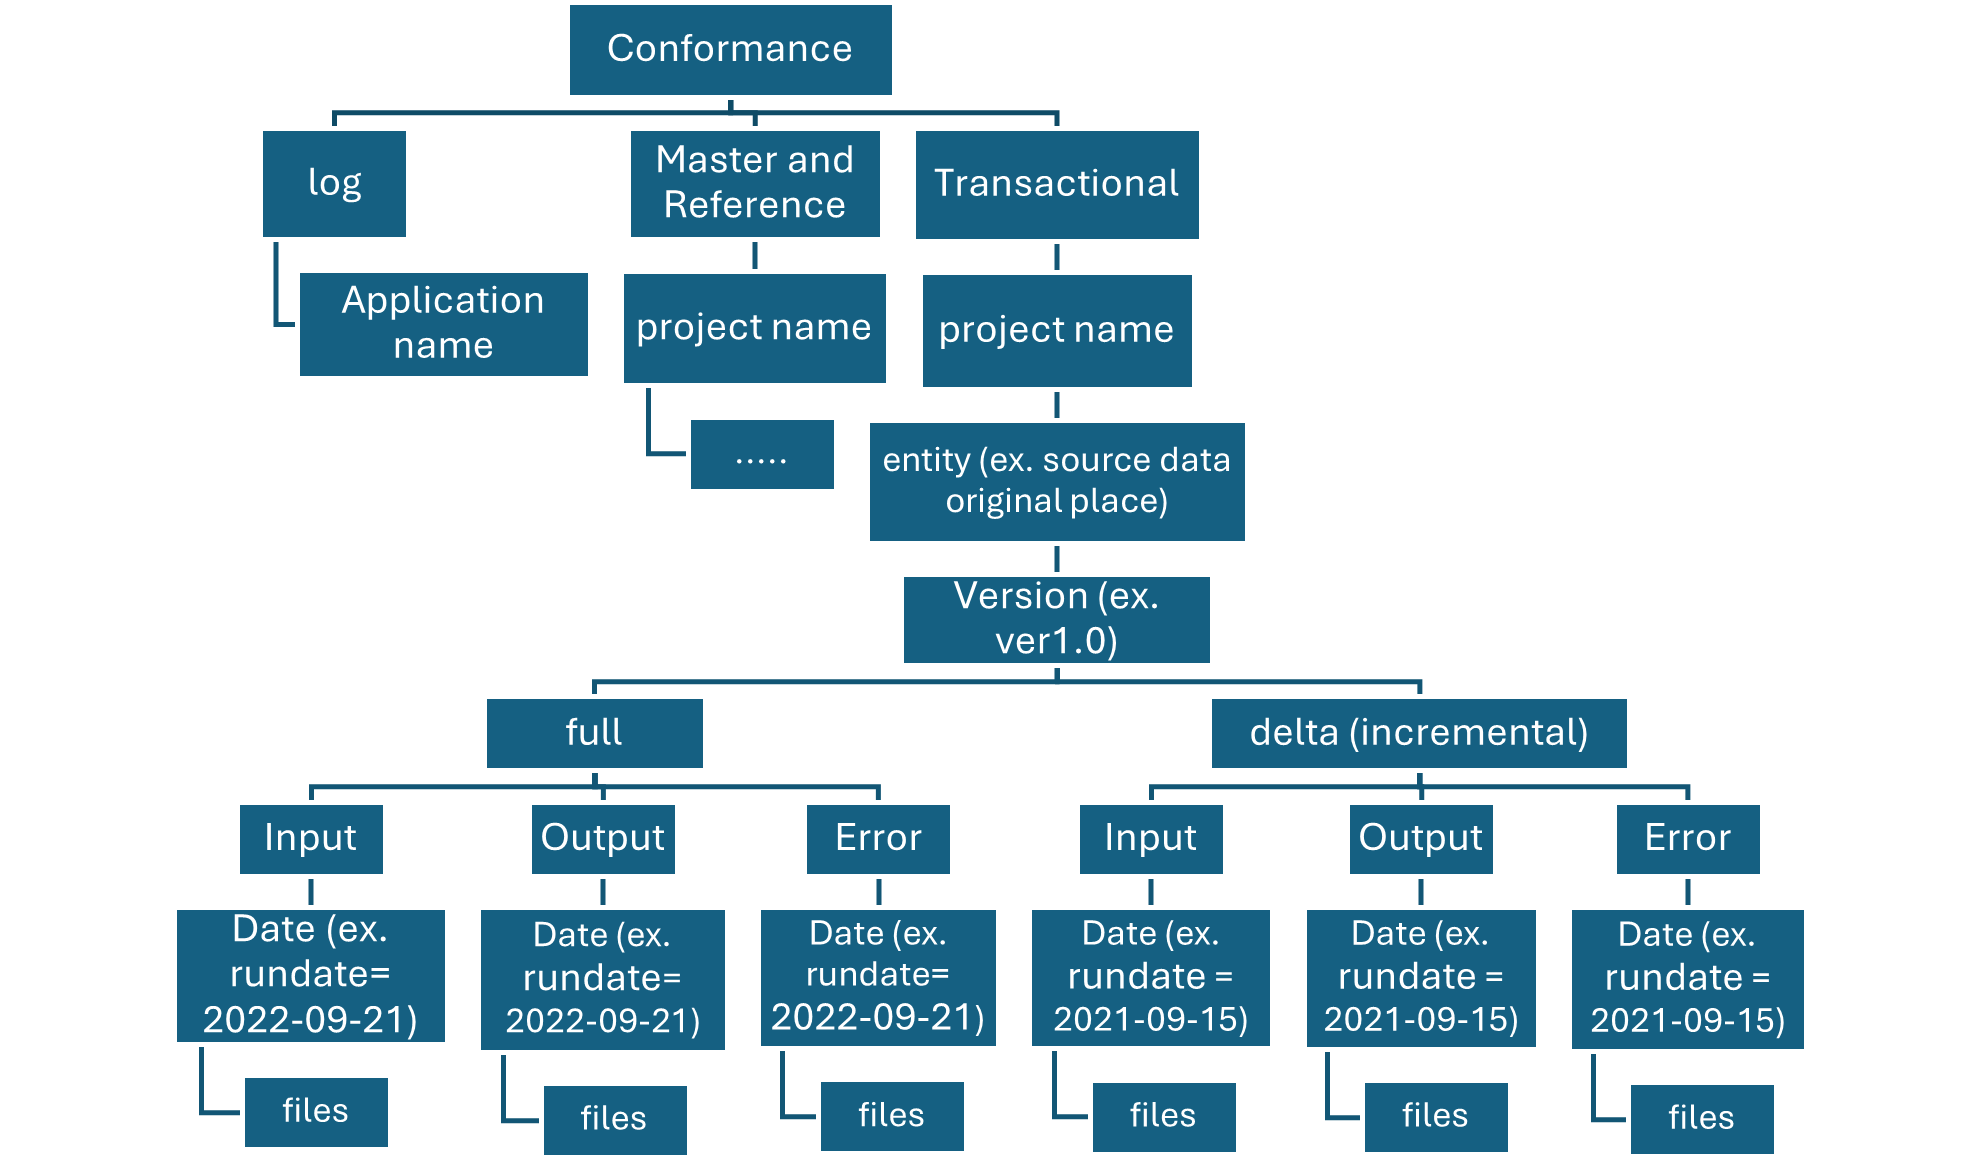
Raw layer conformance container
The conformance container in raw layer contains data quality conformed data.
As data is copied to a landing container, data processing and computing is triggered to copy the data from the landing container to the conformance container. In this first stage, data gets converted into the delta lake format and lands in an input folder. When data quality runs, records that pass are copied into the output folder. Records that fail land in an error folder.
Enriched layer (data lake two)
Think of the enriched layer as a filtration layer. It removes impurities and can also involve enrichment. This data layer is also considered the silver layer.
The following diagram shows the flow of data lakes and containers from source data to a standardized container.
Standardized container
Standardization container holds systems of record and masters. Data within this layer has had no transformations applied other than data quality, delta lake conversion, and data type alignment.
Folders in Standardized container are segmented first by subject area, then by entity. Data is available in merged, partitioned tables that are optimized for analytics consumption.
Curated layer (data lake two)
The curated layer is our consumption layer and known as Golden layer. It’s optimized for analytics rather than data ingestion or processing. The curated layer might store data in denormalized data marts or star schemas.
Data from our standardized container is transformed into high-value data products that are served to our data consumers. This data has structure. It can be served to the consumers as-is, such as data science notebooks, or through another read data store, such as Azure SQL Database.
This layer isn’t a replacement for a data warehouse. Its performance typically isn’t adequate for responsive dashboards or end user and consumer interactive analytics. This layer is best suited for internal analysts and data scientists who run large-scale, improvised queries or analysis, or for advanced analysts who don’t have time-sensitive reporting needs.
Data products container
Data assets in this zone are typically highly governed and well documented. Assign permissions by department or by function, and organize permissions by consumer group or data mart.
When landing data in another read data store, like Azure SQL Database, ensure that we have a copy of that data located in the curated data layer. Our data product users are guided to main read data store or Azure SQL Database instance, but they can also explore data with extra tools if we make the data available in our data lake.
Development layer (data lake three)
Our data consumers can/may bring other useful data products along with the data ingested into our standardized container in the silver layer.
Analytics Sandbox
The analytics sandbox area is a working area for an individual or a small group of collaborators. The sandbox area’s folders have a special set of policies that prevent attempts to use this area as part of a production solution. These policies limit the total available storage and how long data can be stored.
In this scenario, our data platform can/may allocate an analytics sandbox area for these consumers. In the sandbox, they, consumers, can generate valuable insights by using the curated data and data products that they bring.
For example, if a data science team wants to determine the best product placement strategy for a new region, they can bring other data products, like customer demographics and usage data, from similar products in that region. The team can use the high-value sales insights from this data to analyze the product market fit and offering strategy.
These data products are usually of unknown quality and accuracy. They’re still categorized as data products, but are temporary and only relevant to the user group that’s using the data.
When these data products mature, our enterprise can promote these data products to the curated data layer. To keep data product teams responsible for new data products, provide the teams with a dedicated folder on our curated data zone. They can store new results in the folder and share them with other teams across organization.
Conclusion
Data lakes are an indispensable tool in a modern data strategy. They allow teams to store data in a variety of formats, including structured, semi-structured, and unstructured data – all vendor-neutral forms, which eliminates the danger of vendor lock-in and gives users more control over the data. They also make data easier to access and retrieve, opening the door to a wider choice of analytical tools and applications.
Please do not hesitate to contact me if you have any questions at William . chen @mainri.ca
An external data source in Synapse serverless SQL is typically used to reference data stored outside of the SQL pool, such as in Azure Data Lake Storage (ADLS) or Blob Storage. This allows you to query data directly from these external sources using T-SQL.
There are different ways to create external data source. Using Synapse Studio UI, coding etc. the easiest way is to leverage Synapse Studio UI. But we had better know how to use code to create it since in some cases we have to use this way.
Here’s how to create an external data source in Synapse serverless SQL
Using Synapse Studio UI to create External Data Source
Create Lake Database
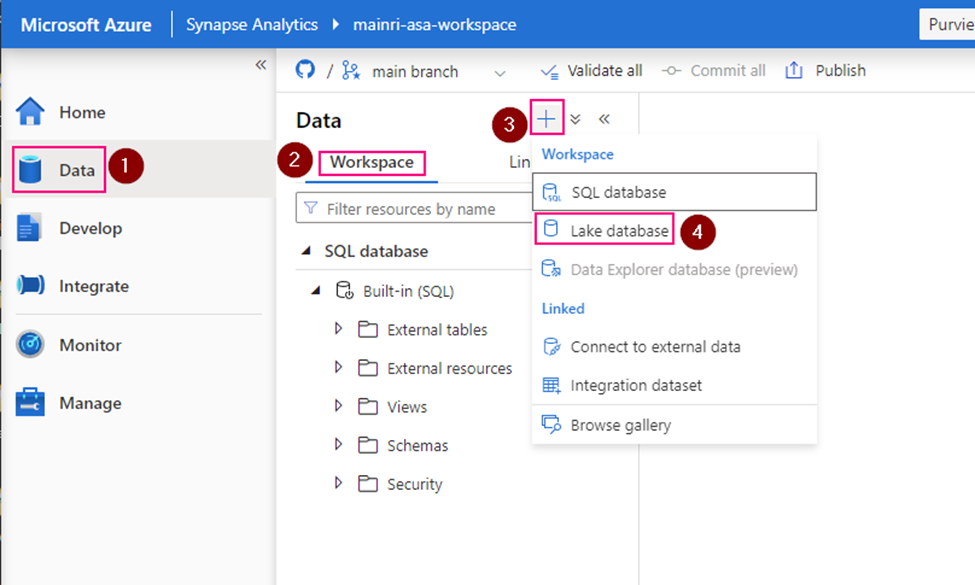
Open Synapse Studio
On the left side, select Data portal > workspace
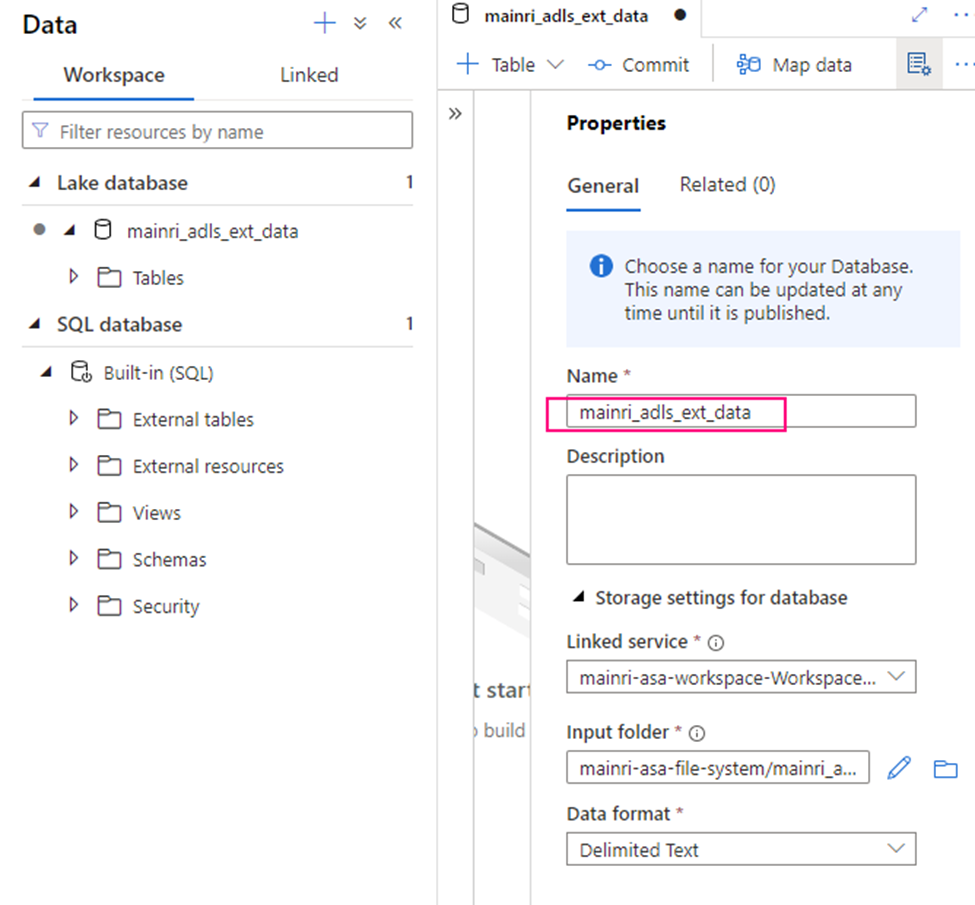
Fill in the properties:
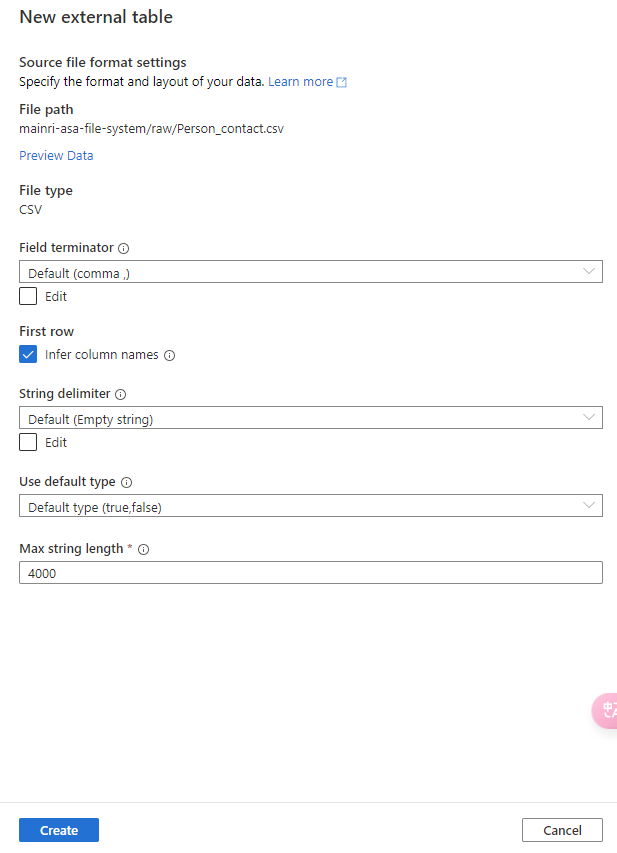
Create external table from data lake
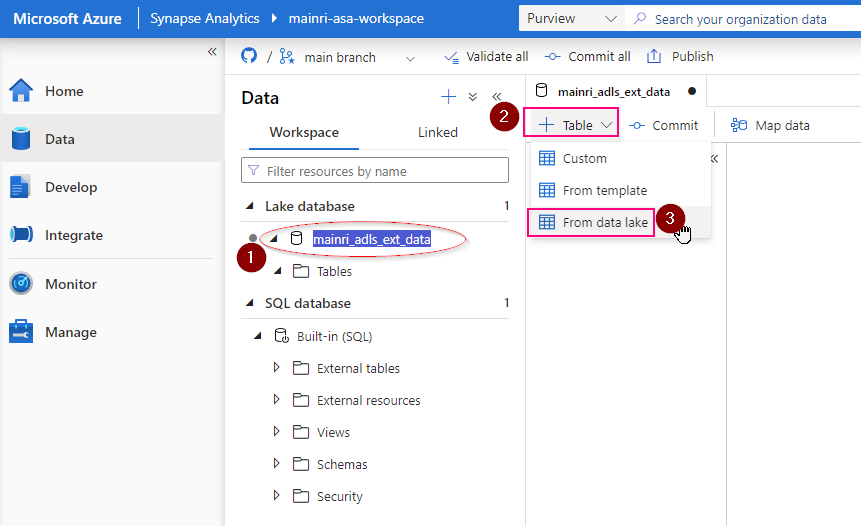
Double clicks the Lake Database you just created.
in the Lake Database tag, click “+ Table”
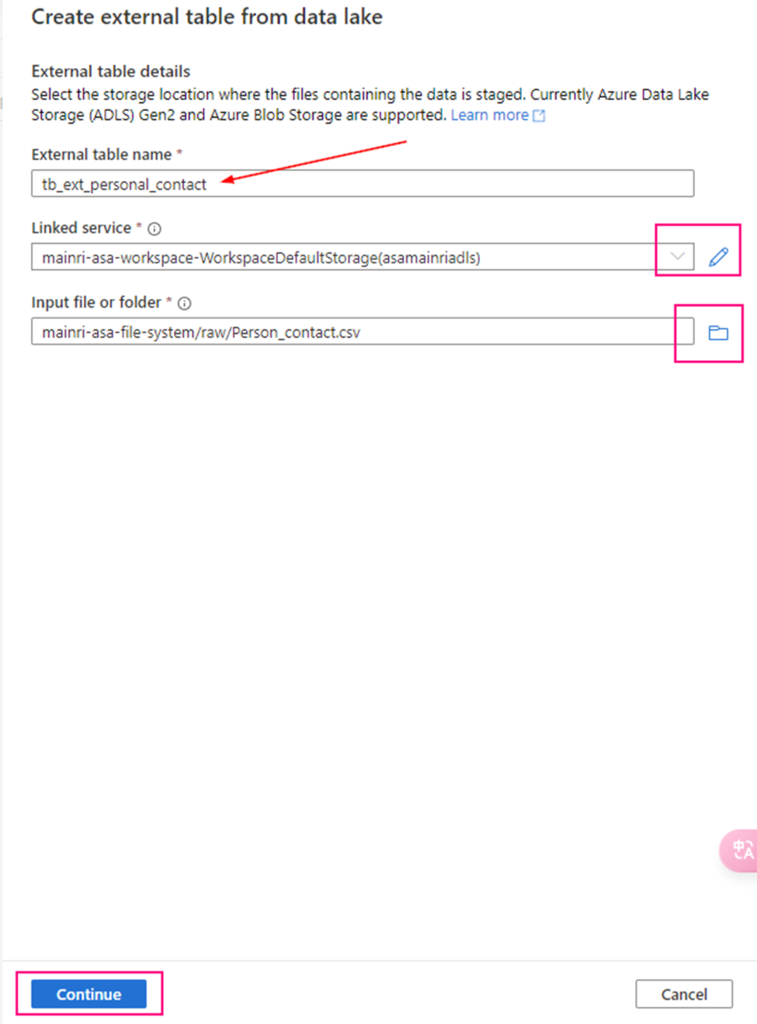
fill in the detail information:
Continue to configure the table properyies
Adjust Table properties
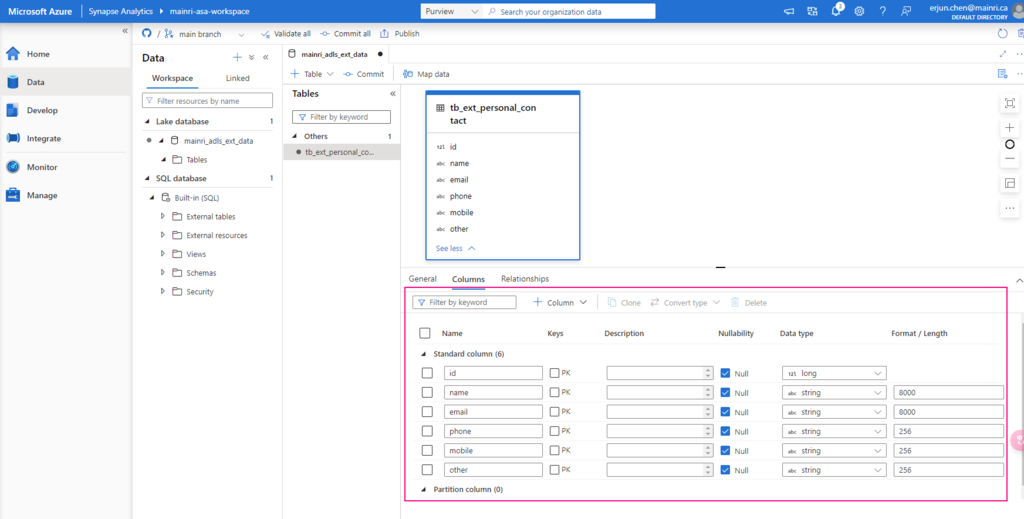
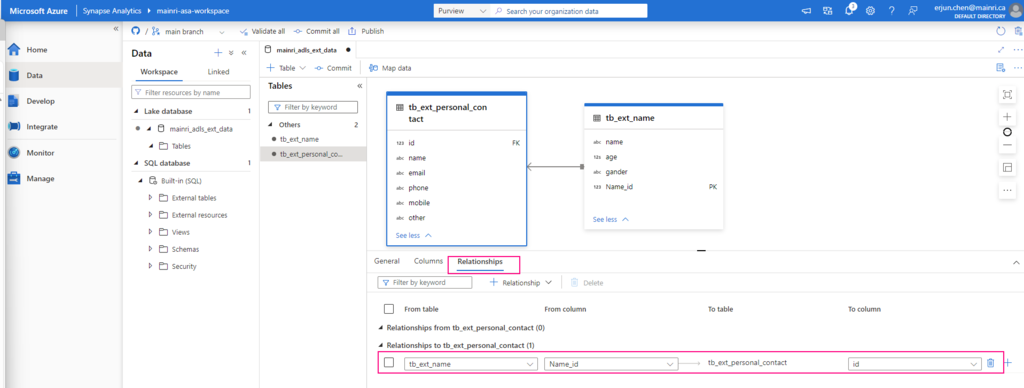
Adjust column other properties, or add even more columns, such as data type, description, Nullability, Primary Key, set up partition create relationship …… etc.
Repeat the above steps to create even more tables to meet your business logic need, or create relationship if need.
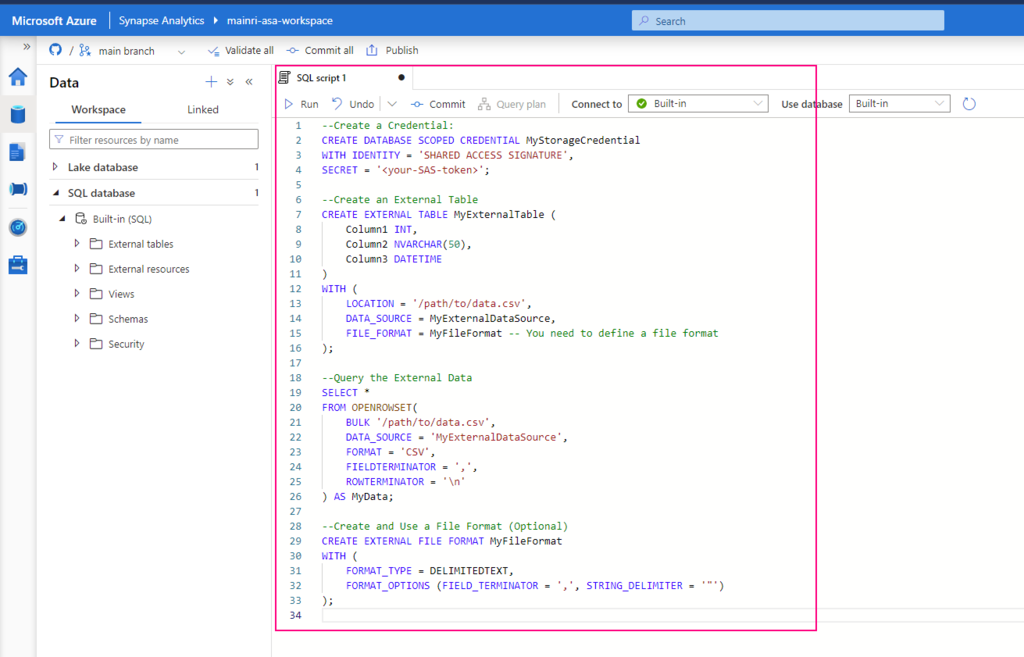
Script to create an External Data Source
Step 1:
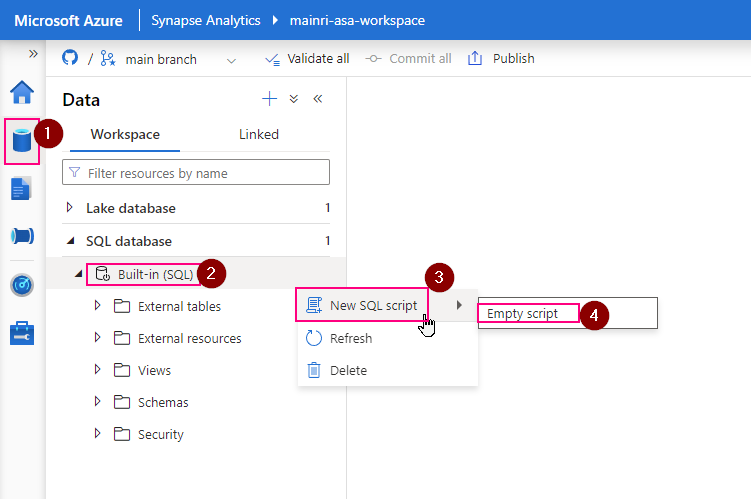
1. Connect to Serverless SQL Pool:
Open Synapse Studio, go to the “Data” hub, and connect to your serverless SQL pool.
2. Create the External Data Source:
Use the following T-SQL script to create an external data source that points to your Azure Data Lake Storage (ADLS) or Blob Storage:
CREATE EXTERNAL DATA SOURCE MyExternalDataSource WITH ( LOCATION = ‘https://<your-storage-account-name>.dfs.core.windows.net/<your-filesystem-name>‘, CREDENTIAL = <your-credential-name> );
Replace <your-storage-account-name>, <your-filesystem-name>, and <your-credential-name> with the appropriate values:
LOCATION: The URL of your Azure Data Lake Storage (ADLS) or Blob Storage.
CREDENTIAL: The name of the database credential used to access the storage. (You may need to create this credential if it doesn’t already exist.)
Step 2:
If you don’t have a credential yet, create one as follows:
Replace <your-SAS-token> with your Azure Storage Shared Access Signature (SAS) token.
2. Create an External Table or Query the External Data
After setting up the external data source, you can create external tables or directly query data:
Create an External Table:
You can create an external table that maps to the data in your external storage:
CREATE EXTERNAL TABLE MyExternalTable ( Column1 INT, Column2 NVARCHAR(50), Column3 DATETIME ) WITH ( LOCATION = ‘/path/to/data.csv’, DATA_SOURCE = MyExternalDataSource, FILE_FORMAT = MyFileFormat — You need to define a file format );
Query the External Data
You can also directly query the data without creating an external table:
SELECT * FROM OPENROWSET( BULK ‘/path/to/data.csv’, DATA_SOURCE = ‘MyExternalDataSource’, FORMAT = ‘CSV’, FIELDTERMINATOR = ‘,’, ROWTERMINATOR = ‘\n’ ) AS MyData;
Create and Use a File Format (Optional)
If you are querying structured files (like CSV, Parquet), you might need to define a file format:
CREATE EXTERNAL FILE FORMAT MyFileFormat WITH ( FORMAT_TYPE = DELIMITEDTEXT, FORMAT_OPTIONS (FIELD_TERMINATOR = ‘,’, STRING_DELIMITER = ‘”‘) );
Summary
By following these steps, you should be able to connect to and query your external data sources using the serverless SQL pool in Synapse. Let me know if you need further assistance!
Create an external data source in Synapse serverless SQL to point to your external storage.
Create a database scoped credential if necessary to access your storage.
Create an external table or directly query data using OPENROWSET.
Define a file format if working with structured data like CSV or Parquet.
Please do not hesitate to contact me if you have any questions at William . chen @ mainri.ca
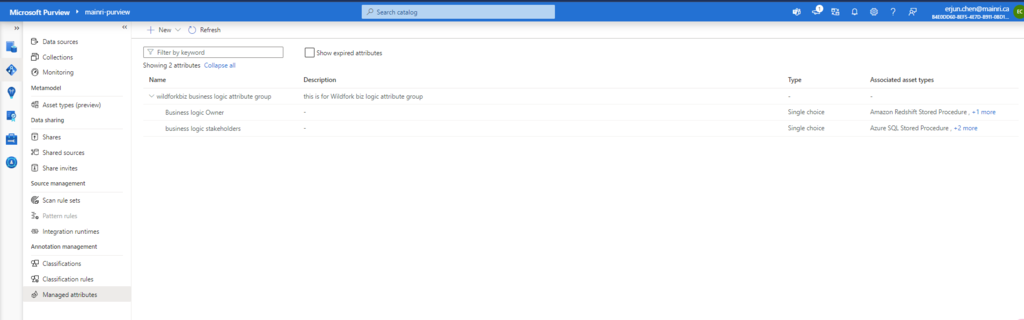
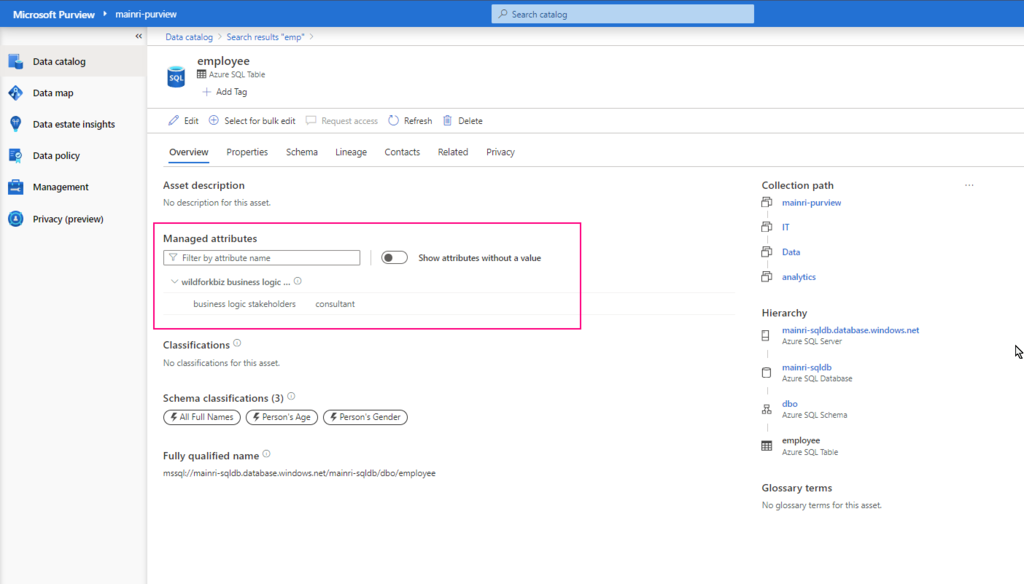
With “Managed Attributes” we can add own attributes (groups of attributes) and provide data stewards with the functionality to improve the content of data catalog.
create a new attribute group
create a new attribute
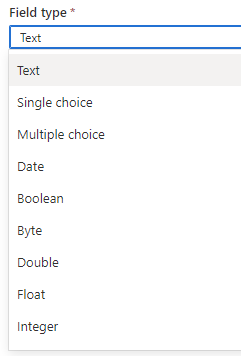
learn more about the available field types
assign and manage attributes for your data assets
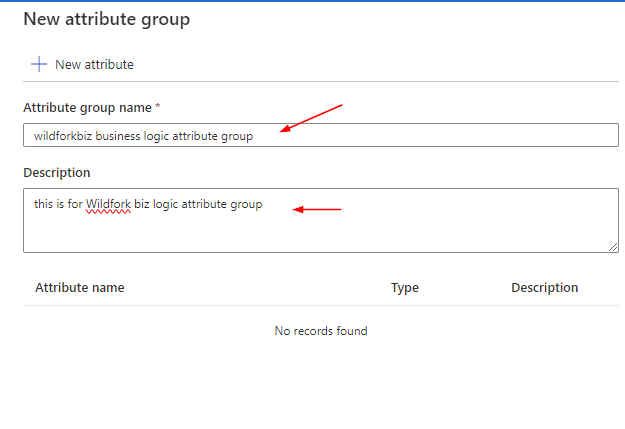
Create a new attribute group
Create attribute group if there is no attribute group
Purview studio > Data Map > Managed attributes > New attribute group
Fill in
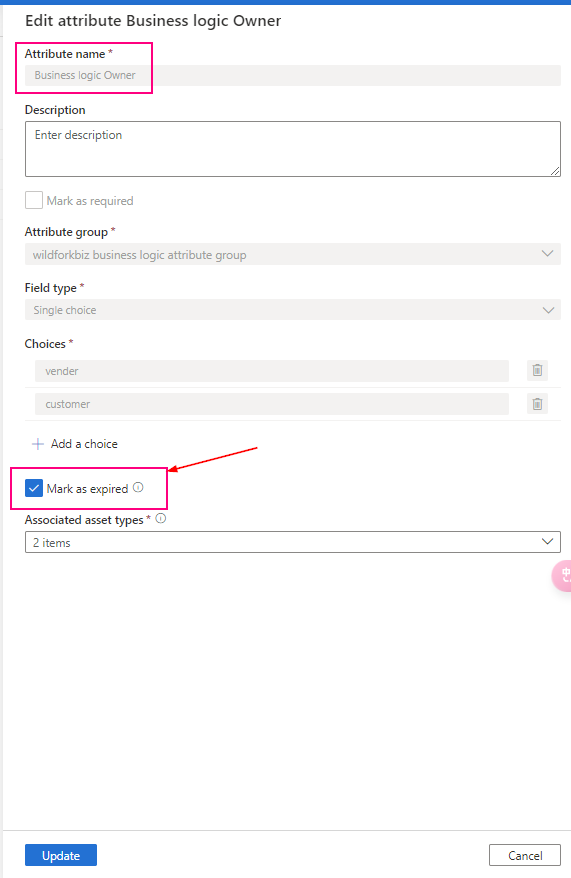
Create a new attribute
File in those fields For field group: There are those can be selected
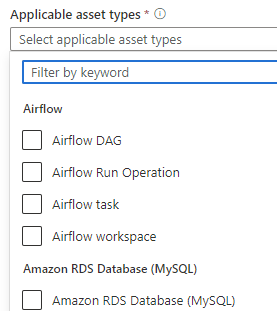
For applicable asset types, many options out of box to be used
Now, new attributes created
In the managed attribute management experience, managed attributes can’t be deleted, only expired. Expired attributes can’t be applied to any assets and are, by default, hidden in the user experience. Once an attribute created, it cannot change. Only mark them as “expired” and create a new, undated one.
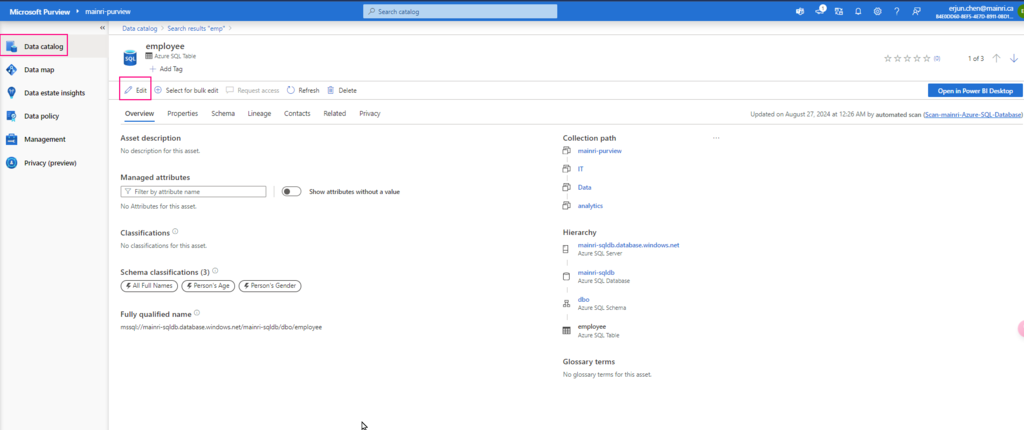
Add value for managed attribute
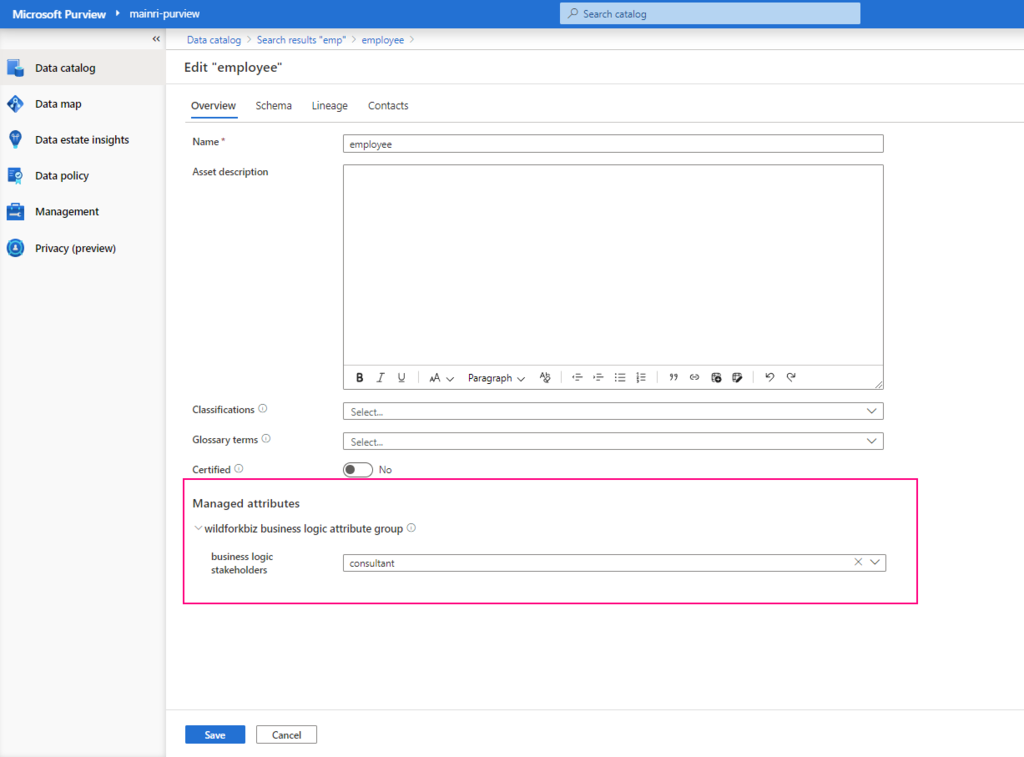
Once a managed attribute has been created, you’ll need to add a value for each of your assets. You can add values to your assets by:
Search for your data asset in the Microsoft Purview Data Catalog
On the overview for your asset, you should see the managed attributes section with all attributes that have values. (You can see attributes without values by using the Show attributes without a value toggle.)
Select the Edit button.
Under Managed attributes, add values for each of your attributes.
If any attributes are Required you will not be able to save until you’ve added a value for that attribute.
Now, managed attribute added
Summary
Managed attribute: A set of user-defined attributes that provide a business or organization level context to an asset. A managed attribute has a name and a value. For example, ‘Department’ is an attribute name and ‘Finance’ is its value. Attribute group: A grouping of managed attributes that allow for easier organization and consumption.
Please do not hesitate to contact me if you have any questions at William . chen @ mainri.ca
(remove all space from the email account 😊)
Next step: Day 10 – Collections access control and management