Previously, we’ve talked about how Purview connect to ADLS and SQL Database, scan in Purview. Today, we focused on Azure Synapse Analytics with Purview.
A comprehensive data analytics solution can include many folders and files in a data lake, and multiple databases that each contain many tables, each with multiple fields. For a data analyst, finding and understanding the data assets associated with a Synapse Analytics workspace can present a significant challenge before any analysis or reporting can even begin.
As we know the Azure Synapse Analytics is a platform for cloud-scale analytics workloads that process data in multiple sources; including:
- Relational databases in serverless and dedicated SQL pools
- Files in Azure Data Lake Storage Gen2
Microsoft Purview can help in this scenario by cataloging the data assets in a data map, and enabling data stewards to add metadata, categorization, subject matter contact details, and other information that helps data analysts identify and understand data.
Before you scan Synapse workspace, you need Azure Synapse Analytics connects Purview account.
Azure Synapse Analytics connects to Purview account.
Synapse Studio > Manage > External connection > Microsoft Purview
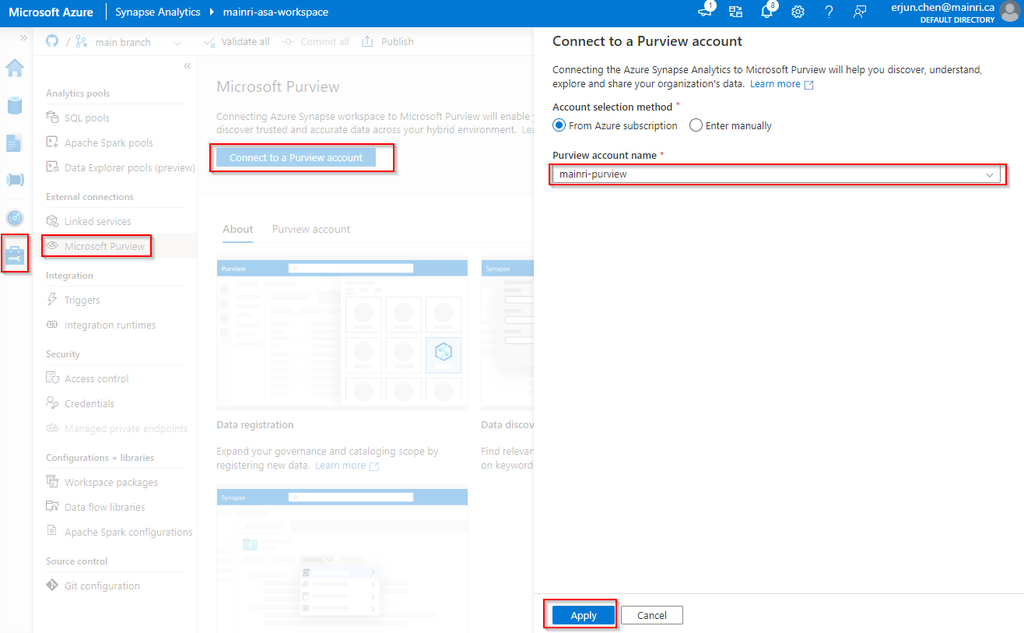
after you click “apply” you will see:
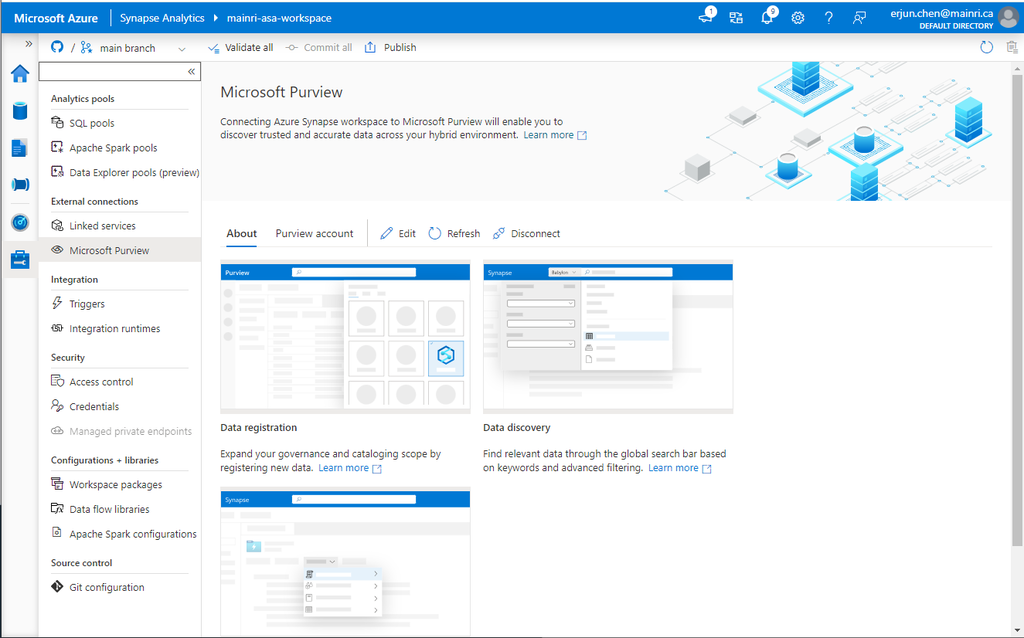
Select “Purview account” tag

Successfully connected with Purview.
To validation, we check what we have in ADLS and SQL Database.
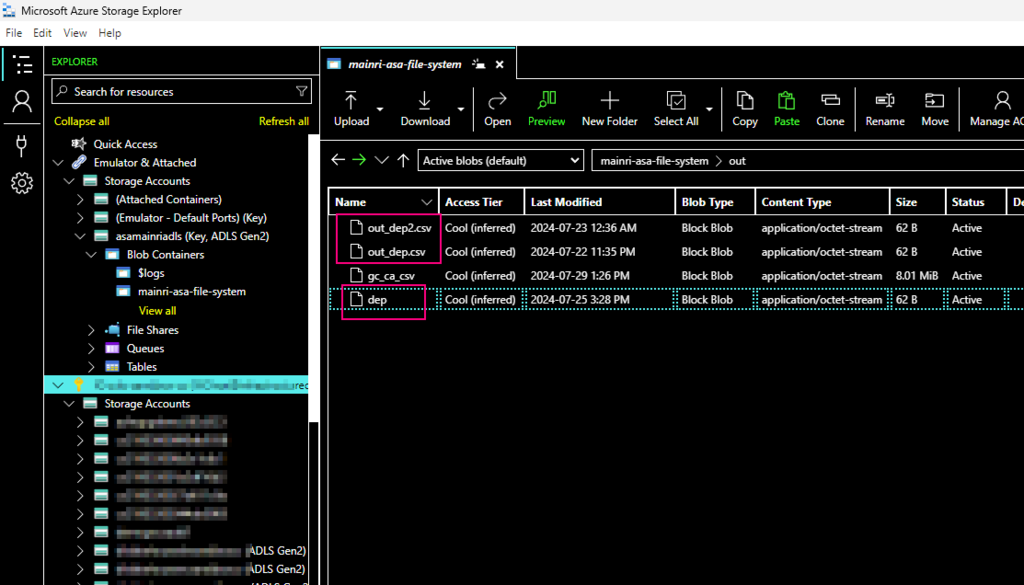
We have in ADLS and Azure SQL Database. There are one table called “dep” in the SQL Database, 3 files in the ADLS.
There is one table in SQL Database:

and there are 3 file related the key word “dep” in ADLS,
using Azure Storage Explore:
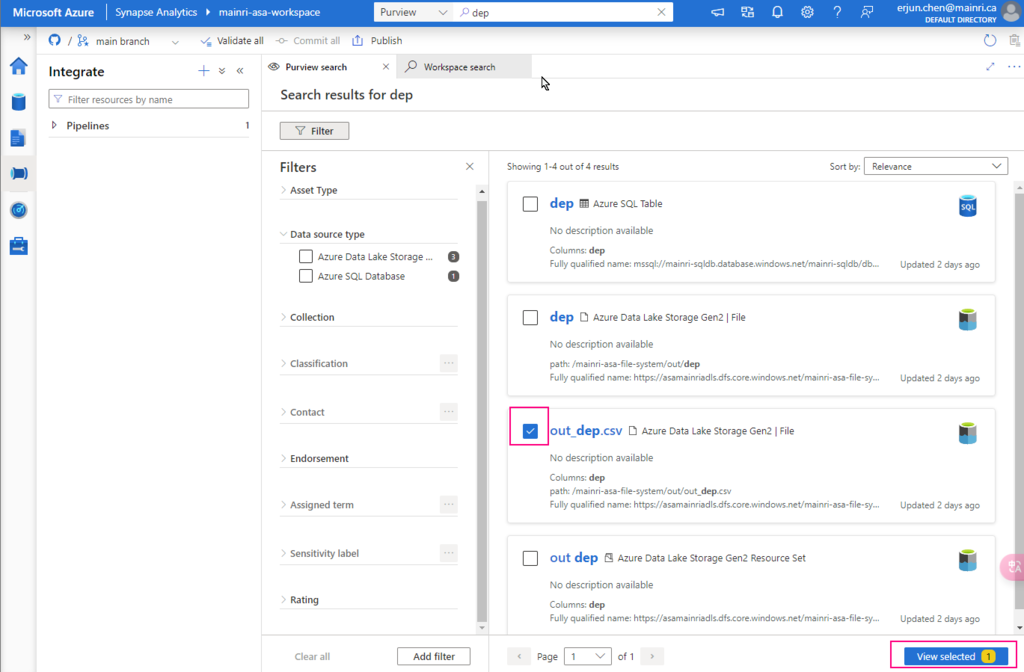
Let’s search “dep” the key from Synapse Studio.
Synapse Studio > from the dropdown > select “Purview” > type “dep”
We find out the objects related to the key words – “dep”
A table in SQL Database, 3 files in ADLS.

Great, we successfully connected to Purview.
choose either of them to view in detail


There are so many powerful and interesting functions regarding the “Searching”, “discovering”, we will talk about them late.
Now, let’s switch to Purview studio.
Register Synapse Analytics Workspace
Assuming you have created Collects, we directly jump into register Azure Synapse Analytics Workspace (ASA).
Purview Studio > Data Map > Data Source
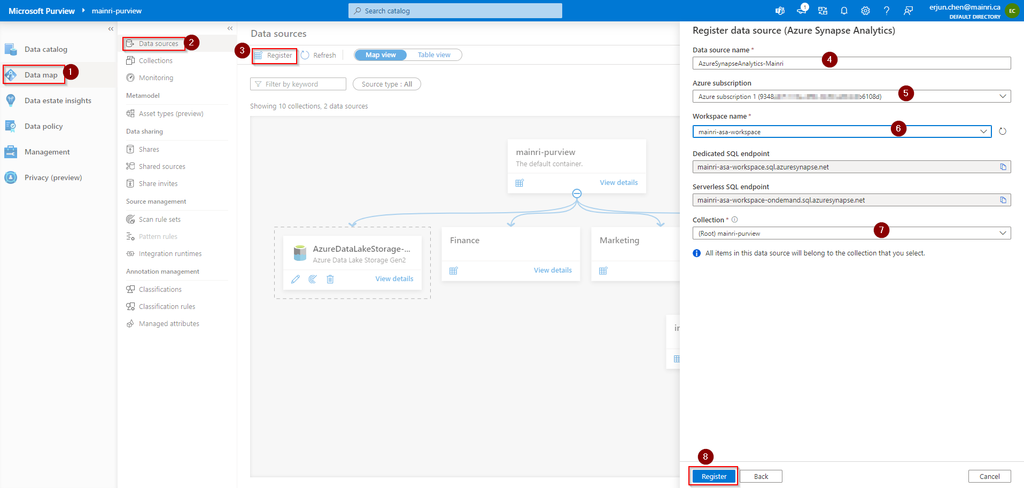
After filling in above values, click “register”, you will this
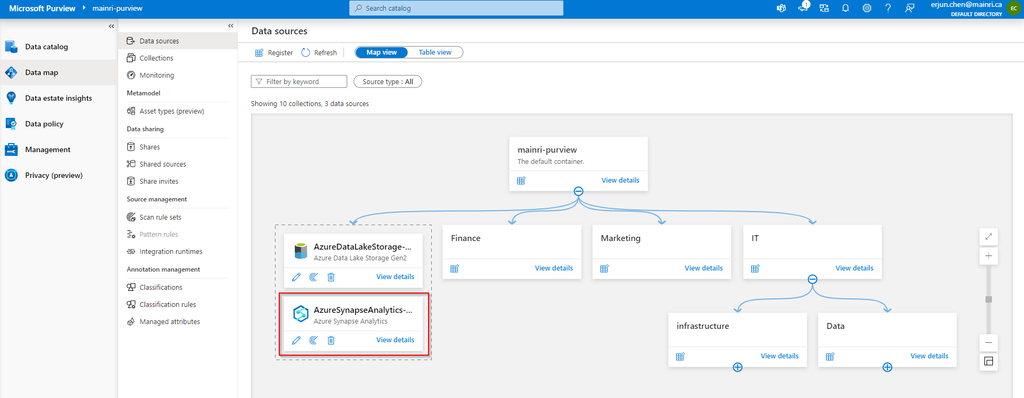
After registering the sources where your data assets are stored, you can scan each source to catalog the assets it contains. You can scan each source interactively, and you can schedule period scans to keep the data map up to date.
You may or may not see this error or alerts:

Read:
“Failed to load serverless databases from Synapse workspace, please give the managed identity of the Microsoft Purview account permissions or apply the correct credential to enumerate serverless databases.”
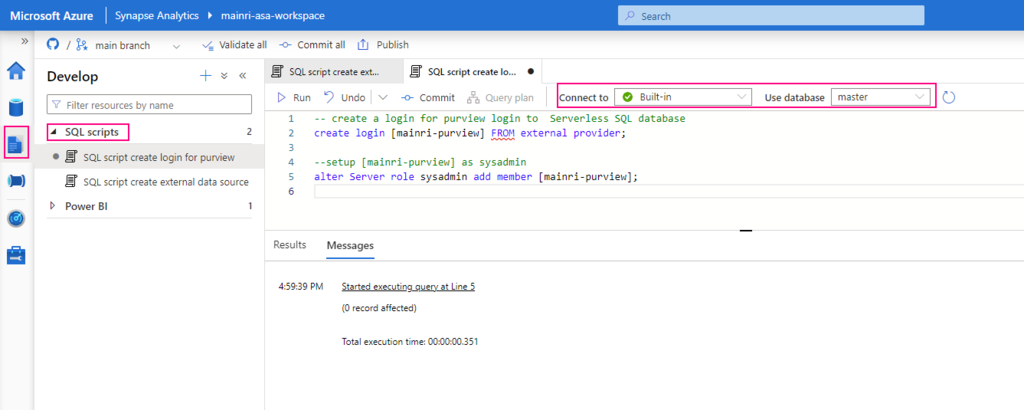
If you see it, you need create a login account for purview account to connect Serverless SQL:
Create Serverless SQL database login account for Purview
— create a login for purview login to Serverless SQL database
create login [mainri-purview] from external provider;
Synapse Studio > Develop > SQL Script >
select: “connect to Built-in” and use database “master”
Grant purview login account Sysadmin privilege
Add managed identity to the storage account
Then, add managed identity to the storage account.
From Azure portal > storage account > Access Control (IAM)
Select Role assignments tag
Add role assignments
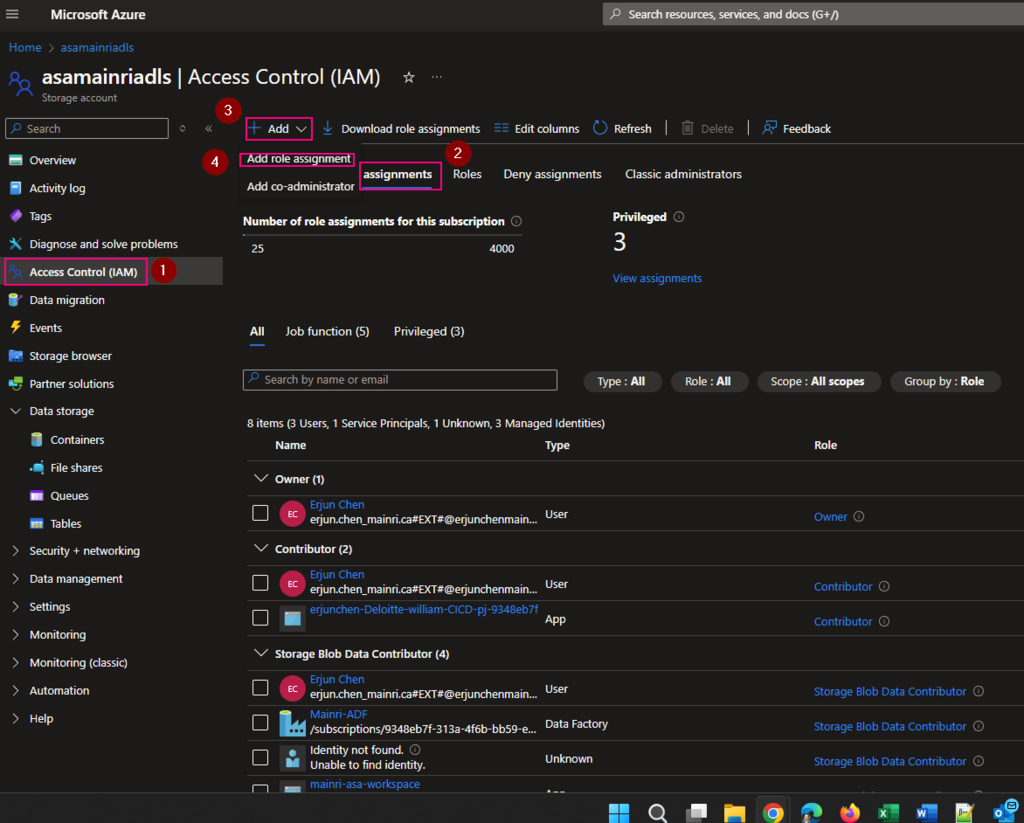
Give the “Storage Account Contributor” role
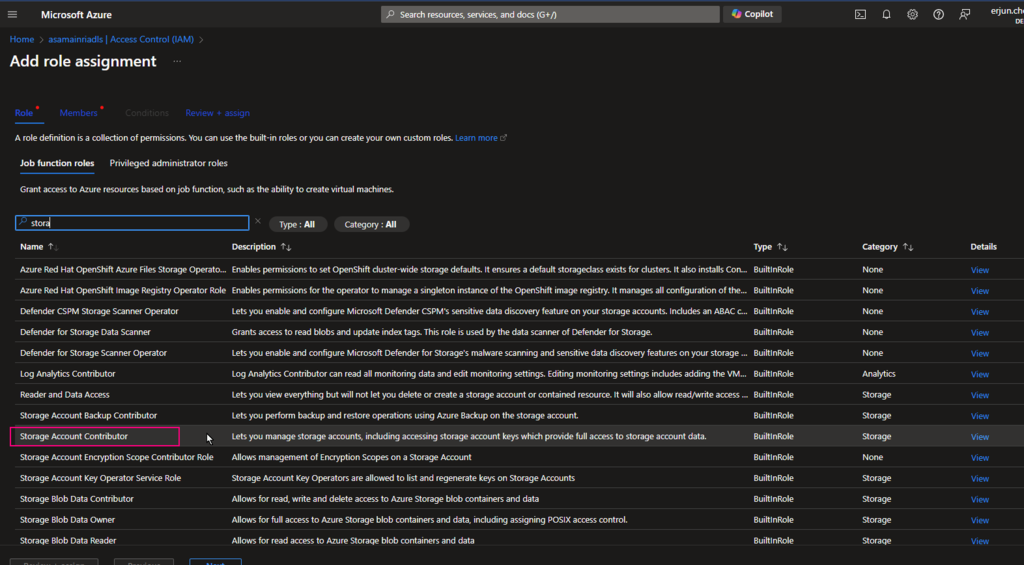
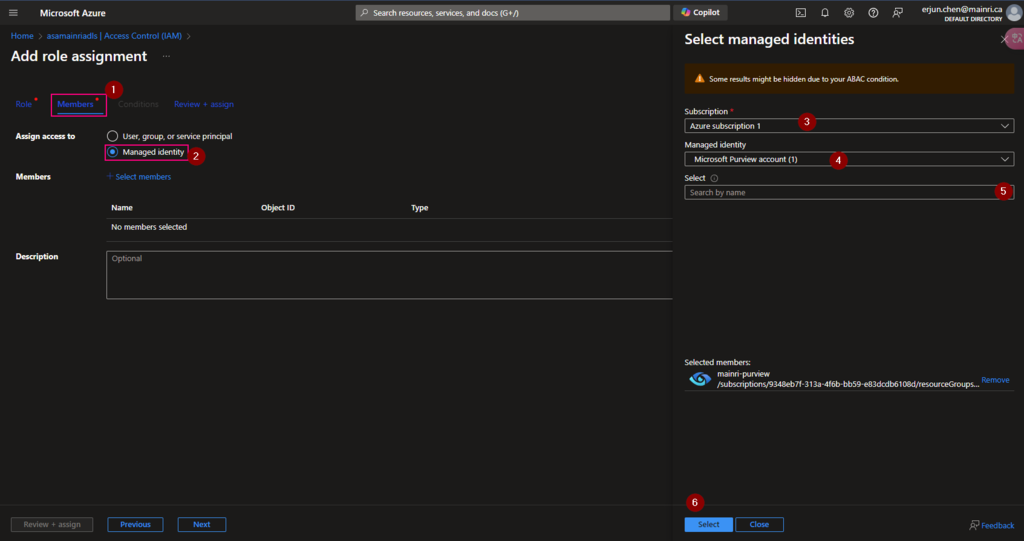
Then, select “Member” tag:
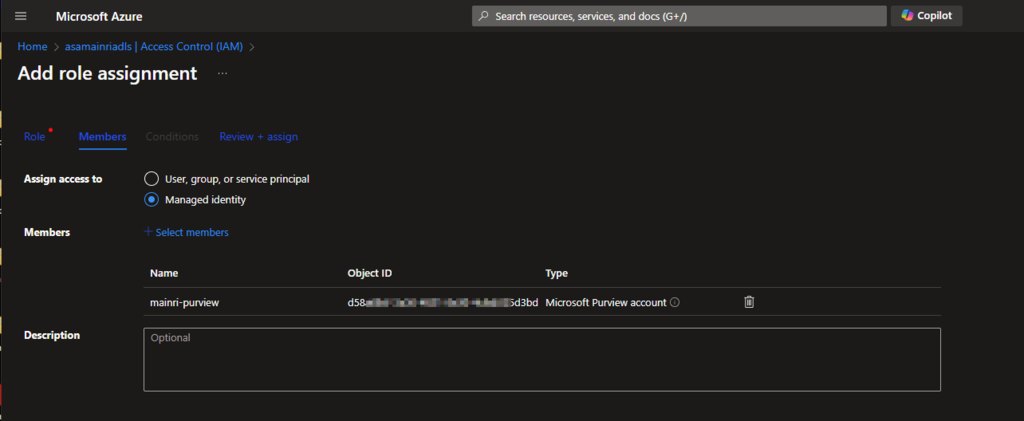
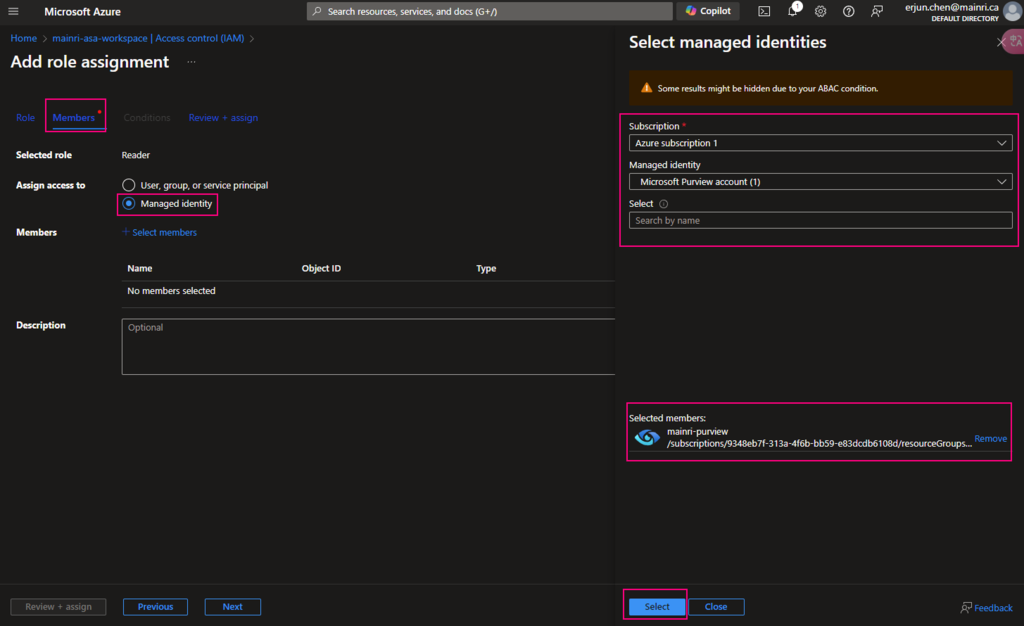
Select “Managed Identity”, fill in all properties, Find out the purview account
Now, the role assignments added.
If you have dedicated SQL pool, we need repeat these.
- Create Serverless SQL database login account for Purview
- Grant purview login account Sysadmin privilege
Let’s test the connection
From Purview studio > scan

we got failed alert.

“Failed to validate the resource expansion. Either the expandable resource has no resources or the Purview account’s MSI has not been assigned to the ‘Reader’ role on it.”
Go back to Synapse portal
Azure Portal > Synapse workspace > Access control (IAM) > Add role assignments
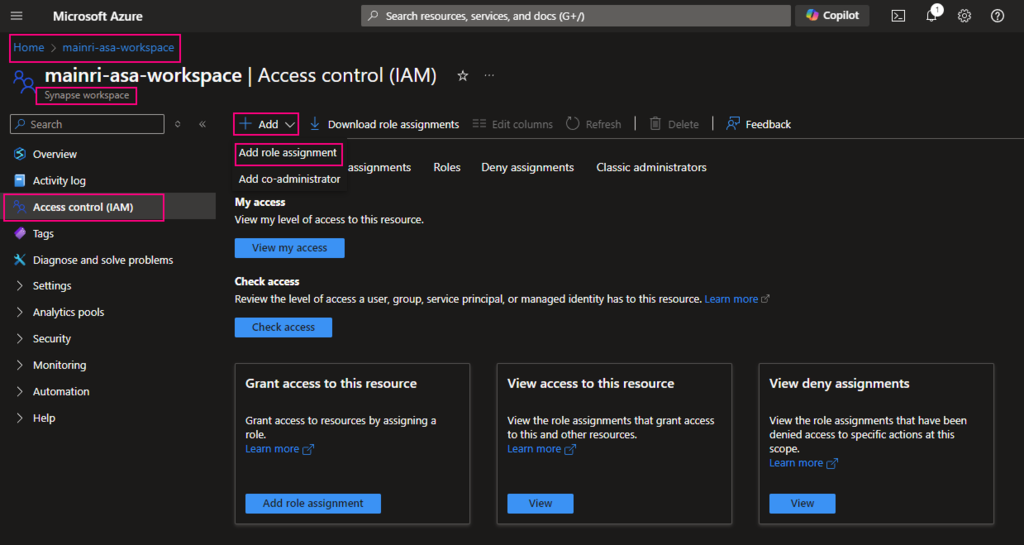
add “read” role
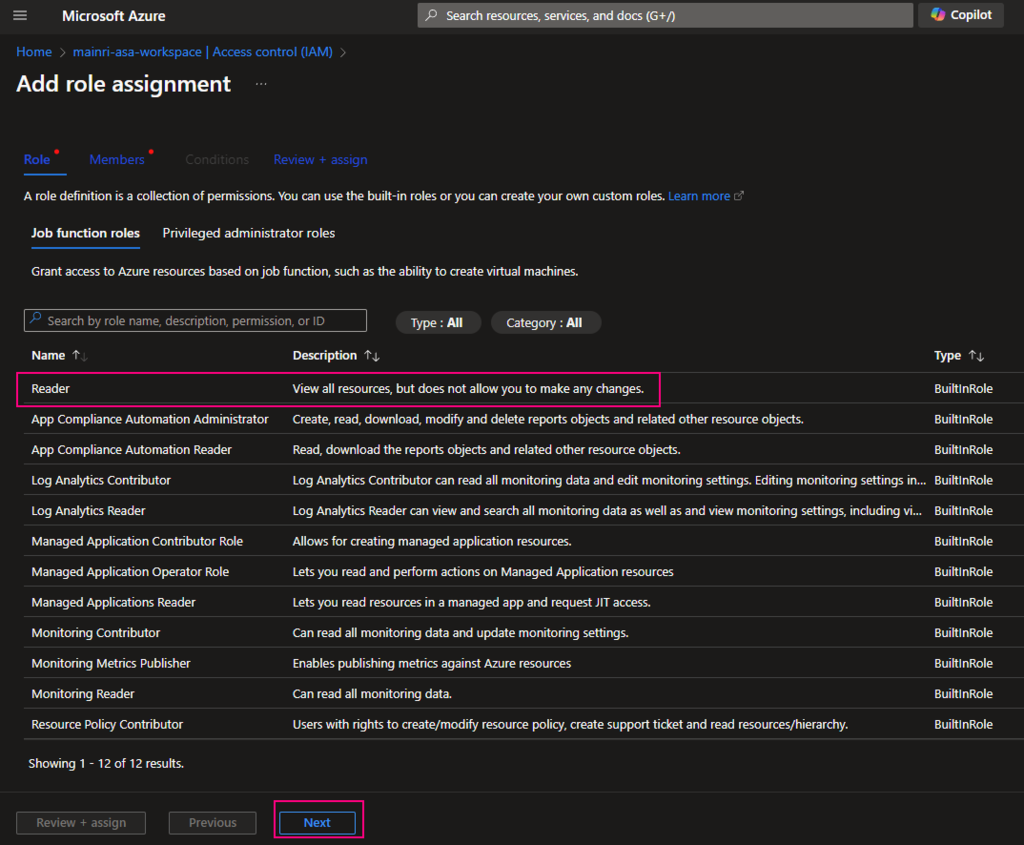
Add “managed Identity” member – Purview
Check Purview access,
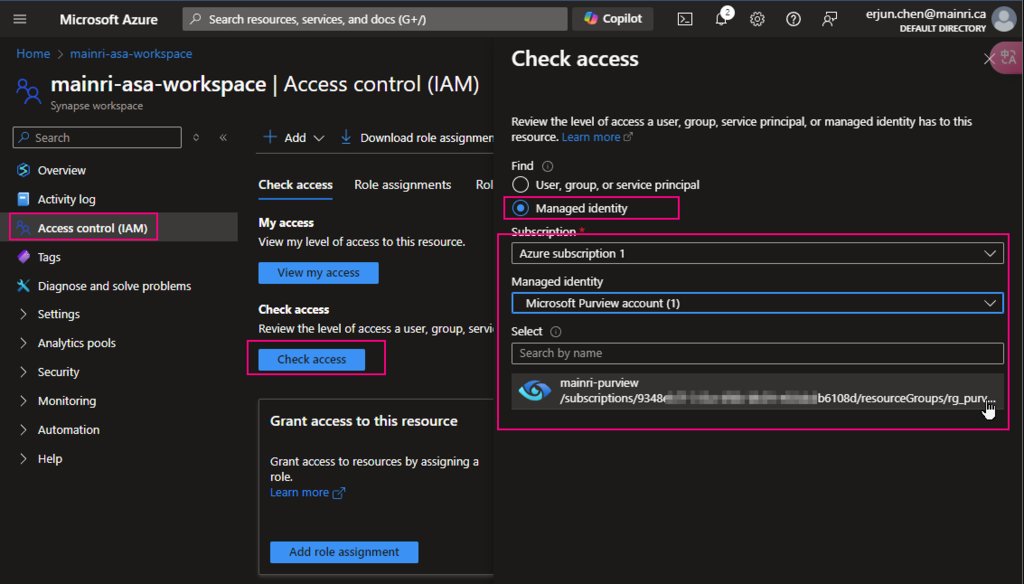
we can see Mainri-purview assignments – mainri-asa-workspace has “read” role (my Synapse workspace named “mainri-asa-workspace”)

Go to Purview Studio test connection again.
Great! We successful connect to Synapse workspace.
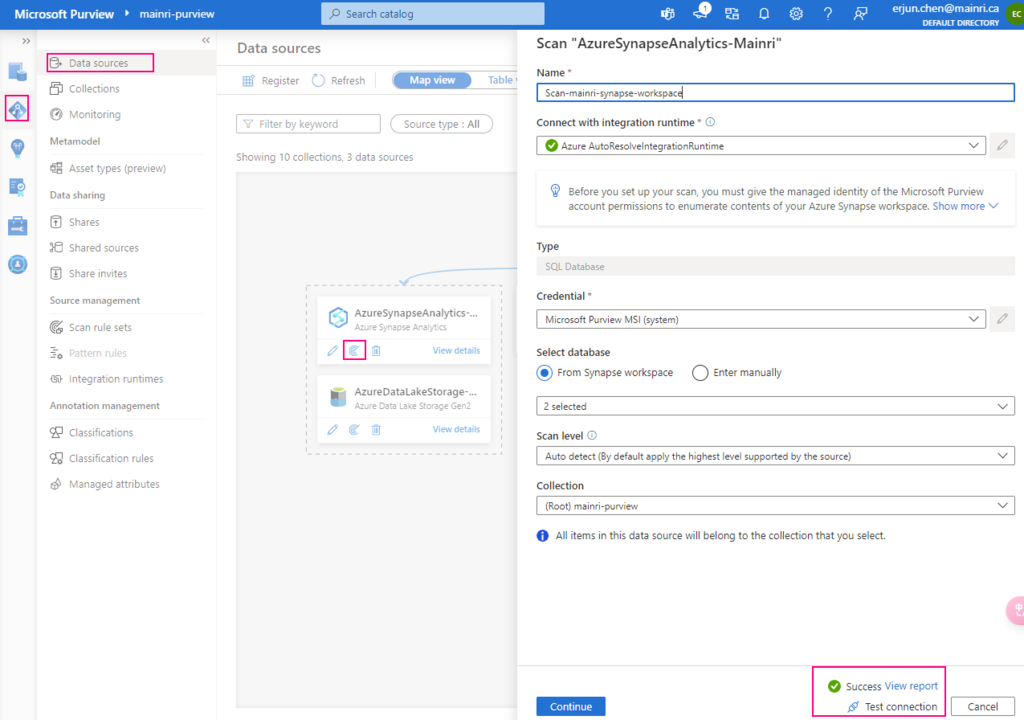
We have gotten access to SQL; we’ve got access to storage account. we have add “read” role assignment to Purview
Alright, we are ready to go – scan.
Scan Synapse workspace
After registering the sources where your data assets are stored, you can scan each source to catalog the assets it contains. You can scan each source interactively, and you can schedule period scans to keep the data map up to date.
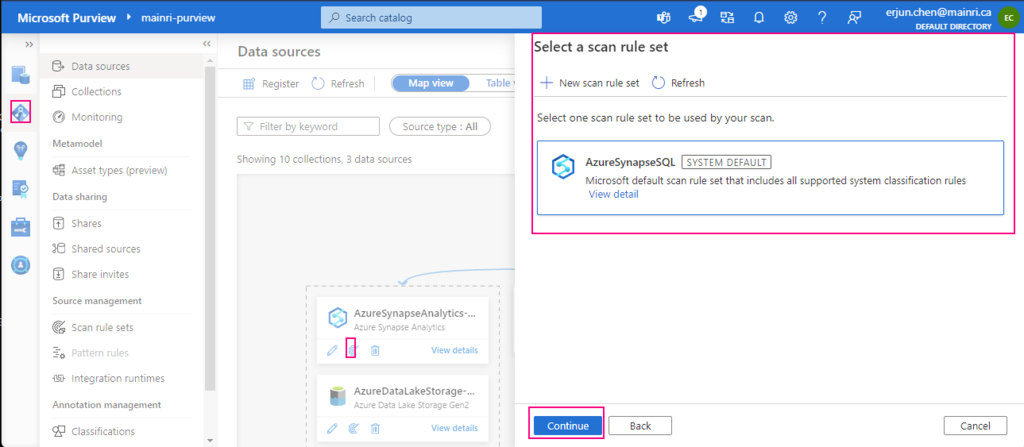
Select a scan rule set
If you like, you are able to add even more new scan rule set at this step.
For this demonstration, we select default scan rule set.
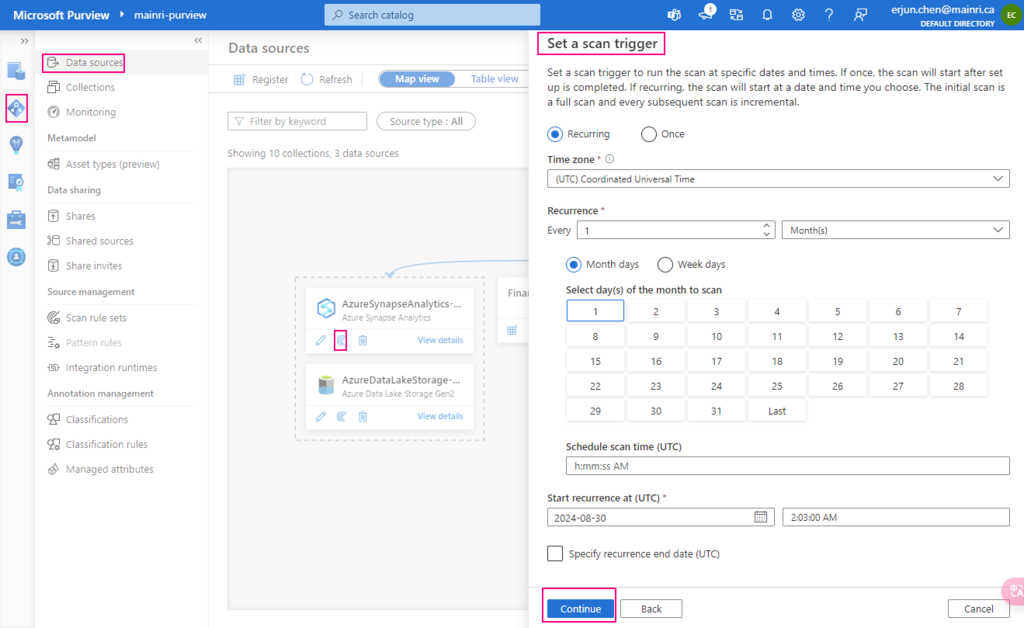
Set a scan trigger
We ca either scan once or schedule and recurring scan on schedule.
Monitoring the scan progress ….

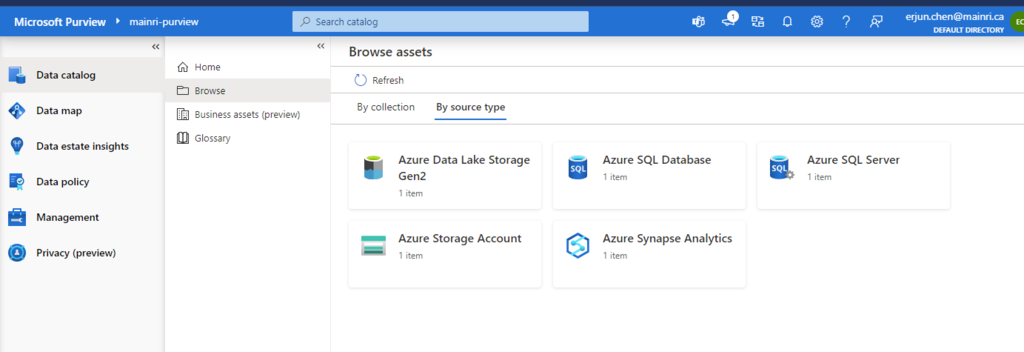
Once the process done, we will see this:

Alright, we have done the Purview for scanning Azure Synapse Workspace. Now, we have those source in our Azure purview.
Next step: Day 7 – Day 7: Permission and Roles, Business Glossary and Collections Access Control in Purview
Please do not hesitate to contact me if you have any questions at William . chen @ mainri.ca
(remove all space from the email account 😊)

