dbutls: notebook run(), exit() and pass parameters

In Databricks, dbutils.notebook provides a set of utilities that allow you to interact with notebooks programmatically. This includes running other notebooks, exiting a notebook with a result, and managing notebook workflows.

Parent Notebook pass parameters to child notebook

run()

dbutils.notebook.run()

run(path: String, timeoutSeconds: int, arguments: Map): String -> This method runs a notebook and returns its exit value

The dbutils.notebook.run() function allows you to run another notebook from your current notebook. It also allows you to pass parameters to the called child notebook and capture the result of the execution.

  • notebook_path: The path to the notebook you want to run. This can be a relative or absolute path.
  • timeout_seconds: How long to wait before timing out. If the notebook does not complete within this time, an error will occur.

    In other words, if the notebook completes before the timeout, it proceeds as normal, returning the result. However, if the notebook exceeds the specified timeout duration, the notebook run is terminated, and an error is raised.

  • arguments: A dictionary of parameters to pass to the called notebook. The called notebook can access these parameters via dbutils.widgets.get().
Parent notebooks
# Define parameters to pass to the child notebook
params = {
  "param1": "value1",
  "param2": "value2"
}


# Run the child notebook and capture its result

result =
dbutils.notebook.run("/Users/your-email@domain.com/child_notebook",
60, params)

 
# Print the result returned from the child notebook

print(f"Child notebook result:
{result}")


Parent notebook calls/runs his child notebook in python only, cannot use SQL

In the child notebook, you can retrieve the passed parameters using dbutils.widgets.get():

Child notebook
param1 = dbutils.widgets.get("param1")
param2 = dbutils.widgets.get("param2")

print(f"Received param1: {param1}")
print(f"Received param2: {param2}")

#SQL

— Use the widget values in a query
SELECT * FROM my_table WHERE column1 = ‘${getArgument(‘param1′)}’ AND column2 = ‘${getArgument(‘param2′)}’;

Child notebook returns values to parent notebook

When parent notebook run/call a child notebook using dbutils.notebook.run(), the child notebook can return a single value (usually a string) using dbutils.notebook.exit() return value to parent notebook. The parent notebook can capture this return value for further processing.

Key Points:

  • The value returned by dbutils.notebook.exit() must be a string.
  • The parent notebook captures this return value when calling dbutils.notebook.run().

exit()

dbutils.notebook.help() get help.

dbutils.notebook.exit(value: String): void 

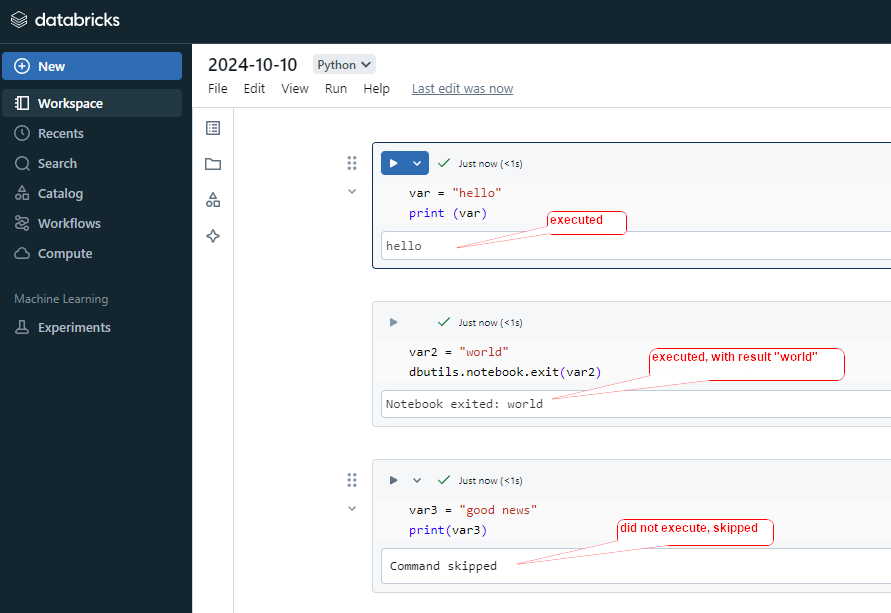
dbutils.notebook.exit() Exit a notebook with a result.

The dbutils.notebook.exit() function is used to terminate the execution of a notebook and return a value to the calling notebook.

After this executed, all below cells commend will skipped, will not execute.

#cell1
var = "hello"
print (var)

#cell2
var2 = "world"
dbutils.notebook.exit(var2)

#cell3
var3 = "good news"
print(var3)

Parent notebook uses child notebook returned value

Parent Notebook
#parent notebook
# Call the child notebook and pass any necessary parameters 
result = dbutils.notebook.run("/Notebooks/child_notebook", 60, {"param1": "some_value"})

#use the child notebook returned value 
print(f"I use the Returned result: {result}")


# Use the result for further logic 
if result == "Success": 
     print("The child notebook completed successfully!") 
else: 
     print("The child notebook encountered an issue.")

child Notebook
#child Notebook
# Simulate some processing (e.g., a query result or a status) 
result_value = "Success" 

# Return the result to the parent notebook 
dbutils.notebook.exit(result_value)

Handling Complex Return Values

Since dbutils.notebook.exit() only returns a string, if you need to return a more complex object (like a dictionary or a list), you need to serialize it to a string format (like JSON) and then deserialize it in the parent notebook.

Child Notebook:

import json

# Simulate a complex return value (a dictionary)
result = {"status": "Success", "rows_processed": 1234}

# Convert the dictionary to a JSON string and exit
dbutils.notebook.exit(json.dumps(result))

Parent Notebook:

import json

# Run the child notebook
result_str = dbutils.notebook.run("/Notebooks/child_notebook", 60, {"param1": "some_value"})

# Convert the returned JSON string back into a dictionary
result = json.loads(result_str)

# Use the values from the result
print(f"Status: {result['status']}")
print(f"Rows Processed: {result['rows_processed']}")

Summary:

  • You can call child notebooks from a parent notebook using Python (dbutils.notebook.run()), but not with SQL directly.
  • You can pass parameters using widgets in the child notebook.
  • Python recommend to use dbutils.get(“parameterName”), still can use getArgument(“parameterName”)
  • SQL use getArgument(“parameterName”) in child notebook only.
  • Results can be returned to the parent notebook using dbutils.notebook.exit().

Please do not hesitate to contact me if you have any questions at William . chen @ mainri.ca

(remove all space from the email account 😊)

delta: Schema Evolution

Schema Evolution in Databricks refers to the ability to automatically adapt and manage changes in the structure (schema) of a Delta Lake table over time. It allows users to modify the schema of an existing table (e.g., adding or updating columns) without the need for a complete rewrite of the data.

Key Features of Schema Evolution

  1. Automatic Adaptation: Delta Lake can automatically evolve the schema of a table when new columns are added to the incoming data, or when data types change, if certain configurations are enabled.
  2. Backward and Forward Compatibility: Delta Lake ensures that new data can be written to a table without breaking the existing schema. It also ensures that existing queries remain compatible, even if the schema changes.

Configuration for Schema Evolution

mergeSchema

This option allows you to append new data with a schema that differs from the existing table schema. It merges the new schema into the table.

Usage: Typically used when you are appending data.

Schema Merging: Use mergeSchema only for adding new columns, not for incompatible changes.

When new data has additional columns that aren’t present in the target Delta table, Delta Lake can automatically merge the new schema into the existing table schema.


# Append new data to the Delta table with automatic schema merging

df_new_data.write.format("delta").mode("append").option("mergeSchema", "true").save("/path/to/delta-table")


overwriteSchema

This option is used when you want to completely replace the schema of the table with the schema of the new data.

If you want to replace the entire schema (including removing existing columns), you can use the overwriteSchema option.


# Overwrite the existing Delta table schema with new data

df_new_data.write.format("delta").mode("overwrite").option("overwriteSchema", "true").save("/path/to/delta-table")


Configure spark.databricks.delta.schema.autoMerge

You can configure this setting at the following levels:

Usage: Typically used when you are overwriting data

  • Session Level (applies to a specific session or job)
  • Cluster Level (applies to all jobs on the cluster)

Session-Level Configuration (Spark session level)

Once this is enabled, all write and merge operations in the session will automatically allow schema evolution.


# Enable auto schema merging for the session

spark.conf.set("spark.databricks.delta.schema.autoMerge.enabled", "true")

Cluster-Level Configuration

This enables automatic schema merging for all operations on the cluster without needing to set it in each job.

  1. Go to your Databricks Workspace.
  2. Navigate to Clusters and select your cluster.
  3. Go to the Configuration tab.
  4. Under Spark Config, add the following configuration:
    spark.databricks.delta.schema.autoMerge.enabled true

Please do not hesitate to contact me if you have any questions at William . chen @ mainri.ca

(remove all space from the email account 😊)

Partition in databricks

In Databricks, partitioning is a strategy used to organize and store large datasets into smaller, more manageable chunks based on specific column values. Partitioning can improve query performance and resource management when working with large datasets in Spark, especially in distributed environments like Databricks.

Key Concepts of Partitioning in Databricks

Partitioning in Tables:

When saving a DataFrame as a table or Parquet file in Databricks, you can specify partitioning columns to divide the data into separate directories. Each partition contains a subset of the data based on the values of the partitioning column(s).

Partitioning in DataFrames

Spark partitions data in-memory across nodes in the cluster to parallelize processing. Partitioning helps distribute the workload evenly across the cluster.

Types of Partitioning

Static Partitioning (Manual Partitioning)

When saving or writing data to a file or table, you can manually specify one or more columns to partition the data by. This helps when querying large tables, as Spark can scan only the relevant partitions instead of the entire dataset.

Dynamic Partitioning (Automatic Partitioning)

Spark automatically partitions a DataFrame based on the size of the data and available resources. The number of partitions is determined by Spark’s internal algorithm based on the data’s size and complexity.

Let’s say, there is dataframe

Partitioning in Databricks File System (DBFS)

When writing data to files in Databricks (e.g., Parquet, Delta), you can specify partitioning columns to optimize reads and queries. For example, when you partition by a column, Databricks will store the data in different folders based on that column’s values.


# Example of saving a DataFrame with partitioning
df.write.partitionBy("year", "month").parquet("/mnt/data/name_partitioned")

In this example, the data will be saved in a directory structure like:

/mnt/data/name_partitioned/gender=F
/mnt/data/name_partitioned/gender=M

Partitioning in Delta Tables

In Delta Lake (which is a storage layer on top of Databricks), partitioning is also a best practice to optimize data management and queries. When you define a Delta table, you can specify partitions to enable efficient query pruning, which results in faster reads and reduced I/O.


# Writing a Delta table with partitioning
df.write.format("delta").partitionBy("gender", "age").save("/mnt/delta/partitioned_data")

In this example, the data will be saved in a directory structure like:

/mnt/delta/partitioned_data/gender=F/age=34
/mnt/delta/partitioned_data/gender=F/age=45
/mnt/delta/partitioned_data/gender=M/age=23
/mnt/delta/partitioned_data/gender=M/age=26
/mnt/delta/partitioned_data/gender=M/age=32
/mnt/delta/partitioned_data/gender=M/age=43

Optimizing Spark DataFrame Partitioning

When working with in-memory Spark DataFrames in Databricks, you can manually control the number of partitions to optimize performance.

Repartition

This increases or decreases the number of partitions.
This operation reshuffles the data, redistributing it into a new number of partitions.


df = df.repartition(10)  # repartition into 10 partitions

Coalesce

This reduces the number of partitions without triggering a shuffle operation (which is often more efficient than repartition).
This is a more efficient way to reduce the number of partitions without triggering a shuffle.


df = df.coalesce(5) # reduce partitions to 5

When to Use Partitioning

  • Partitioning works best when you frequently query the data using the columns you’re partitioning by. For example, partitioning by date (e.g., year, month, day) is a common use case when working with time-series data.
  • Don’t over-partition: Too many partitions can lead to small file sizes, which increases the overhead of managing the partitions.

Key Notes

  • Partitioning Cannot Change: If partitioning changes are needed, you must recreate the table.

Summary

  • Partitioning divides data into smaller, more manageable chunks.
  • It improves query performance by allowing Spark to read only relevant data.
  • You can control partitioning when saving DataFrames or Delta tables to optimize storage and query performance.
  • Use repartition() or coalesce() to manage in-memory partitions for better parallelization.
  • Use coalesce() to reduce partitions without shuffling.
  • Use repartition() when you need to rebalance data.

Please do not hesitate to contact me if you have any questions at William . chen @ mainri.ca

(remove all space from the email account 😊)