In the previous article, we discussed Managed Identity, registering ADLS, and scanning it in Azure Purview. In this article, I will focus on scanning an Azure SQL Database, including how to register and scan it in Azure Purview. The process differs from that of ADLS. You will be required to provide Azure SQL Database credentials.
We will learn the best practice of storing the Azure SQL Database credentials in an Azure Key Vault and use that Key Vault in Purview.
Azure Key Vault provides a way to securely store credentials, secrets, and other keys, but your code must authenticate to Key Vault to retrieve them.
We must follow these steps to register and scan Azure SQL Database:
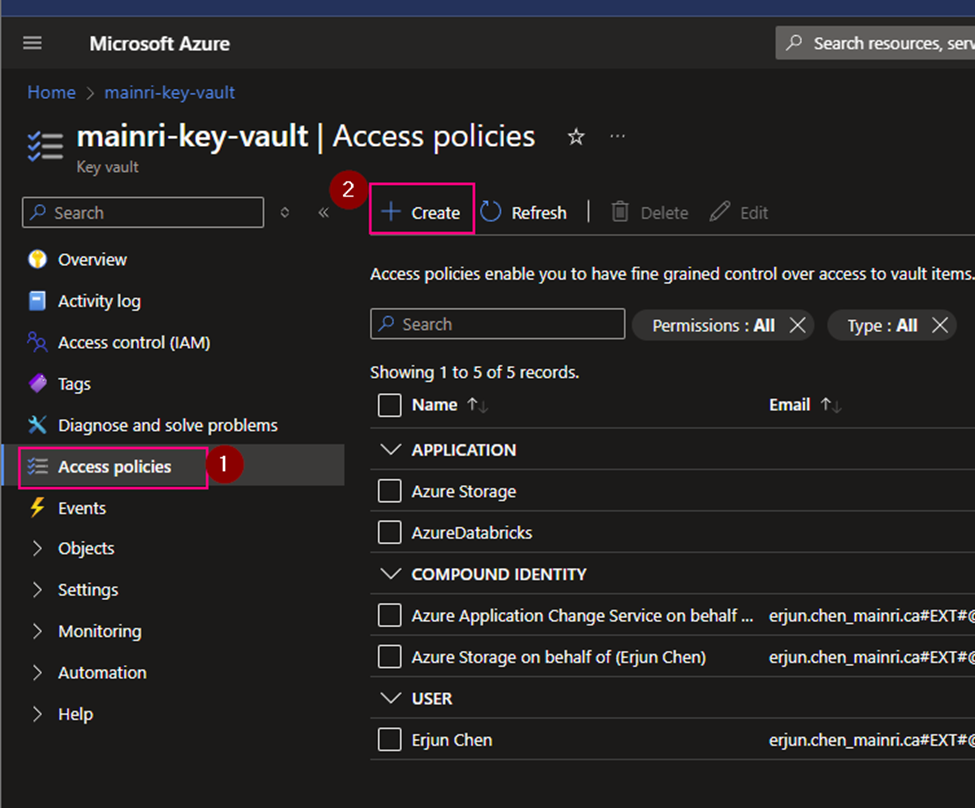
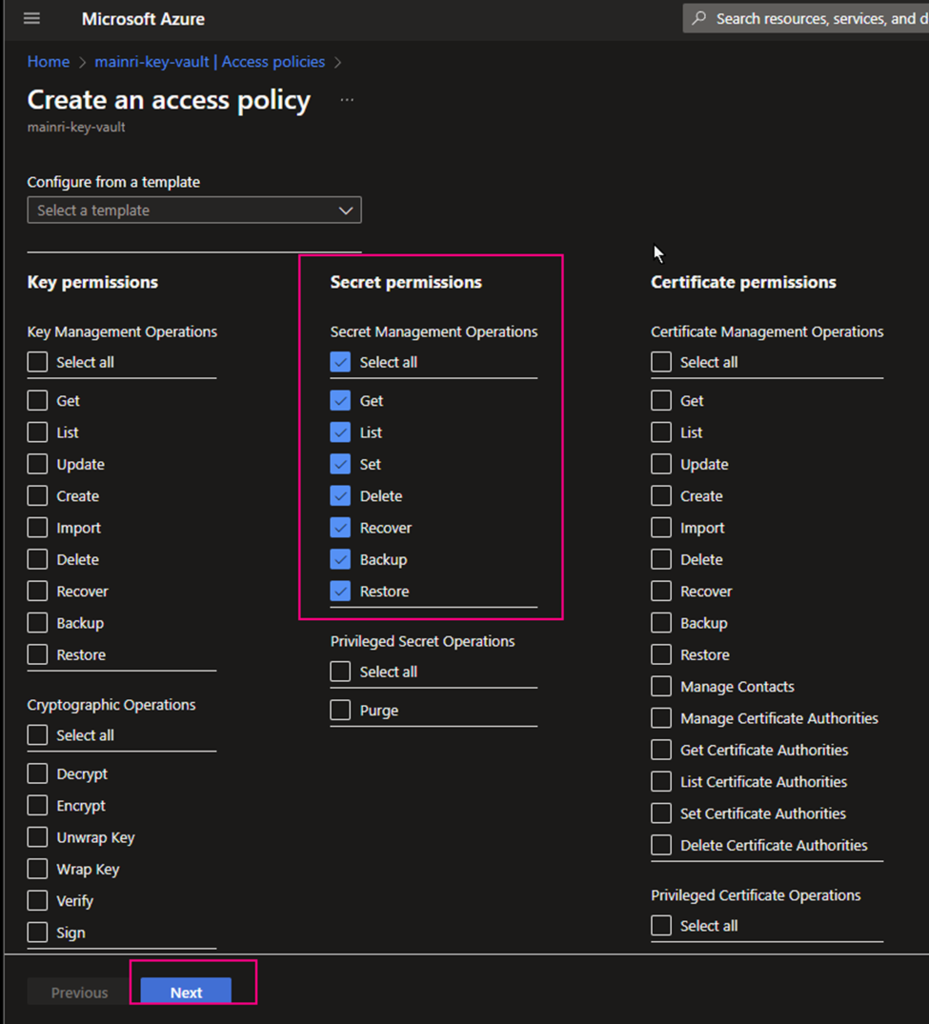
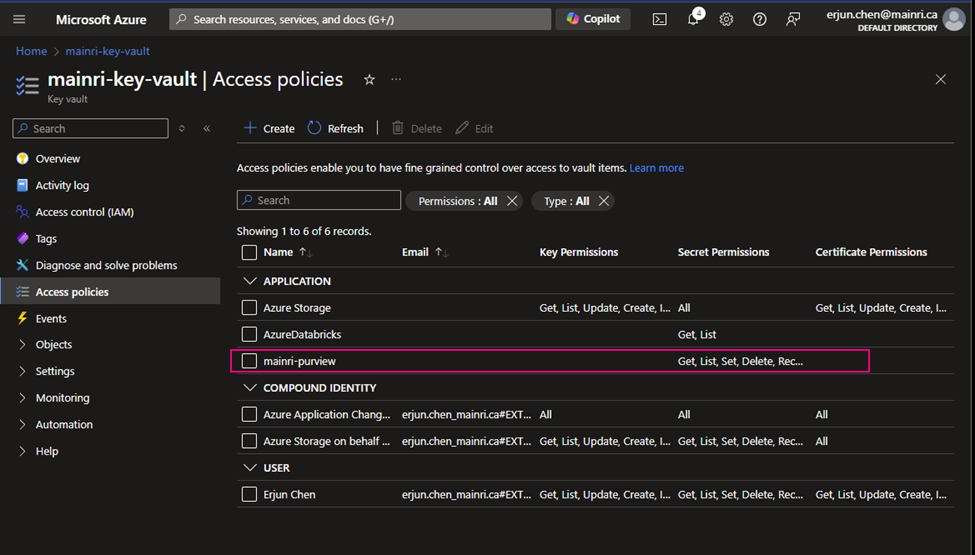
Grant your Azure Account access to Key Vault by adding a new access policy. We will have to grant all the secret permissions.
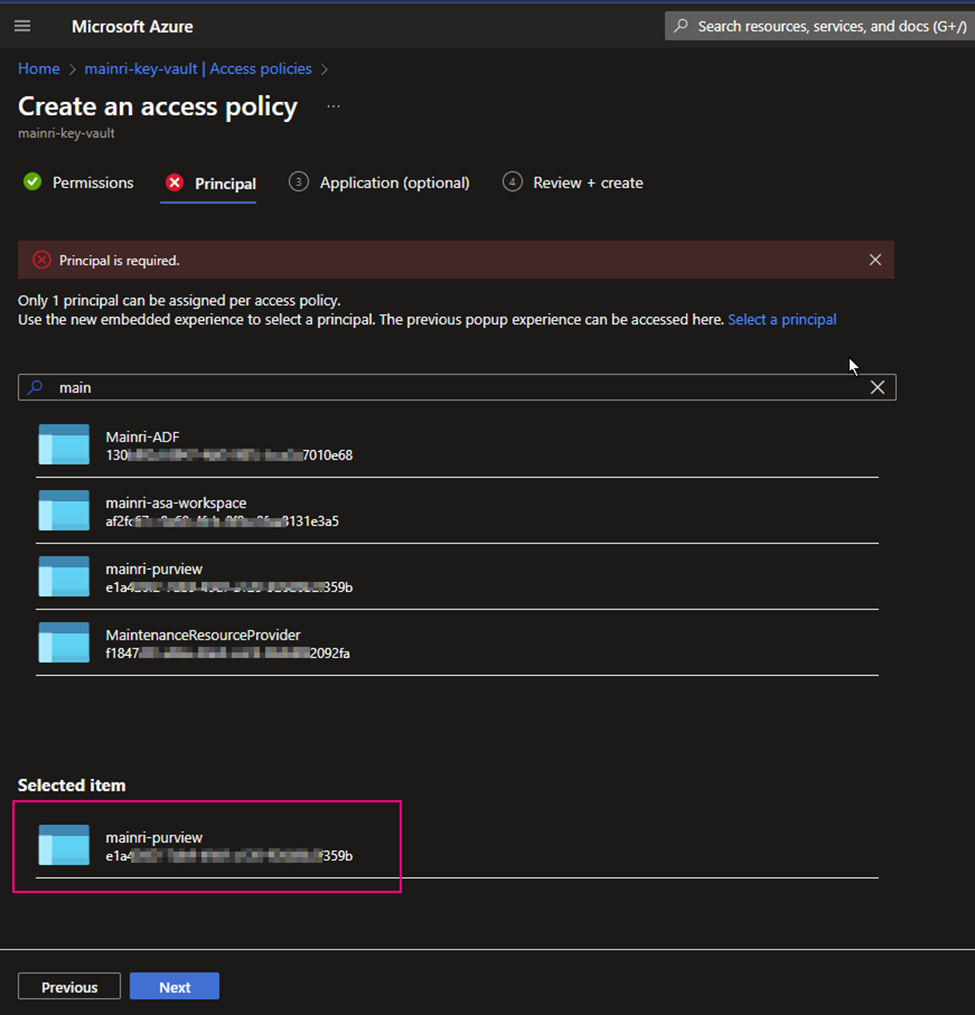
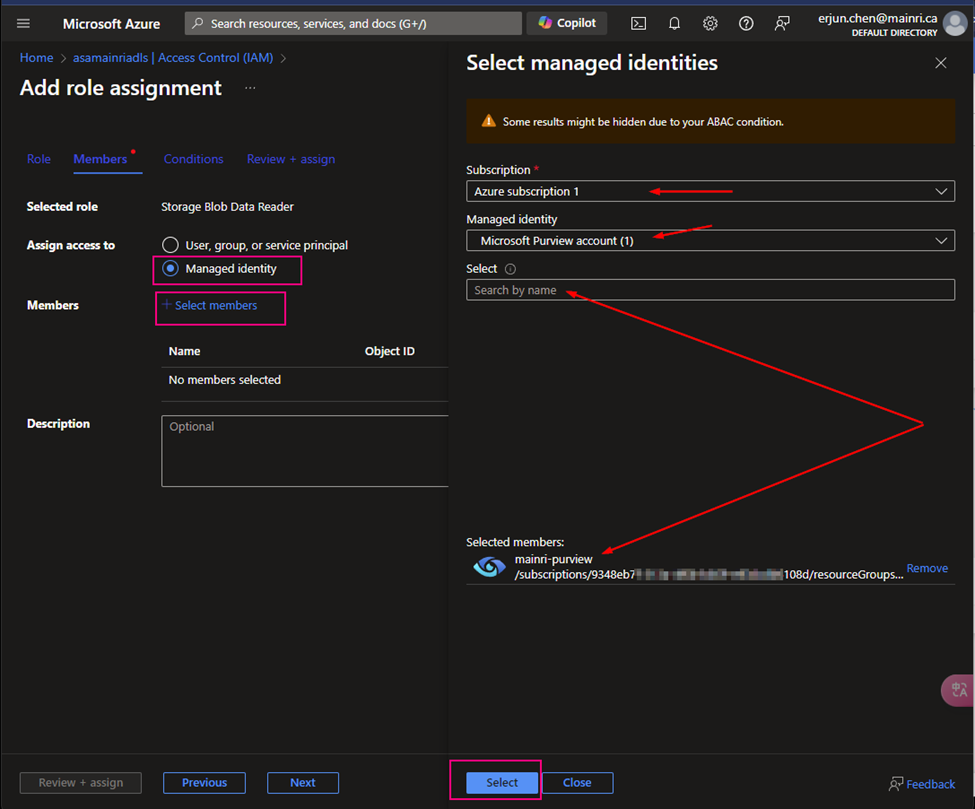
Grant Purview Managed identity access to Key Vault by adding a new access policy. Here we will have to grant Get and List permissions so purview can get(retrieve) and list down all the secrets.
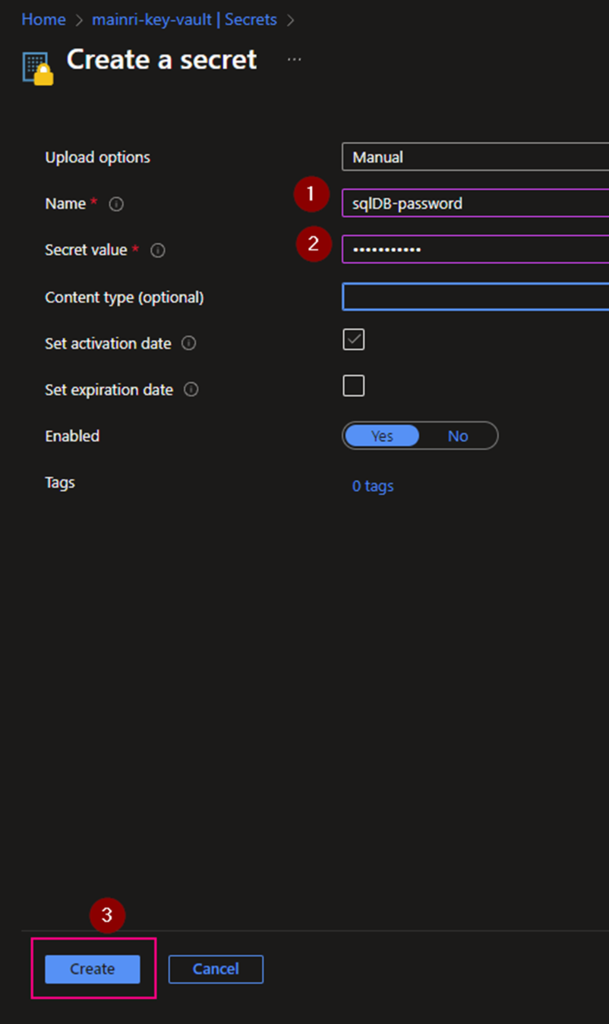
Generate a Secret for SQL Admin in Azure Key Vault. This secret will be used to log in to Azure SQL DB.
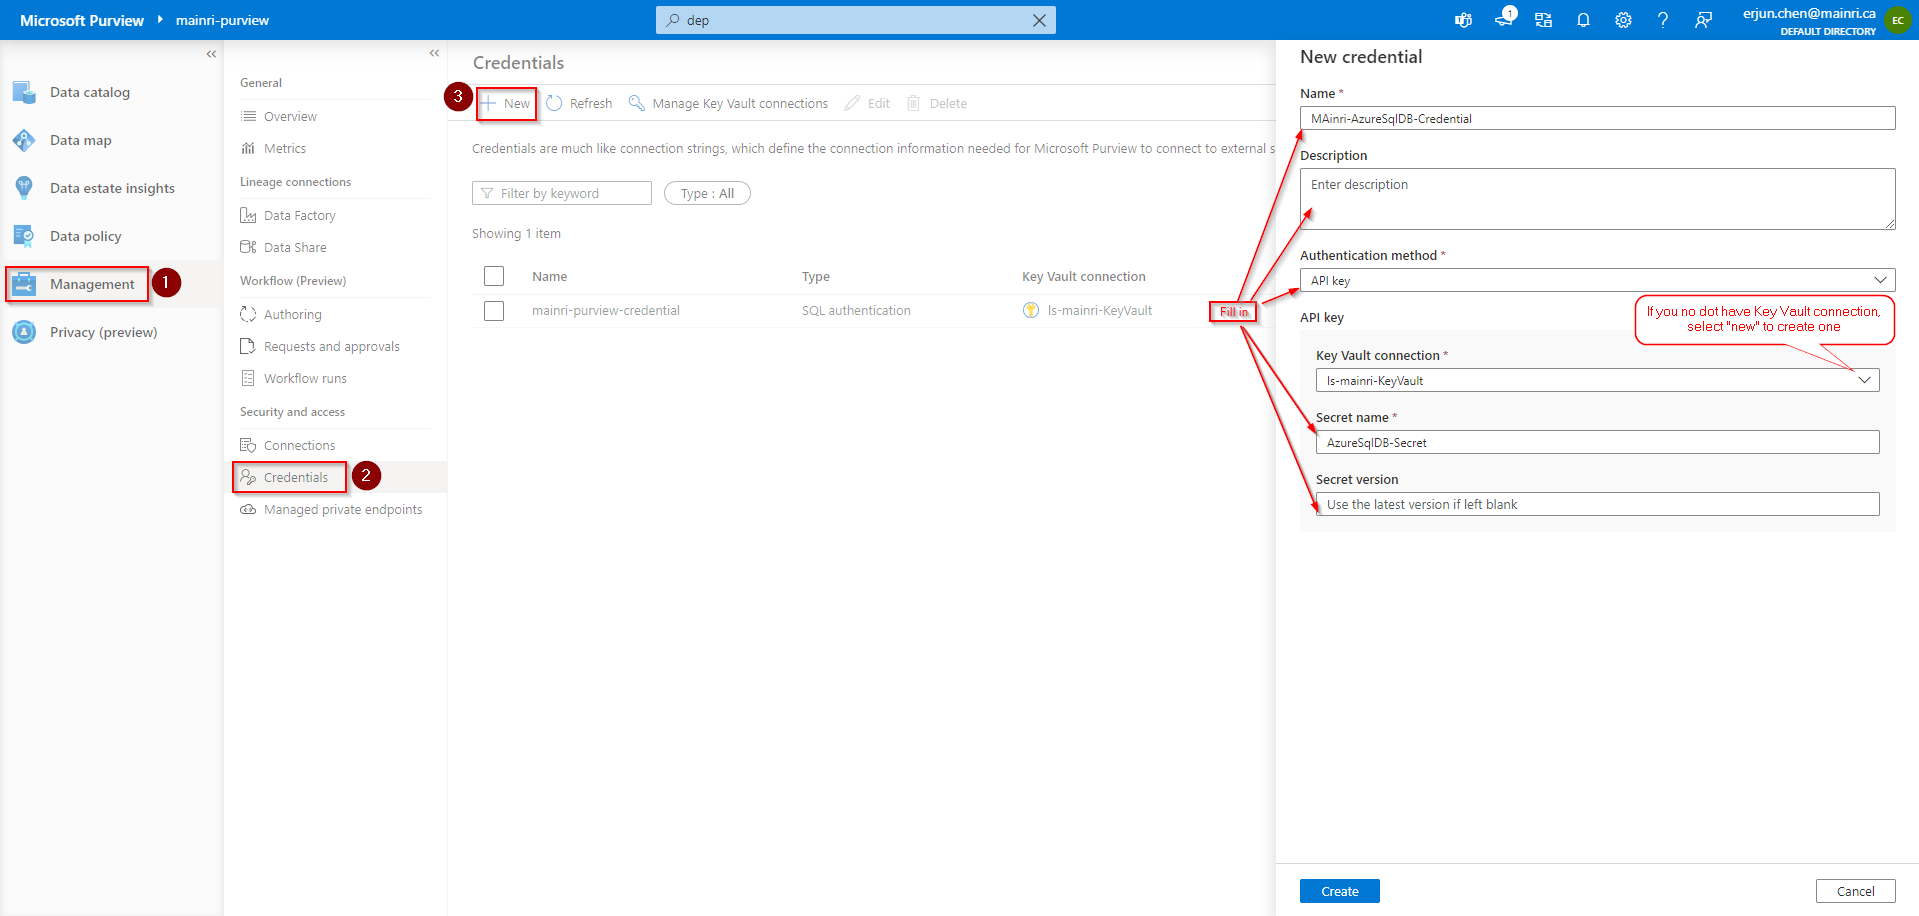
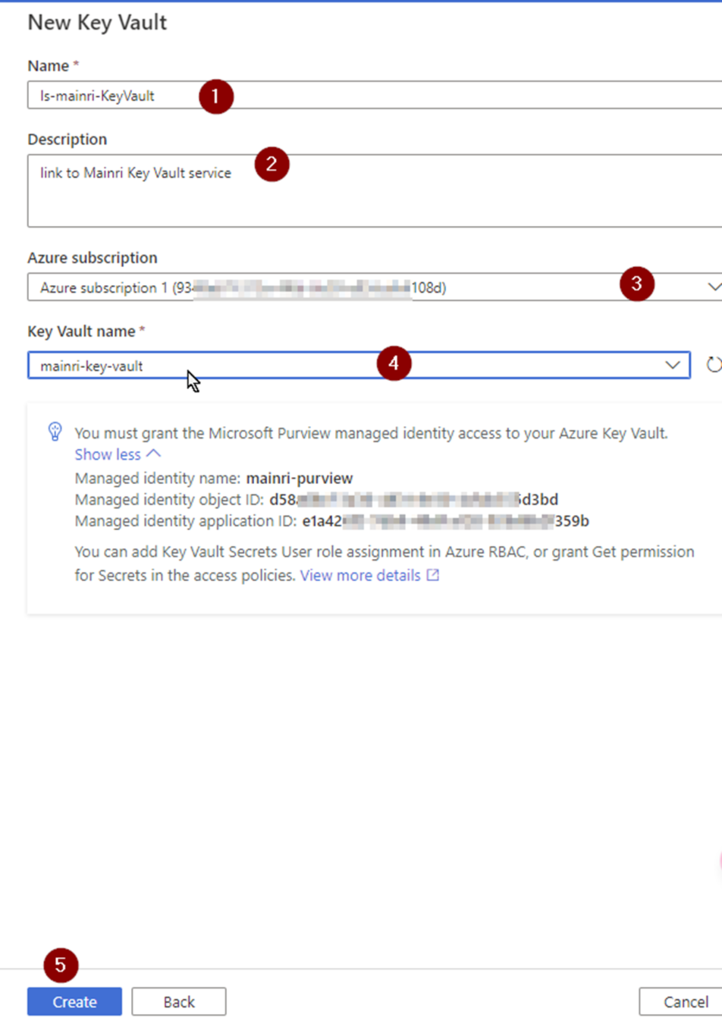
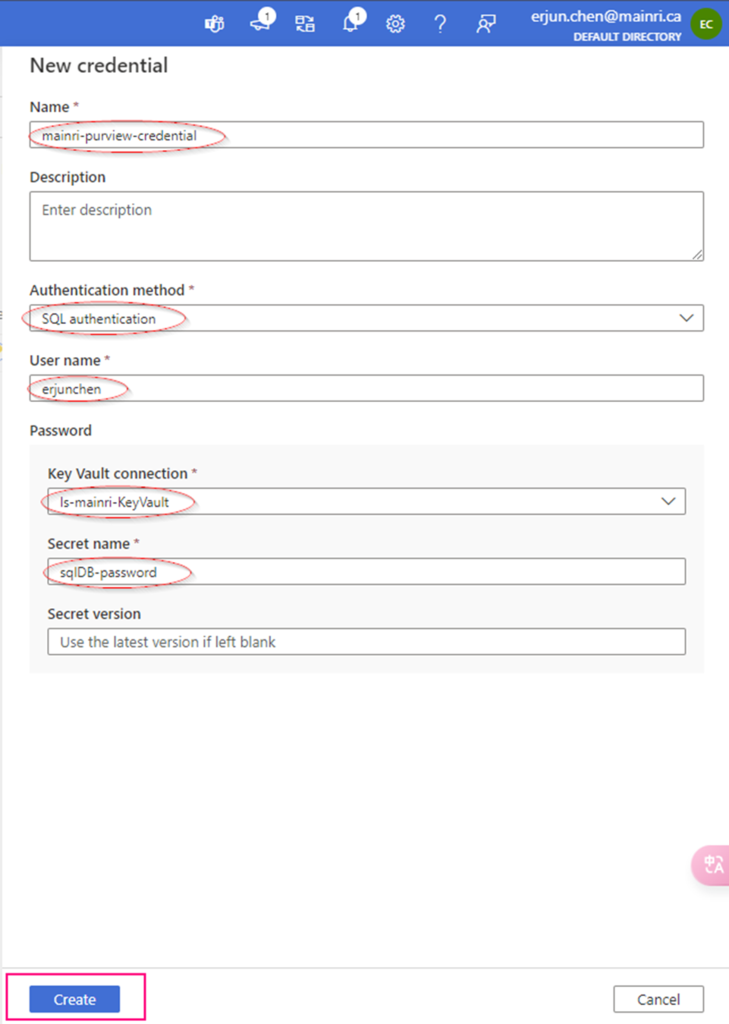
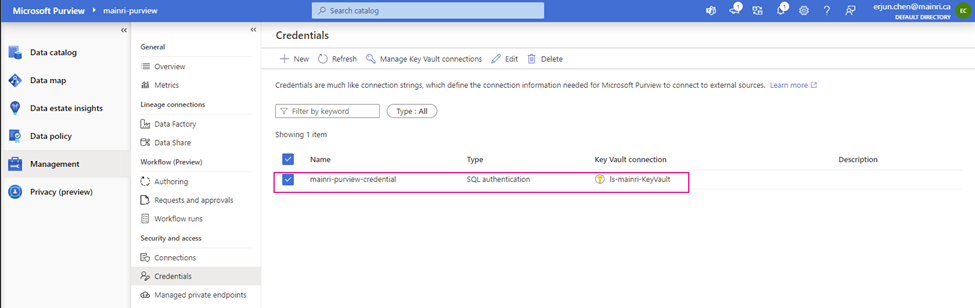
Add SQL Credentials (created above) in Purview so we can use the same credential.
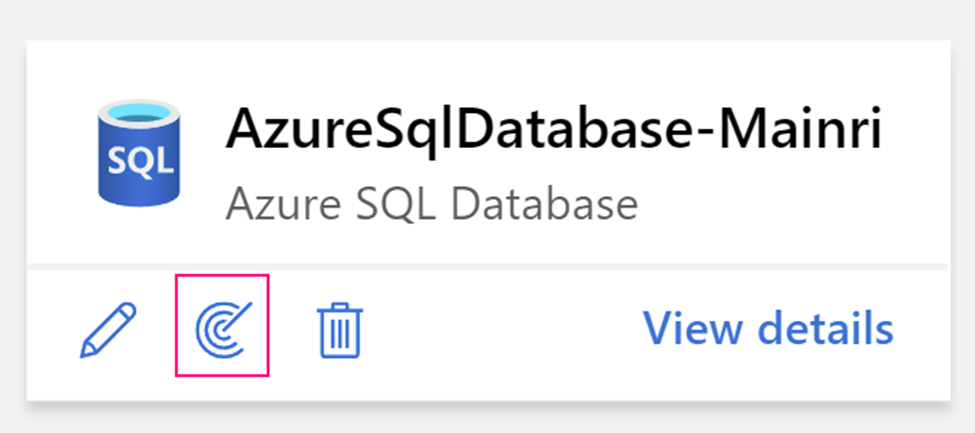
Register Azure SQL DB in Microsoft Purview.
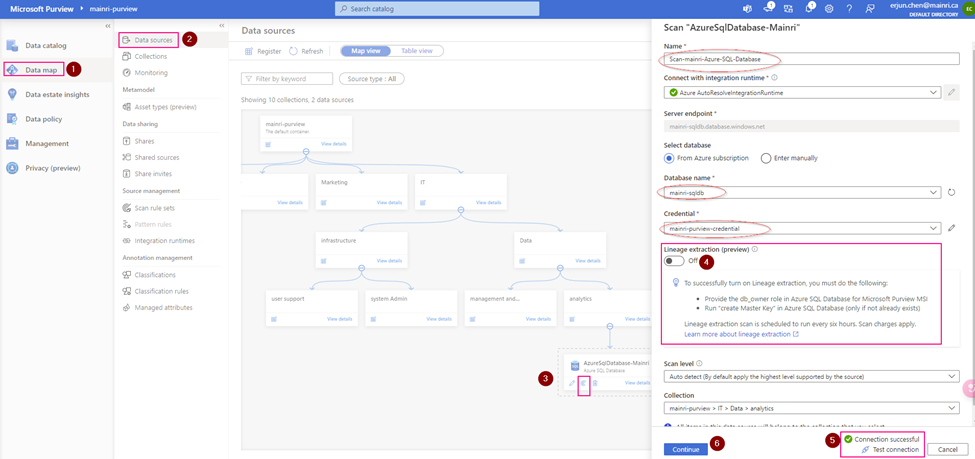
Scan Azure SQL Database as a data source with Azure Key Vault Credentials.
Verify that Purview is able to see tables in the Azure SQL database.
Discover and govern Azure SQL Database in Microsoft Purview
This article outlines the process to register an Azure SQL database source in Microsoft Purview. It includes instructions to authenticate and interact with the SQL database.
When you’re scanning Azure SQL Database, Microsoft Purview supports extracting technical metadata from these sources:
Server
Database
Schemas
Tables, including columns
Views, including columns (with lineage extraction enabled, as part of scanning)
Before we scan data sources in Azure Purview, we have to register data resources that to be scanned.
First, we will learn the concept of managed identity and how Azure purview uses it.
Second, we will learn the steps involved in registering ADLS Gen2.
Azure Purview Managed Identity
We will use Azure Purview Managed Identity that is an Azure resource feature found in Azure Active Directory (Azure AD). The managed identities for Azure resources feature is free and there’s no additional cost.
We can use the identity to authenticate to any service that supports Azure AD authentication, including Key Vault, without any credentials in your code. We will use Azure Purview Managed Identity.
Let’s register source data first.
We have to follow these steps to register and scan ADLS Gen 2 account:
Grant the Azure Purview Managed Identity access to ADLS Gen2 so purview can have access to it. Preview managed identity should have storage blob reader permission on ADLS Gen2
Scan ADLS Gen2 with the Purview Managed Identity registered in step 1
Register an Azure Data Lake Storage Gen2 account
Azure Portal > ADLS > Access Control > Add role assignment
> storage BLOB Data
>Select managed Identities
>next > next > review + assign
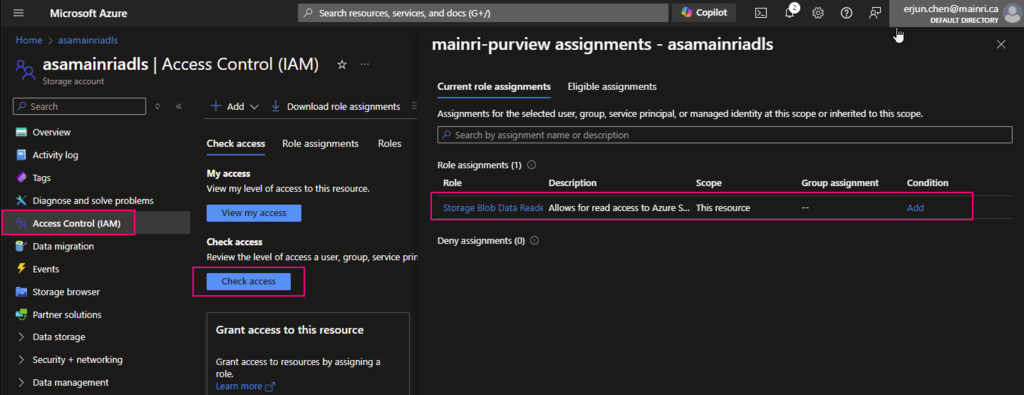
Now, you can “check access”, Now, you can “check access”. It’s added/
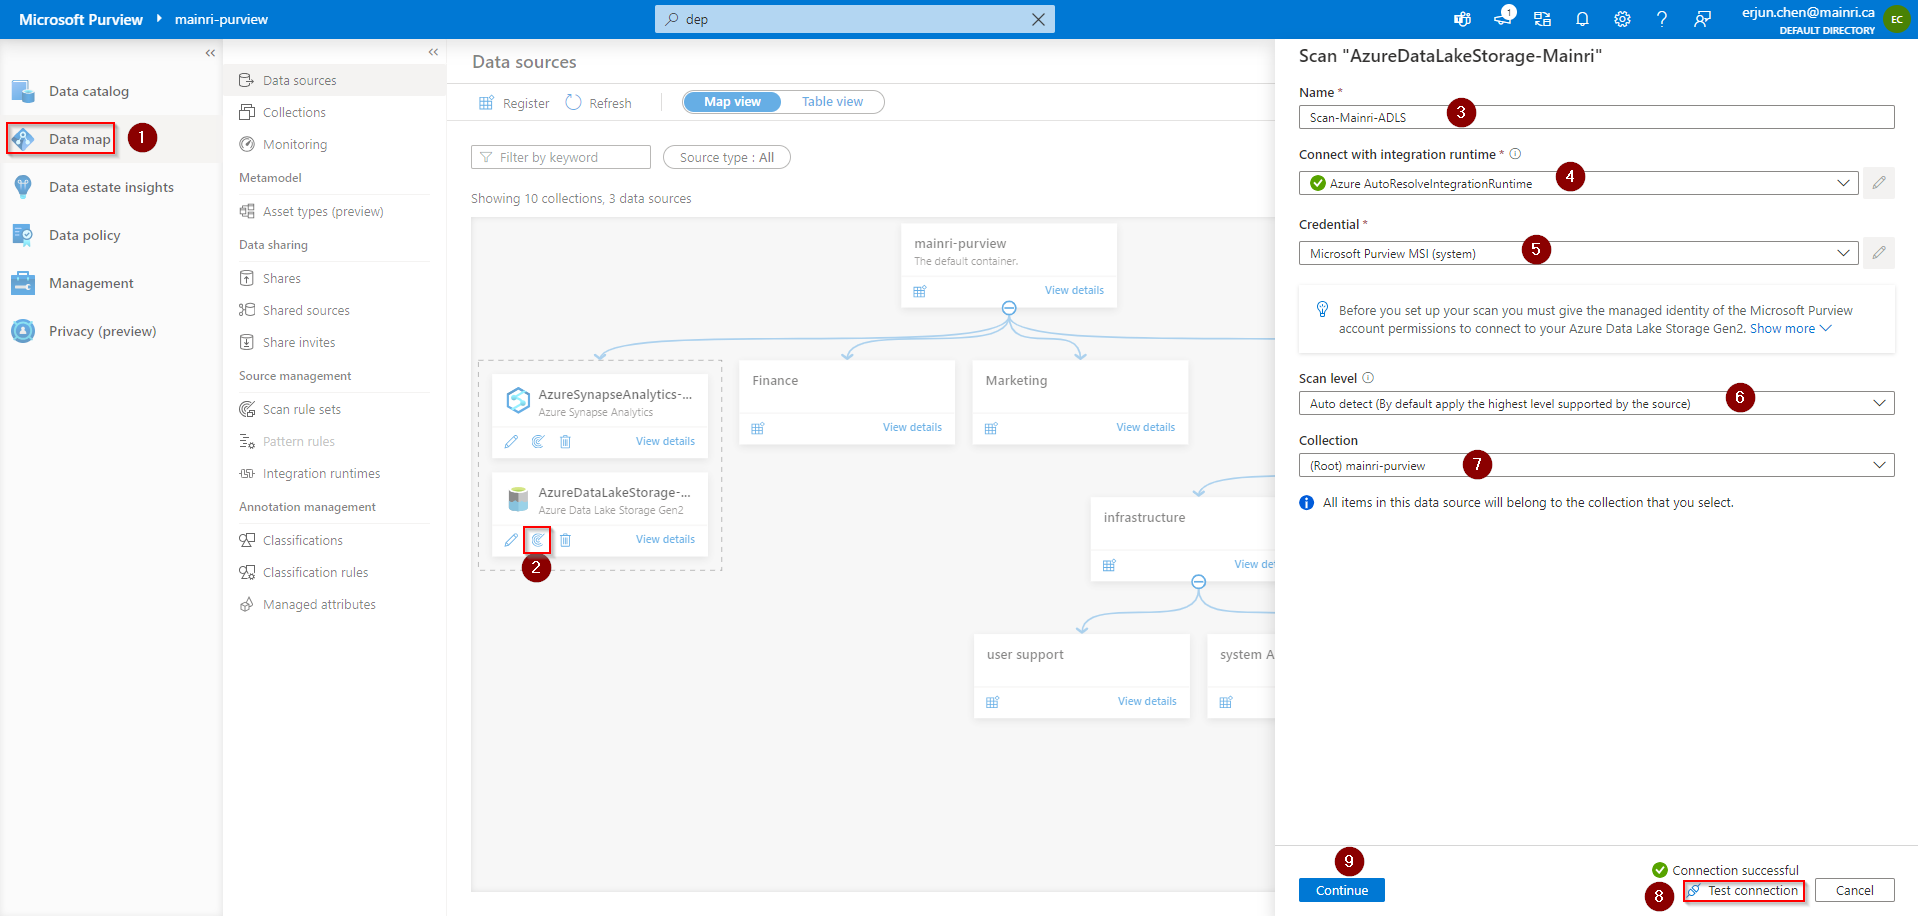
now, it’s time for scanning. from Azure Purview Studio
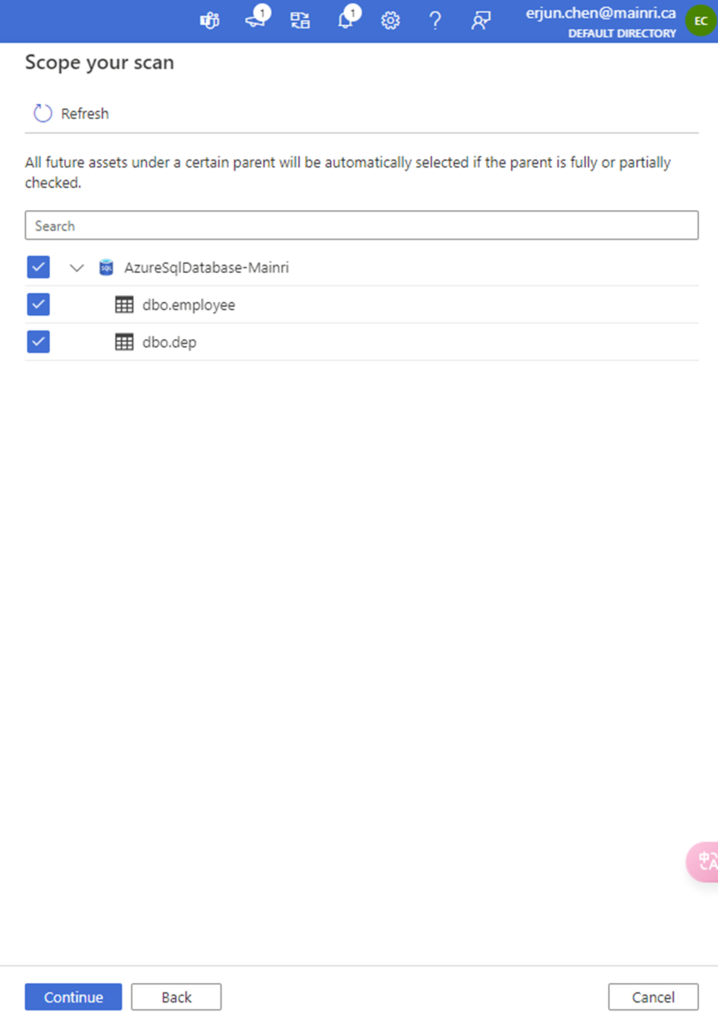
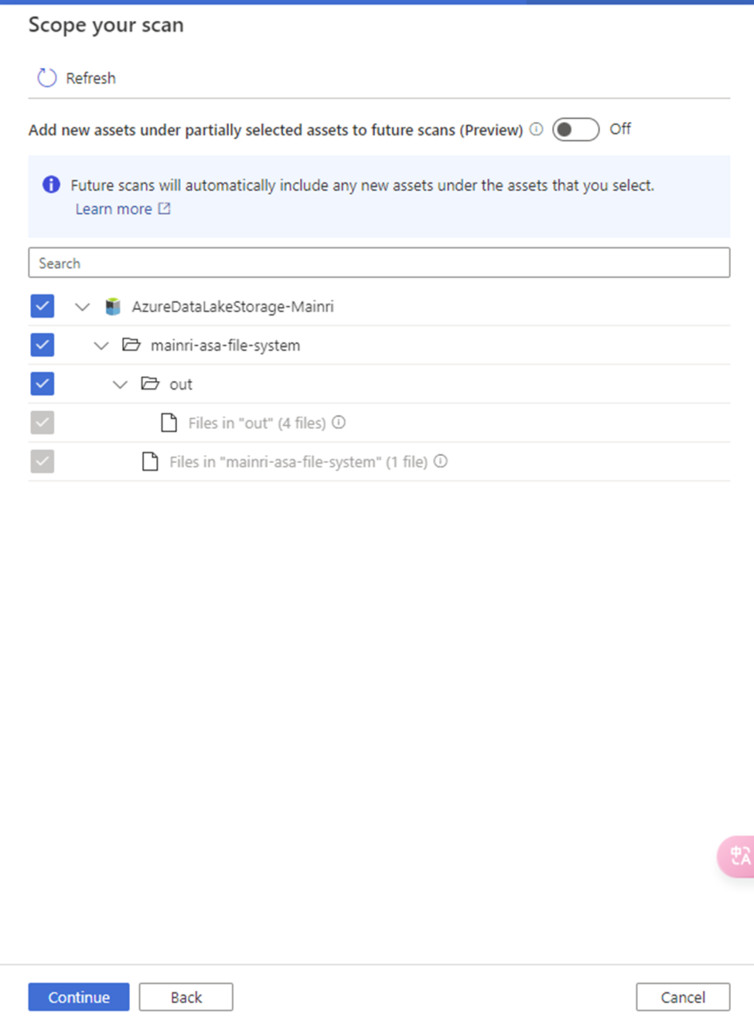
Scope your scan
You will see “scope your scan”. Now we can see all my data and directory structure on ADLS appear.
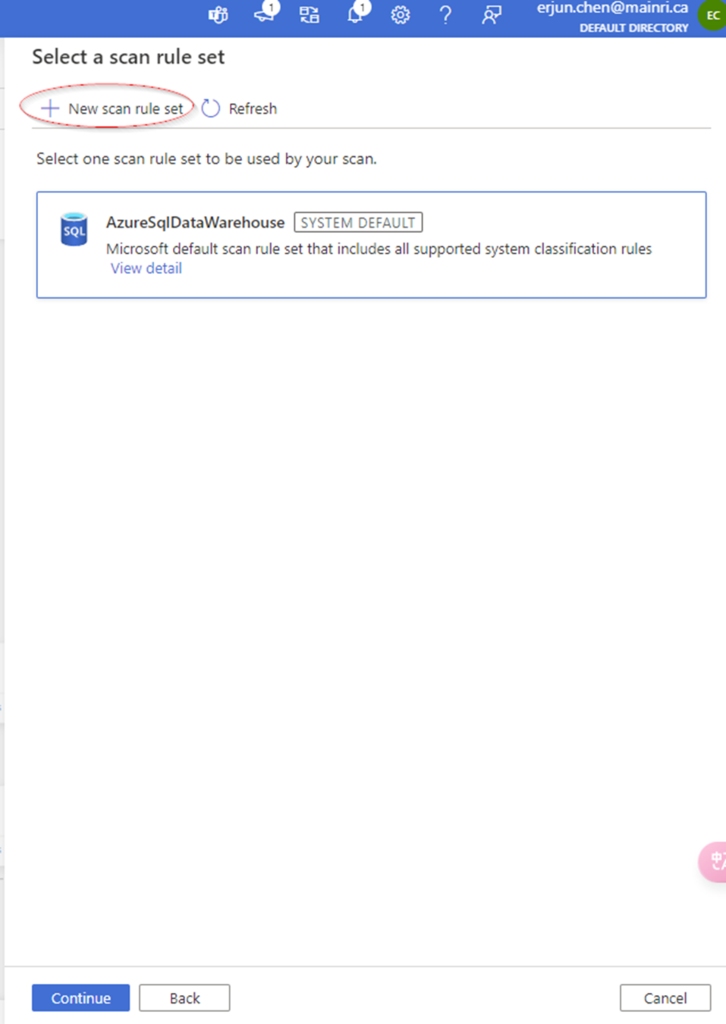
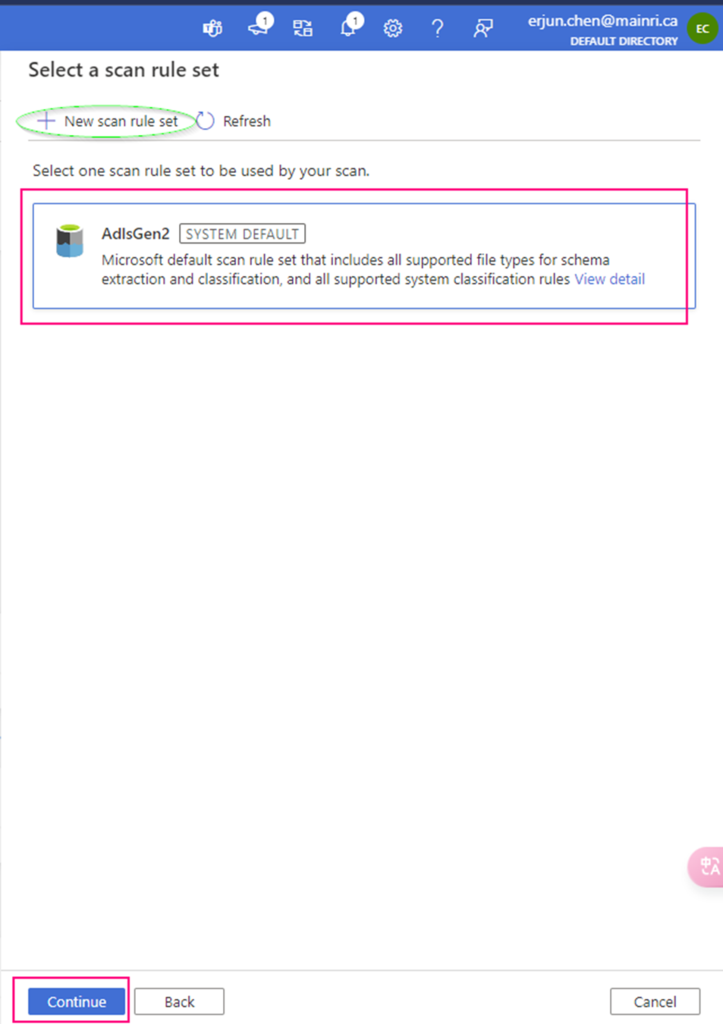
Select scan rule set
We have talked the rile sets in last article. You are able to add even more new scan rule set at this step if you like, or use default Azure System default scan rule set.
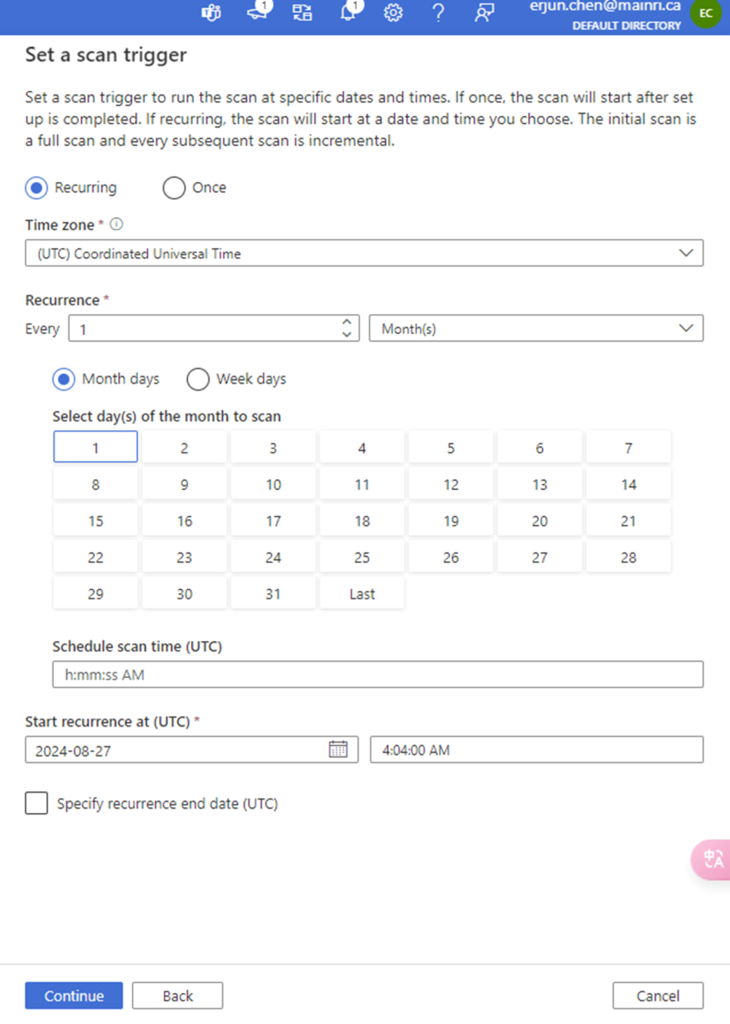
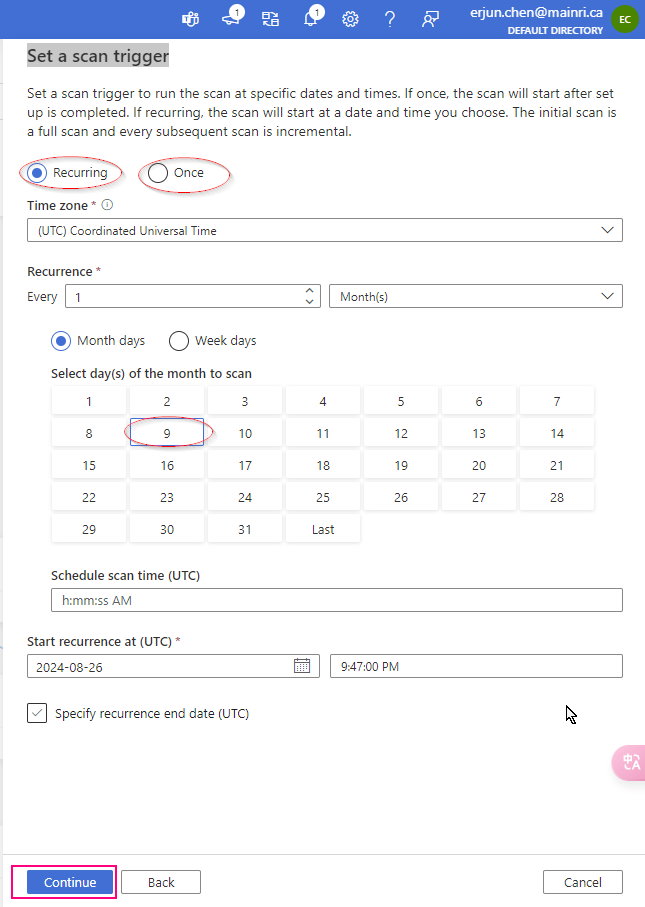
Set a scan trigger
Click the continue, you can setup trigger to scan, either once or recurring.
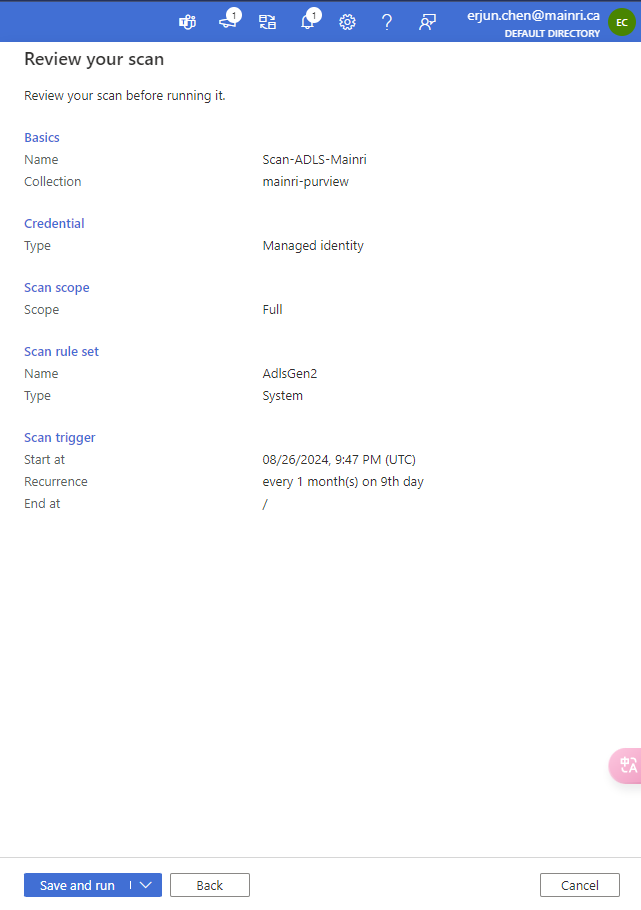
We complete the scan configuration. We have chance to review the configuration if ok save and run the scan progress or back to change it.
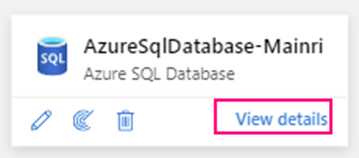
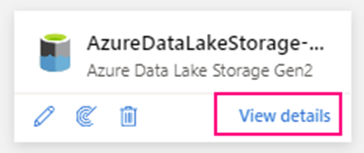
You can see this by clicking “view detail”
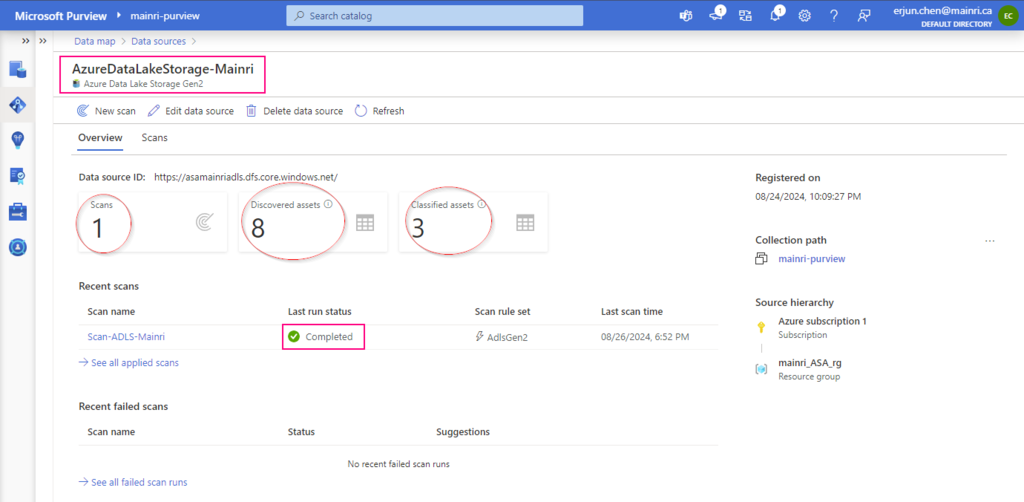
You will see this once the scan progress completed.
Purview provides a robust platform for organizations to govern their data effectively, ensuring data quality, compliance, and accessibility across the enterprise.
In this article, will not discuss creating Azure Purview account, services, open purview UI … etc. Although they are important, they are not having special than subscripting, creating, opening those things for other services in Azure environment. Simply sign in Azure portal, find out purview service, follow guide on the azure portal UI, I strongly believe you will not meet challenge.
Roughly says, Purview has two key steps:
Load data in the data map
Browse and search information in the data catalog
Load data in the data map
Connect to Data Sources: Administrators connect Microsoft Purview to various data sources within their organization, setting up scanning schedules.
Scan and Classify Data: Purview scans these sources, discovers data assets, and classifies them automatically or based on custom rules.
Browse and search information in the data catalog.
View and Manage Data Catalog: Users access the Purview data catalog to search for and manage data assets, using the business glossary to understand the data in context.
Track Lineage and Ensure Compliance: Data lineage is visualized to understand data flow, and governance policies are enforced to ensure data is handled correctly.
Leverage Insights for Decision-Making: The insights provided by Purview help data stewards, analysts, and business users make informed decisions based on governed, trusted data.
Of course, this is too general to let users understand and catch up in detail.
Load data in the data map
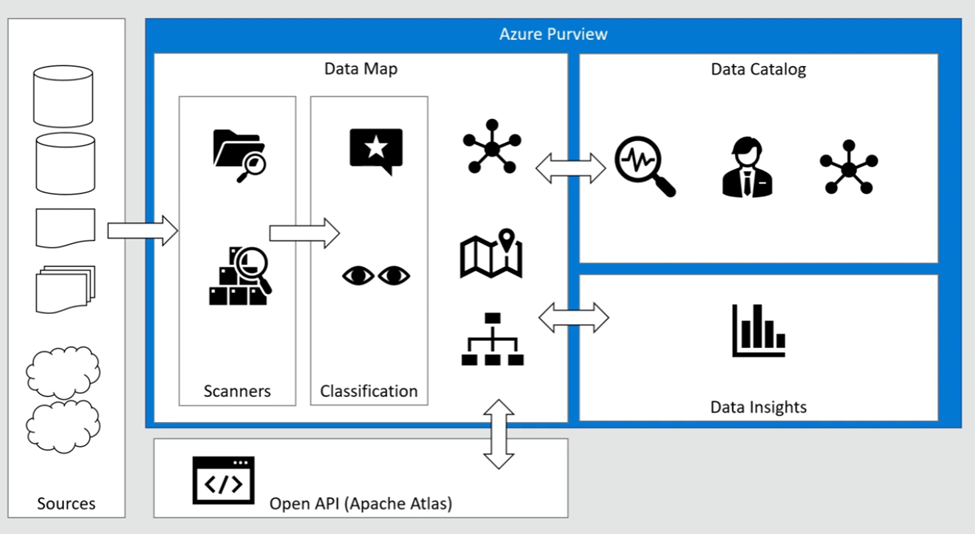
Purview Data Map is a unified map of your data assets and their relationships. It’s easier for you and your users to visualize and govern. It also houses the metadata that underpins the Microsoft Purview Data Catalog and Data Estate Insights. You can use it to govern your data estate in a way that makes the most sense for your business.
Map Data
The data map is the foundational platform for Microsoft Purview. The data map consists of:
Data assets.
Data lineage.
Data classifications.
Business context.
Customers create a knowledge graph of data that comes in from a range of sources. Microsoft Purview makes it easy to register and automatically scan and classify data at scale. Within a data map, you can identify the type of data source, along with other details around security and scanning.
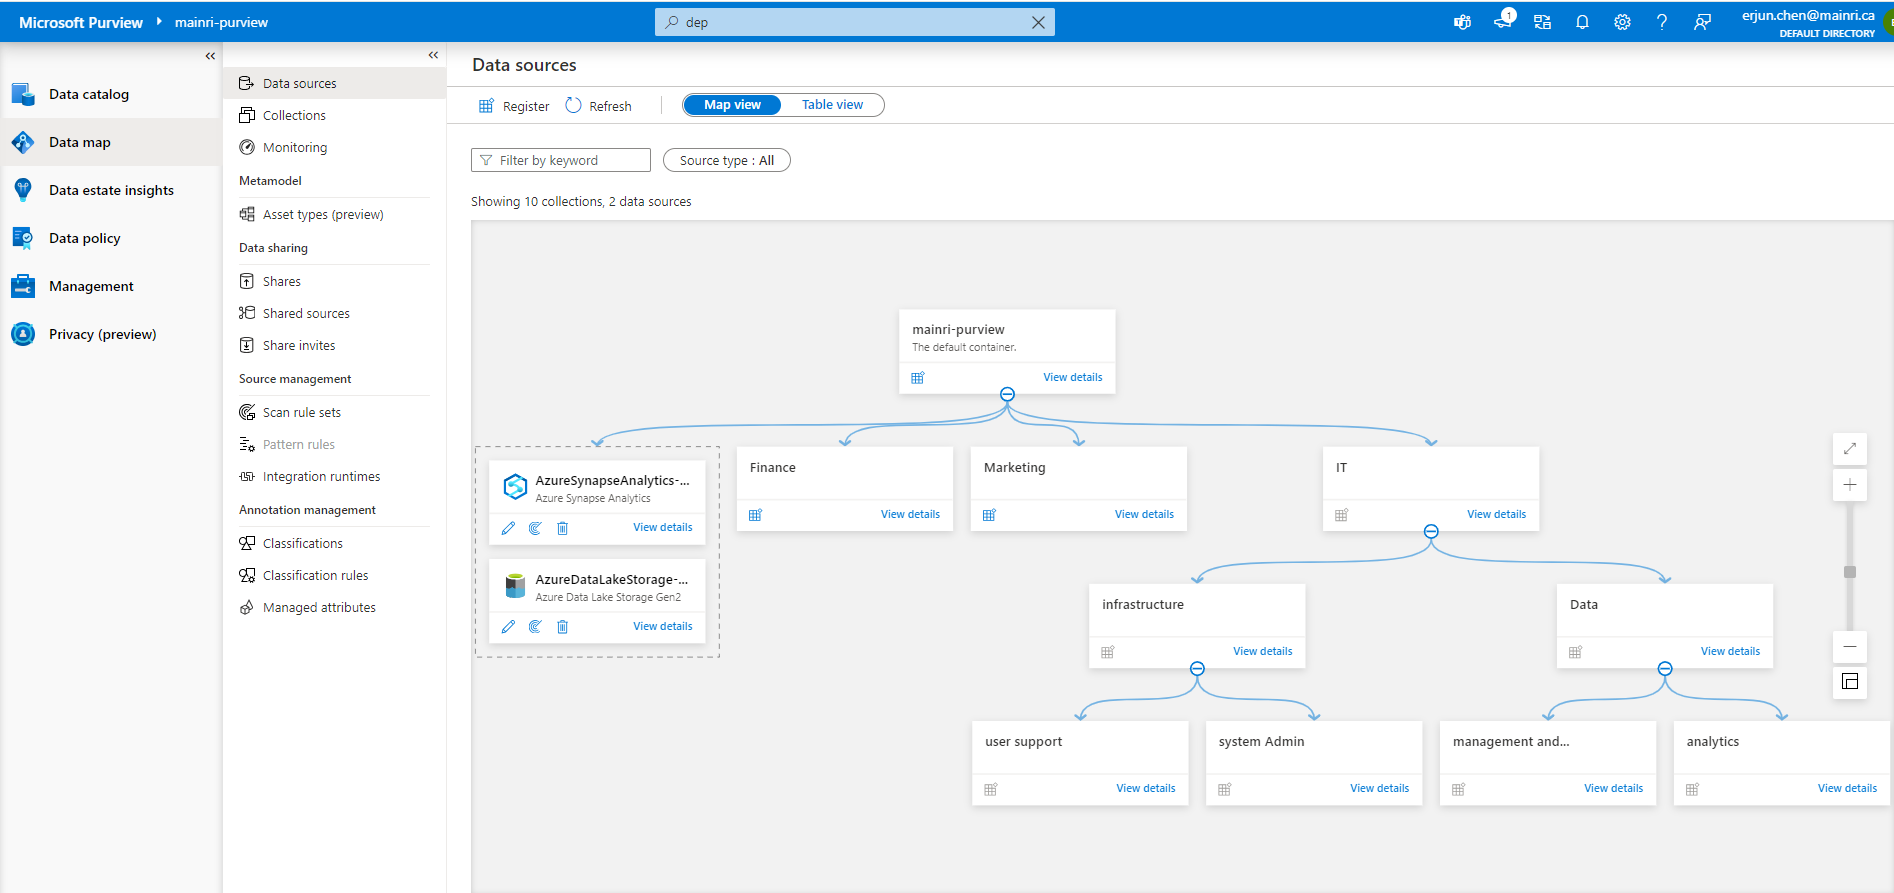
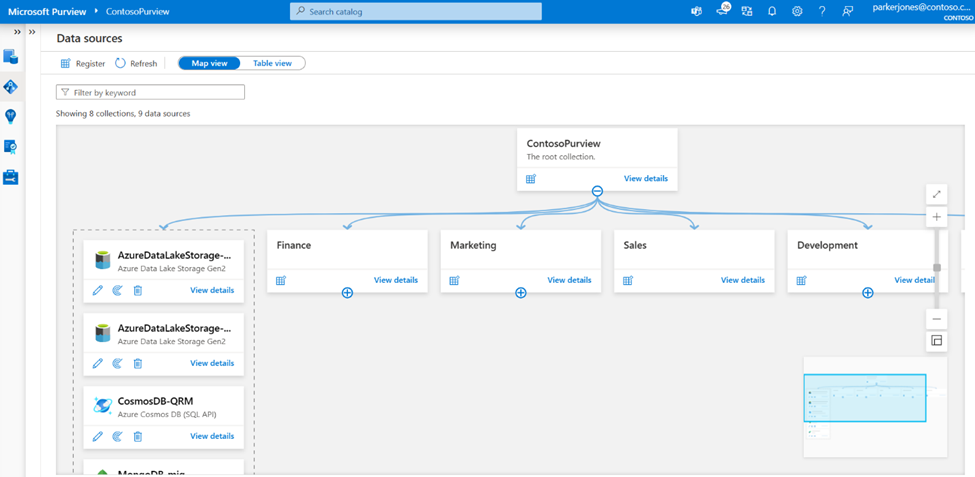
The data map uses collections to organize these details.
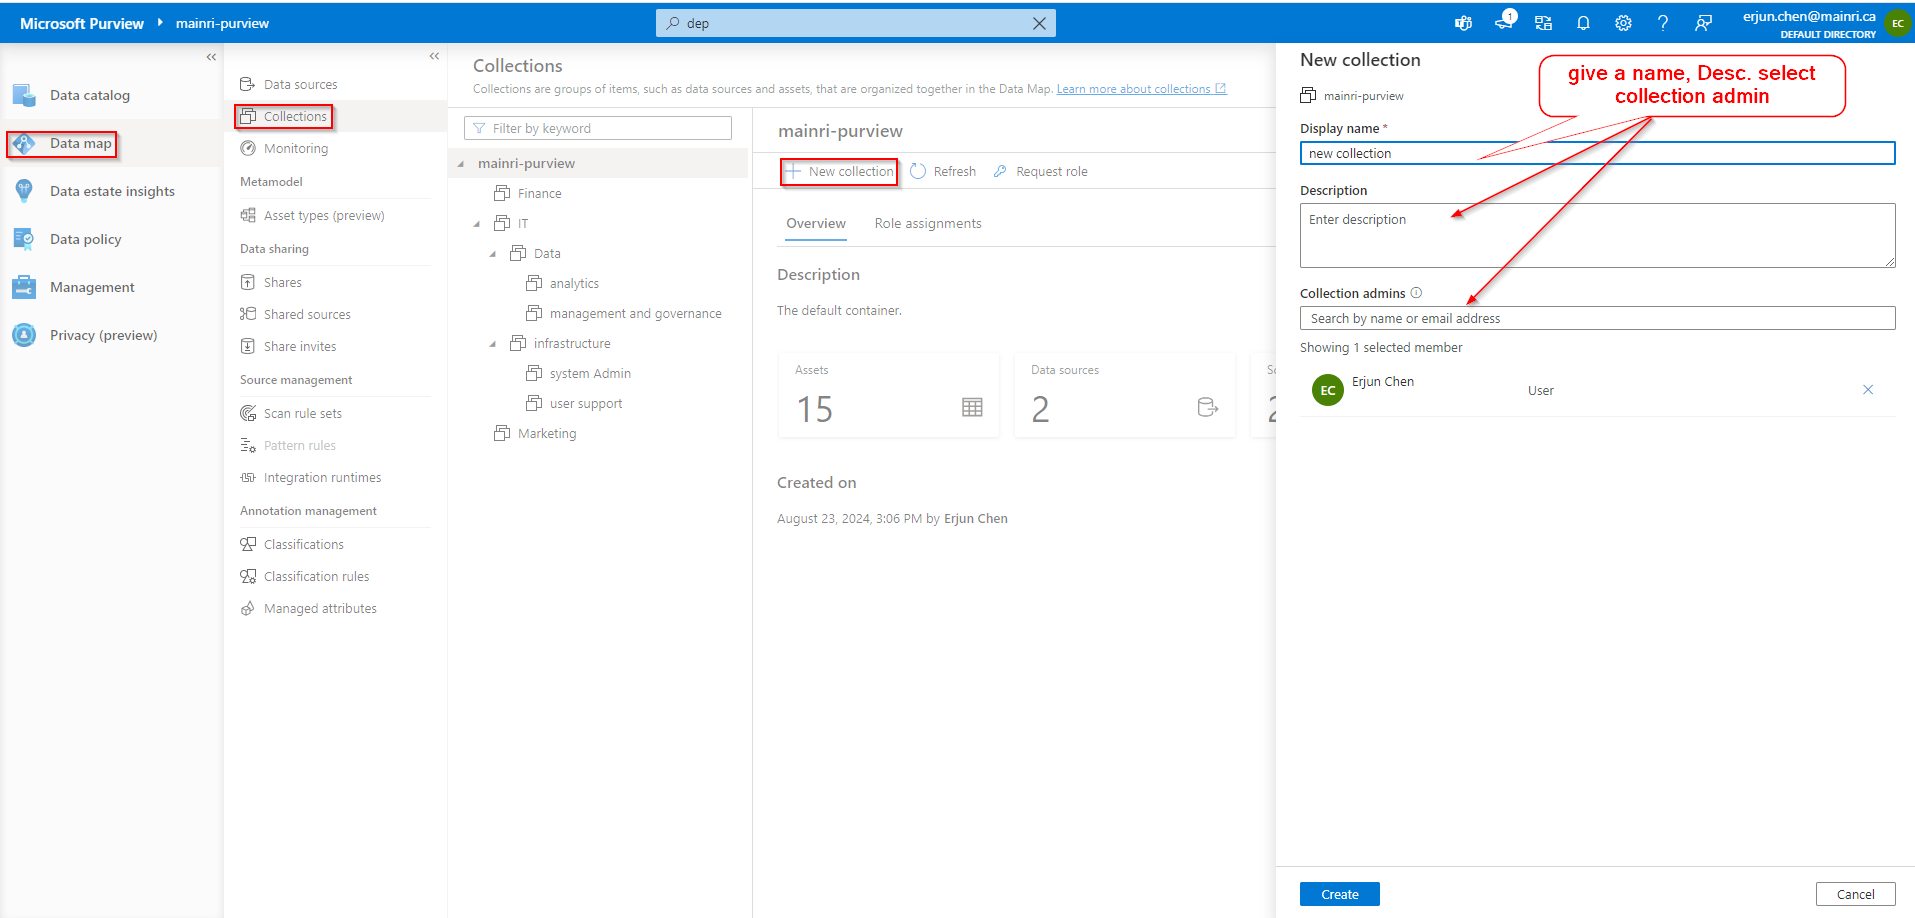
Collection
Collections are groups of items, such as data sources and assets, that are organized together in the Data Map. It is a way of grouping data assets into logical categories to simplify management and discovery of assets within the catalog. You also use collections to manage access to the metadata that’s available in the data map.
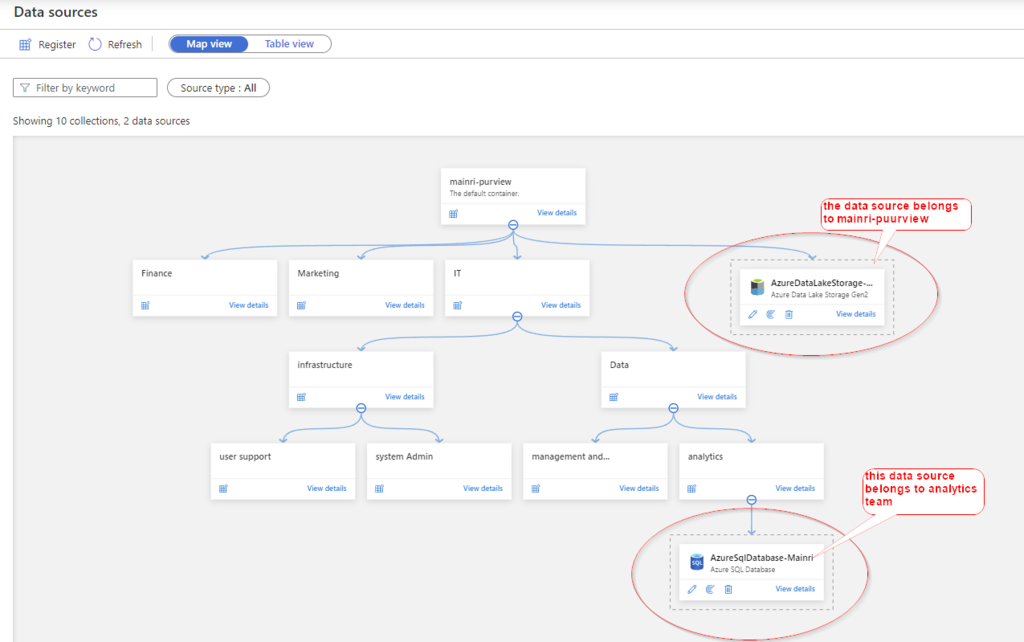
now, collections are created, looks like
Source data
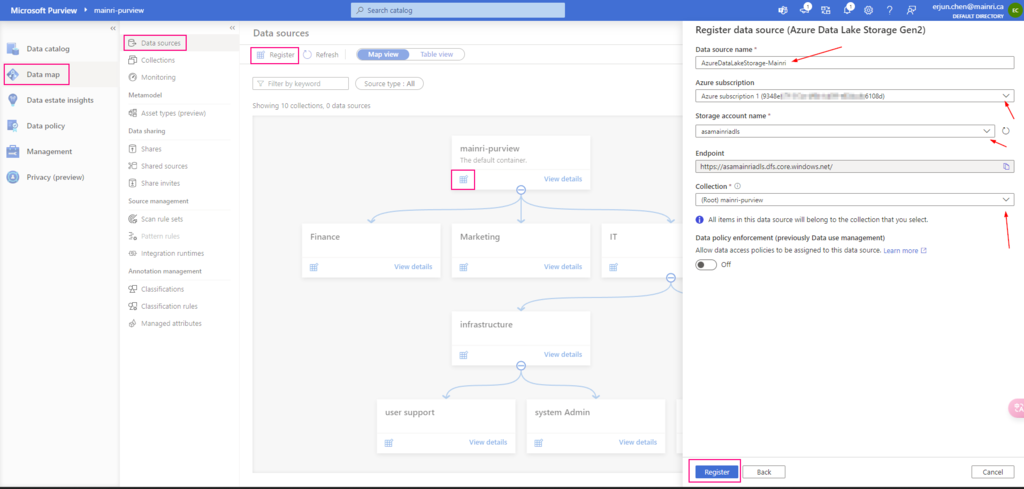
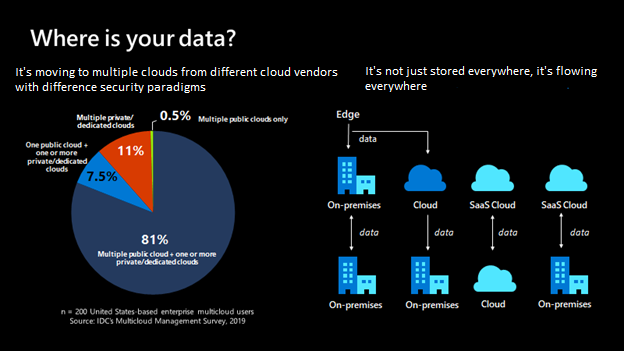
Sourcing your data starts with a process where you register data sources. Microsoft Purview supports an array of data sources that span on-premises, multi-cloud, and software-as-a-service (SaaS) options. You register the various data sources so that Microsoft Purview is aware of them. The data remains in its location and isn’t migrated to any other platform.
Each type of data source you choose requires specific information to complete the registration.
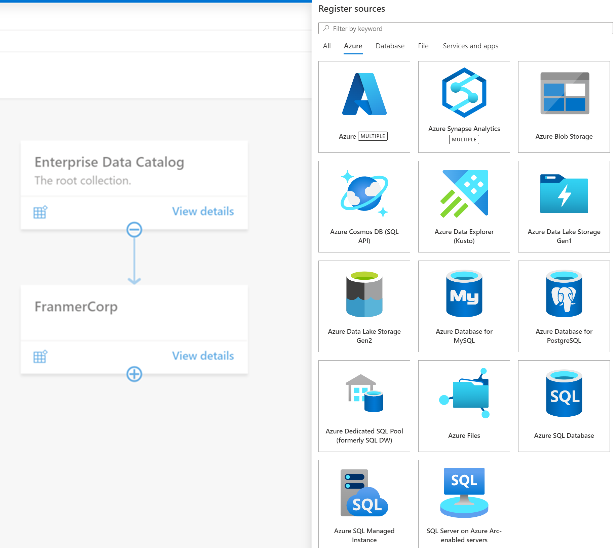
Below is a small sample of available connectors in Microsoft Purview Data Catalog. See supported data sources and file types for an up-to-date list of supported data sources and connectors.
The same way creates another data source – AzureSQLDatabase that belongs to “analytics team”
Rule Sets
After we register our data sources, we will need to run a scan to access their metadata and browse the asset information.
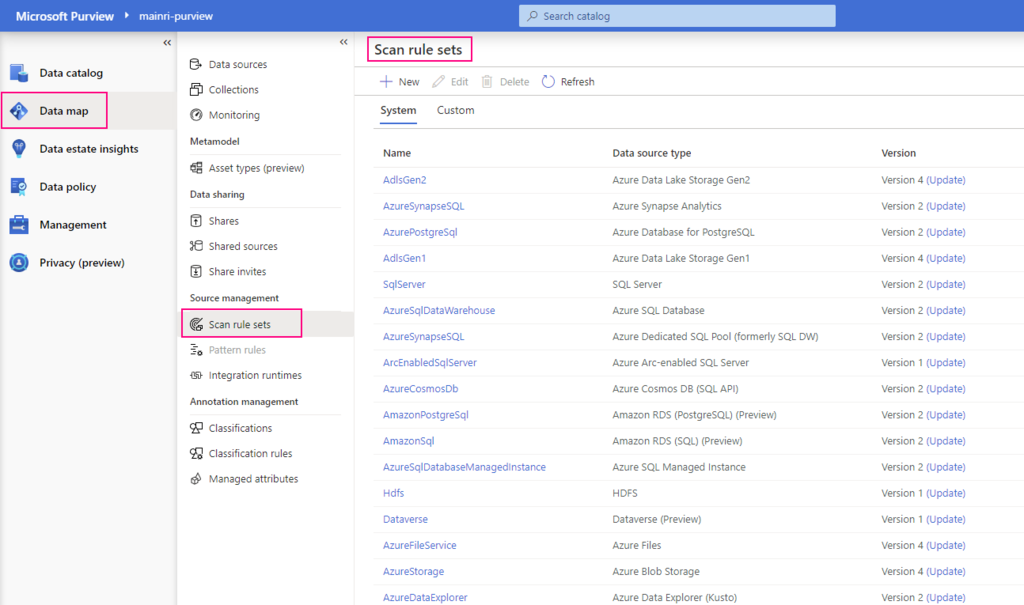
Before you can scan the data sources, you’re required to enter the credentials for these sources. You can use Azure Key Vault to store the credentials for security and ease of access by your scan rules. The Microsoft Purview governance portal comes with existing system scan rule sets that you can select when you create a new scan rule. You can also specify a custom scan rule set.
A scan rule set is a container for grouping scan rules together to use the same rules repeatedly. A scan rule set lets you select file types for schema extraction and classification. It also lets you define new custom file types. You might create a default scan rule set for each of your data source types. Then you can use these scan rule sets by default for all scans within your company.
For example, you might want to scan only the .csv files in an Azure Data Lake Storage account. Or you might want to check your data only for credit card numbers rather than all the possible classifications. You might also want users with the right permissions to create other scan rule sets with different configurations based on business needs.
Scan
Once you have data sources registered in the Microsoft Purview governance portal and displayed in the data map, you can set up scanning. The scanning process can be triggered to run immediately or can be scheduled to run on a periodic basis to keep your Microsoft Purview account up to date.
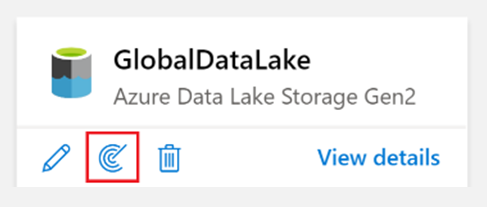
Scanning assets is as simple as selecting New scan from the resource as displayed in the data map.
You’ll now need to configure your scan and assign the following details:
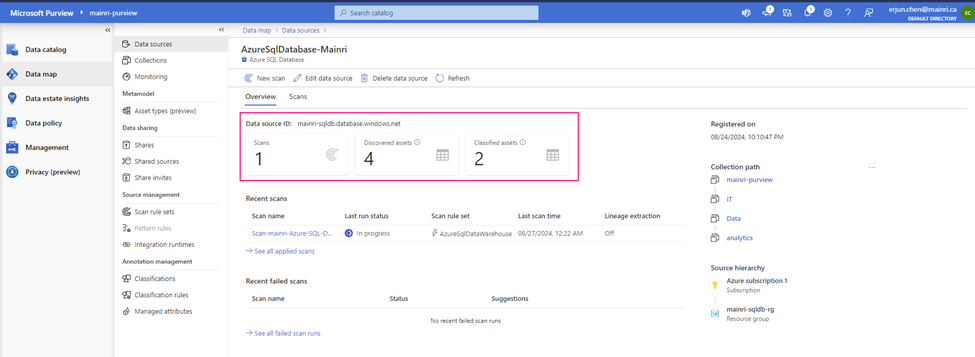
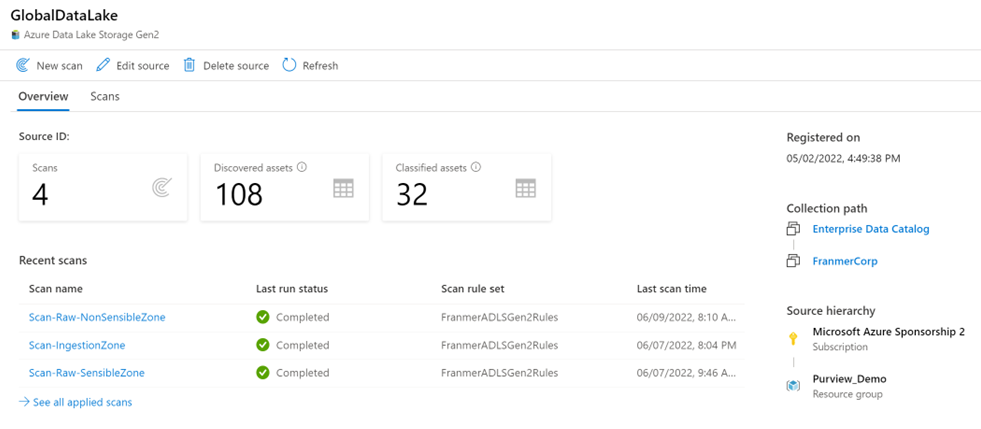
Once a scan is complete, you can refer to the scan details to view information about the number of scans completed, assets detected, assets classified, Scan information. It’s a good place to monitor scan progress, including success or failure.
Recap,
Purview Scan means:
Where to scan
Scan rule set
Type (Full, Increments)
Schedule
Scan Rule Set means:
What to scan (txt, json, parquet,,,,,)?
What to look for (classification rules)?
Specific to source type (ADLS, Database,,,,,)?
System defined ones
Custom
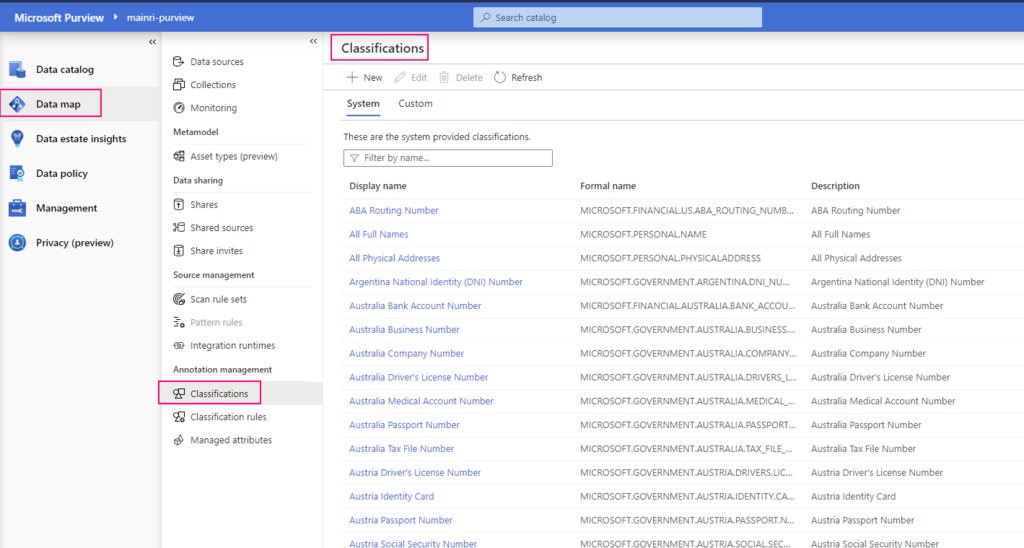
Classification
Metadata is used to help describe the data that’s being scanned and made available in the catalog. During the configuration of a scan set, you can specify classification rules to apply during the scan that also serve as metadata. The classification rules fall under five major categories:
Government: Attributes such as government identity cards, driver license numbers, and passport numbers.
Financial: Attributes such as bank account numbers or credit card numbers.
Personal: Personal information such as a person’s age, date of birth, email address, and phone number.
Security: Attributes like passwords that can be stored.
Miscellaneous: Attributes not included in the other categories.
You can use several system classifications to classify your data. These classifications align with the sensitive information types in the Microsoft Purview compliance portal. You can also create custom classifications to identify other important or sensitive information types in your data estate.
After you register a data source, you can enrich its metadata. With proper access, you can annotate a data source by providing descriptions, ratings, tags, glossary terms, identifying experts, or other metadata for requesting data-source access. This descriptive metadata supplements the structural metadata, such as column names and data types, that’s registered from the data source.
Discovering and understanding data sources and their use is the primary purpose of registering the sources. If you’re an enterprise user, you might need data for business intelligence, application development, data science, or any other task where the right data is required. You can use the data catalog discovery experience to quickly find data that matches your needs. You can evaluate the data for its fitness for the purpose and then open the data source in your tool of choice.
At the same time, you can contribute to the catalog by tagging, documenting, and annotating data sources that have already been registered. You can also register new data sources, which are then discovered, evaluated, and used by the community of catalog users.
In the following separate articles, I would like to use ADLS, Azure SQL Database and Azure Synapse Analytics as examples to step by step show you how to register and scan data source in Purview.
Azure Purview is a unified data governance service provided by Microsoft. It helps organizations manage and govern their on-premises, multi-cloud, and software as a service (SaaS) data. The primary purpose of Azure Purview is to provide a comprehensive understanding of an organization’s data landscape through data discovery, classification, and lineage tracking.
Before you can develop data-governance plans for usage and storage, you need to understand the data your organization uses.
Without the ability to track data from end to end, you must spend time tracing problems created by data pipelines that other teams own. If you make changes to your datasets, you can accidentally affect related reports that are business or mission critical.
Microsoft Purview is designed to address these issues and help enterprises get the most value from their existing information assets. Its catalog makes data sources easy to discover and understand by the users who manage the data.
Key Features of Azure Purview:
Data Cataloging: Automatically discover data assets across your data estate and register them in a unified catalog.
Data Lineage: Track the lineage of data to understand how it flows through different systems.
Data Classification: Apply built-in and custom classifiers to categorize your data based on sensitivity and type.
Business Glossary: Create and manage a business glossary to standardize terms and definitions across your organization.
Data Insights: Gain insights into the distribution of your data, data owners, and data usage patterns.
Integration with Azure Data Services: Integrate with other Azure services like Azure Synapse Analytics, Power BI, and more for seamless data governance.
Microsoft Purview has three main elements:
Data Map:
The data map provides a structure for your data estate in Microsoft Purview, where you can map your existing data stores into groups and hierarchies.
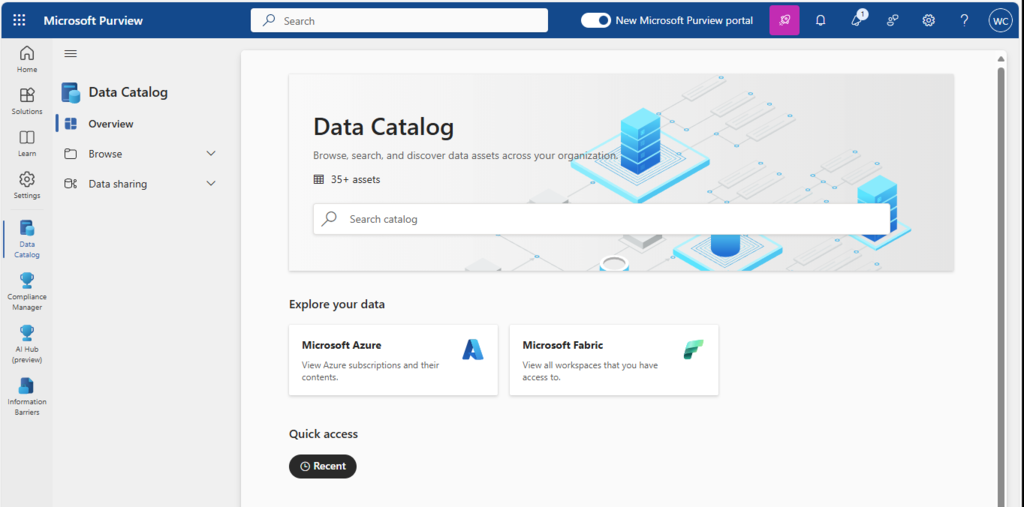
Data Catalog
The data catalog allows your users to browse the metadata stored in the data map so that they can find reliable data and understand its context.
Users can see where the data comes from and who are the experts they can contact about that data source.
The data catalog also integrates with other Azure products, like the Azure Synapse Analytics workspace, so that users can search for the data they need from the applications they need it in.
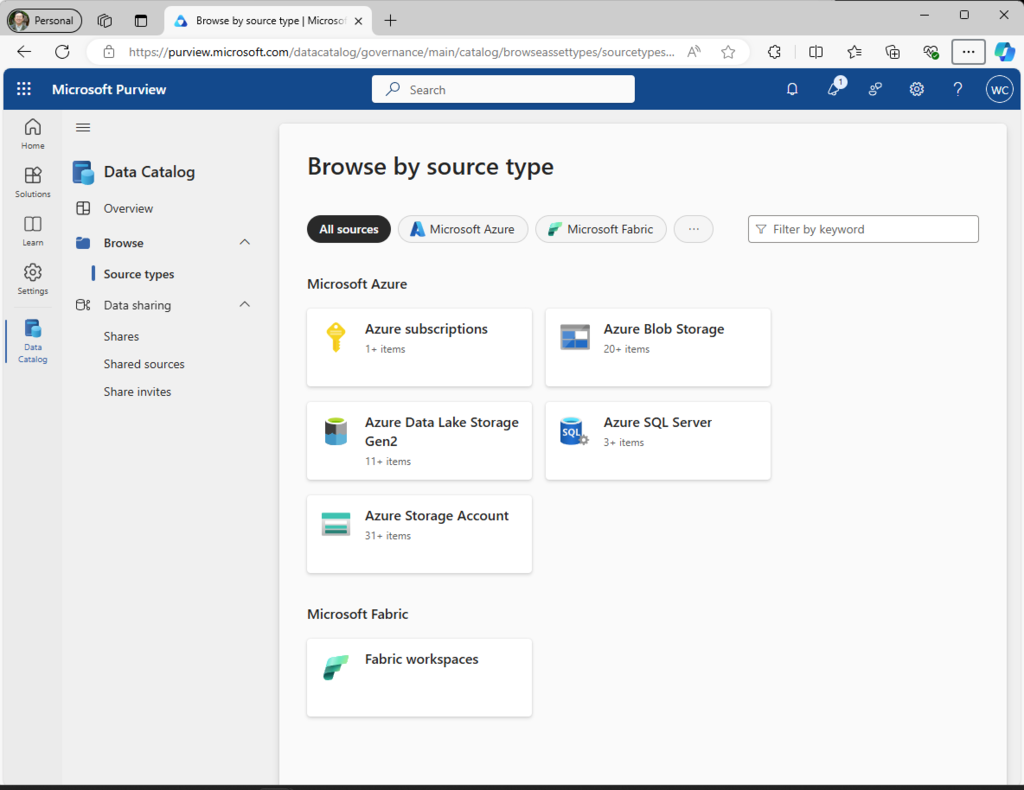
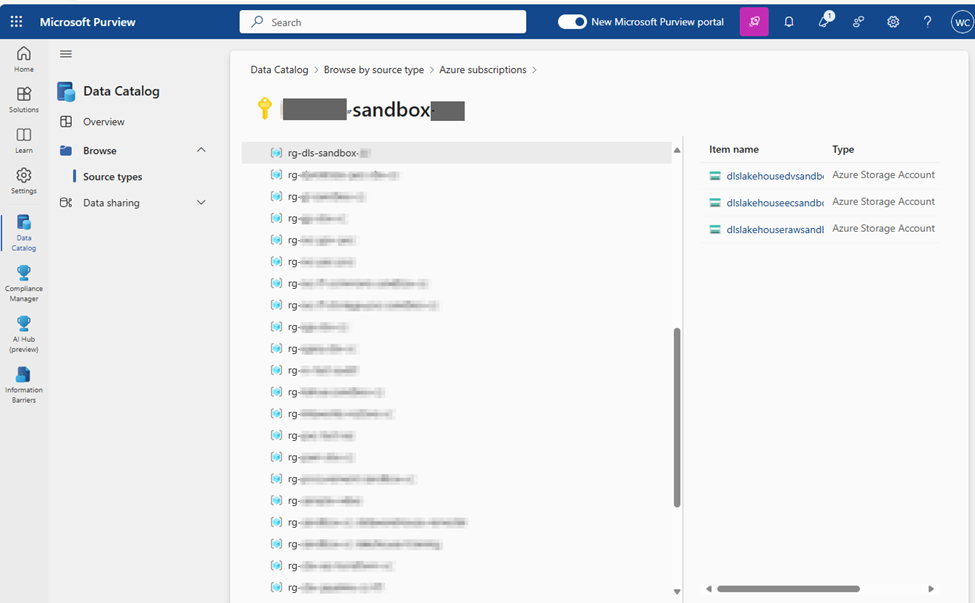
Catalog browse by Azure Subscriptions example:
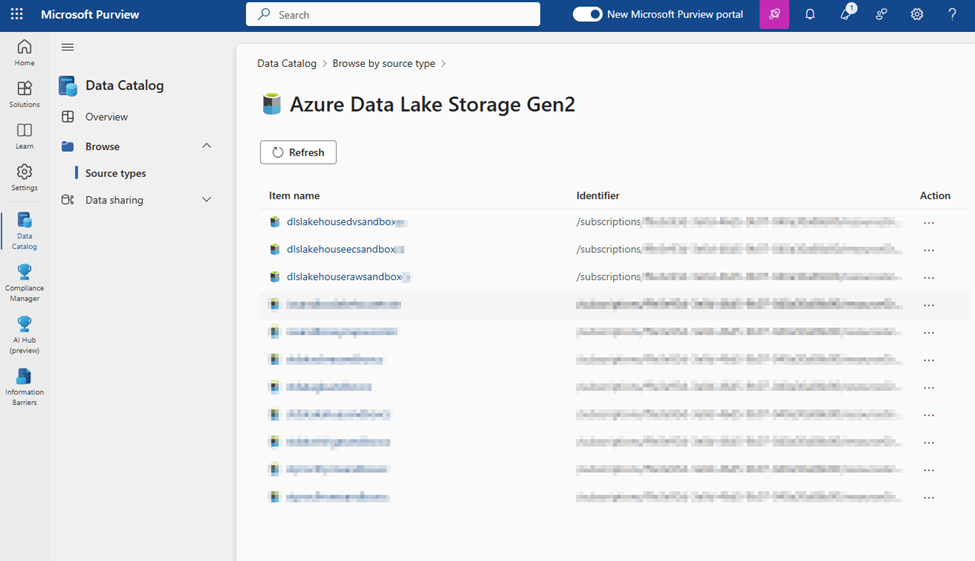
Catalog browse by Azure Data Lake example
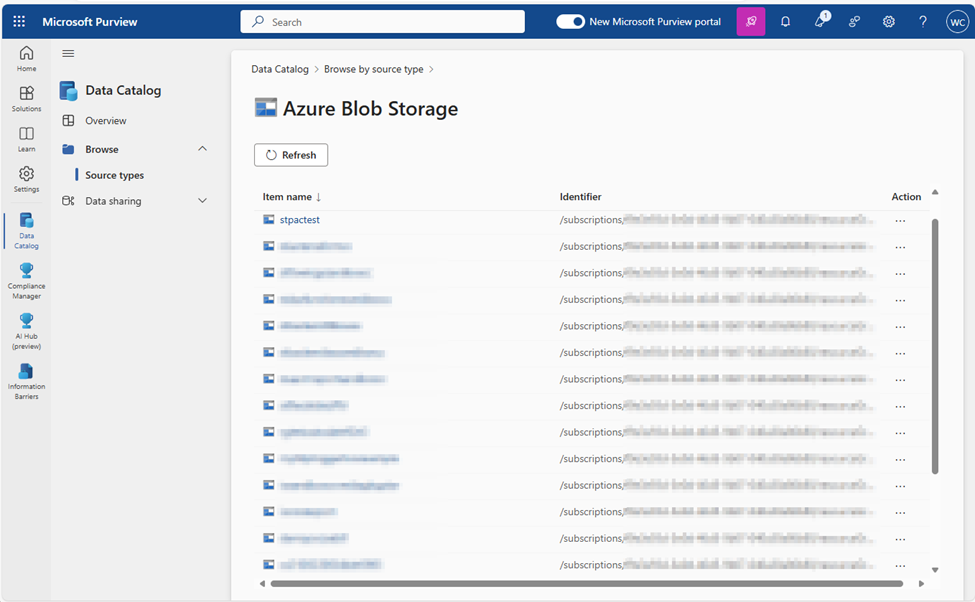
Catalog browser by Blob Storage:
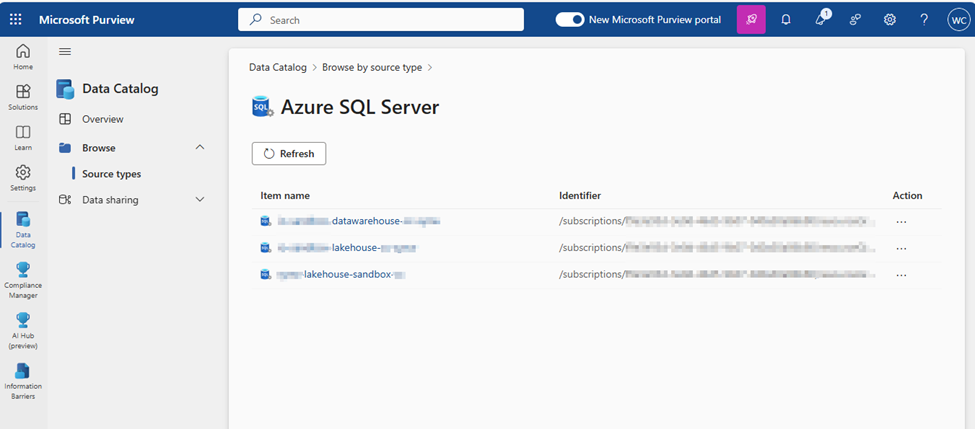
Catalog browser by SQL Server:
Data Estate Insights
Insights offer a high-level view into your data catalog, covering these key facets:
Data stewardship: A report on how curated your data assets are so that you can track your governance progress.
Catalog adoption: A report on the number of active users in your data catalog, their top searches, and your most viewed assets.
Asset insights: A report on the data estate and source-type distribution. You can view by source type, classification, and file size. View the insights as a graph or as key performance indicators.
Scan insights: A report that provides information on the health of your scans (successes, failures, or canceled).
Glossary insights: A status report on the glossary to help users understand the distribution of glossary terms by status, and view how the terms are attached to assets.
Classification insights: A report that shows where classified data is located. It allows security administrators to understand the types of information found in their organization’s data estate.
Sensitivity insights: A report that focuses on sensitivity labels found during scans. Security administrators can make use of this information to ensure security is appropriate for the data estate.
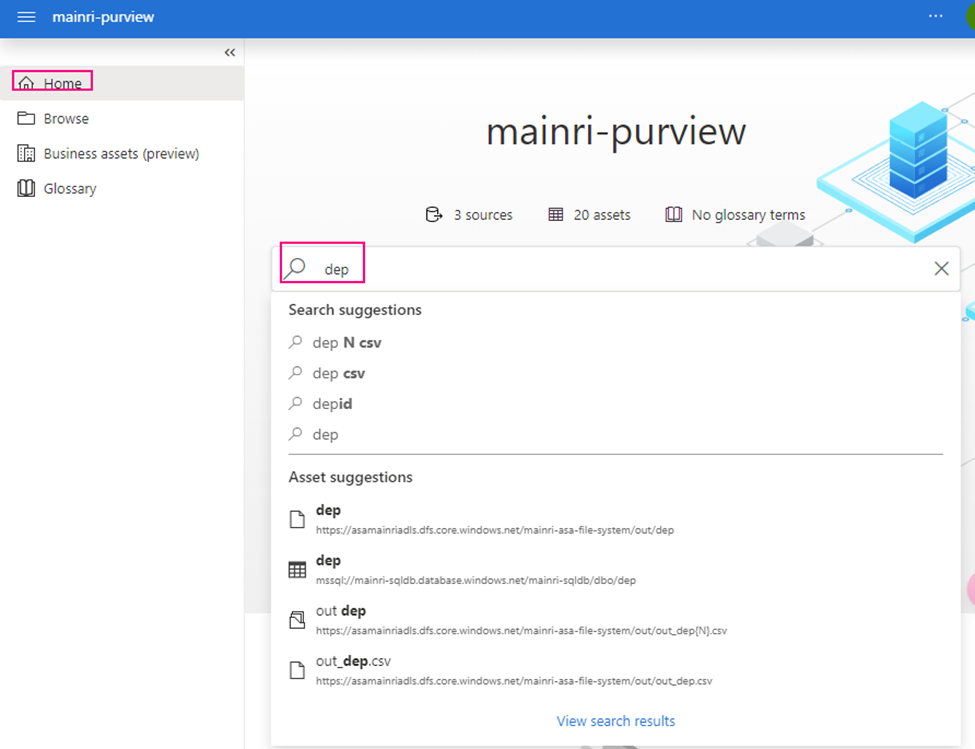
Search the Microsoft Purview data catalog
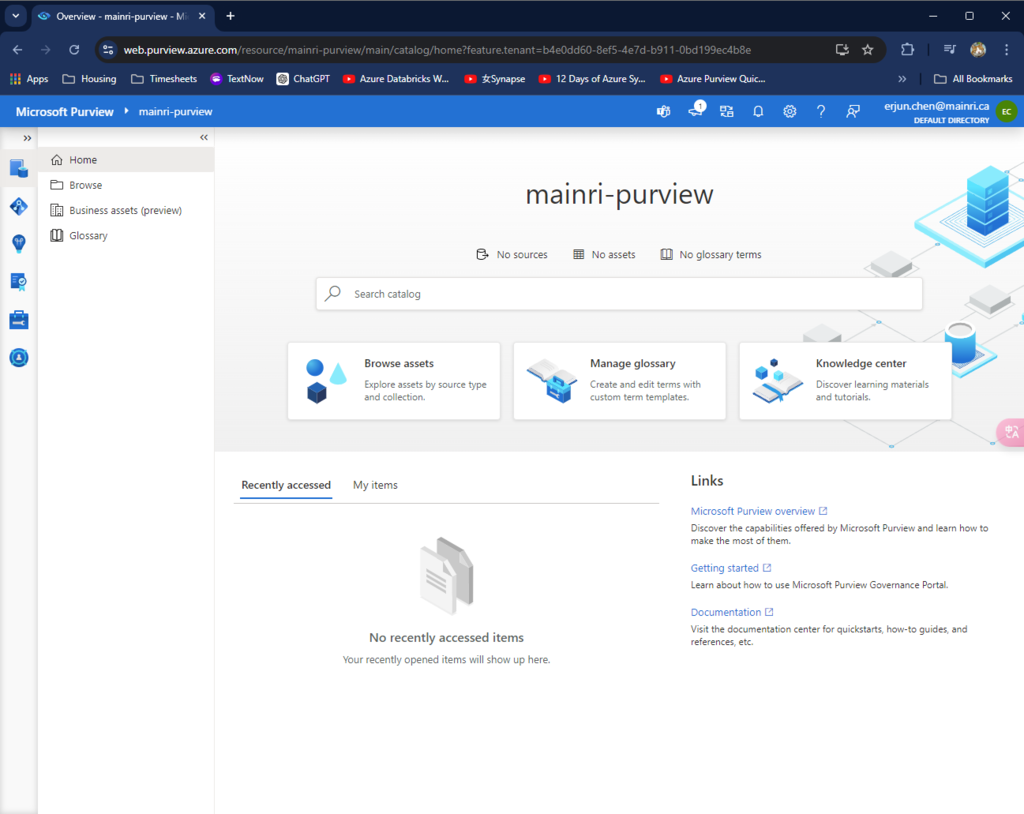
From Purview Studio home, we can type keys to search
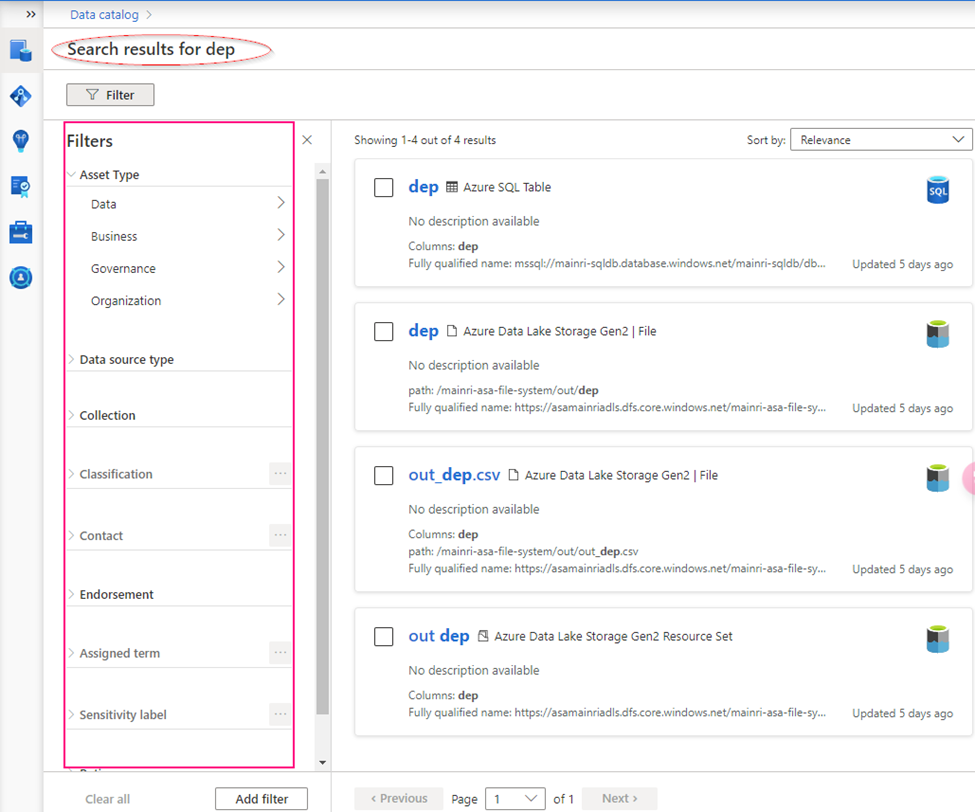
We can filter the search from left hand section
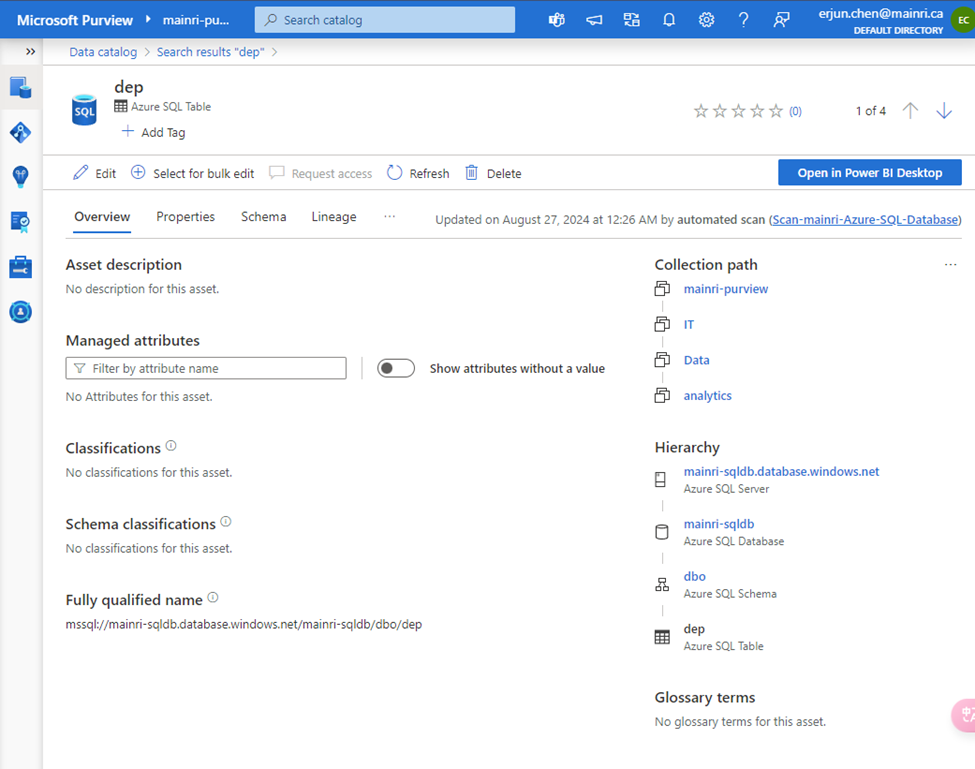
Understand a single asset
Asset overview
Select an asset to see the overview. The overview displays information at a glance, including a description, asset classification, schema classification, collection path, asset hierarchy, and glossary terms.
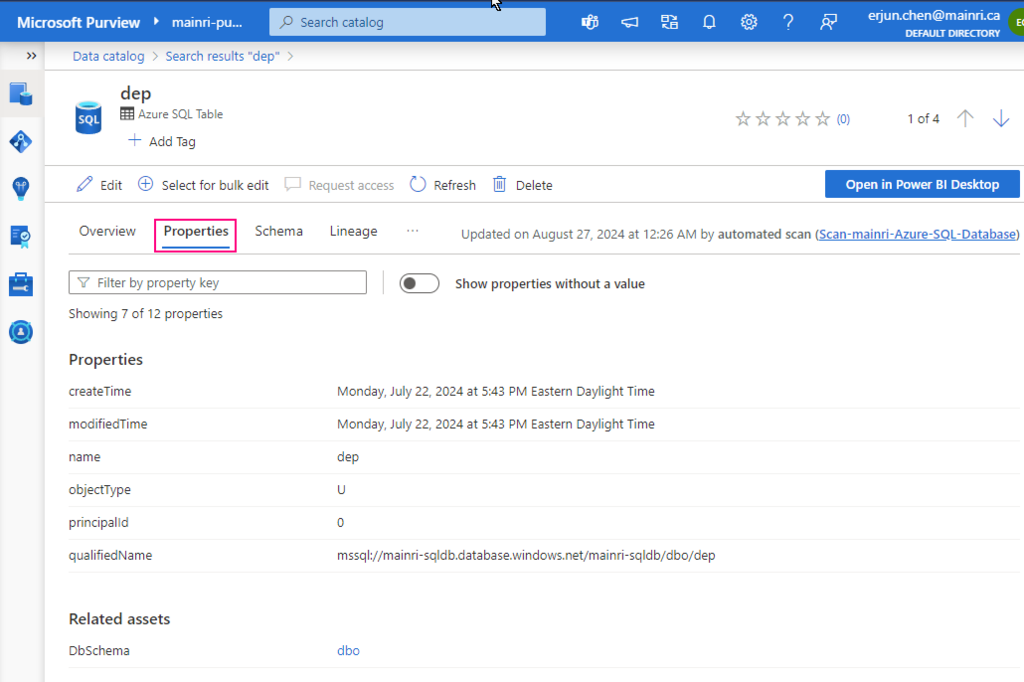
Properties:
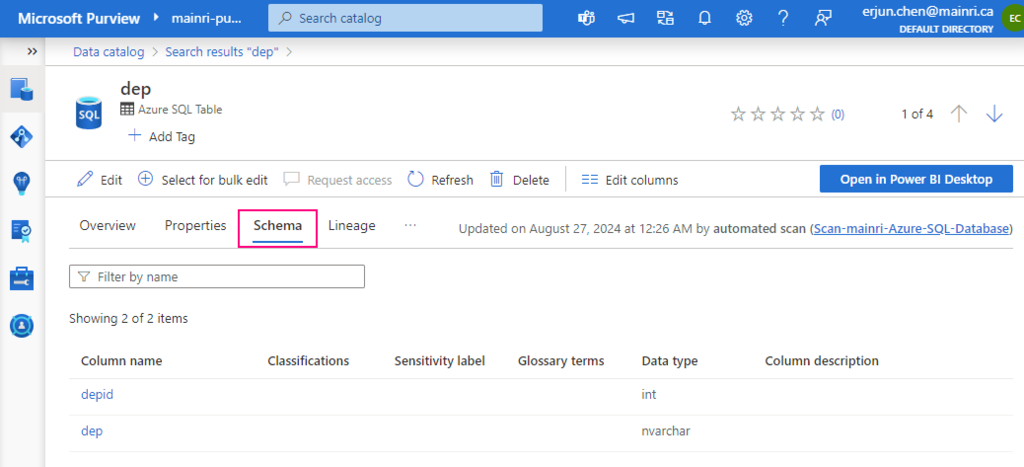
Schema
The schema view of the asset includes more granular details about the asset, such as column names, data types, column level classifications, terms, and descriptions.
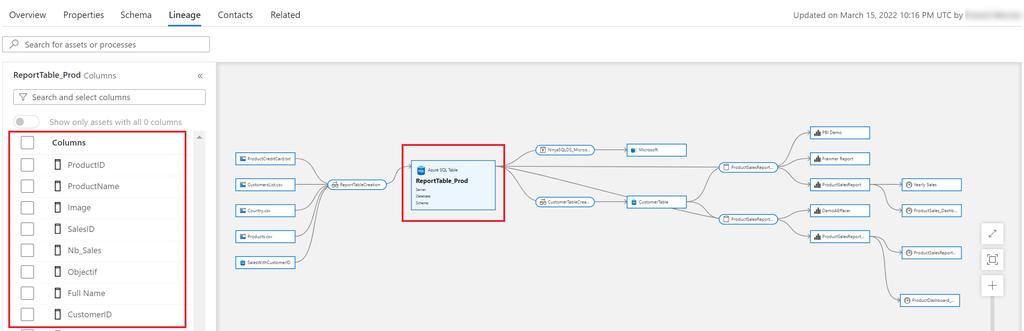
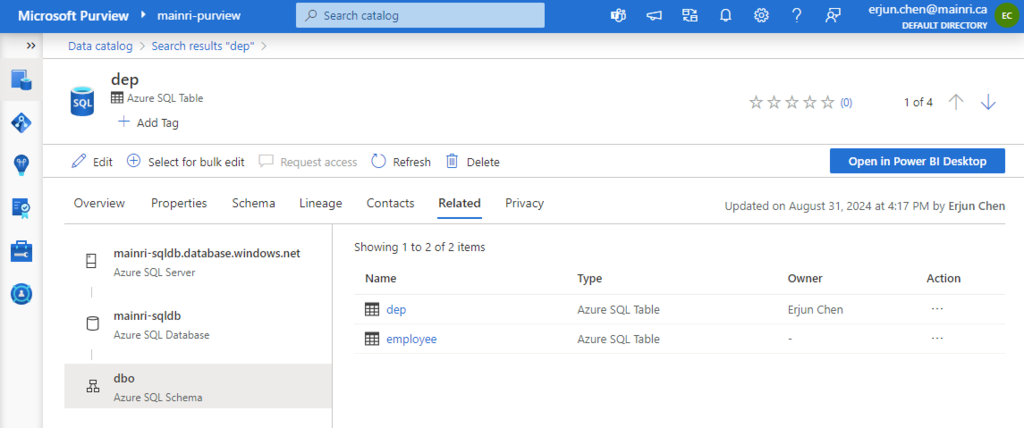
Lineage
Asset lineage gives you a clear view of how the asset is populated and where data comes from. Data lineage is broadly understood as the lifecycle that spans the data’s origin, and where it moves over time across the data estate. Data lineage is important to analysts because it enables understanding of where data is coming from, what upstream changes may have occurred, and how it flows through the enterprise data systems.
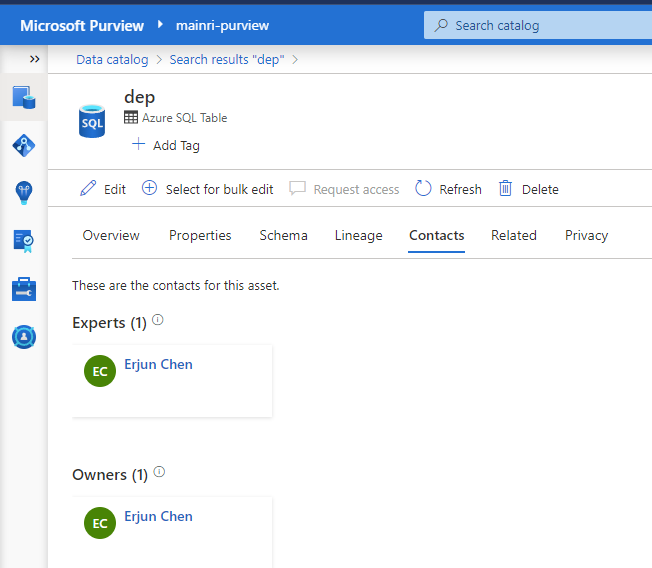
contacts
contacts provide you contact details of experts or dataset owners with any questions.
As the volume and variety of data increases, the challenges of good data governance are likely to become more difficult. Digital transformation technologies have resulted in new data sources. How do users know what data is available? How do administrators manage data when they might not know what type of data exists and where it’s stored? Does the data contain sensitive or personal information?
Writing metadata descriptions for data sources is often a wasted effort. Client applications typically ignore descriptions that are stored in the data source. Creating documentation for data sources is difficult because you must keep documentation in sync with data sources. Users also might not trust documentation that they think is out of date.
Without the ability to track data from end to end, you must spend time tracing problems created by data pipelines that other teams own. If you make changes to your datasets, you can accidentally affect related reports that are business or mission critical.
Azure Purview is a data governance tool offering a unified, cloud-based data discovery, management, and protection approach. It helps organizations manage and govern their on-premises, multi-cloud, and software as a service (SaaS) data. The primary purpose of Azure Purview is to provide a comprehensive understanding of an organization’s data landscape through data discovery, classification, and lineage tracking.
Since its release in December 2020, Azure Purview has been evolving with new features and integrations to enhance its data governance capabilities.
Microsoft Purview is designed to address these issues and help enterprises get the most value from their existing information assets. Its catalog makes data sources easy to discover and understand by the users who manage the data.
I am going to introduce the Azure Purview from scratch using the load map.
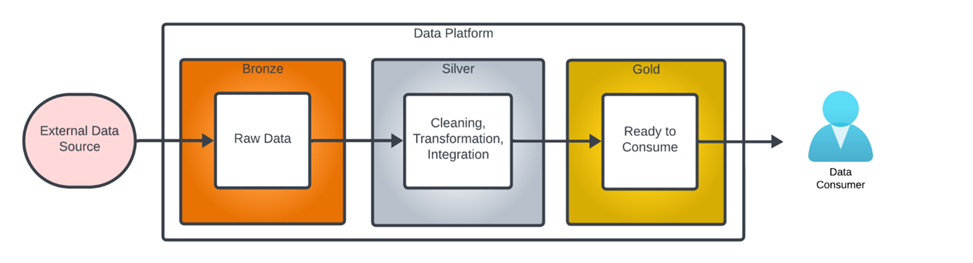
The term “Medallion Data Architecture” was first called by databricks. It is a data design pattern used to logically organize data in a lakehouse. It describes data at different stages of processing as being “bronze,” “silver” or “gold” level data. with the goal of incrementally and progressively improving the structure and quality of data as it flows through each layer of the architecture.
Bronze ⇒ Silver ⇒ Gold layer tables
Bronze data refers to data in its unprocessed state, exactly as loaded from the data source.
Silver data refers to data at various stages of intermediate processing.
Gold level data is fully cleaned and prepared ready for use by a data consumer.
Bronze zone/layer
Data in bronze is raw, unprocessed data. It acts as a landing zone including structured, semi-structured, and unstructured data. Data in this layer is ingested as-is, it is a copy of the data exactly as it was loaded from the data source. meaning it’s often messy, unclean, and can include duplicates.
If a fault occurs, it allows you to quickly determine if the the problem is related to source data or processing within the data platform.
Gold zone
Sometimes it is also called Curated zone/layer.
Data in this layer is fully cleaned, secured and maybe pre-aggregated data. All data is ready for access. contains highly curated, aggregated. data usually tailored for specific use cases, such as reporting, business intelligence, or machine learning.and often ready-for-consumption data.
Silver Layer (Cleaned Data)
There is layer between the Bronze and Gold layer, it is called Silver Layer. The silver layer is where data is cleaned, transformed, and often enriched. It’s meant to be a more refined version of the bronze layer, ready for further analysis or use in applications. Data in this layer is typically free of duplicates, missing values are handled, and unnecessary data is filtered out. The transformations applied here make the data more structured and reliable.
Why use Medallion Architecture
Many software engineers are familiar the “multiple tiers architecture” in software development. Medallion Architecture has the same meaning “multiple architectures”.
Scalability: The layered approach allows for scaling each part of the data pipeline independently.
Flexibility: It provides flexibility in data processing and the ability to handle different data types and sources.
Data Quality: By progressing data through these layers, the architecture naturally enforces data quality and consistency.
Ease of Use: It simplifies data management by organizing the data into distinct stages, making it easier to understand and manage.
Conclusion
Overall, the Medallion Architecture is a powerful pattern for managing data lifecycle, from raw ingestion to refined, consumable datasets. It often use in data engineering project. such as Data Lakes, Big Data Processing, ETL/ELT Pipelines etc.
Please do not hesitate to contact me if you have any questions at William . chen @mainri.ca
As a data engineer, we often hear terms like Data Lake, Delta Lake, Data Lakehouse, and data warehouse, which might be confusing at times. Today, we’ll explain these terms and talk about the differences of each of the technologies and concepts, along with scenarios of usage for each.
Delta Lake
Delta lake is an open-source technology, a storage layer, built on top of Apache Spark. We use Delta Lake to store data in Delta tables. Delta lake improves data storage by supporting ACID transactions, high-performance query optimizations, schema evolution, data versioning and many other features.
Delta Lake takes your existing Parquet data lake and makes it more reliable and performant by:
Storing all the metadata in a separate transaction log
Tracking all the changes to your data in this transaction log
Organizing your data for maximum query performance
Data Lakehouse
Data lakehouse is a new unified architecture, open data management architecture that combines the flexibility, cost-efficiency, and scale of data lakes with the data management and ACID transactions of data warehouses, enabling business intelligence (BI) and machine learning (ML) on all data.
Data Lake
A data lake is a centralized repository that allows organizations to store vast amounts of structured, semi-structured, and unstructured data. Unlike traditional data warehouses, a data lake retains data in its raw form until it is needed, which provides flexibility in how the data can be used.
Data Warehouse
A data warehouse is a centralized repository that stores structured data (database tables, Excel sheets) and semi-structured data (XML files, webpages) Its data is usually cleaned and standardized for the purposes of reporting and analysis.
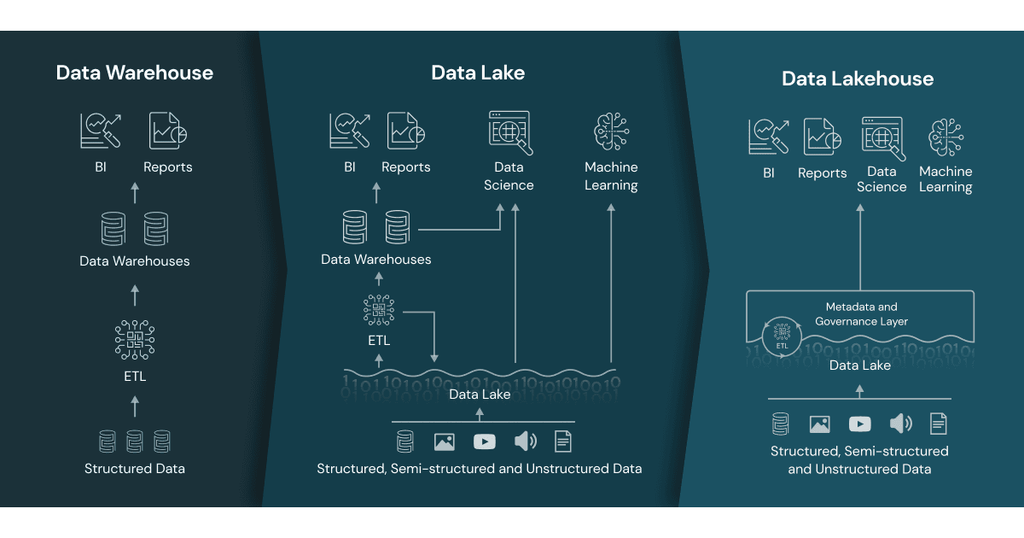
Data lakes vs. data lakehouse vs. data warehouses
follow table simply compared what difference .
Data lake
Data lakehouse
Data warehouse
Types of data
All types: Structured data, semi-structured data, unstructured (raw) data
All types: Structured data, semi-structured data, unstructured (raw) data
Structured data only
Cost
$
$
$$$
Format
Open format
Open format
Closed, proprietary format
Scalability
Scales to hold any amount of data at low cost, regardless of type
Scales to hold any amount of data at low cost, regardless of type
Scaling up becomes exponentially more expensive due to vendor costs
Intended users
Limited: Data scientists
Unified: Data analysts, data scientists, machine learning engineers
Limited: Data analysts
Reliability
Low quality, data swamp
High quality, reliable data
High quality, reliable data
Ease of use
Difficult: Exploring large amounts of raw data can be difficult without tools to organize and catalog the data
Simple: Provides simplicity and structure of a data warehouse with the broader use cases of a data lake
Simple: Structure of a data warehouse enables users to quickly and easily access data for reporting and analytics
Performance
Poor
High
High
summary
Data lakes are a good technology that give you flexible and low-cost data storage. Data lakes can be a great choice for you if:
You have data in multiple formats coming from multiple sources
You want to use this data in many different downstream tasks, e.g. analytics, data science, machine learning, etc.
You want flexibility to run many different kinds of queries on your data and do not want to define the questions you want to ask your data in advance
You don’t want to be locked into a vendor-specific proprietary table format
Data lakes can also get messy because they do not provide reliability guarantees. Data lakes are also not always optimized to give you the fastest query performance.
Delta Lake is almost always more reliable, faster and more developer-friendly than a regular data lake. Delta lake can be a great choice for you because:
You have data in multiple formats coming from multiple sources
You want to use this data in many different downstream tasks, e.g. analytics, data science, machine learning, etc.
You want flexibility to run many different kinds of queries on your data and do not want to define the questions you want to ask your data in advance
You don’t want to be locked into a vendor-specific proprietary table format
Please do not hesitate to contact me if you have any questions at William . chen @mainri.ca
Understanding how failures in individual activities affect the pipeline as a whole is crucial for building robust data workflows.
Some people have used SSIS previously, when they switch from SSIS to the Azure Data Factory and Synapse, they might confuse in ADF or ASA ‘s “pipeline logical failure mechanisam” ADF or ASA’s pipeline orchestration allows conditional logic and enables the user to take a different path based upon outcomes of a previous activity. Using different paths allows users to build robust pipelines and incorporates error handling in ETL/ELT logic.
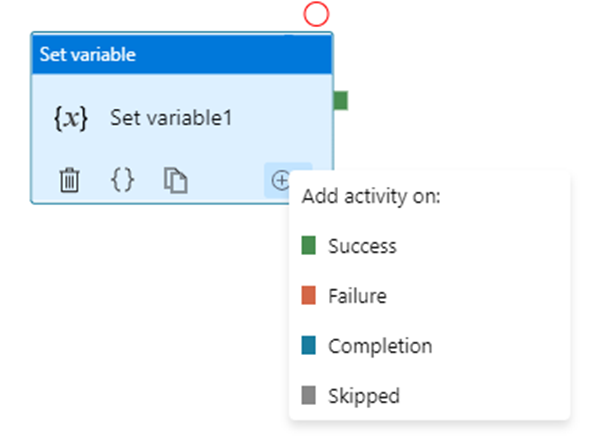
ADF or ASA activity outcomes path
ADF or ASA has 4 paths in total.
A pipeline can have multiple activities that can be executed in sequence or in parallel.
Sequential Execution: Activities are executed one after another.
Parallel Execution: Multiple activities run simultaneously.
You are able to add multiple branches following an activity, for each pipeline run, at most one path is activated, based on the execution outcome of the activity.
Error Handling Mechanism
When an activity fails within a pipeline, several mechanisms can be employed to handle the failure:
In most cases, pipelines are orchestrated in Parallel, Serial or Mixed model. The key point is understanding what will happen in Parallet or Serial model.
From upon activity point of view, the basic principles that are:
Multiple dependencies with the same source are logical “OR”
Multiple dependencies with different sources are logical “AND”
Different error handling mechanisms lead to different status for the pipeline: while some pipelines fail, others succeed. We determine pipeline success and failures as follows:
Evaluate outcome for all leaves activities. If a leaf activity was skipped, we evaluate its parent activity instead.
Pipeline result is success if and only if all nodes evaluated succeed
Let us discuss in detail.
Multiple dependencies with the same source
This seems like “Serial” or “sequence”
How “Serial” pipeline failure is determined
As we develop more complicated and resilient pipelines, it’s sometimes required to introduce conditional executions to our logic: execute a certain activity only if certain conditions are met. At this point, as long as one or more activities failed while one or other activities success in a pipeline, what is the status of the entire pipeline? Success? Failure? How are pipeline failure determined?
In fact, ADF/ASA has unique insight. Software engineers are used to customary form:
“if … then … else …”; try … catch …”, let’s use the developer’ idiom
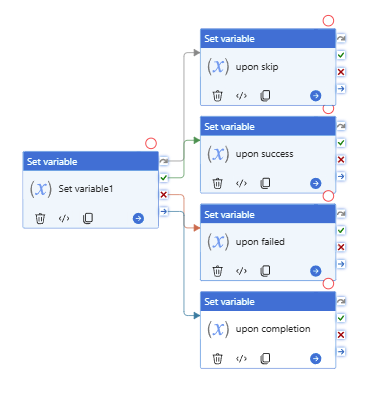
Single upon activity or Serial model, multiple downstream
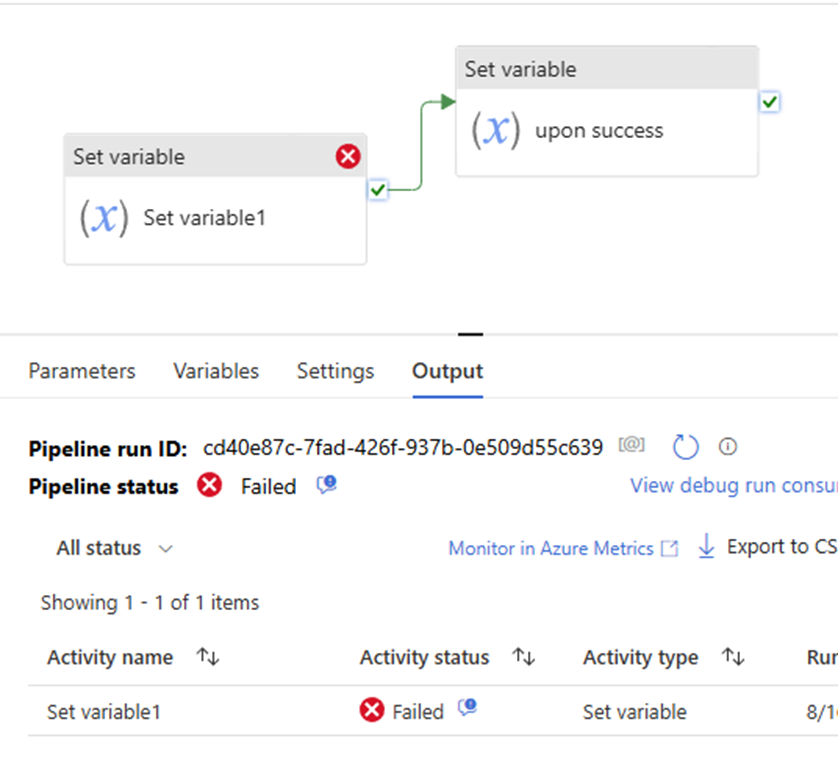
upon act failed >> downstream act success >> pipeline success
Scenario 2:
If … then … Else …
Pipeline defines both the Upon Failure and Upon Success paths. This approach renders pipeline fails, even if Upon Failure path succeeds.
Both success & failure path
upon act failed >> downstream act failed >> pipeline success
Both success & failure path
upon act failed >> downstream failed >> pipeline failed
Scenario 3
If …Skip… Else ….
Both success & failure path, and skip path
upon act success >> downstream act success >> skip path is skipped >> pipeline success
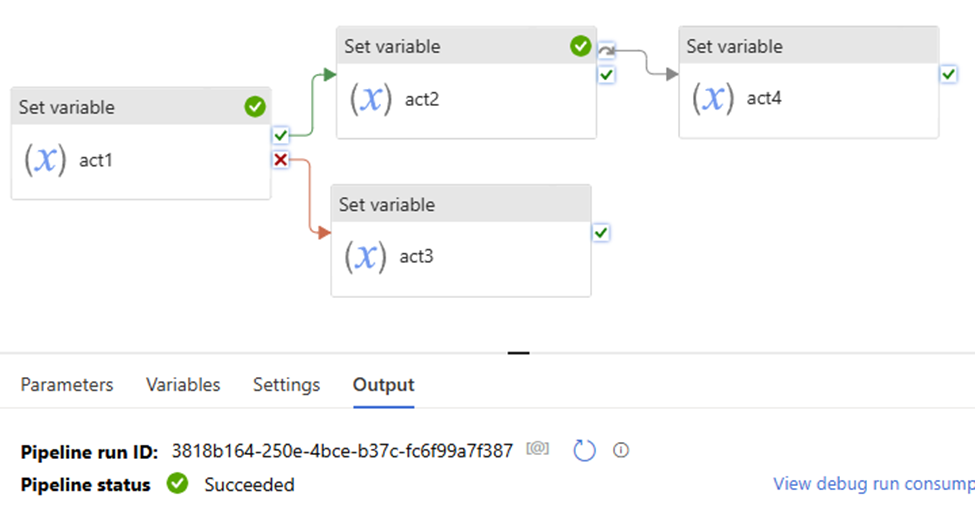
Multiple dependencies with different sources
This seems like “Parallel”, its logical is “And”
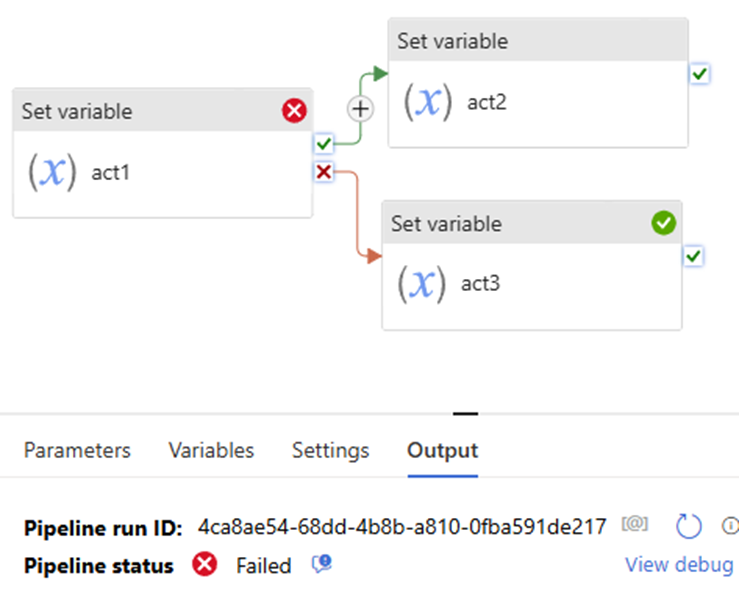
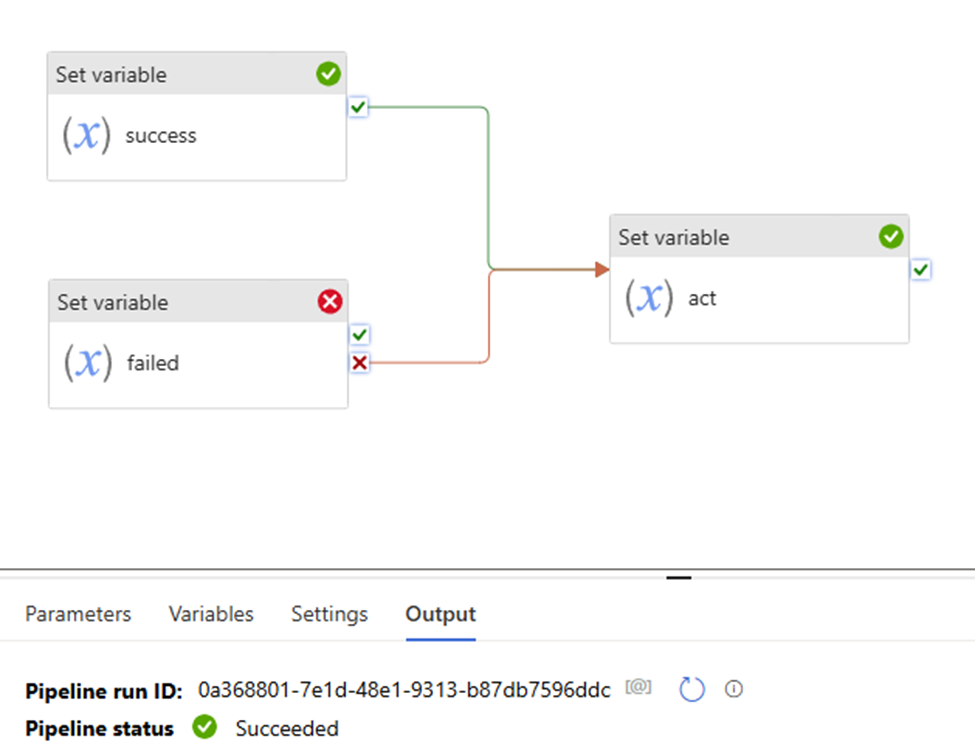
Scenario 4:
Upon act 1 success and upon act 2 success >> downstream act success >> pipeline success.
Upon act 1 success and upon act 2 failed >> downstream act success >> pipeline success.
pay attention to the “Set variable failed” uses “fail” path.
That mean:
“set variable success” the action is true
Although “set variable failed” activity failed, but “set variable failed” the action is true.
so both “set variable success” and “set variable failed” the two action true.
pipeline shows to “success”
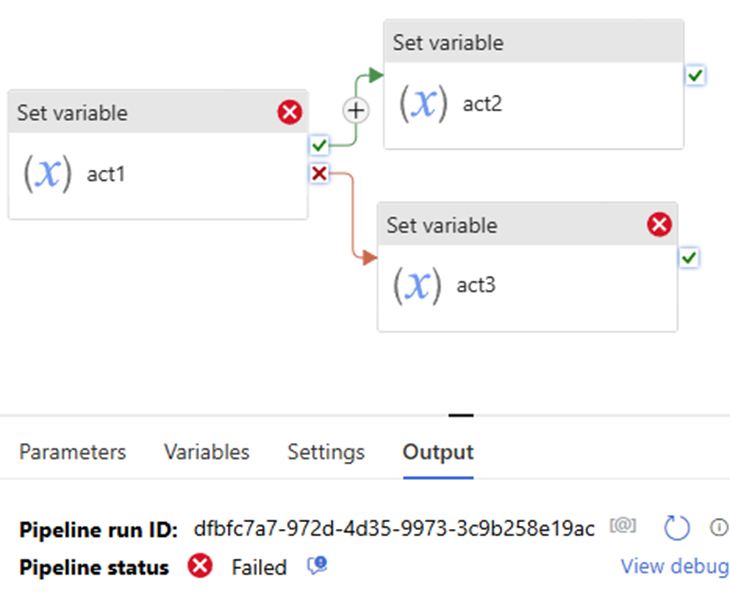
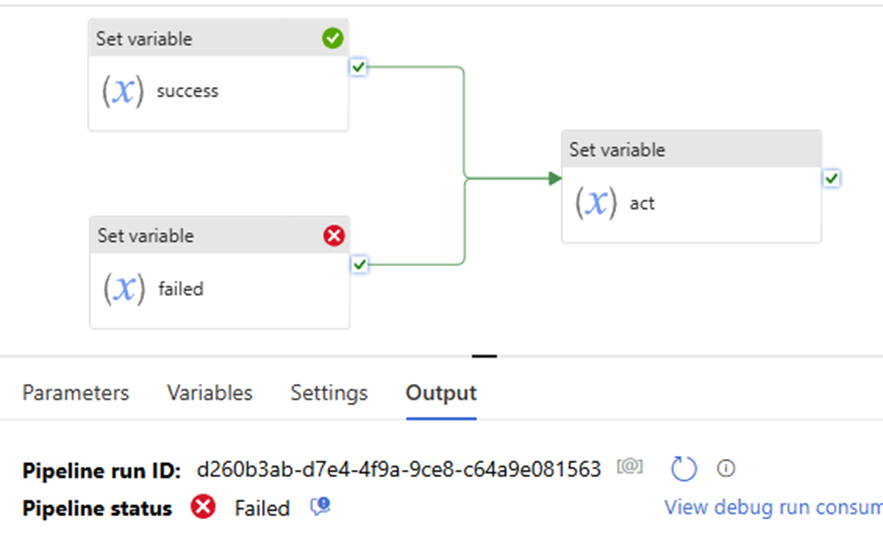
Now, let’s try this:
the “Set variable failed” uses “success” path, to see what pipeline shows, pipeline failed.
Why? since the “Set variable failed” action is not true. even if the “set variable success” action is True. True + False = False. follow activity – “set variable act” is skipped. will not execute, will not run! pipeline failed!
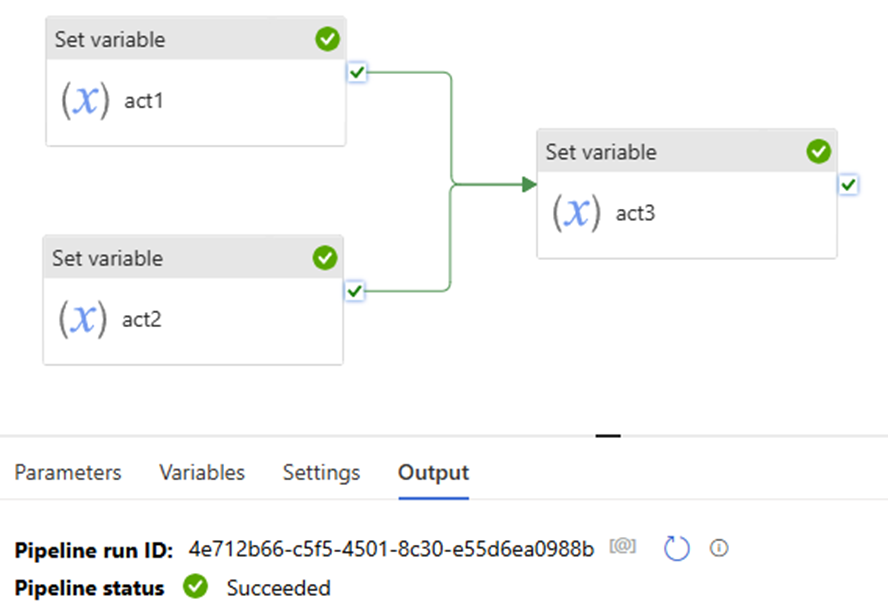
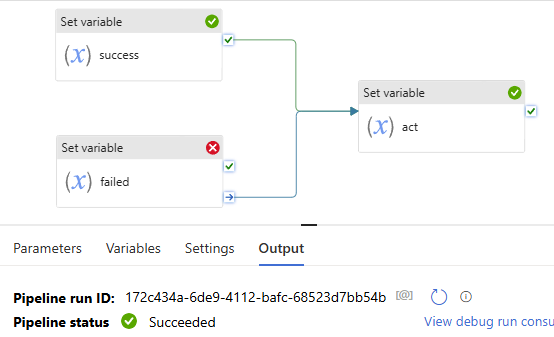
All right, you might immediately realize that once we let the “Set variable failed” path uses “complete”, that means no matter it true or false, the downstream activity “set variable act” will not be skipped. Pipeline will show success.
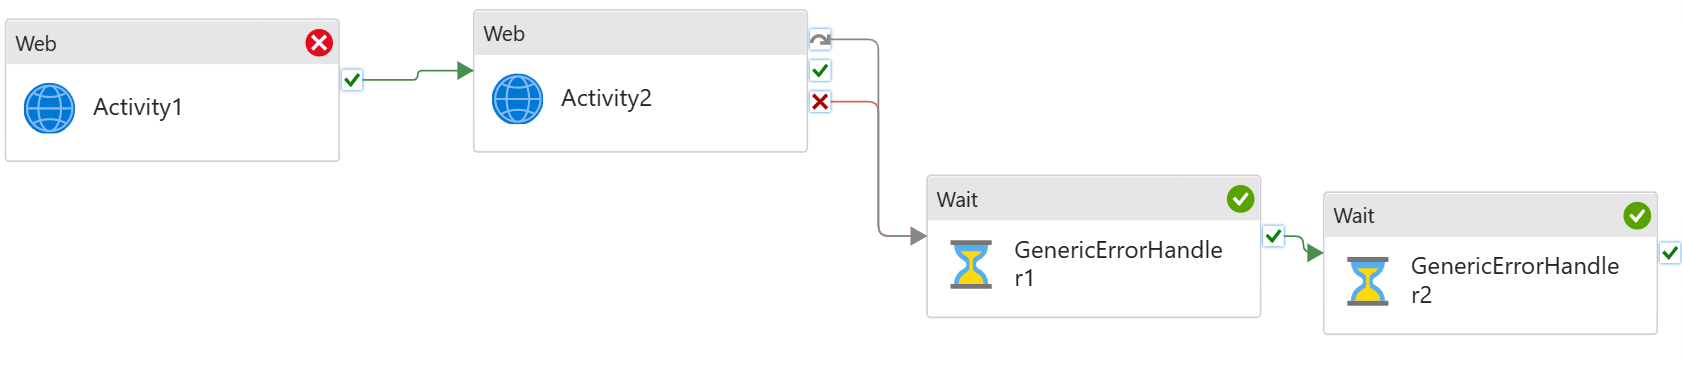
Error Handling
Sample error handling patterns
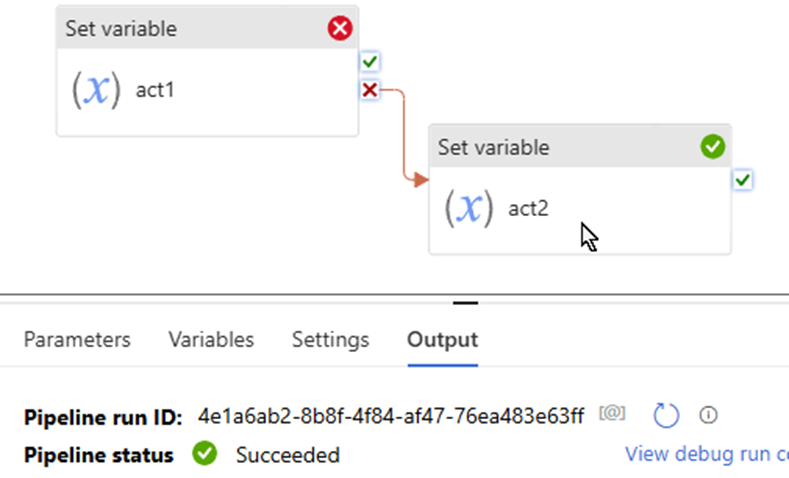
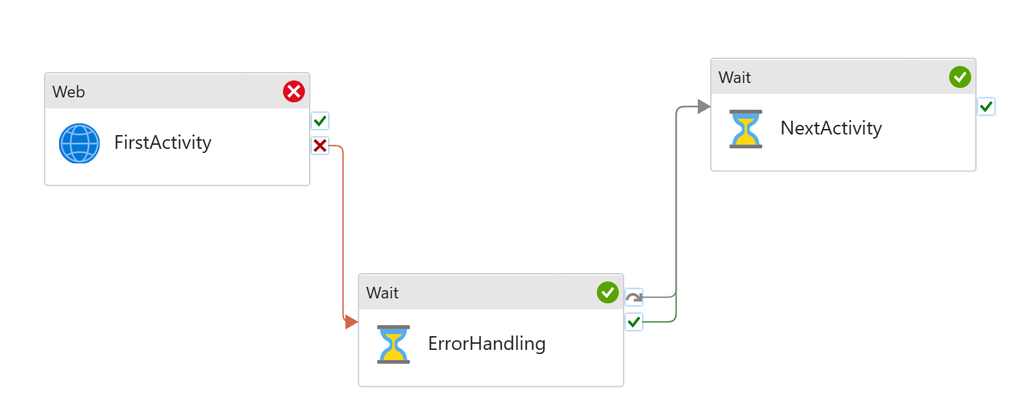
The pattern is equivalent to try catch block in coding. An activity might fail in a pipeline. When it fails, customer needs to run an error handling job to deal with it. However, the single activity failure shouldn’t block next activities in the pipeline. For instance, I attempt to run a copy job, moving files into storage. However it might fail half way through. And in that case, I want to delete the partially copied, unreliable files from the storage account (my error handling step). But I’m OK to proceed with other activities afterwards.
To set up the pattern:
Add first activity
Add error handling to the UponFailure path
Add second activity, but don’t connect to the first activity
Connect both UponFailure and UponSkip paths from the error handling activity to the second activity
Error Handling job runs only when First Activity fails. Next Activity will run regardless if First Activity succeeds or not.
Generic error handling
We have multiple activities running sequentially in the pipeline. If any fails, I need to run an error handling job to clear the state, and/or log the error.
For instance, I have sequential copy activities in the pipeline. If any of these fails, I need to run a script job to log the pipeline failure.
To set up the pattern:
Build sequential data processing pipeline
Add generic error handling step to the end of the pipeline
Connect both Upon Failure and Upon Skip paths from the last activity to the error handling activity
The last step, Generic Error Handling, will only run if any of the previous activities fails. It will not run if they all succeed.
You can add multiple activities for error handling.
Summary
Handling activity failures effectively is crucial for building robust pipelines in Azure Data Factory. By employing retry policies, conditional paths, and other error-handling strategies, you can ensure that your data workflows are resilient and capable of recovering from failures, minimizing the impact on your overall data processing operations.
if you have any questions, please do not hesitate to contact me at william. chen @mainri.ca (remove all space from the email account 😊)
A Service Principal in Azure is an identity used by applications, services, or automated tools to access specific Azure resources. It’s tied to an Azure App Registration and is used for managing permissions and authentication.
The Microsoft identity platform performs identity and access management (IAM) only for registered applications. Whether it’s a client application like a ADF or Synapse, Wen Application or mobile app, or it’s a web API that backs a client app, registering establishes a trust relationship between your application and the identity provider, the Microsoft identity platform.
This article is talking on registering an application in the Microsoft Entra admin center. I outline the registration procedure step by step.
Summary steps:
Navigate to Azure Entra ID (Azure Active Directory)
Create an App Registration
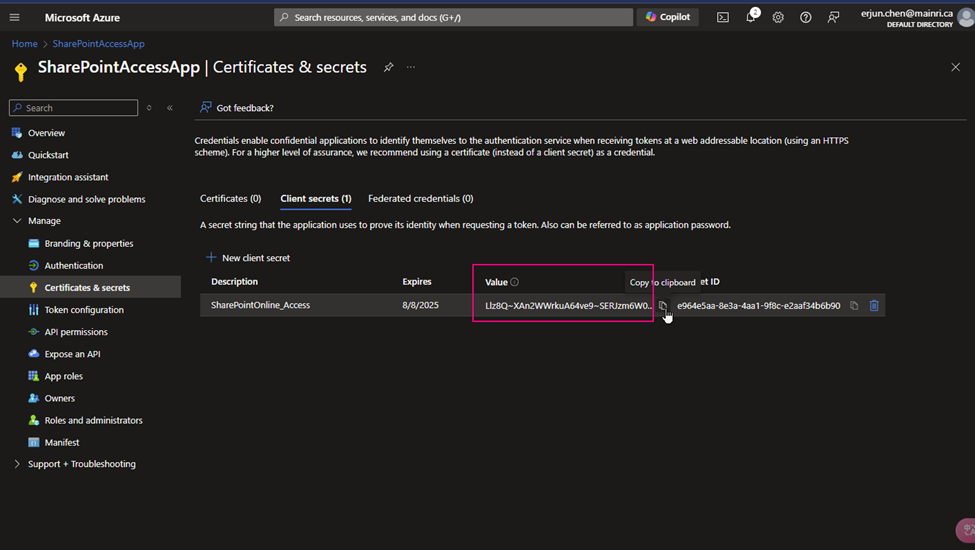
Generate Client Secret, note down Important the Application (client) ID and Directory (tenant) ID, Client-Secret-value.
Using the Service Principle – Assign Roles to the Service Principal Navigate to the Azure resource (e.g., Storage Account, Key Vault, SQL Database) you want your Service Principal to access.
Step by Step Demo
Register a new Application on Azure Entra ID (formerly called Azure Active Directory), get an Application ID and Client Secret value.
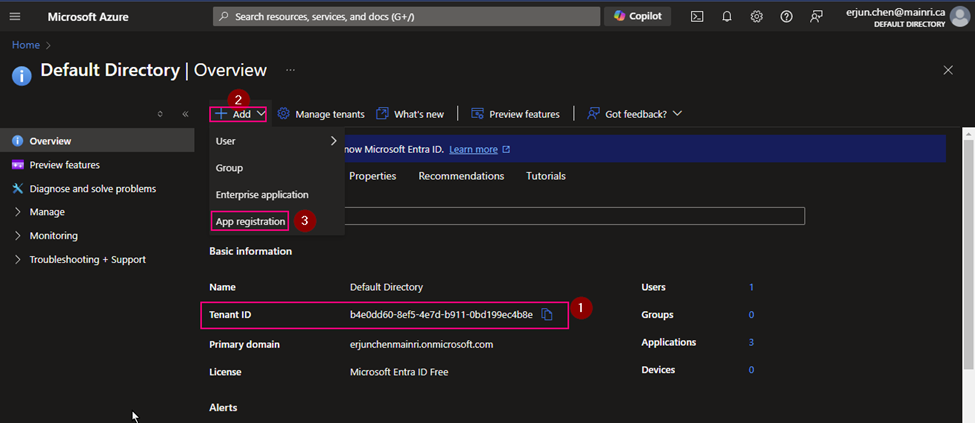
Azure Portal >> Azure Entra ID (formerly called Azure Active Directory)
(1) Copy Tenant ID.
We need this Tenant ID later.
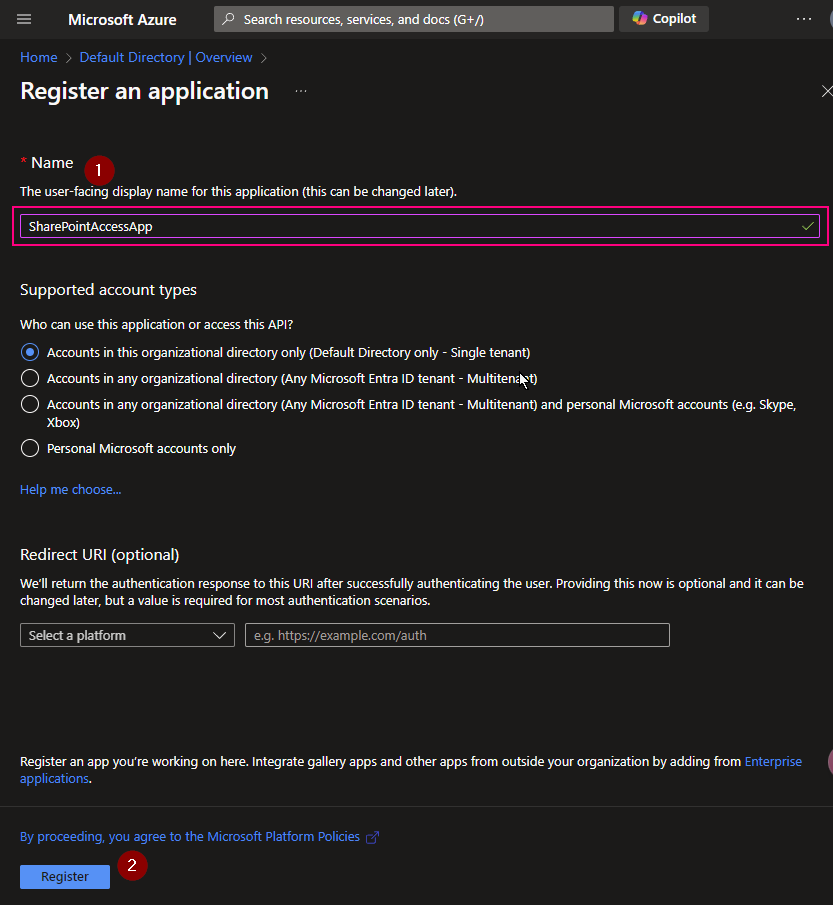
(2) App Registration
(3) Copy Application ID. We will use it later
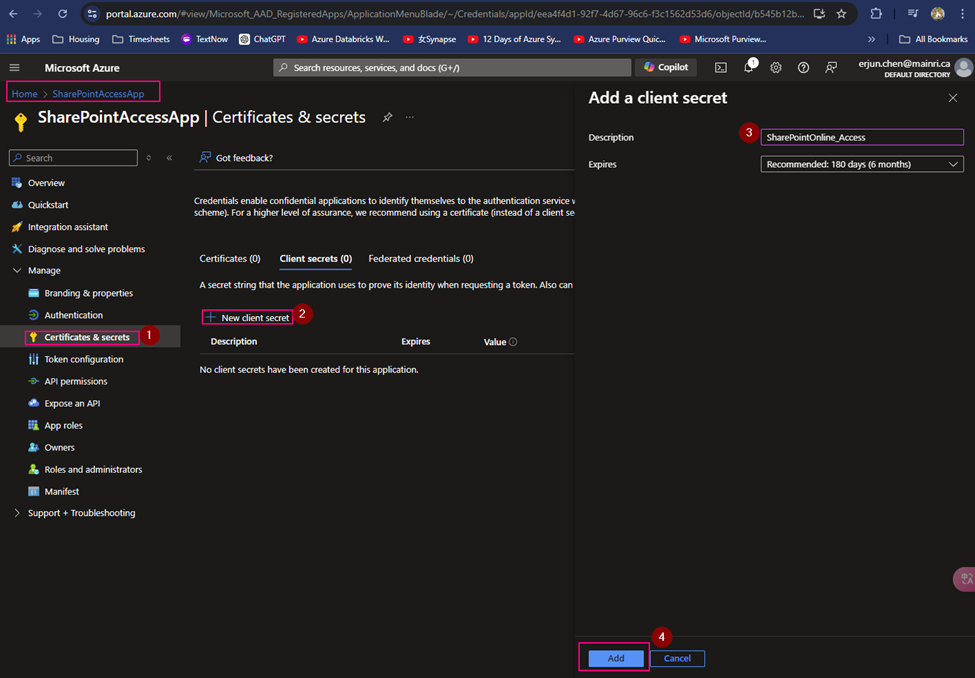
(4) Create Client Secret
Generate a new client Secret,
(5) copy the Client Secret Value
Copy client-secret-value, we need it later.
Cause: the Client Secret Value you HAVE TO COPY IT RIGHT NOW! IMMEDIATELY copy NOW. And put it to a secure place. Since the Value WILL NOT reappear anymore. IMOPRTANT!
(6) Using the Service Principle – Assign Roles to the Service Principal
Assign Roles to the Service Principal
Now, assign permissions to your Service Principal so it can access specific Azure resources:
Navigate to the Azure resource (e.g., Storage Account, Key Vault, SQL Database) you want your Service Principal to access.
Go to Access Control (IAM).
Click Add and choose Add role assignment.
Choose a role (e.g., Contributor, Reader, or a custom role).
Search for your App Registration by its name and select it.
Save
We have finished all at Azure Entra ID (Former Azure Active Directory)
Please do not hesitate to contact me if you have any questions at william . chen @mainri.ca
In this article I will provide a fully Metadata driven solution about using Azure Data Factory (ADF) or Synapse Analytics (ASA) incrementally copy multiple data sets one time from SharePoint Online (SPO) then sink them to ADSL Gen2.
Previously, I have published articles regarding ADF or ASA working with SPO. if you are interested in specifics matters, please look at related articles from here , or email me at william . chen @ mainri.ca (please remove spaces from email account 🙂 ).
Scenario and Requirements
Metadata driven. All metadata are save on SharePoint list, such as TenantID, ClientID, SPO site name, ADLS account, inspecting offset days for increment loading …. etc.
Initial full load, then monitor data set status, once it update, incrementally load, for example, on daily basis.
Solution
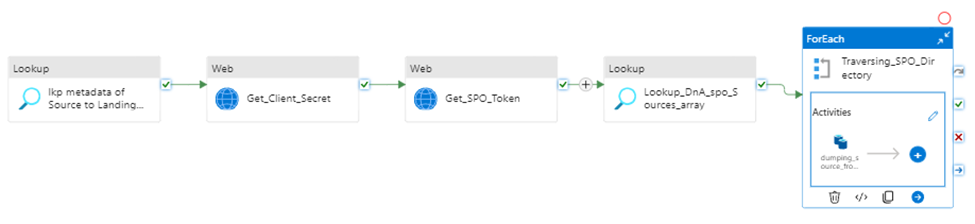
Retrieves metadata >> retrieves “client Secret” >> request access token >> insect and generate interests data list >> iteratively copy interest data sink to destination storage.
Prerequisite
Register SharePoint (SPO) application in Azure Active Directory (AAD).
Grant SPO site permission to registered application in AAD.
Provision Resource Group, ADF (ASA) and ADLS in your Azure Subscription.
I have other articles to talk those in detail. If you need review, please go to
Let us begin , Step by Step in detail, I will mention key points for every steps.
Step1:
Using Lookup activity to retrieve all metadata from SharePoint Online
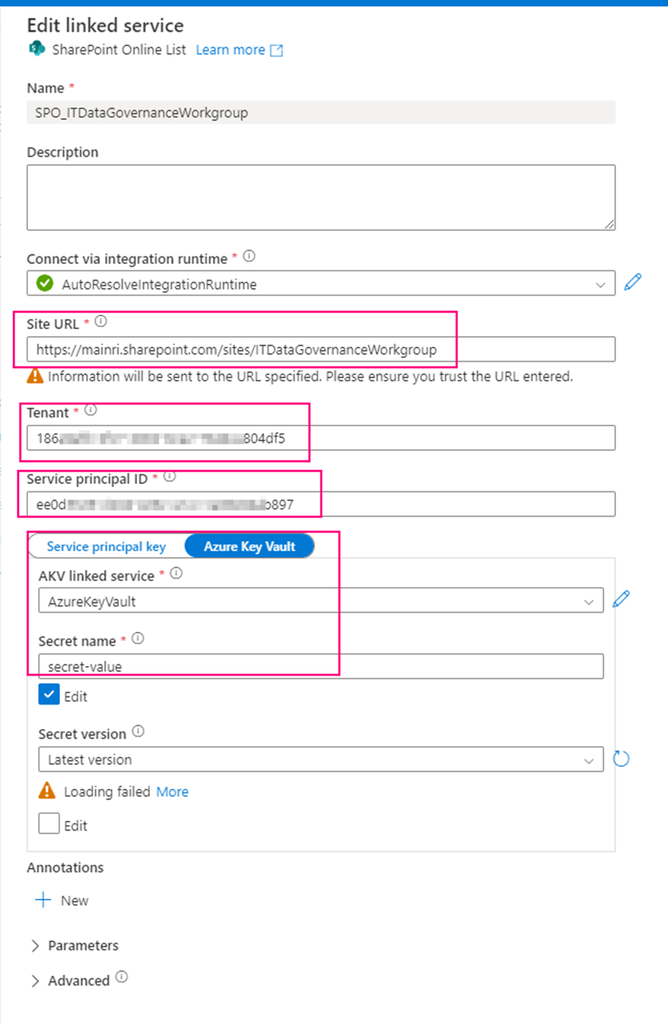
Firstly, create a SharePoint on Line List type Linked Service – SPO_ITDataGovernanceWorkgroup you need provide:
SharePoint site URL, you should replace it by using yours. it looks like htts://[your_domain].sharepoint.sites/[your_site_name]. mine is https://mainri.sharepoint.com/sites/ITDataGovernanceWorkgroup.
Tenant ID. The tenant ID under which your application resides. You can find it from Azure portal Microsoft Entra ID (formerly called Azure AD) overview page.
Service principal ID (Client ID) The application (client) ID of your application registered in Microsoft Entra ID. Make sure to grant SharePoint site permission to this application.
Service principal Key The client secret of your application registered in Microsoft Entra ID. mine is save in Azure Key Vault
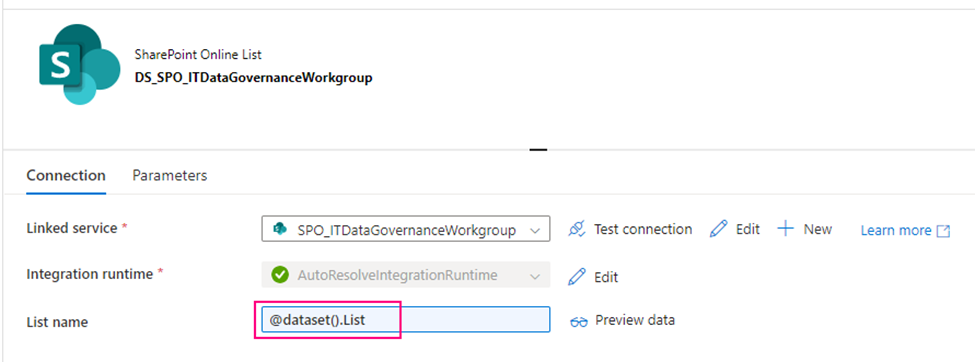
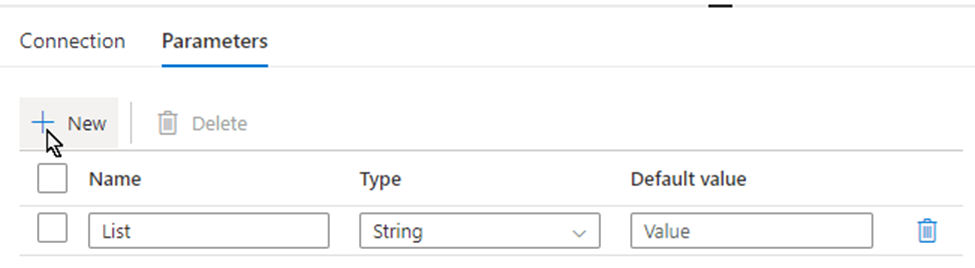
secondly, using above Linked Service create a SharePoint type Dataset – DS_SPO_ITDataGovernanceWorkgroup parametrize the dataset.
I name the parameter “List“, This parameter lets lookup activity knows where your metadata resides. (mine is called SourceToLanding)
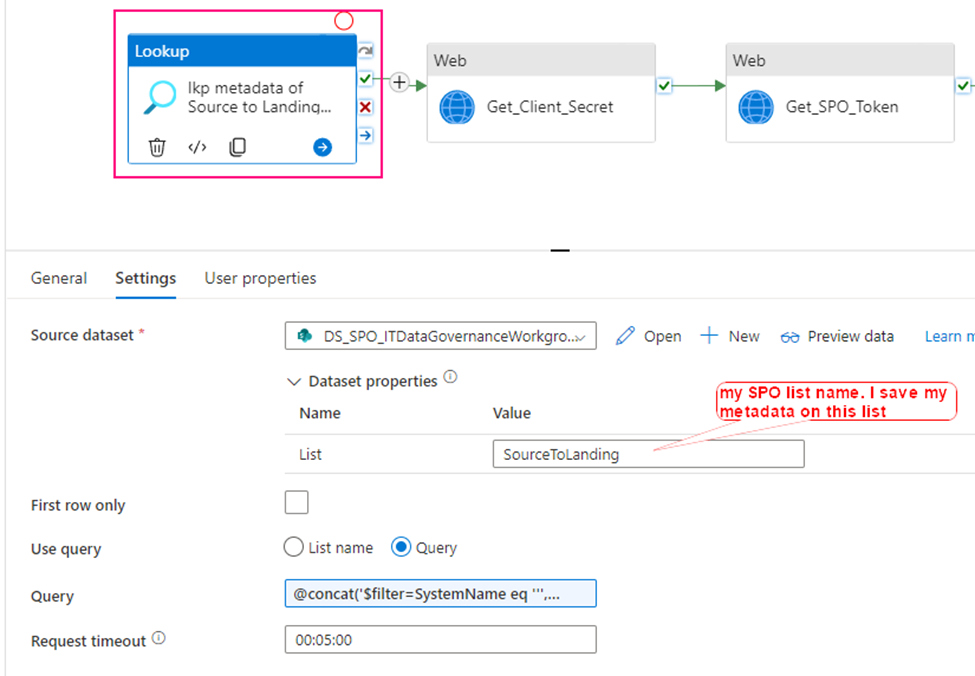
Now, we are ready to configure the Lookup activity
Source dataset: use above created dataset – DS_SPO_ITDataGovernanceWorkgroup
Query: @concat(‘$filter=SystemName eq ”’,pipeline().parameters.System,”’ and StatusValue eq ”Active”’)
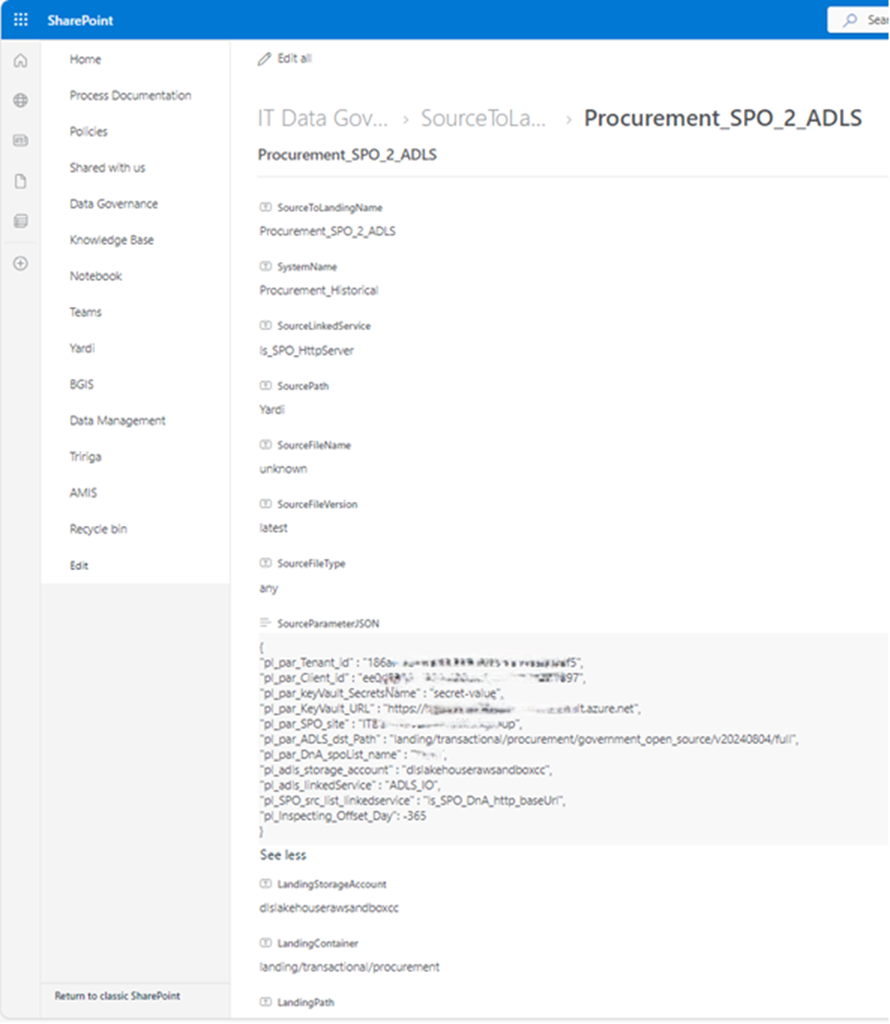
This query filters out my interest SPO list where my metadata saves. My metadata list in SPO looks like this
This lookup activity return metadata retrieved from SPO list. Looks like this.
response is json format. My “SourceParameterJSON” value is string, but it well match json format, could be covert to json.
Step 2:
Get Client Secret
To get SPO access token, we need: Tenant ID, Client ID, and Client Secret
Tenant ID: You can get this from Azure Entra ID (former Azure active Directory)
Client ID: When you register your application at Azure Entra ID, azure Entra ID will generate one, called Application ID (Client ID). You can get this from Azure Portal >>Entra ID
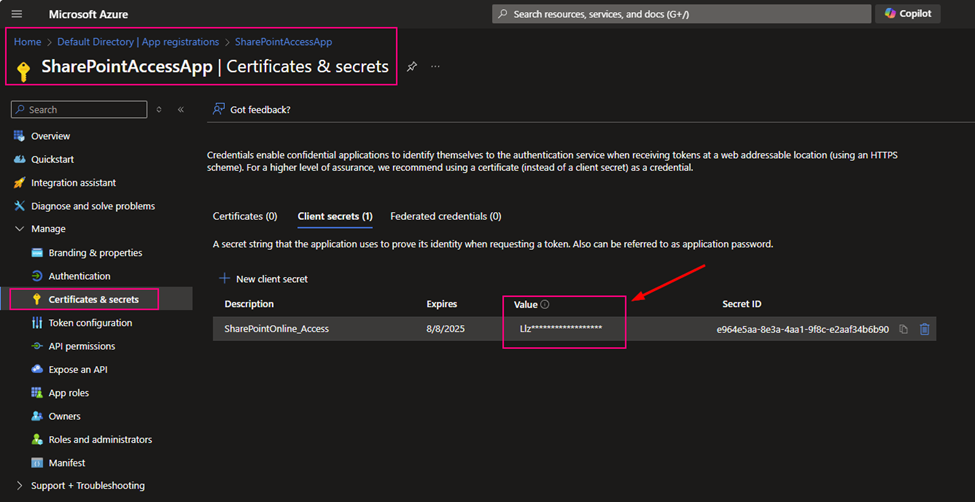
Client Secret: After you registered your application at Azure Entra ID, you build a certificate secret from Azure Entra ID, and you immediately copied and kept that value. The value will not reappear after that process anymore.
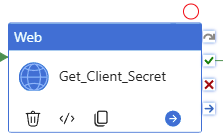
As I mentioned above, my client Secret is saved in azure Key-vault. To get Client Secret, use Web Activity to retrieve Client Secret (if you have the client Secret on hand, you can skip this activity, directly move to next activity Get SPO Token)
Method: GET
Authentication: System Assigned Managed Identity
Resource: https://vault.azure.net
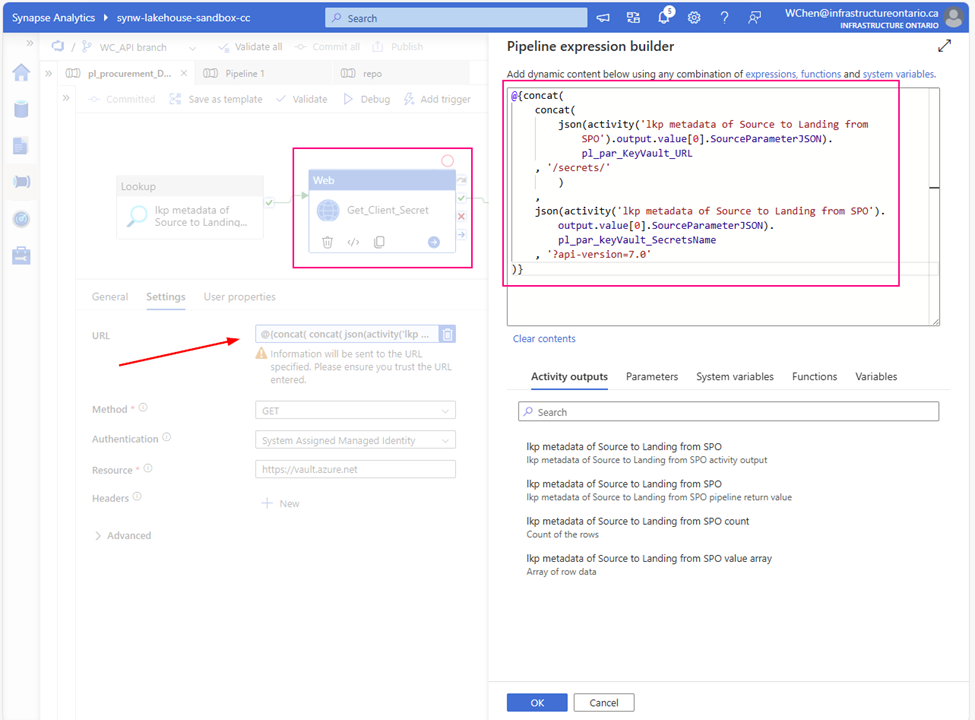
URL:
@{concat( concat( json(activity(‘lkp metadata of Source to Landing from SPO’).output.value[0].SourceParameterJSON).pl_par_KeyVault_URL , ‘/secrets/’ ) , json(activity(‘lkp metadata of Source to Landing from SPO’).output.value[0].SourceParameterJSON).pl_par_keyVault_SecretsName , ‘?api-version=7.0′ )}
Attention: from above URL content, you can see. this SourceParameterJSON section matches well with json format. BUT it is NOT json, it is a string, so I convert the string to json. ?api-version=7.0 is another key point. You must add to your URL
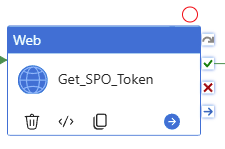
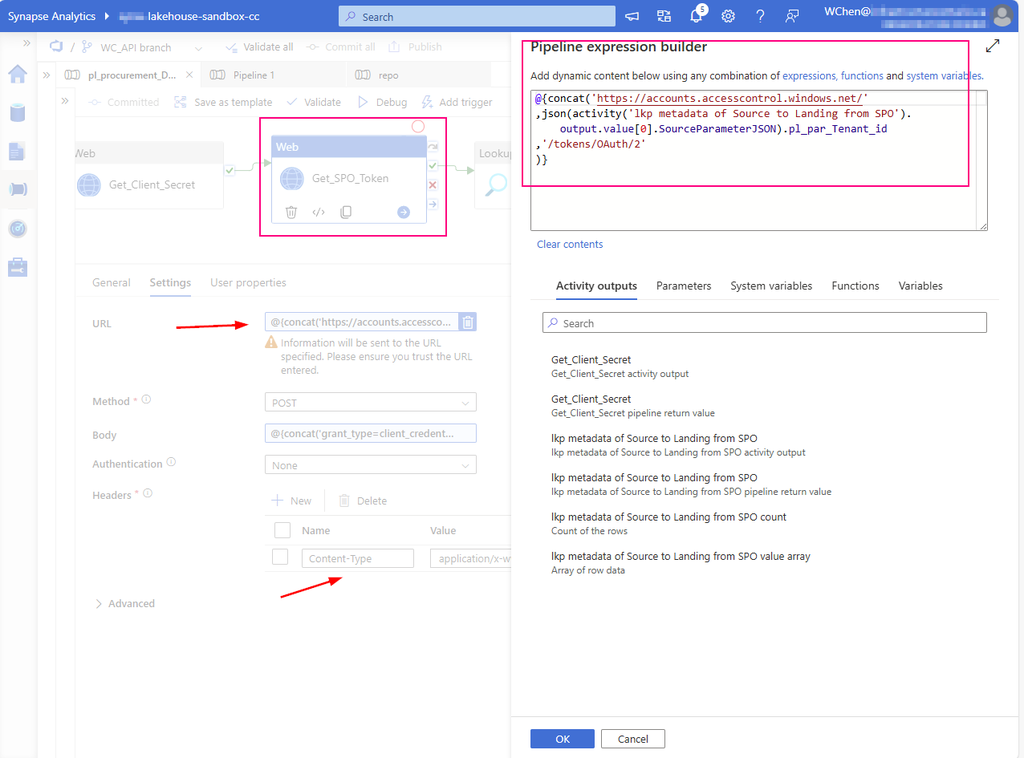
Create a Web Activity to get the access token from SharePoint Online:
URL: https://accounts.accesscontrol.windows.net/[Tenant-ID]/tokens/OAuth/2. Replace the tenant ID.
mine looks : @{concat(‘https://accounts.accesscontrol.windows.net/’ ,json(activity(‘lkp metadata of Source to Landing from SPO’).output.value[0].SourceParameterJSON).pl_par_Tenant_id ,’/tokens/OAuth/2′ )}
Replace the client ID (application ID), client secret (application key), tenant ID, and tenant name (of the SharePoint tenant).
mine looks: @{concat(‘grant_type=client_credentials&client_id=’ , json(activity(‘lkp metadata of Source to Landing from SPO’).output.value[0].SourceParameterJSON).pl_par_Client_id , ‘@’ , json(activity(‘lkp metadata of Source to Landing from SPO’).output.value[0].SourceParameterJSON).pl_par_Tenant_id ,’&client_secret=’ , activity(‘Get_Client_Secret’).output.value , ‘&resource=00000003-0000-0ff1-ce00-000000000000/infrastructureontario.sharepoint.com@’ , json(activity(‘lkp metadata of Source to Landing from SPO’).output.value[0].SourceParameterJSON).pl_par_Tenant_id )}
Attention: As mentioned at Step 2 , pay attention to json convert for section “SourceParameterJSON”
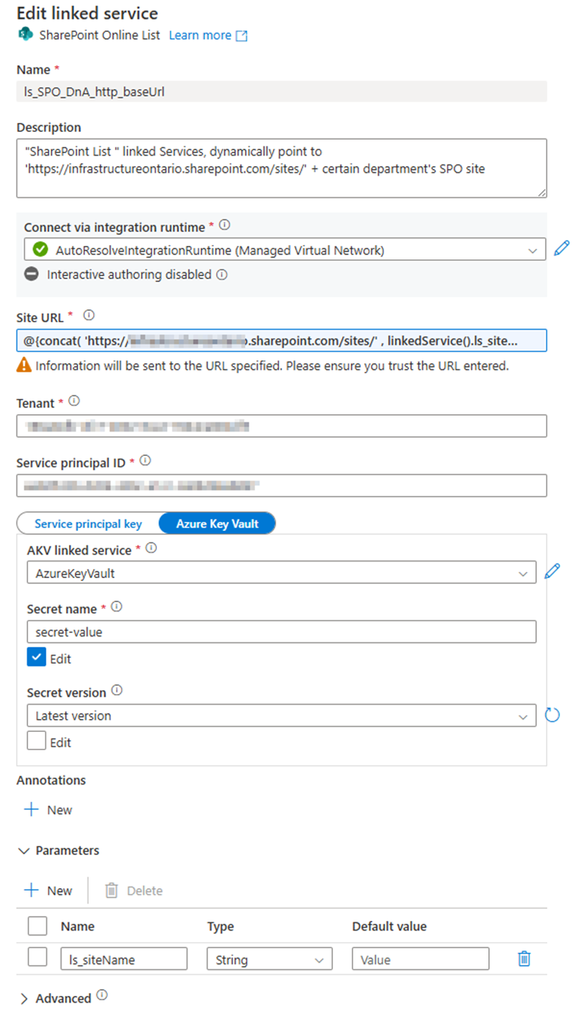
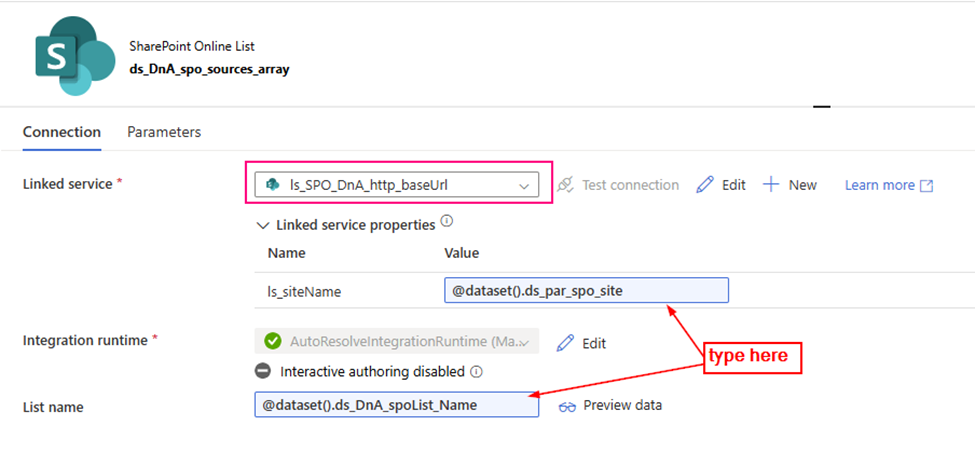
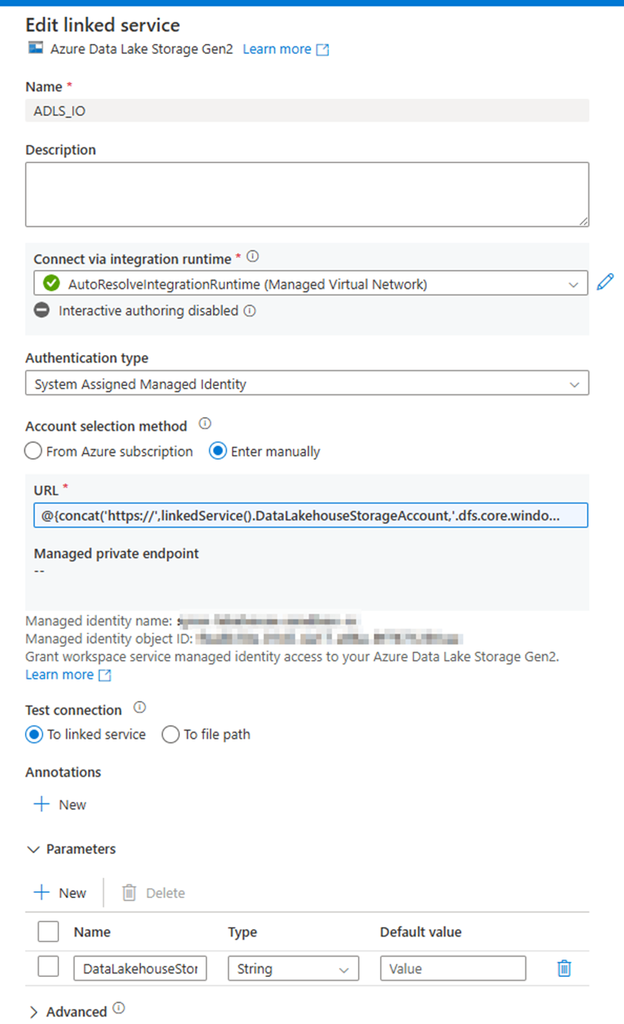
Called: “ls_SPO_DnA_http_baseUrl”, Parameteriz the Linked Service
Provide:
SharePoint site URL Pattern: https://<your domain>.sharepoint.com/sites/<SPO site Name> Replace <your domain> and <SPO site Name> Mine looks: https://mainri.sharepoint.com/sites/dataengineering
Tenant ID
Service principal (or says clientID, applicationID)
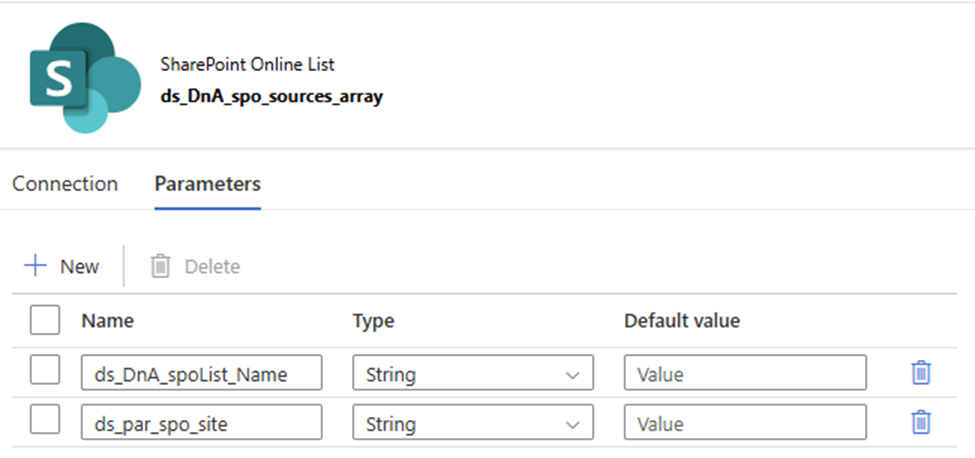
2. Create a SharePoint List type Dataset, Called “ds_DnA_spo_sources_array” and parameteriz the dataset.
Linked service: ls_SPO_DnA_http_baseUrl (you just created)
Parameter:
ds_DnA_spoList_Name
ds_par_spo_site
The dataset looks
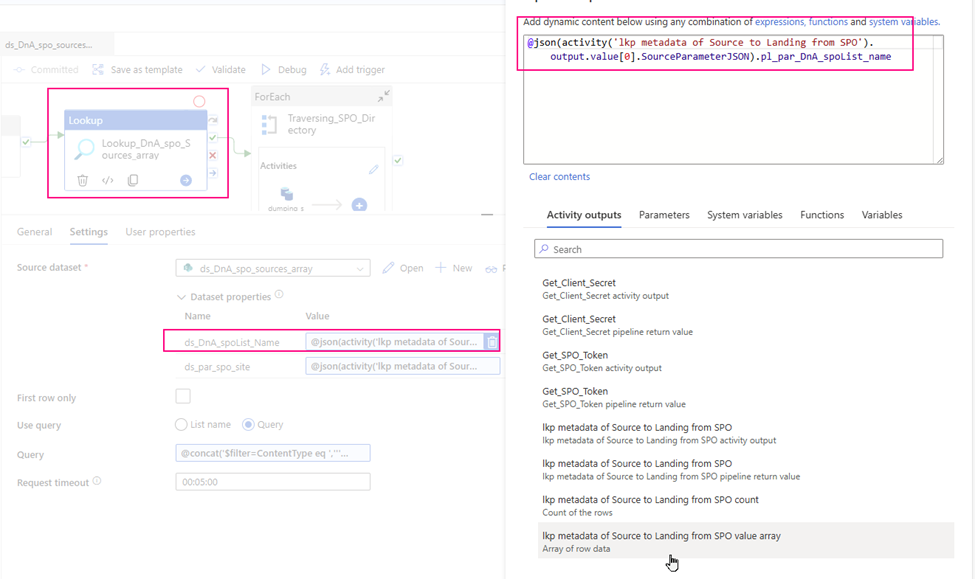
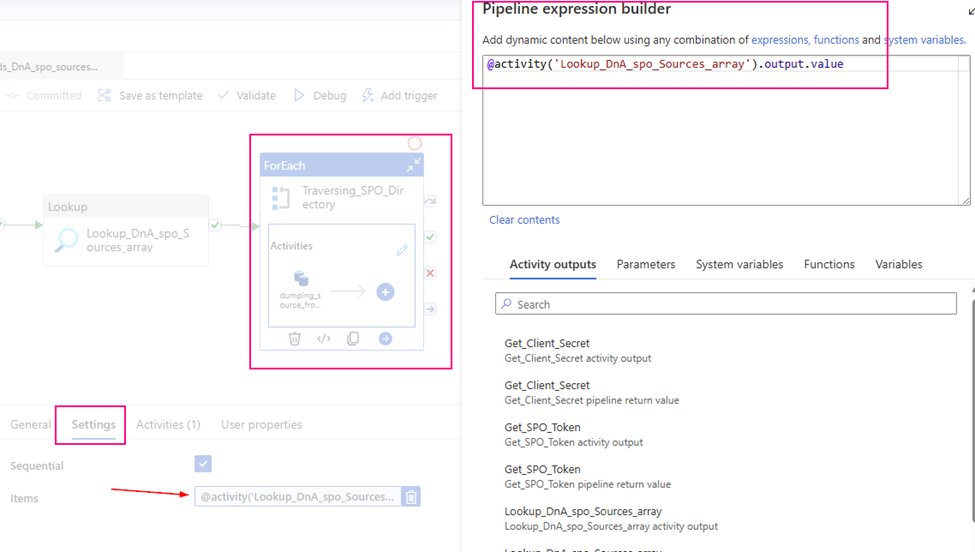
3. configure the Lookup Activity
Use up steam activities return results to configure lookup activity.
source dataset: ds_DnA_spo_sources_array
Dynamic content: ds_DnA_spoList_Name: @json(activity(‘lkp metadata of Source to Landing from SPO’).output.value[0].SourceParameterJSON).pl_par_DnA_spoList_name
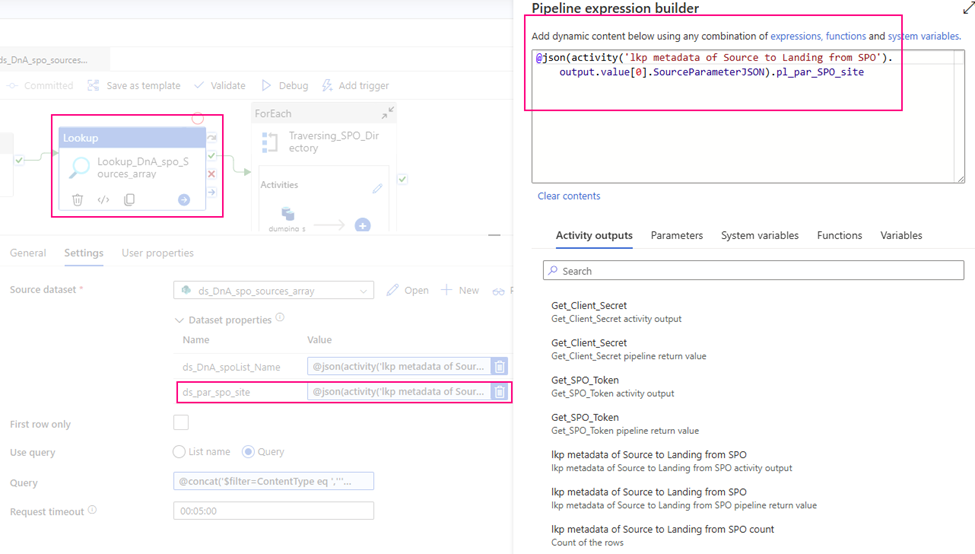
ds_par_spo_site: @json(activity(‘lkp metadata of Source to Landing from SPO’).output.value[0].SourceParameterJSON).pl_par_SPO_site
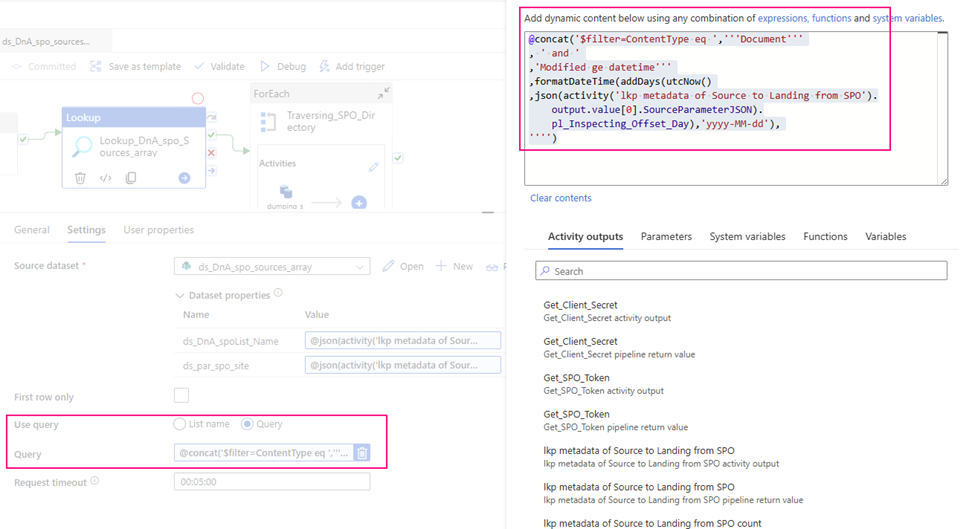
Query: I incrementally ingest data, so I use query to filter out interest items only.
@concat(‘$filter=ContentType eq ‘,”’Document”’ , ‘ and ‘ ,’Modified ge datetime”’ ,formatDateTime(addDays(utcNow() ,json(activity(‘lkp metadata of Source to Landing from SPO’).output.value[0].SourceParameterJSON).pl_Inspecting_Offset_Day),’yyyy-MM-dd’), ””)
The value of ‘GetFileByServerRelativeUrl’ is our key point of work. It points to the specific URL location of the dataset. In fact, all upstream work efforts are aimed at generating specific content for this link item!
Cheers, we are almost there!
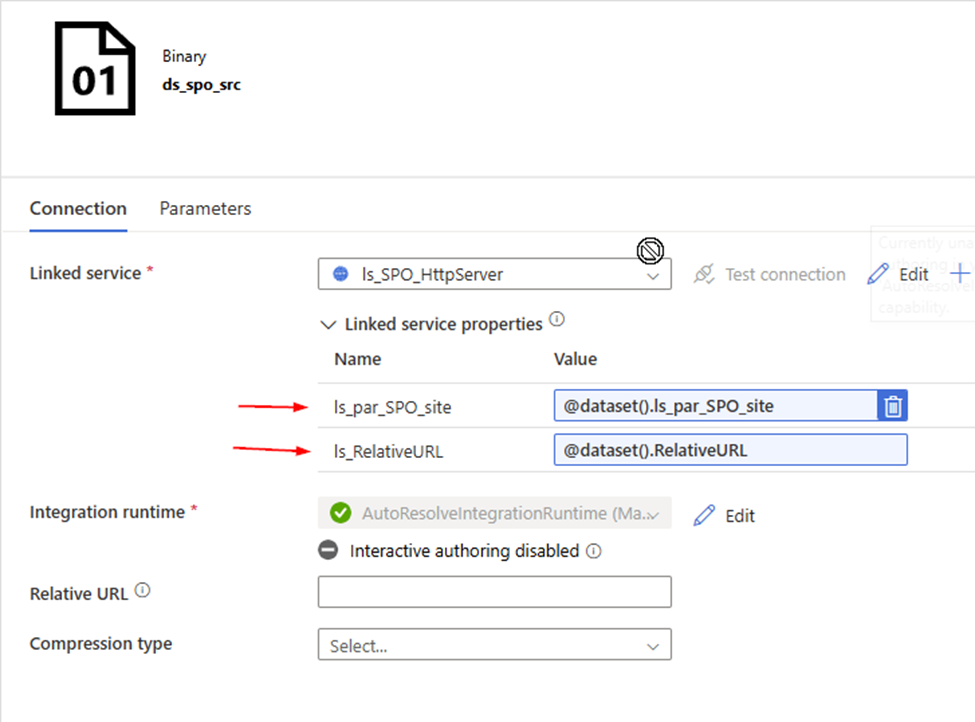
2. Create a Http Binary source dataset , called “ds_spo_src”, Parameterize it
Parameter: RelativeURL ls_par_SPO_site
Linked Service: ls_SPO_HttpServer , we just created.
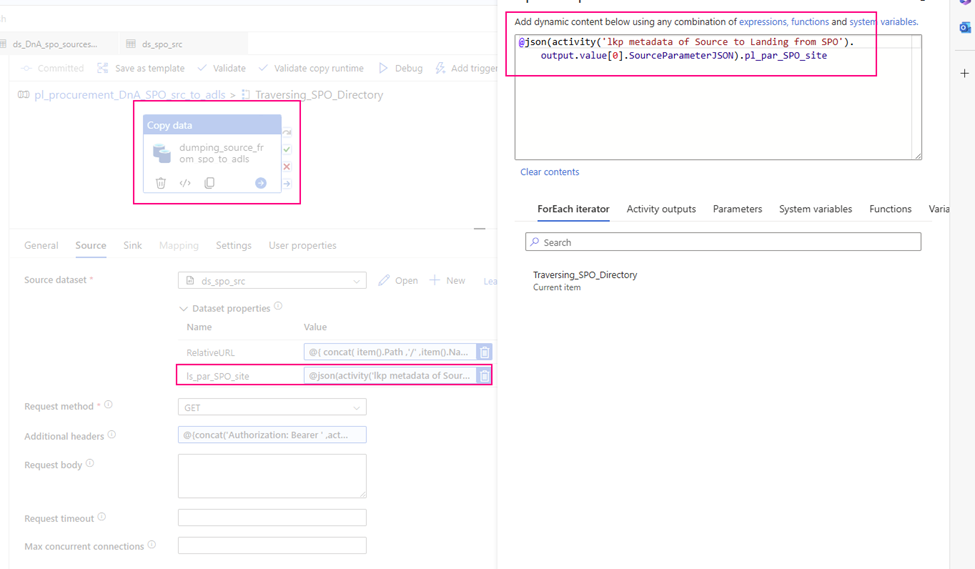
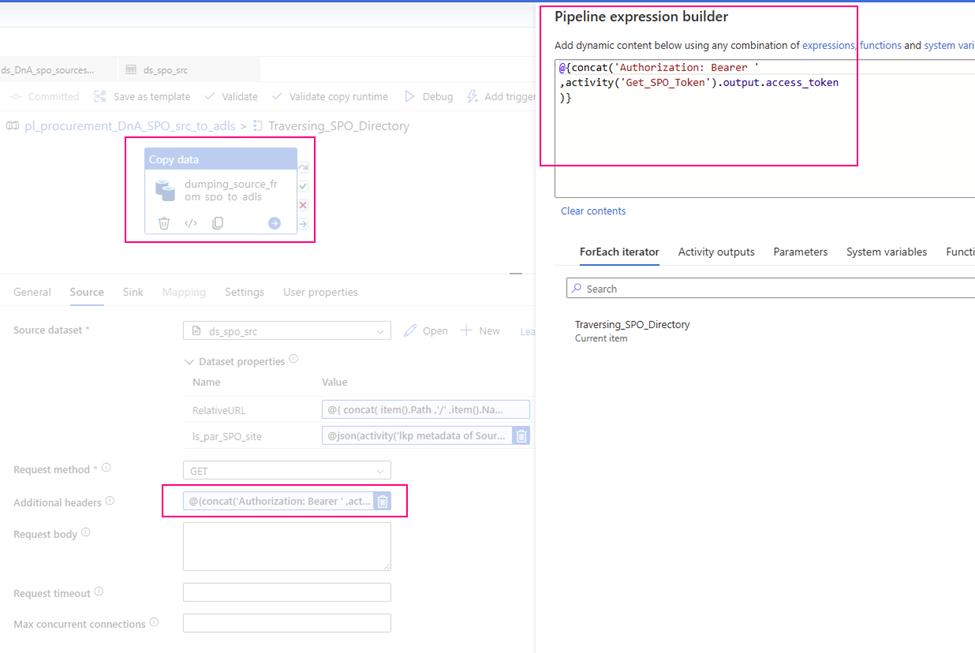
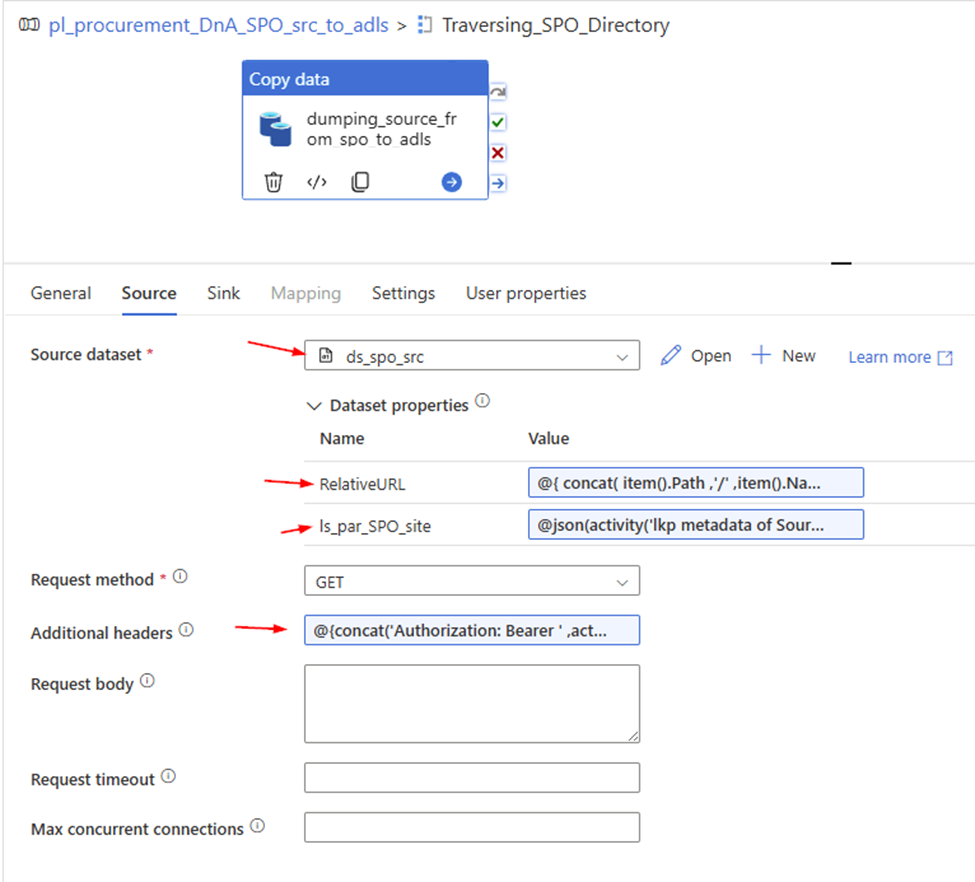
3. Configure copy activity’s “Source”
Request method: GET
Source dataset: ds_spo_src
RelativeURL:
@{ concat( item().Path ,’/’ ,item().Name ) }
ls_par_SPO_site:
@json(activity(‘lkp metadata of Source to Landing from SPO’).output.value[0].SourceParameterJSON).pl_par_SPO_site