Using SQL Server Change Data Capture (CDC) in pipeline to implement incrementally UPSERT

SQL Server Change Data Capture (CDC) is a feature that captures changes to data in SQL Server tables. It captures the changes in the source data and updates only the data in the destination that has changed. Any inserts, updates or deletes made to any of the tables made in a specified time window are captured for further use, such as in ETL processes. Here’s a step-by-step guide to enable and use CDC.

Preconditions

1. SQL Server Agent is running

Since CDC relies on SQL Server Agent, verify that the agent is up and running.

To check if SQL Server Agent is running, you can follow these steps:

  • Open SQL Server Management Studio (SSMS).
  • In the Object Explorer, expand the SQL Server Agent node.
    If you see a green icon next to SQL Server Agent, it means the Agent is running.
    If the icon is red or gray, it means the SQL Server Agent is stopped or disabled.

To start the Agent, right-click on SQL Server Agent and select Start.

Or start it from SSMS or by using the following command:


EXEC msdb.dbo.sp_start_job @job_name = 'SQLServerAgent';

Ensure the database is in FULL or BULK_LOGGED recovery model

CDC requires that the database be in the FULL or BULK_LOGGED recovery model. You can check the recovery model with:

SELECT name, recovery_model_desc
FROM sys.databases
WHERE name = 'YourDatabaseName';

If it’s in SIMPLE recovery mode, you need to change it:

ALTER DATABASE YourDatabaseName
SET RECOVERY FULL;

Let’s start show the fully processes, step by step and we will Focus on “how to use CDC, tracking changed, using in ETL”

Step 1: Enable CDC on the Database

CDC must first be enabled at the database level before you can enable it on individual tables.

Let’s use a database called TestDB. There is table called tb_person with schema dbo.

the tb_person looks like:

id name age sex
1 Alcy 32 f
2 Bob 24 f
3 Cary 27 f
4 David 36 m
5 Eric 40 m

Connect to SQL Server Management Studio (SSMS).

Step 1: Enable CDC on the Database


USE YourDatabaseName;
GO
EXEC sys.sp_cdc_enable_db;
GO
--- So, I do this:
USE testdb;
GO
EXEC sys.sp_cdc_enable_db;
GO

Step 2: Enable CDC on the Table

EXEC sys.sp_cdc_enable_table
@source_schema = N'dbo',
@source_name = N'tb_person',
@role_name = NULL; -- NULL allows access for all users
GO

This will create a change table cdc.tb_Person_CT for tracking changes to the tb_person table.

Step 3: Verify CDC is Enabled

1. Check if CDC is enabled on the database:

SELECT name, is_cdc_enabled
FROM sys.databases
WHERE name = 'testDB';

This query should return 1 under is_cdc_enabled, indicating that CDC is enabled on the database.

2. Check if CDC is enabled on the tb_person table:

SELECT * FROM cdc.change_tables;

Step 4: Insert, Update, and Delete Data to Capture Changes

Now let’s perform some operations (insert, update, and delete) on the tb_person table to capture changes.

1. Insert some data:

INSERT INTO dbo.tb_person ([id],[name],[age],[sex])
VALUES
(6, ‘TOM’, 29, ‘MALE’),
(7, ‘Mary’, 39, ‘Female’)

2. Update a row:

UPDATE dbo.tb_person
set Age=33
WHERE Name = 'TOM';
select * from tb_person;

3, Delete a row:

DELETE from dbo.tb_person
WHERE Name = 'Mary'
select * from tb_person;

Step 5: Query the CDC Change Table

Once CDC is enabled, SQL Server will start capturing insert, update, and delete operations on the tracked tables.

The CDC system creates specific change tables. The name of the change table is derived from the source table and schema. For example, for tb_Person in the dbo schema, the change table might be named something like cdc.dbo_tb_person_CT.

Querying the change table: To retrieve changes captured by CDC, you can query the change table directly:

SELECT *
FROM cdc.dbo_tb_person_CT;

This table contains:

  • __$operation: The type of operation:
    • 1: DELETE
    • 2: INSERT
    • 3: UPDATE (before image)
    • 4: UPDATE (after image)
  • __$start_lsn: The log sequence number (LSN) of the transaction.
  • Columns of the original table (e.g., OrderID, CustomerName, Product, etc.) showing the state of the data before and after the change.

Step 5: Manage CDC

As your tables grow, CDC will collect more data in its change tables. To manage this, SQL Server includes functions to clean up old change data.

1. Set up CDC clean-up jobs, Adjust the retention period (default is 3 days)

SQL Server automatically creates a cleanup job to remove old CDC data based on retention periods. You can modify the retention period by adjusting the @retention parameter.

EXEC sys.sp_cdc_change_job
@job_type = N'cleanup',
@retention = 4320; -- Retention period in minutes (default 3 days)

2. Disable CDC on a table:

If you no longer want to track changes on a table, disable CDC:

EXEC sys.sp_cdc_disable_table
@source_schema = N'dbo',
@source_name = N'SalesOrder',
@capture_instance = N'dbo_SalesOrder';

3. Disable CDC on a database:

If you want to disable CDC for the entire database, run:

USE YourDatabaseName;
GO
EXEC sys.sp_cdc_disable_db;
GO

Step 6: Monitor CDC

You can monitor CDC activity and performance using the following methods

1. Check the current status of CDC jobs:

EXEC sys.sp_cdc_help_jobs;

2. Monitor captured transactions:

You can query the cdc.lsn_time_mapping table to monitor captured LSNs and their associated times:

SELECT *
FROM cdc.lsn_time_mapping;

Step 7: Using CDC Data in ETL Processes

Once CDC is capturing data, you can integrate it into ETL processes or use it for auditing or tracking changes over time. Use change tables

cdc. [YourSchema]_[YourTableName]_CT

 to identify rows that have been modified, deleted, or inserted, and process the changes accordingly. e.g.

SELECT *
FROM cdc.dbo_tb_person_CT;

System function cdc.fn_cdc_get_all_changes_<Capture_Instance>

cdc.fn_cdc_get_all_changes_<capture_instance>

The function fn_cdc_get_all_changes_<capture_instance> is a system function that allows you to retrieve all the changes (inserts, updates, and deletes) made to a CDC-enabled table over a specified range of log sequence numbers (LSNs).

For your table tb_person, if CDC has been enabled, the function to use would be:

SELECT *FROM cdc.fn_cdc_get_all_changes_dbo_tb_person(@from_lsn, @to_lsn, N'all');

the Parameters:

  • @from_lsn: The starting log sequence number (LSN). This represents the point in time (or transaction) from which you want to begin retrieving changes.
  • @to_lsn: The ending LSN. This represents the point up to which you want to retrieve changes.
  • N'all': This parameter indicates that you want to retrieve all changes (including inserts, updates, and deletes).

Retrieve LSN Values

You need to get the LSN values for the time range you want to query. You can use the following system function to get the from_lsn and to_lsn values:

  • Get the minimum LSN for the CDC-enabled table:
    sys.fn_cdc_get_min_lsn(‘dbo_tb_person’)
    e.g.
    SELECT sys.fn_cdc_get_min_lsn(‘dbo_tb_person’);
  • Get the maximum LSN (which represents the latest changes captured):
    sys.fn_cdc_get_max_lsn();
    SELECT sys.fn_cdc_get_max_lsn();

Use the LSN Values in the Query

Now, you can use these LSNs to query the changes. Here’s an example:

DECLARE @from_lsn binary(10), @to_lsn binary(10);

SET @from_lsn = sys.fn_cdc_get_min_lsn('dbo_tb_person');
SET @to_lsn = sys.fn_cdc_get_max_lsn();

SELECT *
FROM cdc.fn_cdc_get_all_changes_dbo_tb_person(@from_lsn, @to_lsn, N'all');

The result set will include:

  • __$operation: The type of change (1 = delete, 2 = insert, 3 = update before, 4 = update after).
  • __$start_lsn: The LSN value at which the change occurred.
  • __$seqval: Sequence value for sorting the changes within a transaction.
  • __$update_mask: Binary value indicating which columns were updated.
  • All the columns from the original tb_person table.

Querying Only Inserts, Updates, or Deletes

If you want to query only a specific type of change, such as inserts or updates, you can modify the function’s third parameter:

Inserts only:

SELECT *
FROM cdc.fn_cdc_get_all_changes_dbo_tb_person(@from_lsn, @to_lsn, N'insert');

Updates only:

SELECT *
FROM cdc.fn_cdc_get_all_changes_dbo_tb_person(@from_lsn, @to_lsn, N'update');

Deletes only:

SELECT *
FROM cdc.fn_cdc_get_all_changes_dbo_tb_person(@from_lsn, @to_lsn, N'delete');

Map datetime to log sequence number (lsn)

sys.fn_cdc_map_time_to_lsn

The sys.fn_cdc_map_time_to_lsn function in SQL Server is used to map a datetime value to a corresponding log sequence number (LSN) in Change Data Capture (CDC). Since CDC captures changes using LSNs, this function is helpful to find the LSN that corresponds to a specific point in time, making it easier to query CDC data based on a time range.

Syntax

sys.fn_cdc_map_time_to_lsn ( 'lsn_time_mapping', datetime_value )

Parameters:

  • lsn_time_mapping: Specifies how you want to map the datetime_value to an LSN. It can take one of the following values:
    • smallest greater than or equal: Returns the smallest LSN that is greater than or equal to the specified datetime_value.
    • largest less than or equal: Returns the largest LSN that is less than or equal to the specified datetime_value.
  • datetime_value: The datetime value you want to map to an LSN.

Using sys.fn_cdc_map_time_to_lsn() in a CDC Query

Mapping a Date/Time to an LSN

-- Mapping a Date/Time to an LSN
DECLARE @from_lsn binary(10);
SET @from_lsn = sys.fn_cdc_map_time_to_lsn('smallest greater than or equal', '2024-09-06 12:00:00');

This will map the datetime '2024-09-06 12:00:00' to the corresponding LSN.

Finding the Largest LSN Before a Given Time

-- Finding the Largest LSN Before a Given Time
DECLARE @to_lsn binary(10);
SET @to_lsn = sys.fn_cdc_map_time_to_lsn('largest less than or equal', '2024-09-06 12:00:00');

This will return the largest LSN that corresponds to or is less than the datetime '2024-09-06 12:00:00'.

Querying Changes Between Two Time Points

cdc.fn_cdc_get_all_changes_<schem_tableName>

Syntax

cdc.fn_cdc_get_all_changes_dbo_tb_person (from_lsn, to_lsn, row_filter_option)

Parameters

from_lsn: The starting LSN in the range of changes to be retrieved.

to_lsn: The ending LSN in the range of changes to be retrieved.

row_filter_option: Defines which changes to return:

  • 'all': Returns both the before and after images of the changes for update operations.
  • 'all update old': Returns the before image of the changes for update operations.
  • 'all update new': Returns the after image of the changes for update operations.

Let’s say you want to find all the changes made to the tb_person table between
'2024-09-05 08:00:00' and '2024-09-06 18:00:00'.
You can map these times to LSNs and then query the CDC changes.

-- Querying Changes Between Two Time Points
DECLARE @from_lsn binary(10), @to_lsn binary(10);

-- Map the datetime range to LSNs
SET @from_lsn = sys.fn_cdc_map_time_to_lsn('smallest greater than or equal', '2024-09-05 08:00:00');
SET @to_lsn = sys.fn_cdc_map_time_to_lsn('largest less than or equal', '2024-09-06 18:00:00');

-- Query the CDC changes for the table tb_person within the LSN range
SELECT * 
FROM cdc.fn_cdc_get_all_changes_dbo_tb_person(@from_lsn, @to_lsn, N'all');

Output:

This query will return the following data for changes between the specified LSN range:

  • __$operation: Indicates whether the row was inserted, updated, or deleted.
  • __$start_lsn: The LSN at which the change occurred.
  • Other columns: Any other columns that exist in the tb_person table.

Using sys.fn_cdc_map_lsn_to_time () convert an LSN value to a readable datetime

In SQL Server, Change Data Capture (CDC) tracks changes using Log Sequence Numbers (LSNs), but these LSNs are in a binary format and are not directly human-readable. However, you can map LSNs to timestamps (datetime values) using the system function sys.fn_cdc_map_lsn_to_time

Syntax

sys.fn_cdc_map_lsn_to_time (lsn_value)

Example: Mapping LSN to Datetime

Get the LSN range for the cdc.fn_cdc_get_all_changes function:


DECLARE @from_lsn binary(10), @to_lsn binary(10);
-- Get minimum and maximum LSN for the table
SET @from_lsn = sys.fn_cdc_get_min_lsn('dbo_tb_person');
SET @to_lsn = sys.fn_cdc_get_max_lsn();

Query the CDC changes and retrieve the LSN values:

-- Query CDC changes for the tb_person table
SELECT $start_lsn, $operation, PersonID, FirstName, LastName
FROM cdc.fn_cdc_get_all_changes_dbo_tb_person(@from_lsn, @to_lsn, 'all');

Convert the LSN to a datetime using sys.fn_cdc_map_lsn_to_time


-- Convert the LSN to datetime
SELECT $start_lsn, sys.fn_cdc_map_lsn_to_time($start_lsn) AS ChangeTime,
__$operation,
PersonID,
FirstName,
LastName
FROM cdc.fn_cdc_get_all_changes_dbo_tb_person(@from_lsn, @to_lsn, 'all');

Output

$start_lsn ChangeTime __$operation PersonID FirstName LastName
0x000000240000005A 2024-09-06 10:15:34.123 2 1 John Doe
0x000000240000005B 2024-09-06 10:18:45.321 4 1 John Smith
0x000000240000005C 2024-09-06 10:25:00.789 1 2 Jane Doe

Explanation

sys.fn_cdc_map_lsn_to_time(__$start_lsn) converts the LSN from the CDC changes to a human-readable datetime.


This is useful for analyzing the time at which changes were recorded.

Notes:

  • CDC vs Temporal Tables: CDC captures only DML changes (inserts, updates, deletes), while temporal tables capture a full history of changes.
  • Performance: Capturing changes can add some overhead to your system, so it’s important to monitor CDC’s impact on performance.

Summary

  • Step 1: Enable CDC at the database level.
  • Step 2: Enable CDC on the SalesOrder table.
  • Step 3: Verify CDC is enabled.
  • Step 4: Perform data changes (insert, update, delete).
  • Step 5: Query the CDC change table to see captured changes.
  • Step 6: Manage CDC retention and disable it when no longer needed.
  • Step 7: Using CDC Data in ETL Processes

This step-by-step example shows how CDC captures data changes, making it easier to track, audit, or integrate those changes into ETL pipelines.

Please do not hesitate to contact me if you have any questions at William . chen @ mainri.ca

(remove all space from the email account 😊)

Configuring Azure Entra ID Authentication in Azure SQL Database

Azure SQL Database can be integrated with Azure Entra ID to provide identity and access management. With this integration, users can sign in to Azure SQL Database using their Azure Entra ID credentials, enabling a centralized and secure way to manage database access.

Register the SQL Server in Azure Entra ID

Enable Azure Entra ID Admin

Register your SQL Server (or SQL Database) as an application in Azure Entra ID.

Azure Portal > find out the SQL Server that you want to register with Azure Entra ID >

Settings > Microsoft Entra ID (Active Directory Admin)

Assign Users/Groups

You can assign Azure Entra ID users or groups to specific roles within the SQL Database, such as db_owner, db_datareader, or db_datawriter.

Then, Click Save to apply the changes.

Configure Azure Entra ID Authentication in Azure SQL Database

Connect to SQL Database using Azure Entra ID

You can connect to your Azure SQL Database using Azure Entra ID by selecting the “Azure Active Directory – Universal with MFA support” authentication method in tools like SQL Server Management Studio (SSMS).

Assign Roles to Azure Entra ID Users

Use a SQL query to assign roles to Azure Entra ID users or groups. For example:

CREATE USER [your_username@yourdomain.com] FROM EXTERNAL PROVIDER;
ALTER ROLE db_datareader ADD MEMBER [your_username@yourdomain.com];

This command creates an Azure Entra ID user in your SQL Database and adds them to the db_datareader role.

Set Up Role-Based Access Control (RBAC)

You can manage permissions through Azure Entra ID roles and assign these roles to your SQL Database resources.

Assign Roles via Azure Portal

Azure portal > your SQL Database > Access control (IAM) > Add role assignment.

Choose the appropriate role, such as “SQL DB Contributor“.

and assign it to the desired Azure Entra ID user or group

Considerations

  • No Password Management: Since authentication is managed via Azure Entra ID, there’s no need to manage passwords directly within the database.
  • Integration with Conditional Access: This allows you to enforce compliance requirements, such as requiring MFA or ensuring connections only come from specific locations.

Please do not hesitate to contact me if you have any questions at William . chen @ mainri.ca

(remove all space from the email account 😊)

Using Key Vault services in Azure Ecosystem

Azure Key Vault safeguards encryption keys and secrets like certificates, connection strings, and passwords. 

Key vaults define security boundaries for stored secrets. It allows you to securely store service or application credentials like passwords and access keys as secrets. All secrets in your key vault are encrypted with a software key. When you use Key Vault, you no longer need to store security information in your applications. Not having to store security information in applications eliminates the need to make this information part of the code.

What is a secret in Key Vault?

In Key Vault, a secret is a name-value pair of strings. Secret names must be 1-127 characters long, contain only alphanumeric characters and dashes, and must be unique within a vault. A secret value can be any UTF-8 string up to 25 KB in size.

Vault authentication and permissions

Developers usually only need Get and List permissions to a development-environment vault. Some engineers need full permissions to change and add secrets, when necessary.

For apps, often only Get permissions are required. Some apps might require List depending on the way the app is implemented. The app in this module’s exercise requires the List permission because of the technique it uses to read secrets from the vault.

In this article, we will focus on 2 sections, set up secrets in Key Vault and application retrieves secrets that ware saved in Key vault.

Create a Key Vault and store secrets

Creating a vault requires no initial configuration. You can start adding secrets immediately. After you have a vault, you can add and manage secrets from any Azure administrative interface, including the Azure portal, the Azure CLI, and Azure PowerShell. When you set up your application to use the vault, you need to assign the correct permissions to it

Create a Key Vault service

To create Azure Key Vault service, you can follow the steps.

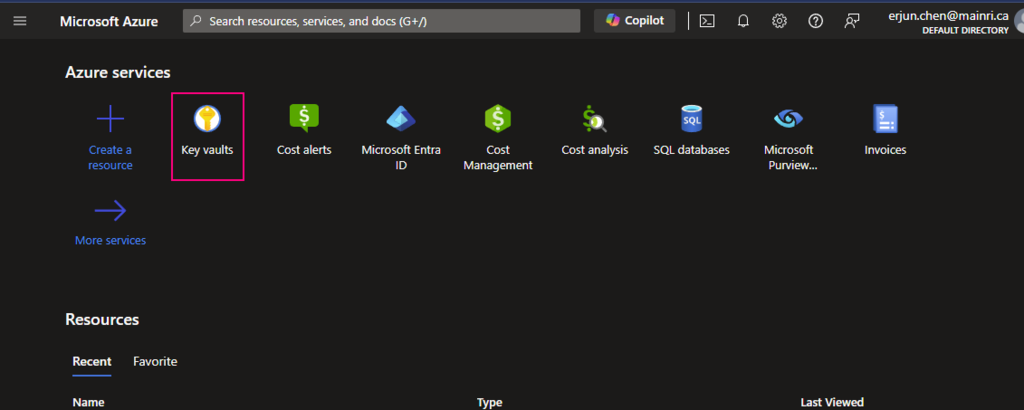
From Azure Portal, search “key Vault”

click “key Vault”

Fill in all properties

Click review + create. That’s all. Quite simple, right?

Create secrets and save in Key Vault

There are two ways to create secret and save in Key vault.

  • Access control, Identity and Access management (IAM)
  • Access Policies

Using Access Control (IAM) create a secret

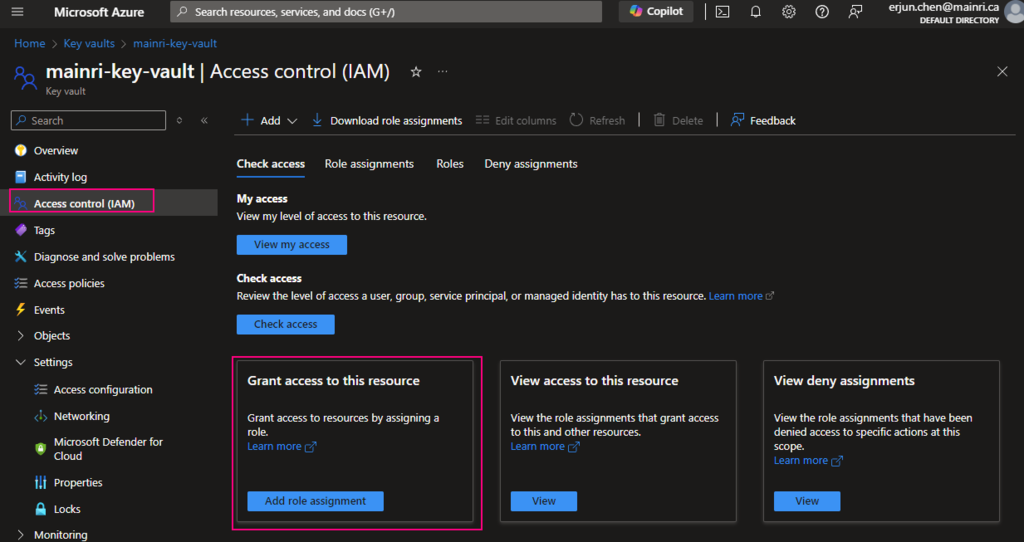
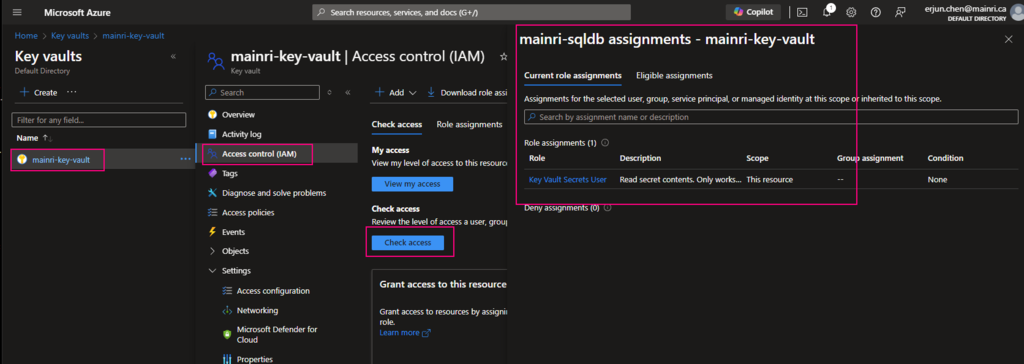
From Key Vault> Access Control (IAM) > Add role Assignment

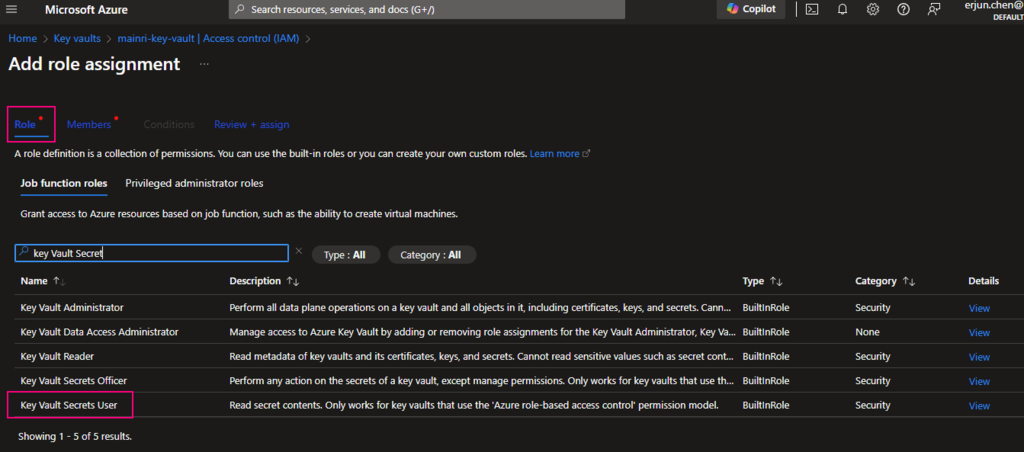
In most cases, if you create and save secrets in key-vault for your users to use, you only need add the “Key vault secrets user” role assignment.

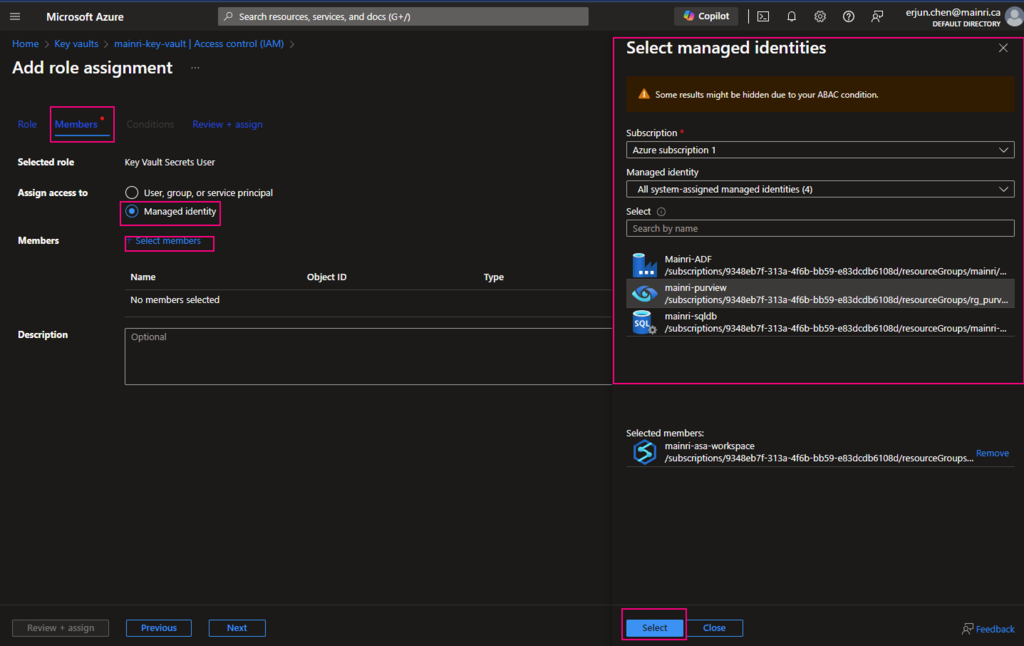
click “next” select a member or group

Pay attention to here, if your organization has multiple instances of the same services, for example, different teams are independently using different ADF instants, make sure you correctly, accurately add the right service instant to access policies.

Once it’s down, check the access.

Create a Secret

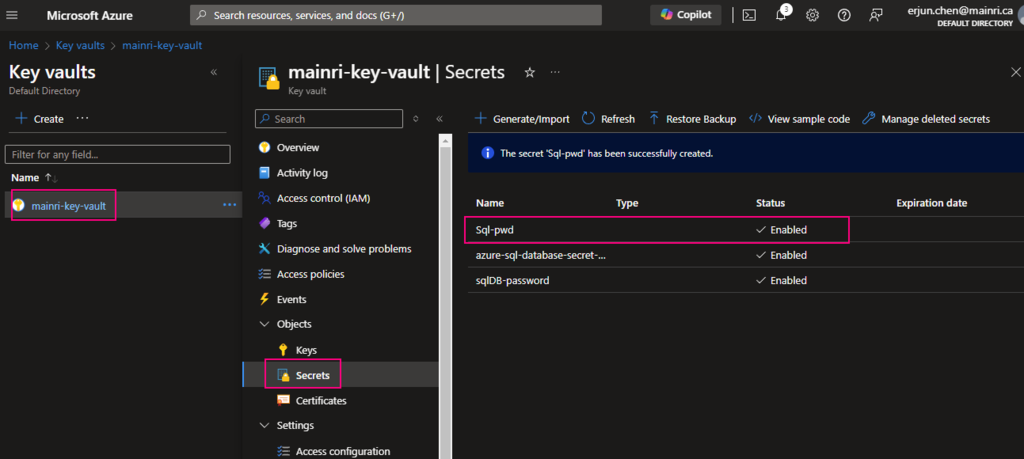
From “Key Vault” > “Object” > “Secrets” > “+ Generate/Import”

Fill in all properties, :Create”

Secrets key and value created That’s all.

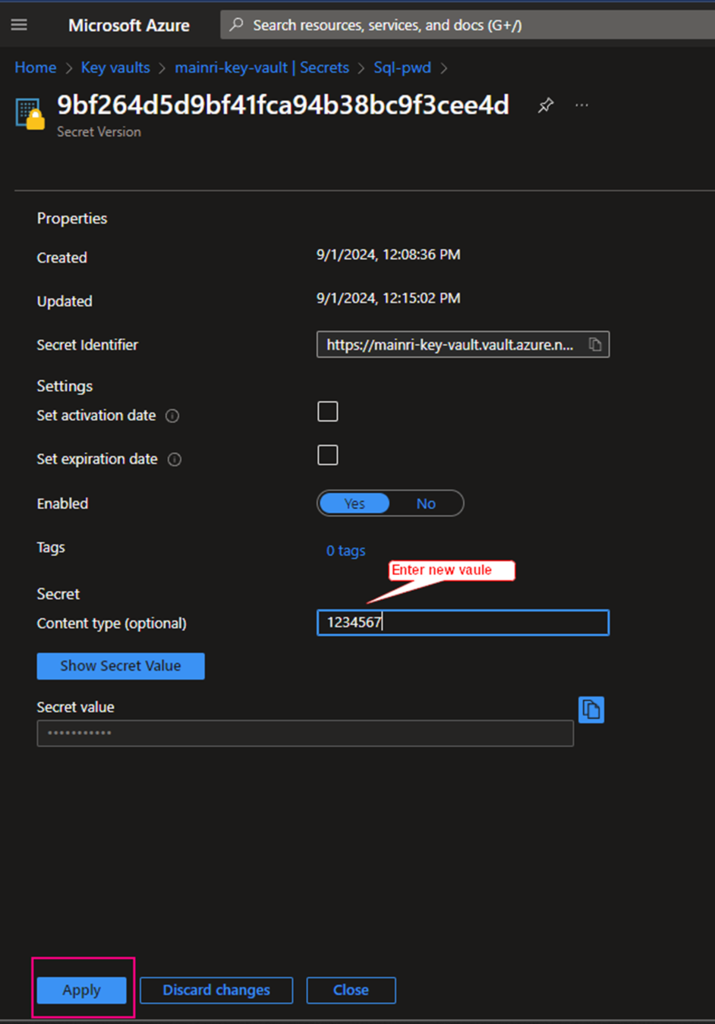
If you want to update the secret, simply click the key, follow the UI guide, you will not miss it.

Click the “version” that you want to update. Update the content > apply it.

That’s all.

Using Access Policies create a secret

There is another way “Access Policies” to create a secret.

Select the permissions you want under Key permissionsSecret permissions, and Certificate permissions.

If you create a key secret for users to use in their application or other azure services, usually you give “get” and “list” in  the “Secret permissions” enough. Otherwise, check Microsoft official documentation.

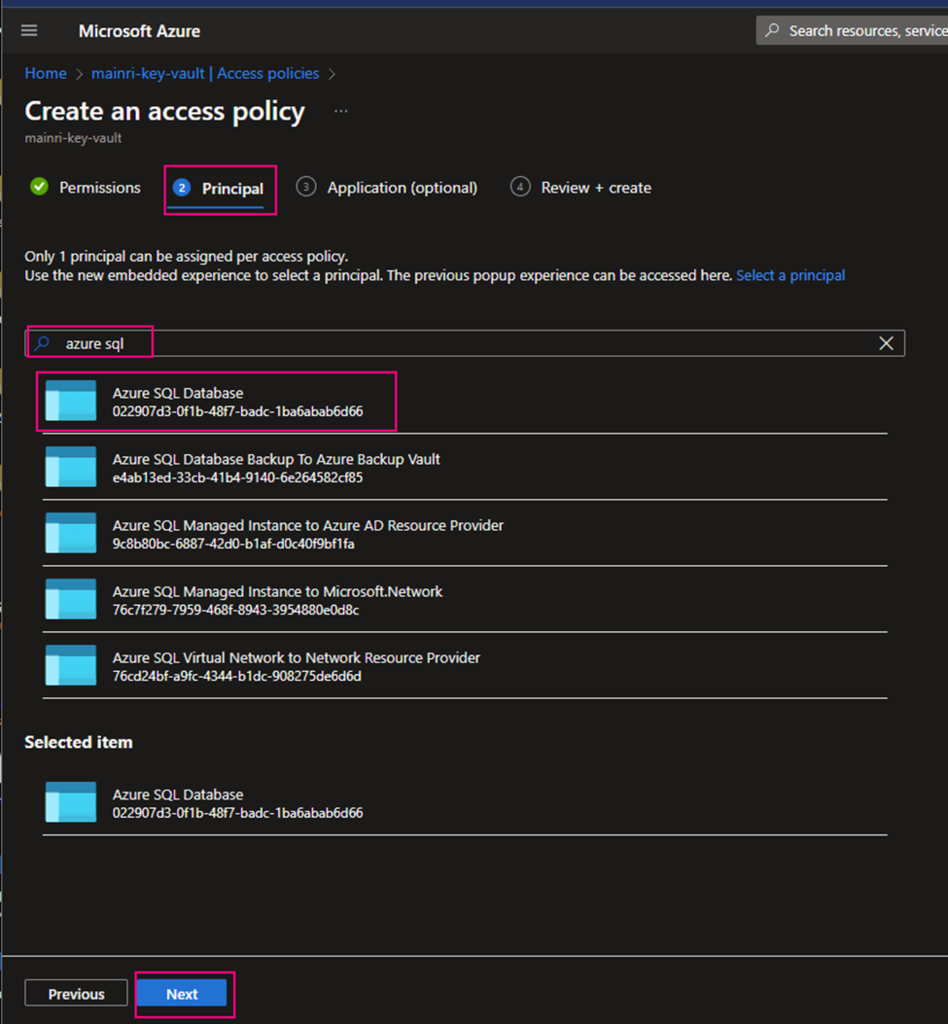
Under the Principal selection pane, enter the name of the user, app or service principal in the search field and select the appropriate result.

Using Azure SQL Database as an example

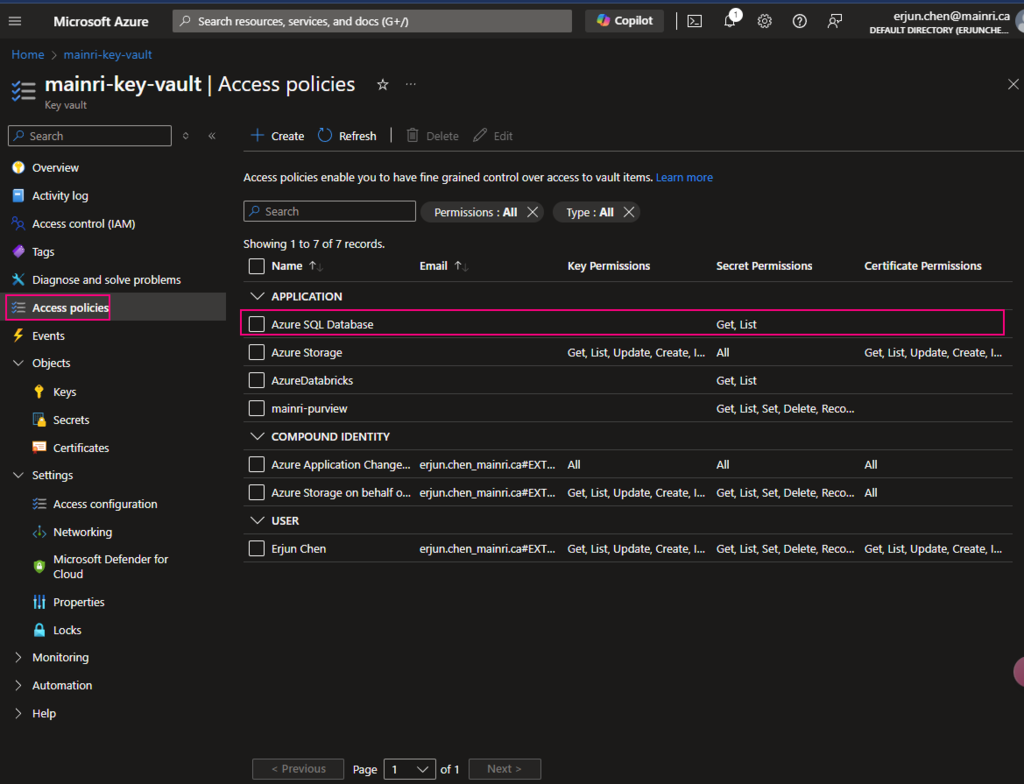
Caution: when you add principal, make sure you select right service instant. Especially you act as a infrastructure administer, your organization has multiple teams that they are independently using different service instants, e.g. different Synapse Workspace. select correct instant. I have been asked to help trouble shotting this scenario a few time. Azure admin says, he has added policies to key-vault, but the use cannot access there yet. that is a funny mistake made, he has added ADF to kay-vault policies, unfortunately, the ADF is NOT team A used, team B is using it. 🙂

Back on the Access policies page, verify that your access policy is listed.

Create secret key and value

We have discussed it above. Need not verbose.

Done!

Using secrets that were saved in Key Vault

Using secrets usually have 2 major scenarios, directly use, or use REST API call to retrieve the saved secret value.

Let’s use Data Factory as an example to discuss.

Scenario 1, directly use it

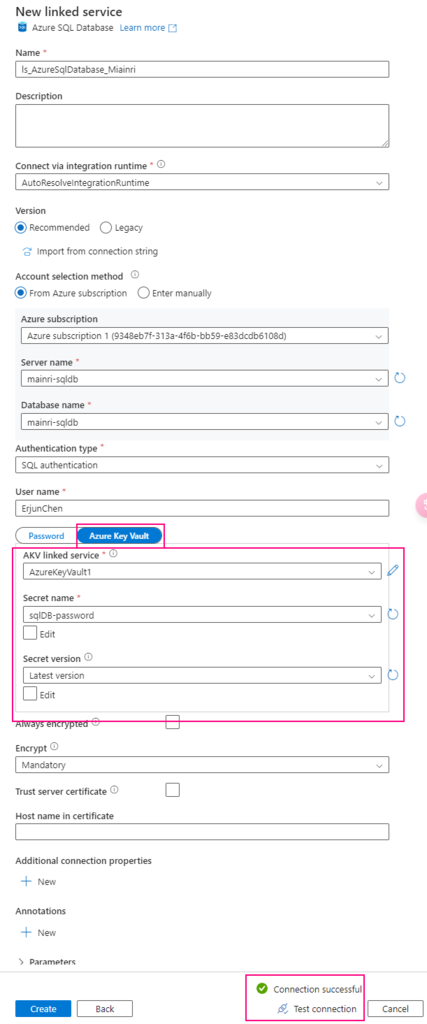
For example, when you create linked service to connect Azure Sql Database

 You have to make sure that Key Vault’s access policies has this ADF access policies, get and list

one more example, System workspaces use key-vault.

Once again, make sure your Synapse Workspace has access policies, “Key Vault Secrets User“, “get” and “List”

Scenario 2, REST API call Key Vault to use secret

Many engineers want to call the key Vault to retrieve the secret value for a certain purpose, e.g.  Synapse pipeline to get SharePoint Online list or files that resident in SharePoint Library, you need an application secret value to build the query string. Normally, the application’s secret value is saved in Key Vault. In this case, you have to make a http call to Key value.

Get a specified secret from a given key vault.
The GET operation is applicable to any secret stored in Azure Key Vault. This operation requires the secrets/get permission.

GET {vaultBaseUrl}/secrets/{secret-name}/{secret-version}?api-version=7.4

for this example,

{vaultBaseUrl} https://mainri-key-vault.vault.azure.net

{secret-name} mySecretName

{secret-version} can skipped, if you skipped it, it will use “Latest Version”

Look at the pipeline

This web activity calls Azure Key Vault to retrieve secret value.

URL: https://mainri-key-vault.vault.azure.net/secrets/mySecretName?api-version=7.4

Method: Get

Authentication: Get

Resource: https://vault.azure.net

Caution, ?api-version=7.4 is very important, you have to add it to the URL.

all done.

Please do not hesitate to contact me if you have any questions at William . chen @ mainri.ca

(remove all space from the email account 😊)

Appendix:

MS document Get Secret – Get Secret

Create External Data Sources in Synapse Serverless SQL

An external data source in Synapse serverless SQL is typically used to reference data stored outside of the SQL pool, such as in Azure Data Lake Storage (ADLS) or Blob Storage. This allows you to query data directly from these external sources using T-SQL.

There are different ways to create external data source. Using Synapse Studio UI, coding etc. the easiest way is to leverage Synapse Studio UI. But we had better know how to use code to create it since in some cases we have to use this way.

Here’s how to create an external data source in Synapse serverless SQL

Using Synapse Studio UI to create External Data Source

Create Lake Database

Open Synapse Studio

On the left side, select Data portal > workspace

Fill in the properties:

Create external table from data lake

Double clicks the Lake Database you just created.

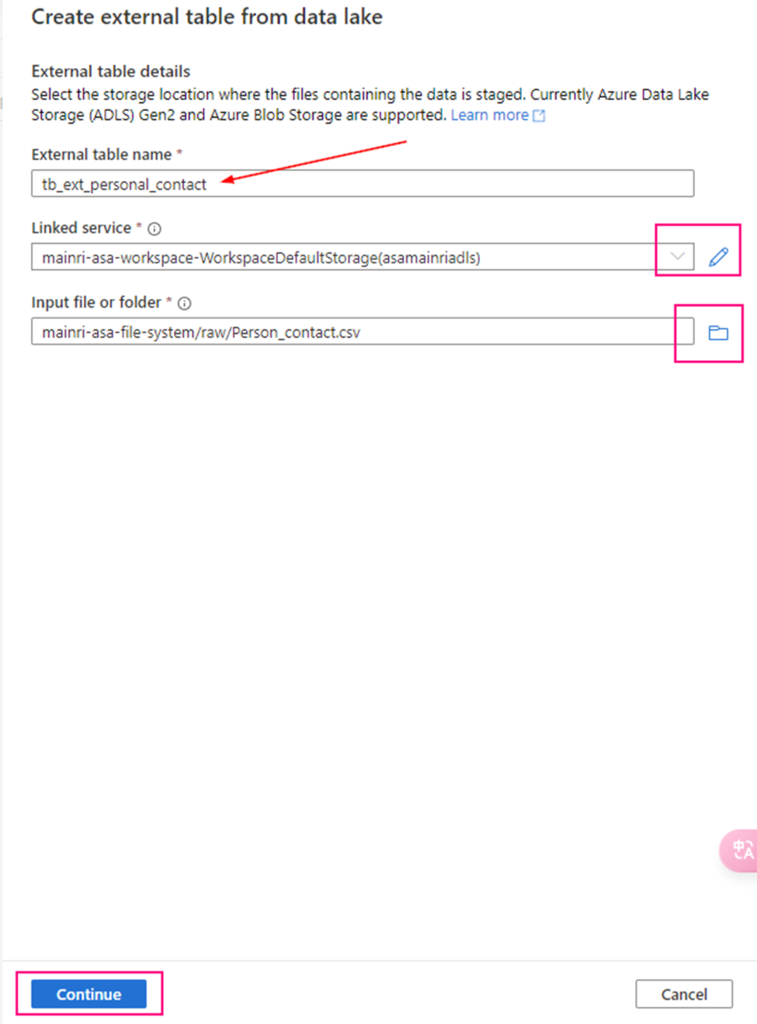
in the Lake Database tag, click “+ Table”

fill in the detail information:

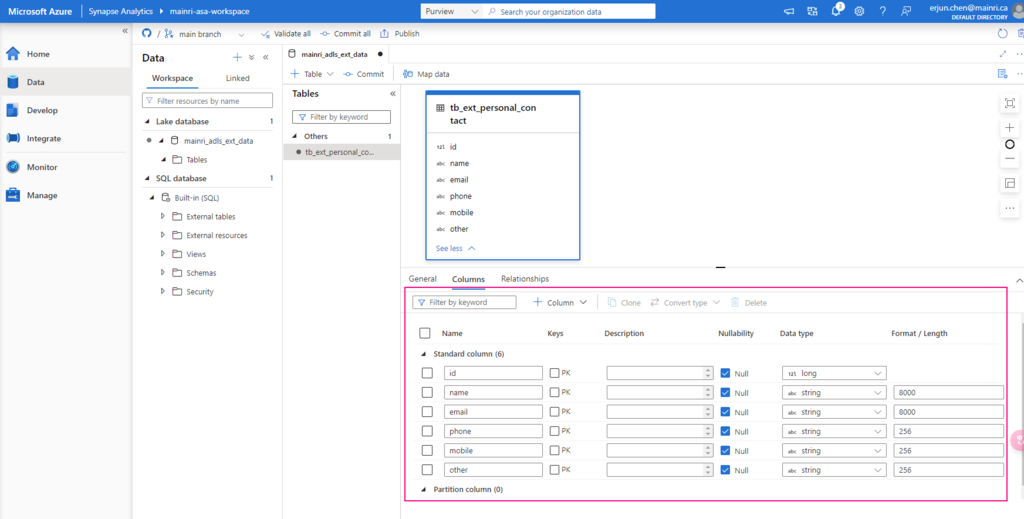
Continue to configure the table properyies

Adjust Table properties

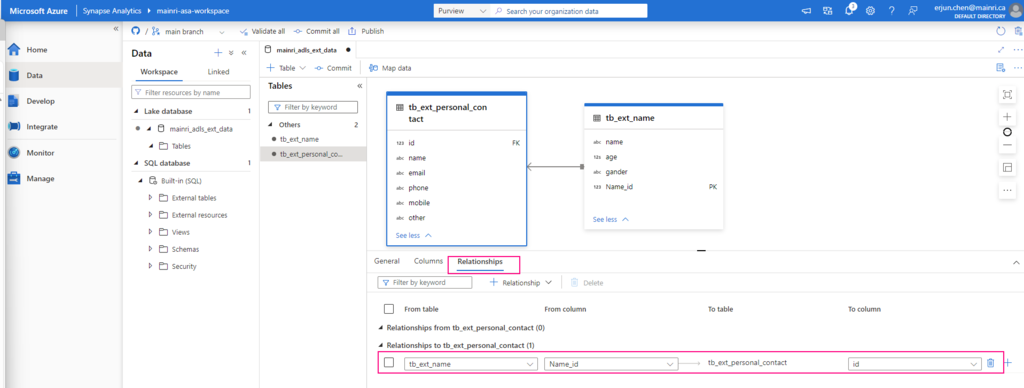
Adjust column other properties, or add even more columns, such as data type, description, Nullability, Primary Key, set up partition create relationship …… etc.

Repeat the above steps to create even more tables to meet your business logic need, or create relationship if need.

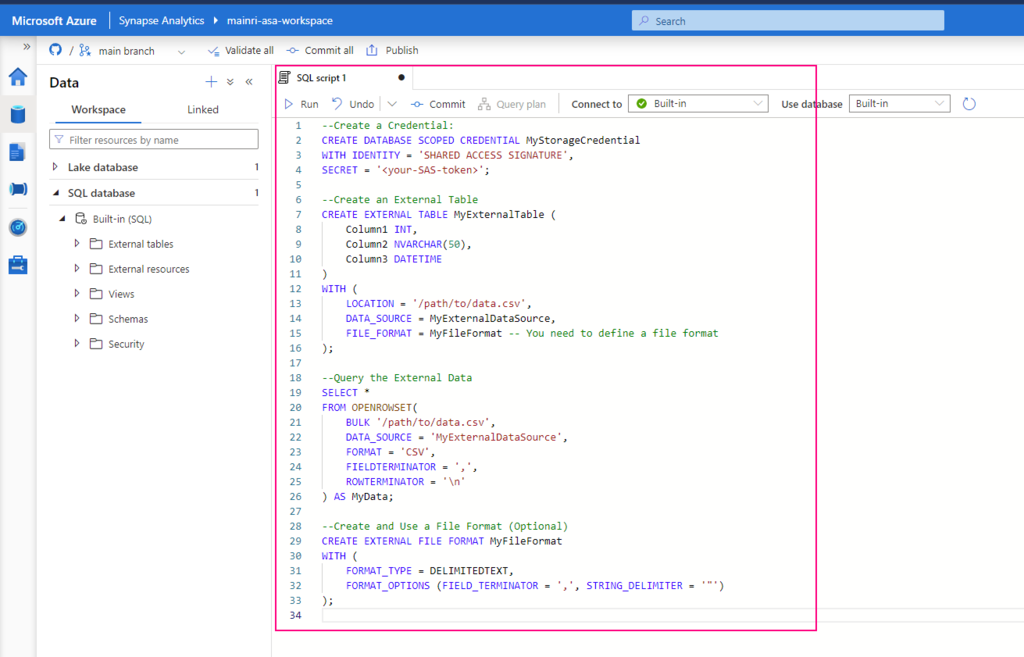
Script to create an External Data Source

Step 1:

1. Connect to Serverless SQL Pool:

Open Synapse Studio, go to the “Data” hub, and connect to your serverless SQL pool.

2. Create the External Data Source:

Use the following T-SQL script to create an external data source that points to your Azure Data Lake Storage (ADLS) or Blob Storage:

CREATE EXTERNAL DATA SOURCE MyExternalDataSource
WITH (
LOCATION = ‘https://<your-storage-account-name>.dfs.core.windows.net/<your-filesystem-name>‘,
CREDENTIAL = <your-credential-name>
);

Replace <your-storage-account-name>, <your-filesystem-name>, and <your-credential-name> with the appropriate values:

  • LOCATION: The URL of your Azure Data Lake Storage (ADLS) or Blob Storage.
  • CREDENTIAL: The name of the database credential used to access the storage. (You may need to create this credential if it doesn’t already exist.)

Step 2:

If you don’t have a credential yet, create one as follows:

1. Create a Credential:

CREATE DATABASE SCOPED CREDENTIAL MyStorageCredential
WITH IDENTITY = ‘SHARED ACCESS SIGNATURE’,
SECRET = ”;

Replace <your-SAS-token> with your Azure Storage Shared Access Signature (SAS) token.

2. Create an External Table or Query the External Data

After setting up the external data source, you can create external tables or directly query data:

Create an External Table:

You can create an external table that maps to the data in your external storage:

CREATE EXTERNAL TABLE MyExternalTable (
Column1 INT,
Column2 NVARCHAR(50),
Column3 DATETIME
)
WITH (
LOCATION = ‘/path/to/data.csv’,
DATA_SOURCE = MyExternalDataSource,
FILE_FORMAT = MyFileFormat — You need to define a file format
);

Query the External Data

You can also directly query the data without creating an external table:

SELECT *
FROM OPENROWSET(
BULK ‘/path/to/data.csv’,
DATA_SOURCE = ‘MyExternalDataSource’,
FORMAT = ‘CSV’,
FIELDTERMINATOR = ‘,’,
ROWTERMINATOR = ‘\n’
) AS MyData;

Create and Use a File Format (Optional)

If you are querying structured files (like CSV, Parquet), you might need to define a file format:

CREATE EXTERNAL FILE FORMAT MyFileFormat
WITH (
FORMAT_TYPE = DELIMITEDTEXT,
FORMAT_OPTIONS (FIELD_TERMINATOR = ‘,’, STRING_DELIMITER = ‘”‘)
);

Summary

By following these steps, you should be able to connect to and query your external data sources using the serverless SQL pool in Synapse. Let me know if you need further assistance!

  • Create an external data source in Synapse serverless SQL to point to your external storage.
  • Create a database scoped credential if necessary to access your storage.
  • Create an external table or directly query data using OPENROWSET.
  • Define a file format if working with structured data like CSV or Parquet.

Please do not hesitate to contact me if you have any questions at William . chen @ mainri.ca

(remove all space from the email account 😊)

Day 10: Workflows in Azure Purview

Workflow in Purview

In Azure Purview, a workflow refers to a set of predefined, automated tasks that streamline and manage certain processes, such as approving data access requests or managing metadata curation.

Workflows in Azure Purview help automate data governance operations and improve collaboration across teams. They can include tasks like approving the registration of new data sources, assigning data stewards, or managing access to certain datasets.

Key Features of Workflows in Azure Purview:

  1. Data Curation and Approval Processes
    Workflows can be used to automate the process of curating and approving metadata changes or lineage extraction requests.
  2. Automated Notifications
    Users can receive notifications when tasks like data registration or classification have been completed or need approval.
  3. Customizable Steps
    Workflows are customizable, allowing we to define multiple stages of approval or validation depending on the organization’s governance policies.
  4. Access Management
    We can define workflows to manage how access requests are handled for sensitive data.
  5. Approval Requests
    For example, if someone registers a new data source, the workflow might require approval from a Purview Collection Administrator before proceeding.

Next step: Day 11 –

Please do not hesitate to contact me if you have any questions at William . chen @ mainri.ca

(remove all space from the email account 😊)

Day 11: Purview Access Control and Management

This article describes collections and access management for your account in the Microsoft Purview governance portal.

Please do not hesitate to contact me if you have any questions at William . chen @ mainri.ca

(remove all space from the email account 😊)

Next Step: Day 11:

Day 9: Managed attributes in Data Map

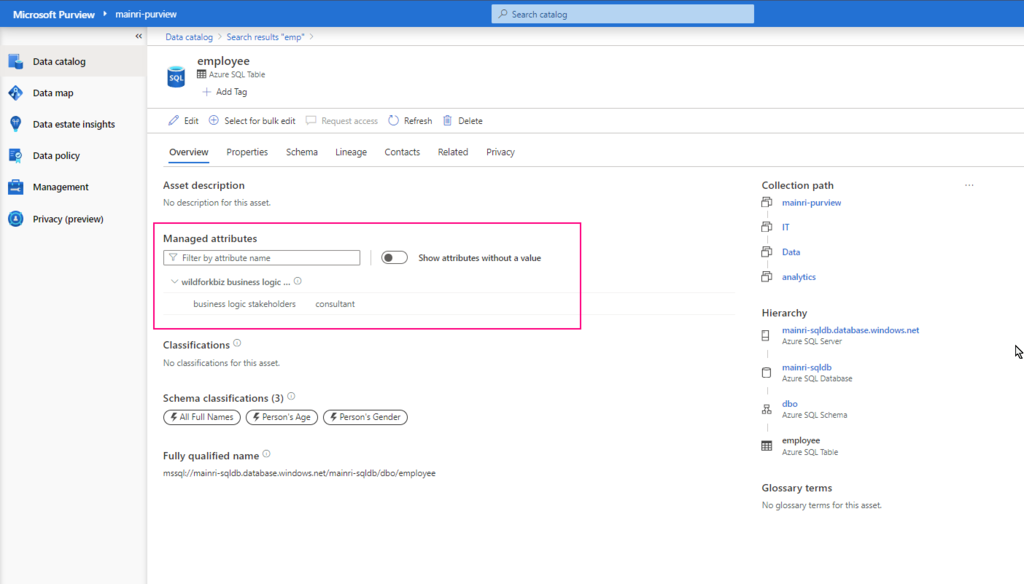
With “Managed Attributes” we can add own attributes (groups of attributes) and provide data stewards with the functionality to improve the content of data catalog.

  • create a new attribute group
  • create a new attribute
  • learn more about the available field types
  • assign and manage attributes for your data assets

Create a new attribute group

Create attribute group if there is no attribute group

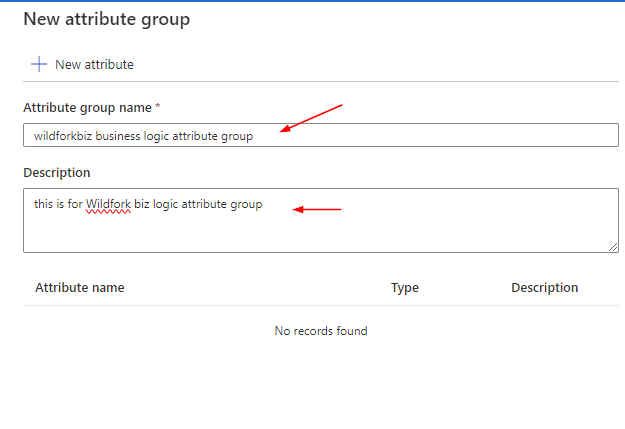
Purview studio > Data Map > Managed attributes > New attribute group

Fill in

Create a new attribute

File in those fields
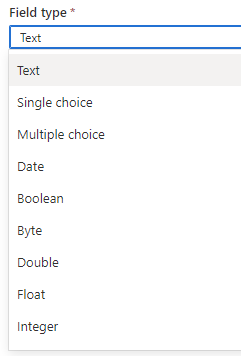
For field group: There are those can be selected

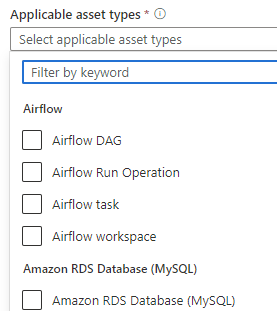
For applicable asset types, many options out of box to be used

Now, new attributes created

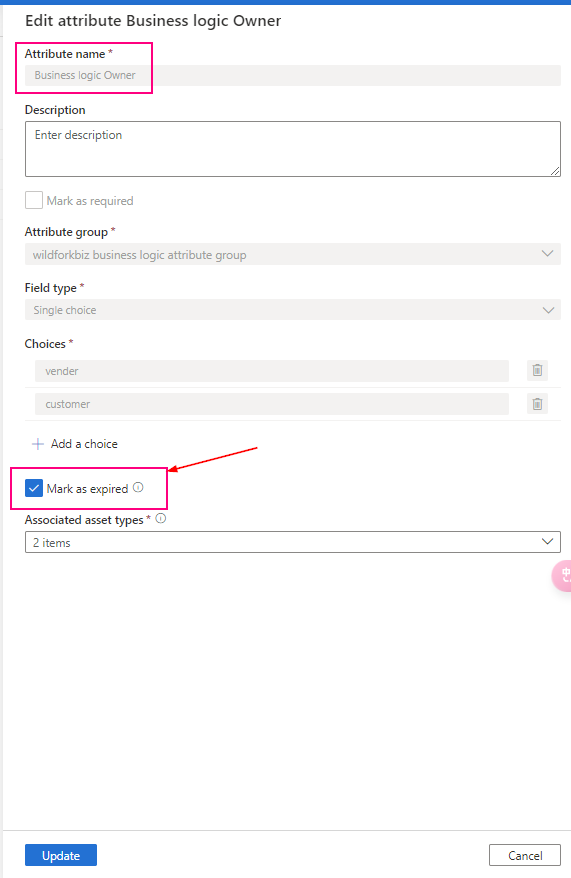
In the managed attribute management experience, managed attributes can’t be deleted, only expired. Expired attributes can’t be applied to any assets and are, by default, hidden in the user experience. Once an attribute created, it cannot change. Only mark them as “expired” and create a new, undated one.

Add value for managed attribute

Once a managed attribute has been created, you’ll need to add a value for each of your assets. You can add values to your assets by:

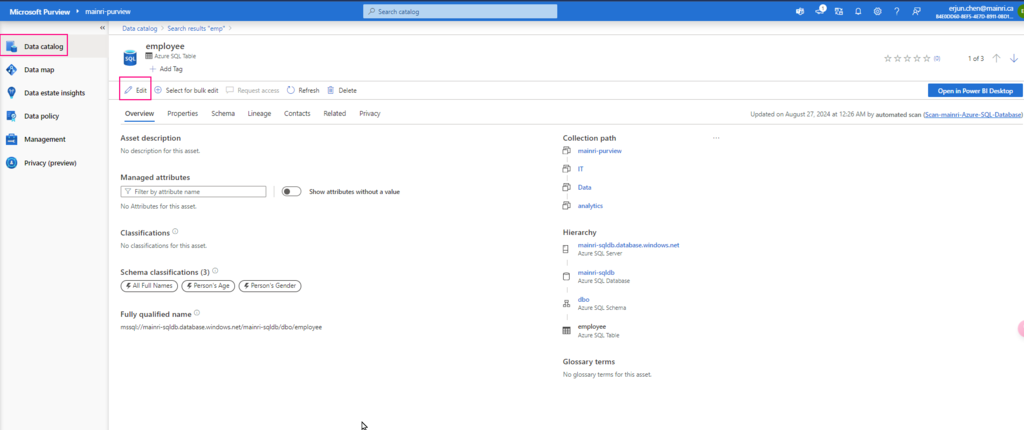
  1. Search for your data asset in the Microsoft Purview Data Catalog
  2. On the overview for your asset, you should see the managed attributes section with all attributes that have values. (You can see attributes without values by using the Show attributes without a value toggle.)
  3. Select the Edit button.

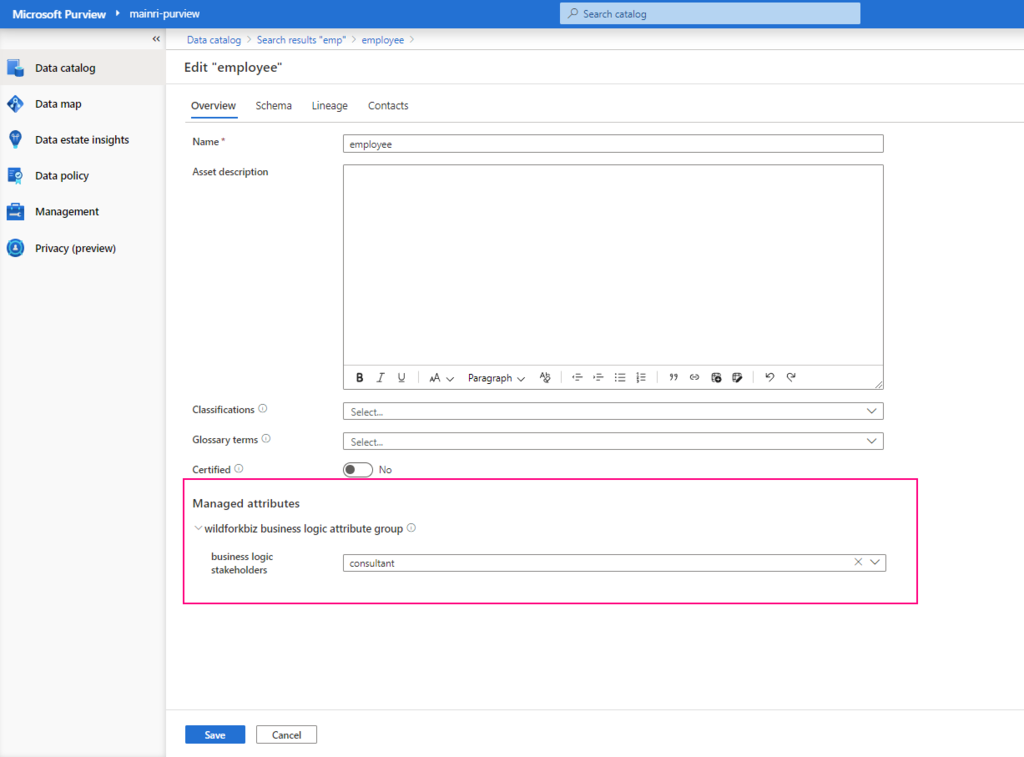
Under Managed attributes, add values for each of your attributes.

If any attributes are Required you will not be able to save until you’ve added a value for that attribute.

Now, managed attribute added

Summary

Managed attribute: A set of user-defined attributes that provide a business or organization level context to an asset. A managed attribute has a name and a value. For example, ‘Department’ is an attribute name and ‘Finance’ is its value. Attribute group: A grouping of managed attributes that allow for easier organization and consumption.

Please do not hesitate to contact me if you have any questions at William . chen @ mainri.ca

(remove all space from the email account 😊)

Next step: Day 10 – Collections access control and management

Day 8 – Data Lineage, Extract SQL, ADF and Synapse Pipeline Lineage

Microsoft Purview provides an overview of data lineage in the Data Catalog. It also details how data systems can integrate with the catalog to capture lineage of data.

Lineage is represented visually to show data moving from source to destination including how the data was transformed. Given the complexity of most enterprise data environments.

Microsoft Purview supports lineage for views and stored procedures from Azure SQL Database. While lineage for views is supported as part of scanning, you will need to turn on the Lineage extraction toggle to extract stored procedure lineage when you’re setting up a scan.

Lineage collection

Metadata collected in Microsoft Purview from enterprise data systems are stitched across to show an end to end data lineage. Data systems that collect lineage into Microsoft Purview are broadly categorized into following three types:

  • Data processing systems
  • Data storage systems
  • Data analytics and reporting systems

Each system supports a different level of lineage scope.  

Data estate might include systems doing data extraction, transformation (ETL/ELT systems), analytics, and visualization systems. Each of the systems captures rich static and operational metadata that describes the state and quality of the data within the systems boundary. The goal of lineage in a data catalog is to extract the movement, transformation, and operational metadata from each data system at the lowest grain possible.

The following example is a typical use case of data moving across multiple systems, where the Data Catalog would connect to each of the systems for lineage.

  • Data Factory copies data from on-prem/raw zone to a landing zone in the cloud.
  • Data processing systems like Synapse, Databricks would process and transform data from landing zone to Curated zone using notebooks.
  • Further processing of data into analytical models for optimal query performance and aggregation.
  • Data visualization systems will consume the datasets and process through their meta model to create a BI Dashboard, ML experiments and so on.

Lineage for SQL DB views

Starting 6/30/24, SQL DB metadata scan will include lineage extraction for views. Only new scans will include the view lineage extraction. Lineage is extracted at all scan levels (L1/L2/L3). In case of an incremental scan, whatever metadata is scanned as part of incremental scan, the corresponding static lineage for tables/views will be extracted.

Prerequisites for setting up a scan with Stored Procedure lineage extraction

<Purview-Account> can access SQL Database and in db_owner group

To check whether the Account Exists in the Database


SELECT name, type_desc
FROM sys.database_principals
WHERE name = 'YourUserName';

Replace ‘YourUserName’ with the actual username you’re checking for.

If the user exists, it will return the name and type (e.g., SQL_USER or WINDOWS_USER).

If it does not exist, create one.

Sign in to Azure SQL Database with your Microsoft Entra account, create a <Purview-account> account and assign db_owner permissions to the Microsoft Purview managed identity.

You can review my previous article Configuring Azure Entra ID Authentication in Azure SQL Database If you are not sure how to enable Azure Entra ID login.


Create user <purview-account> FROM EXTERNAL PROVIDER
GO
EXEC sp_addrolemember 'db_owner', <purview-account> 
GO

replace <purview-account> with the actual purview account name.

Master Key

Check whether master exists or not.

To check if the Database Master Key (DMK) exists or not


SELECT * FROM sys.symmetric_keys
WHERE name = '##MS_DatabaseMasterKey##';Create master key
Go

if the query returns a result, it means the Database Master Key already exists.

If no rows are returned, it means the Database Master Key does not exist, and you may need to create one if required for encryption-related operations.

Create a master key


Create master key
Go

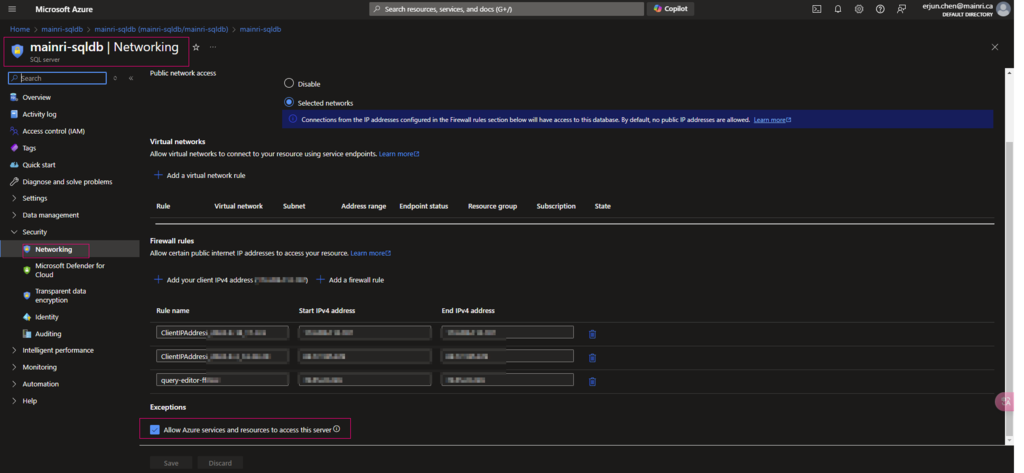
Allow Azure services and resources to access this server 

Ensure that Allow Azure services and resources to access this server is enabled under networking/firewall for your Azure SQL resource.

Previously, we have discussed create a scan for Azure SQL Database at Registering Azure SQL Database and Scan in Purview, that scan progress is disabled “Lineage extraction” in that article.

To allow purview extract lineage, we need set to on

Extract Azure Data Factory/Synapse pipeline lineage

When we connect an Azure Data Factory to Microsoft Purview, whenever a supported Azure Data Factory activity is run, metadata about the activity’s source data, output data, and the activity will be automatically ingested into the Microsoft Purview Data Map.

Microsoft Purview captures runtime lineage from the following Azure Data Factory activities:

  • Copy Data
  • Data Flow
  • Execute SSIS Package

If a data source has already been scanned and exists in the data map, the ingestion process will add the lineage information from Azure Data Factory to that existing source. If the source or output doesn’t exist in the data map and is supported by Azure Data Factory lineage Microsoft Purview will automatically add their metadata from Azure Data Factory into the data map under the root collection.

This can be an excellent way to monitor your data estate as users move and transform information using Azure Data Factory.

Connect to Microsoft Purview account in Data Factory

Set up authentication

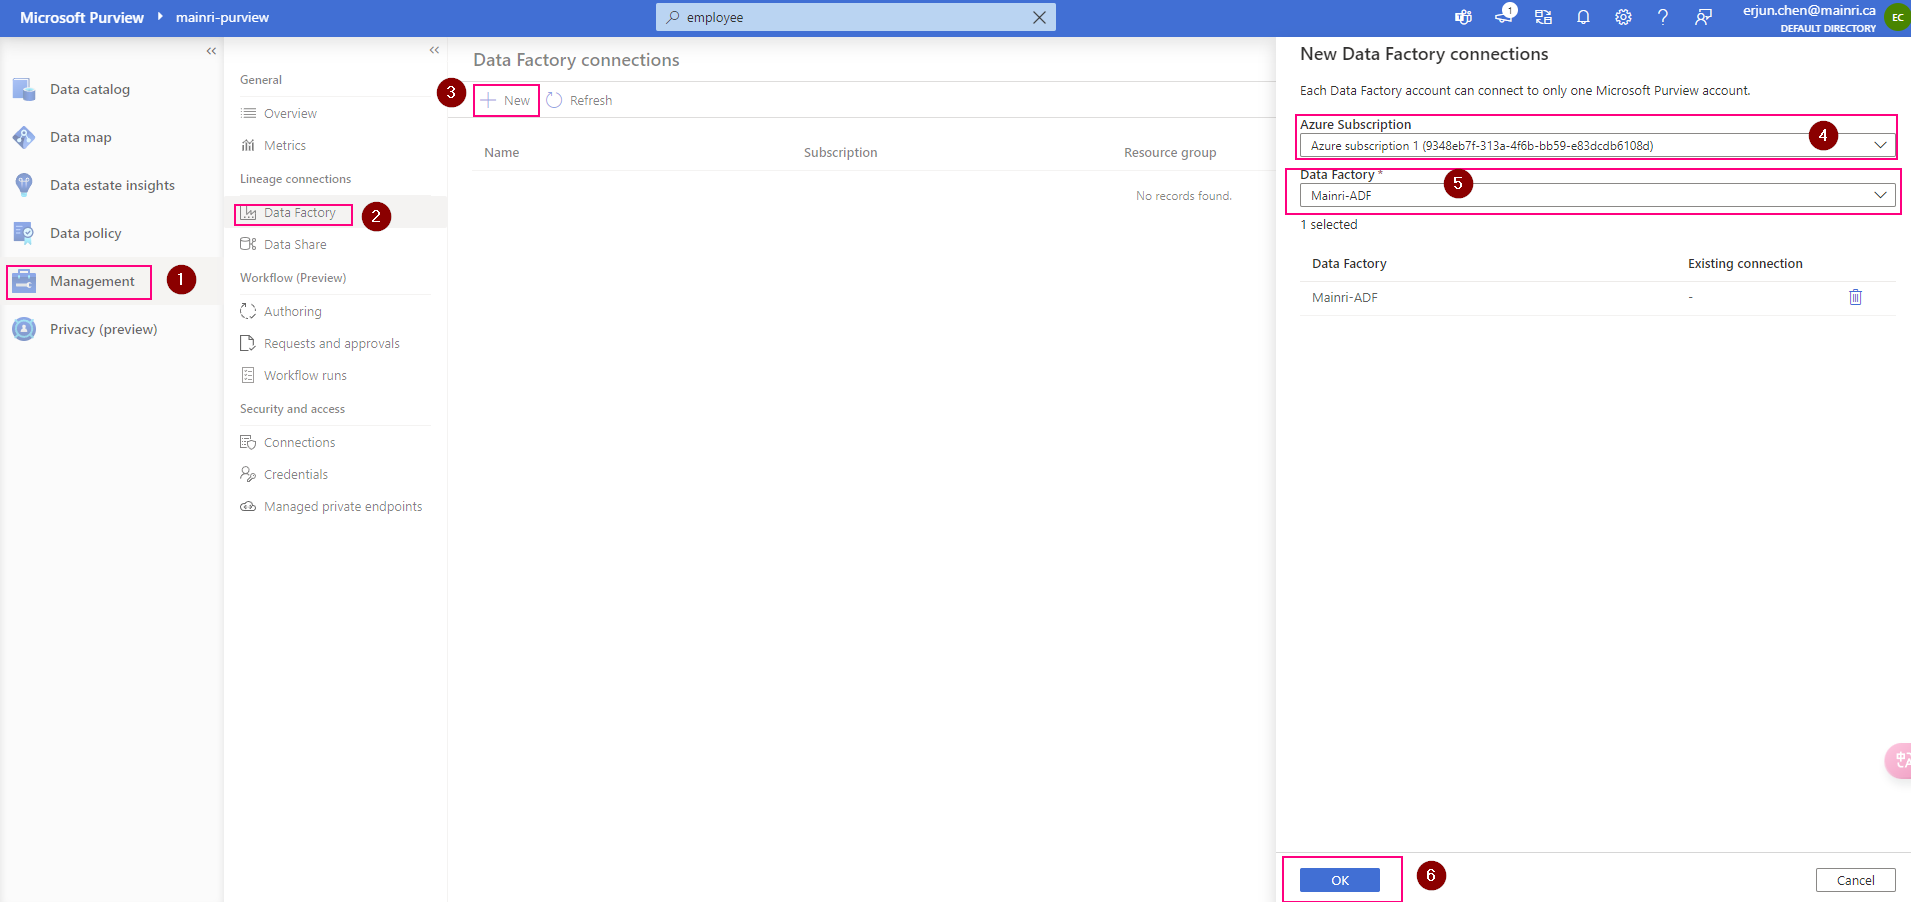
Data factory’s managed identity is used to authenticate lineage push operations from data factory to Microsoft Purview. Grant the data factory’s managed identity Data Curator role on Microsoft Purview root collection.

Purview > Management > Lineage connections > Data Factory > new

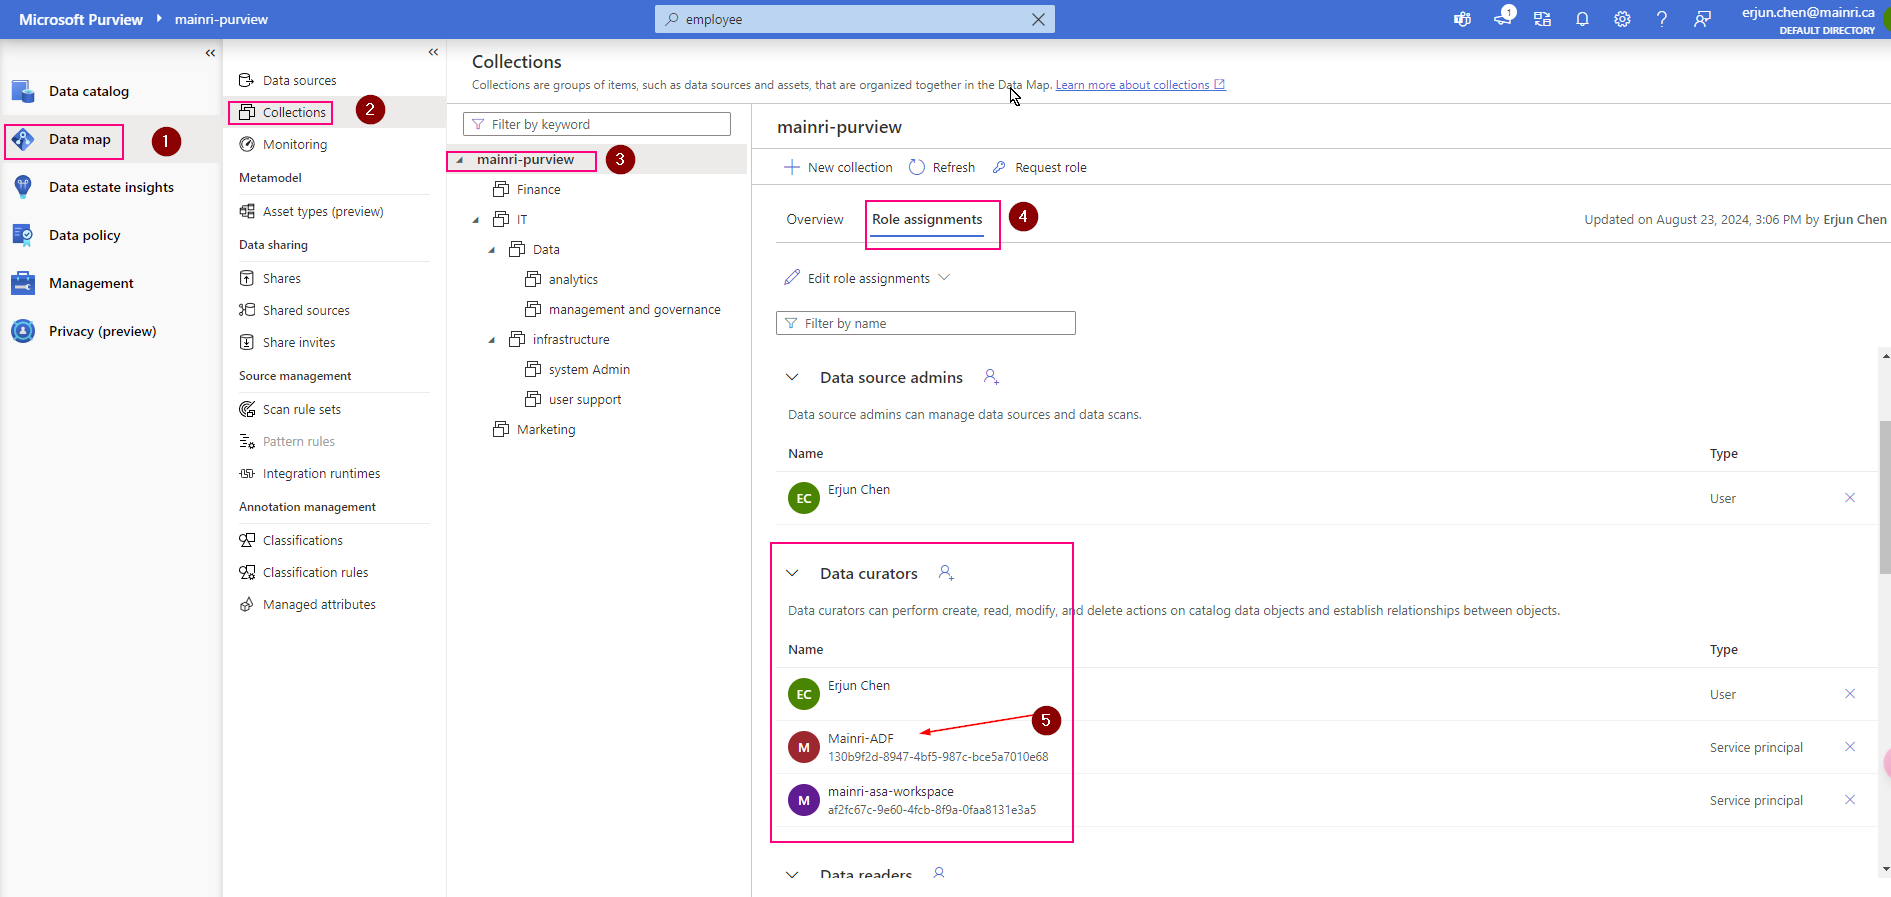
Validation: Purview > Data map > Collection > Root collection > Role assignments >

Check, the ADF is under “data Curators” section. That’s OK

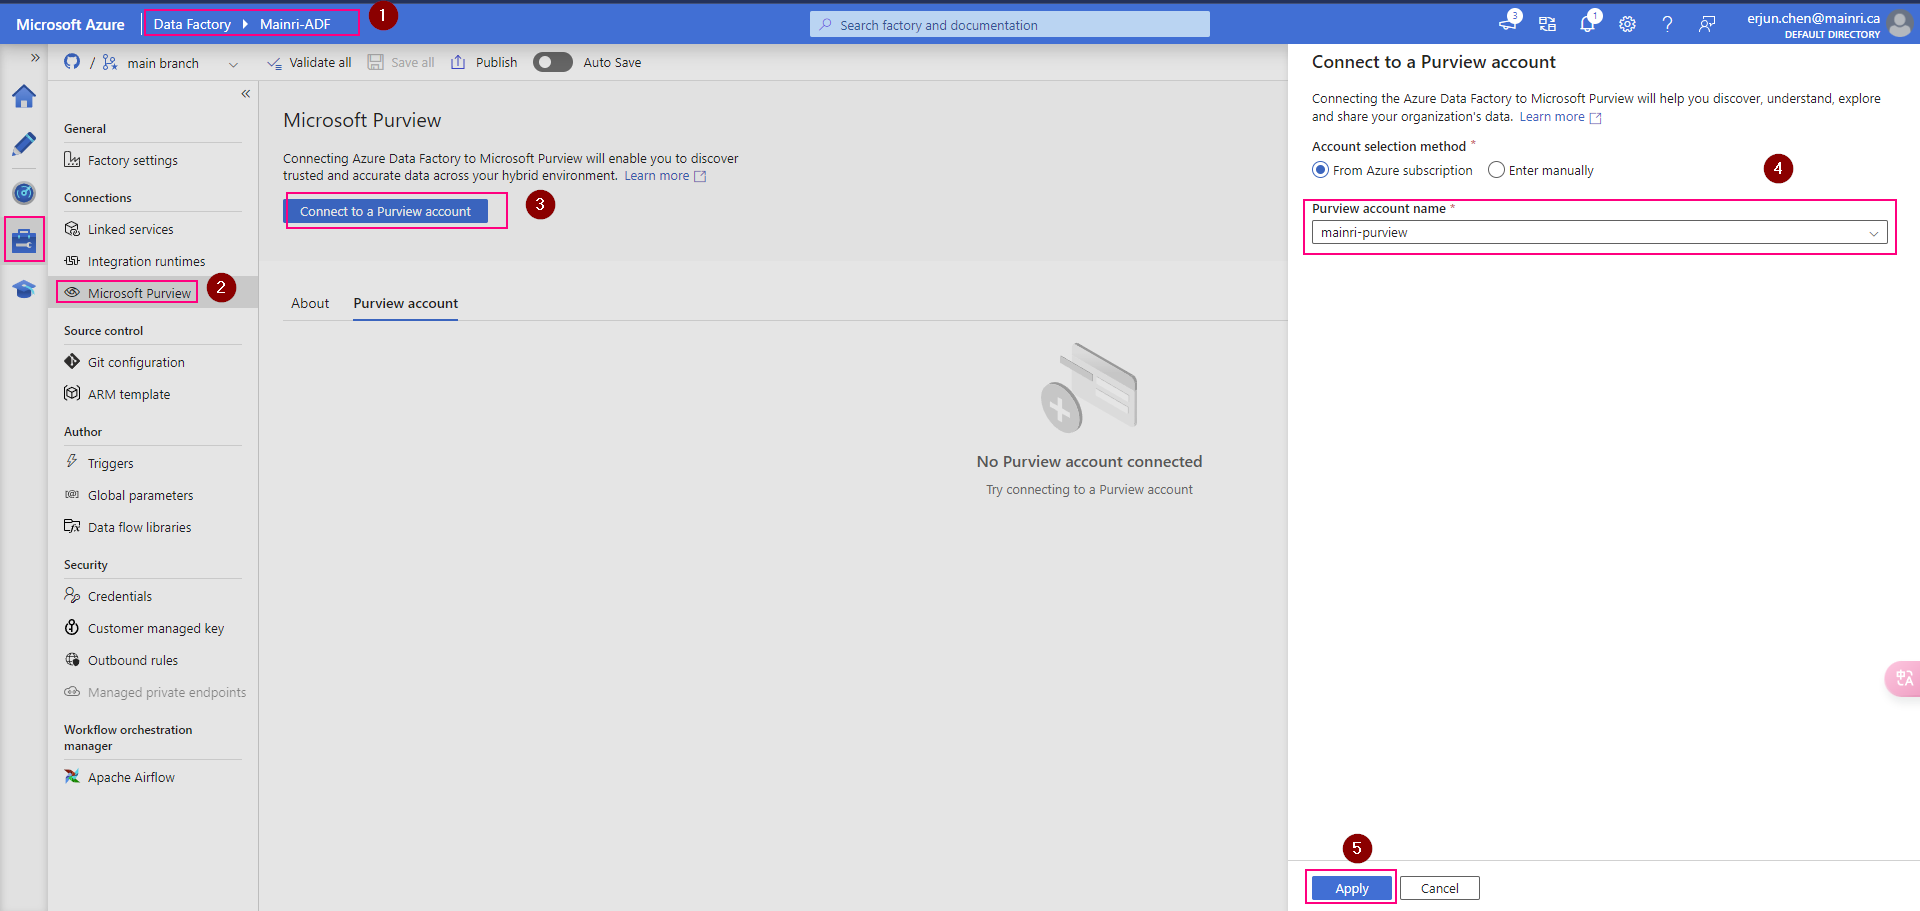
ADF connect to purview

In the ADF studio: Manage -> Microsoft Purview, and select Connect to a Microsoft Purview account

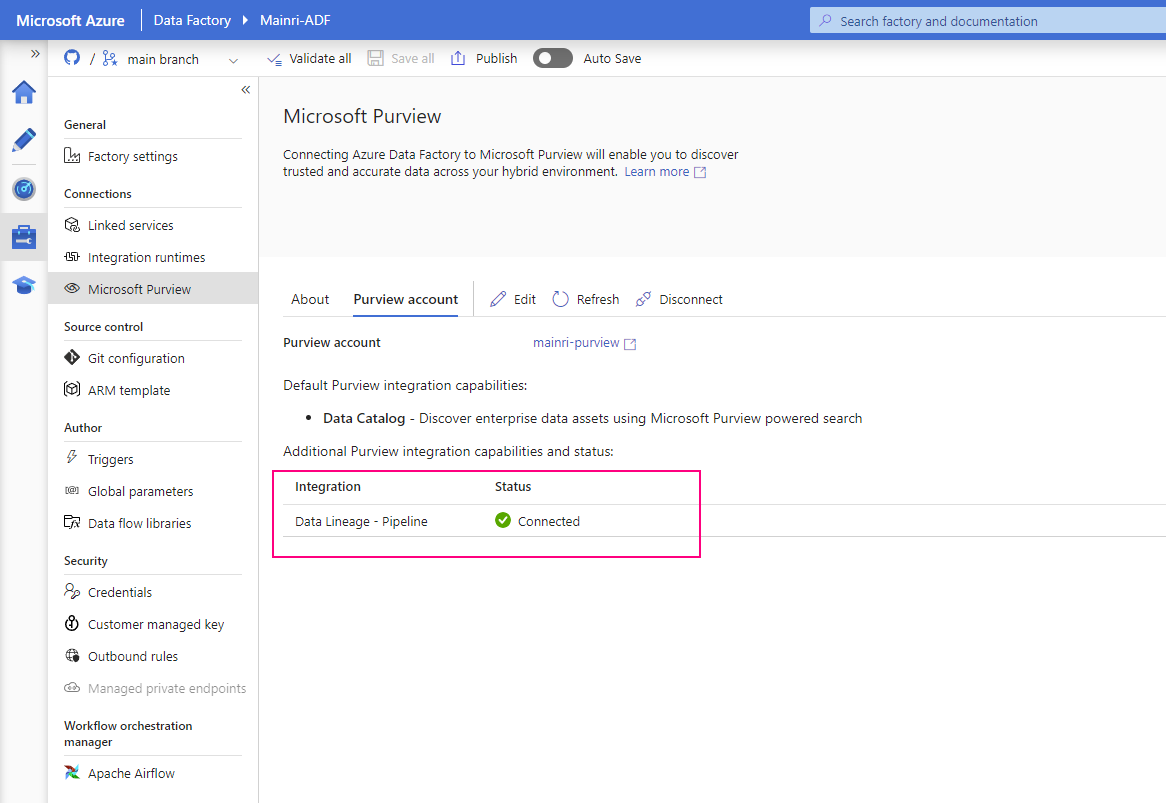
We will see this

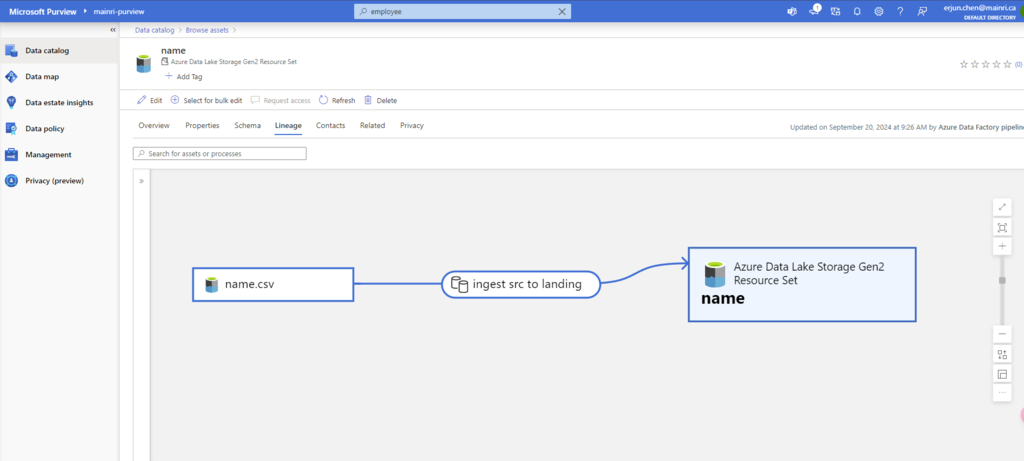
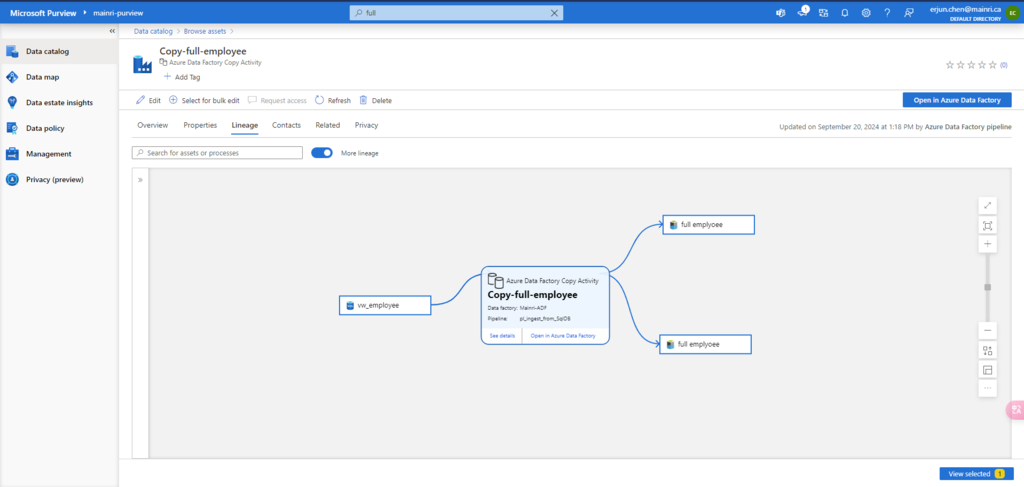
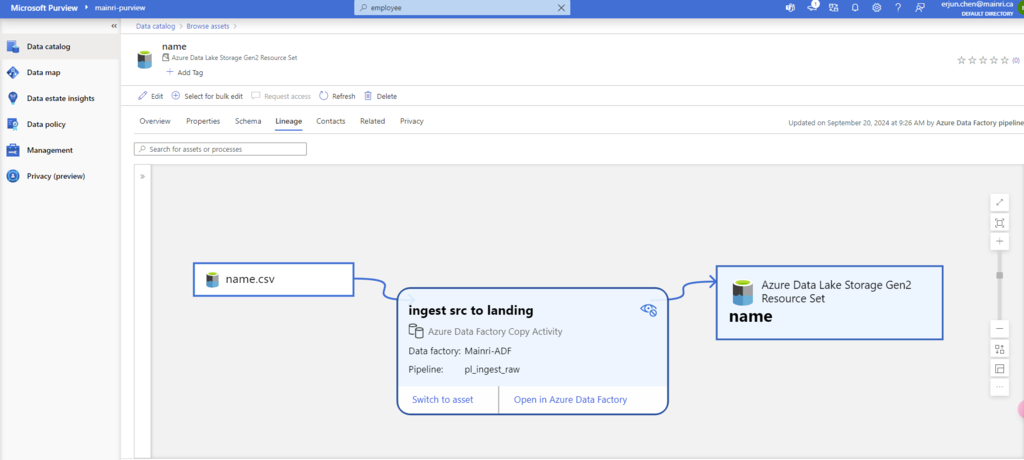
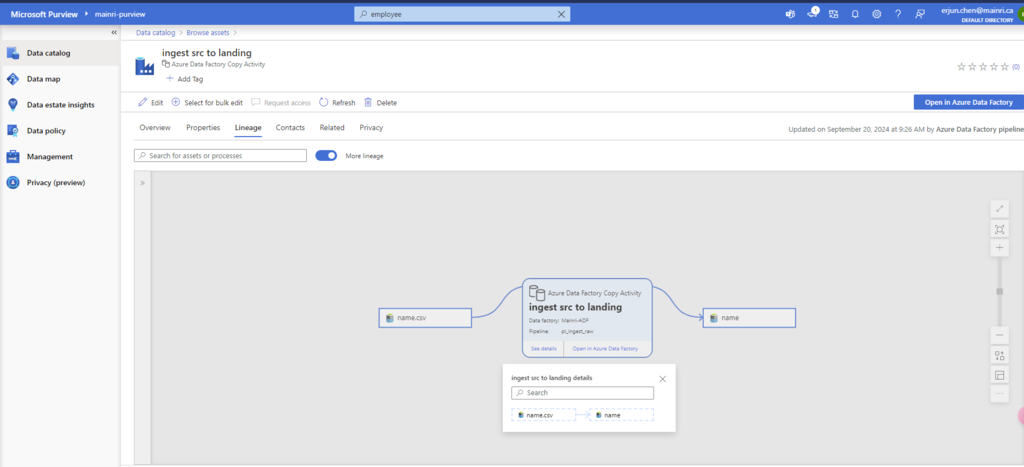
Once pipeline successfully runs, activity will be caught, extracted lineage look this.

that’s all for extracting ADF pipeline lineage.

Next step: Day 9 – Managed attributes in Data Map

Please do not hesitate to contact me if you have any questions at William . chen @ mainri.ca

(remove all space from the email account 😊)

Day 7: Permission and Roles, Business Glossary and Collections Access Control in Purview

Role and roles and responsibilities in Purview

When working with a data catalog, different users and roles are involved. The permission concept in an Azure Purview data map is quite simple.

  • Permissions can be applied at collection level
  • Permission inheritance is possible (but can be restricted)
  • As of today, four roles (admins, data source admins, curators and readers) are available

The Microsoft Purview governance portal uses Collections in the Microsoft Purview Data Map to organize and manage access across its sources, assets, and other artifacts.

Collections

A collection is a tool that the Microsoft Purview Data Map uses to group assets, sources, and other artifacts into a hierarchy to manage access control. All accesses to the Microsoft Purview governance portal’s resources are managed from collections in the Microsoft Purview Data Map.

Role

The Microsoft Purview governance portal uses a set of predefined roles to control who can access what within the account.

These roles are currently:

  • Collection administrator 
  • Data curators
  • Data readers
  • Data source administrator
  • Insights reader
  • Policy author
  • Workflow administrator 

Detail definition please review Microsoft Purview official documentation.

Here is a summary of roles and responsibilities

Add or move Role assignments

Select the Role assignments tab to see all the roles in a collection. Only a collection admin can manage role assignments.

Type in the textbox to search for users you want to add to the role member. Select X to remove members you don’t want to add.

Restrict inheritance

Collection permissions are inherited automatically from the parent collection. For example, any permissions on the root collection (the collection at the top of the list that has the same name as your account), will be inherited by all collections below it. You can restrict inheritance from a parent collection at any time, using the restrict inherited permissions option.

After restriction, inherited members are removed from the roles expect for collection admin.

Select the Restrict inherited permissions toggle button again to revert.

Business Glossary

glossary provides vocabulary for business users. It consists of business terms that can be related to each other and allow them to be categorized so that they can be understood in different contexts. 

business glossary is a collection of terms. Each term represents an object in an organization and it’s highly likely that there are multiple terms representing the same object.

There are some out of box templates that have predefined.

Add new glossary

Purview studio > Data Catalog > Glossary > new Glossary

Fill in all properties.

Next step: Day 8 – Data Lineage – Extract SQL, ADF and Synapse Pipeline Lineage

Please do not hesitate to contact me if you have any questions at William . chen @ mainri.ca

(remove all space from the email account 😊)

Day 6: Registering Azure Synapse Analytics workspaces and scan in Microsoft Purview

Previously, we’ve talked about how Purview connect to ADLS and SQL Database, scan in Purview. Today, we focused on Azure Synapse Analytics with Purview.

A comprehensive data analytics solution can include many folders and files in a data lake, and multiple databases that each contain many tables, each with multiple fields. For a data analyst, finding and understanding the data assets associated with a Synapse Analytics workspace can present a significant challenge before any analysis or reporting can even begin.

As we know the Azure Synapse Analytics is a platform for cloud-scale analytics workloads that process data in multiple sources; including:

  • Relational databases in serverless and dedicated SQL pools
  • Files in Azure Data Lake Storage Gen2

Microsoft Purview can help in this scenario by cataloging the data assets in a data map, and enabling data stewards to add metadata, categorization, subject matter contact details, and other information that helps data analysts identify and understand data.

Before you scan Synapse workspace, you need Azure Synapse Analytics connects Purview account.

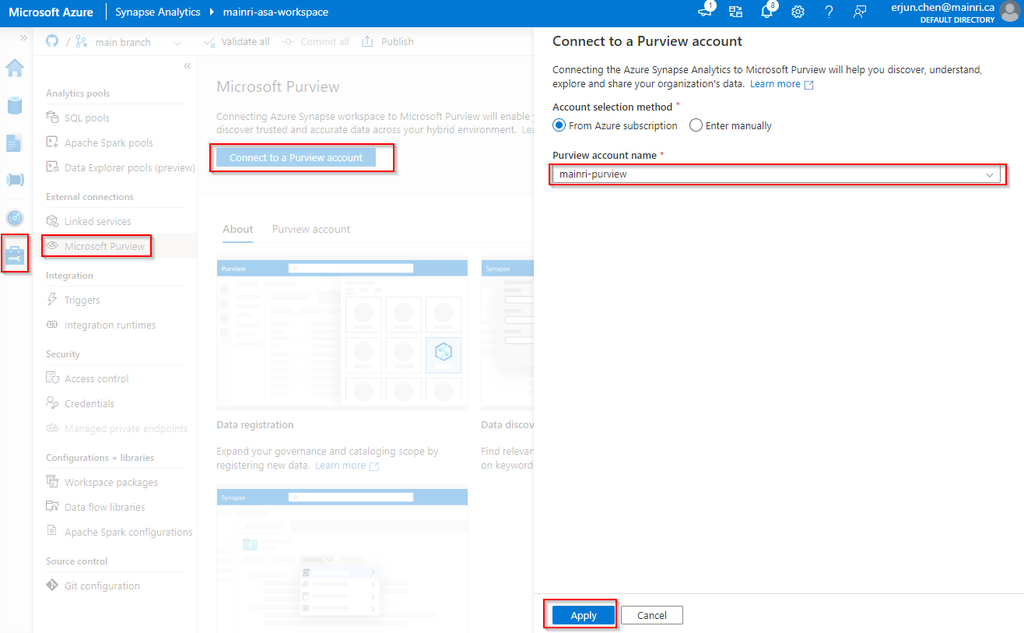
Azure Synapse Analytics connects to Purview account.

Synapse Studio > Manage > External connection > Microsoft Purview

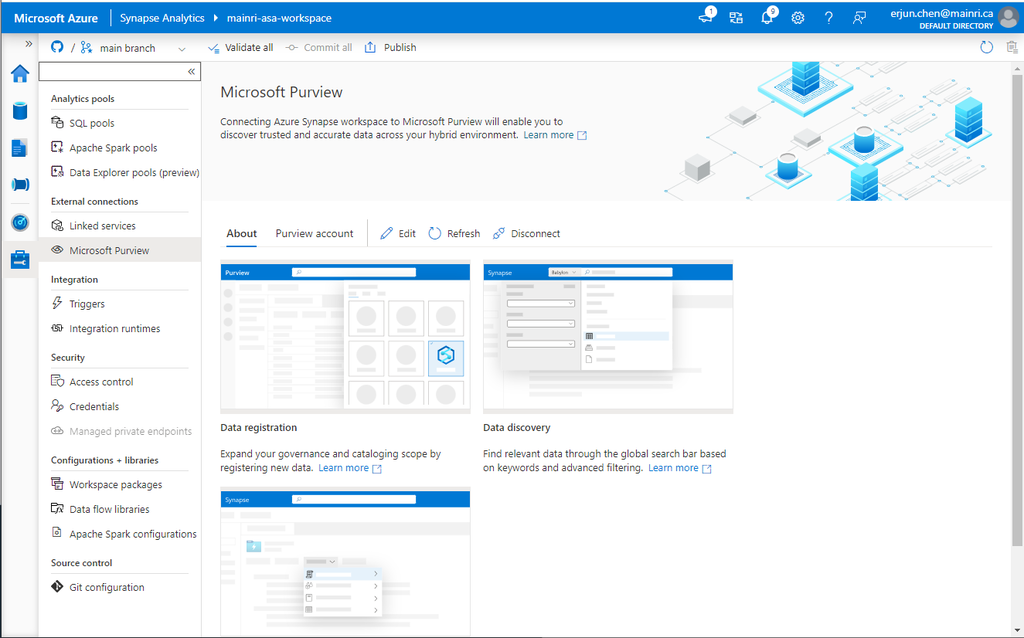
after you click “apply” you will see:

Select “Purview account” tag

Successfully connected with Purview.

To validation, we check what we have in ADLS and SQL Database.

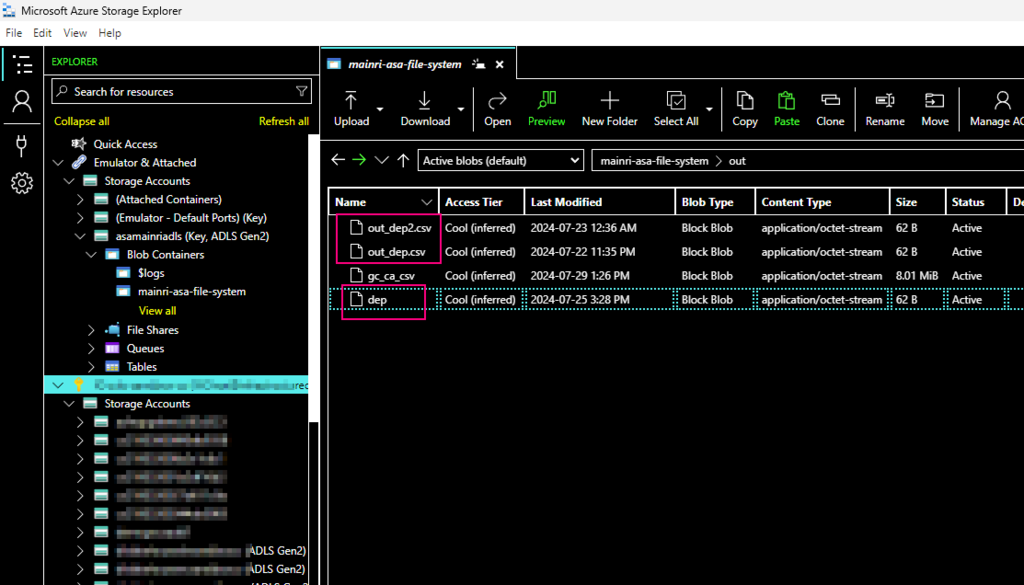
We have in ADLS and Azure SQL Database. There are one table called “dep” in the SQL Database, 3 files in the ADLS.

There is one table in SQL Database:

and there are 3 file related the key word “dep” in ADLS,

using Azure Storage Explore:

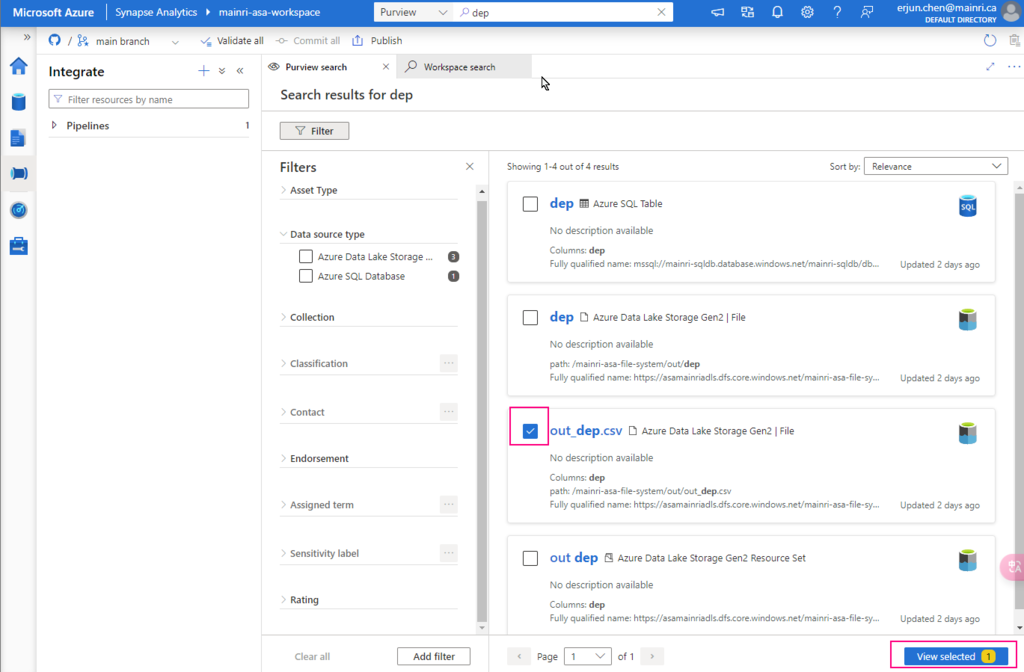
Let’s search “dep” the key from Synapse Studio.

Synapse Studio > from the dropdown > select “Purview” > type “dep”

We find out the objects related to the key words – “dep”

 A table in SQL Database, 3 files in ADLS.

Great, we successfully connected to Purview.

choose either of them to view in detail

There are so many powerful and interesting functions regarding the “Searching”, “discovering”, we will talk about them late.  

Now, let’s switch to Purview studio.

Register Synapse Analytics Workspace

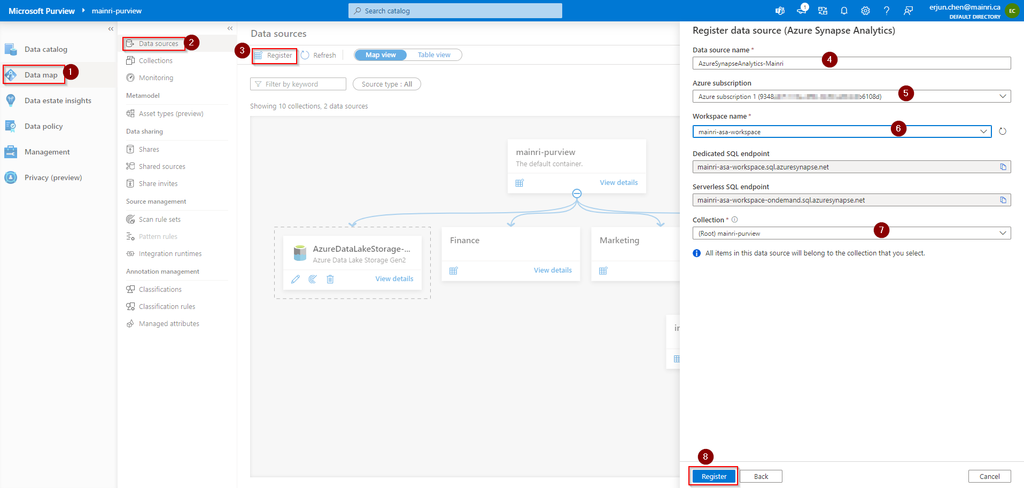
Assuming you have created Collects, we directly jump into register Azure Synapse Analytics Workspace (ASA).

Purview Studio > Data Map > Data Source

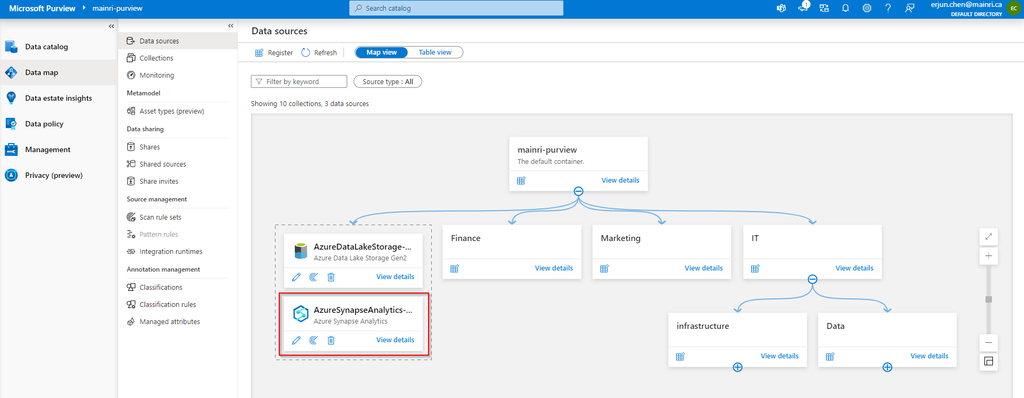
After filling in above values, click “register”, you will this

After registering the sources where your data assets are stored, you can scan each source to catalog the assets it contains. You can scan each source interactively, and you can schedule period scans to keep the data map up to date.

You may or may not see this error or alerts:

Read:

“Failed to load serverless databases from Synapse workspace, please give the managed identity of the Microsoft Purview account permissions or apply the correct credential to enumerate serverless databases.”

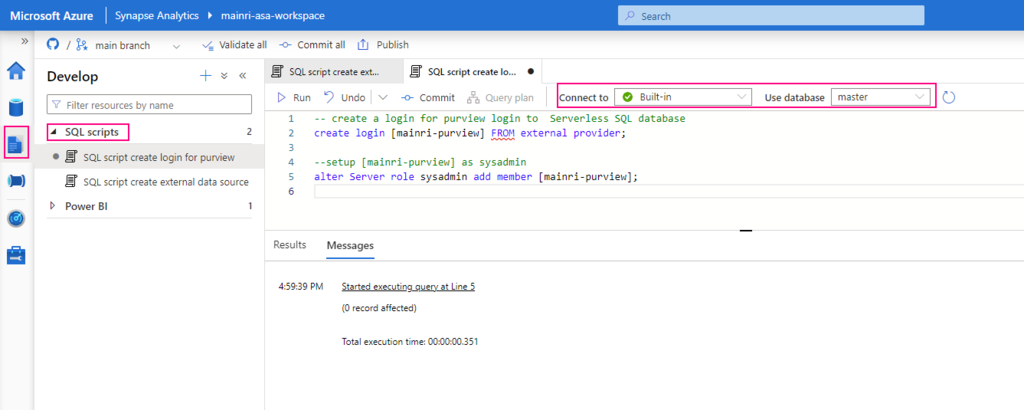
If you see it, you need create a login account for purview account to connect Serverless SQL:

Create Serverless SQL database login account for Purview

— create a login for purview login to  Serverless SQL database


create login [mainri-purview] from external provider;

Synapse Studio > Develop > SQL Script >
select: “connect to Built-in” and use database “master”

Grant purview login account Sysadmin privilege

Add managed identity to the storage account

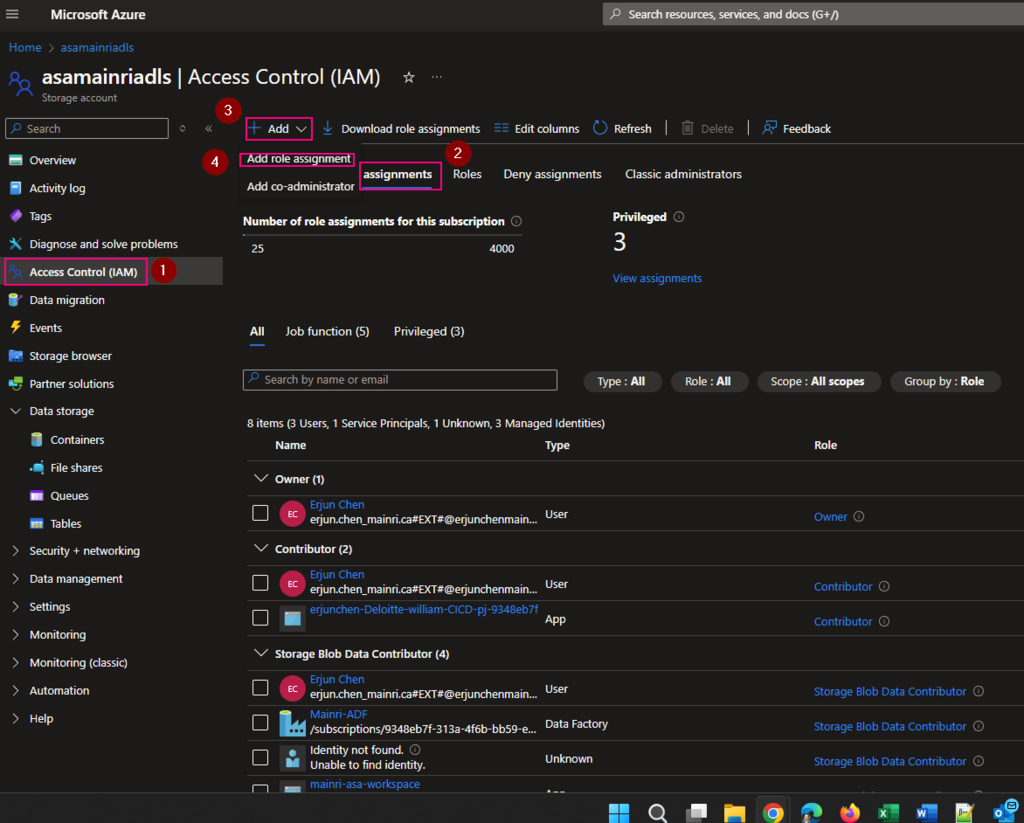
Then, add managed identity to the storage account.

From Azure portal > storage account > Access Control (IAM)
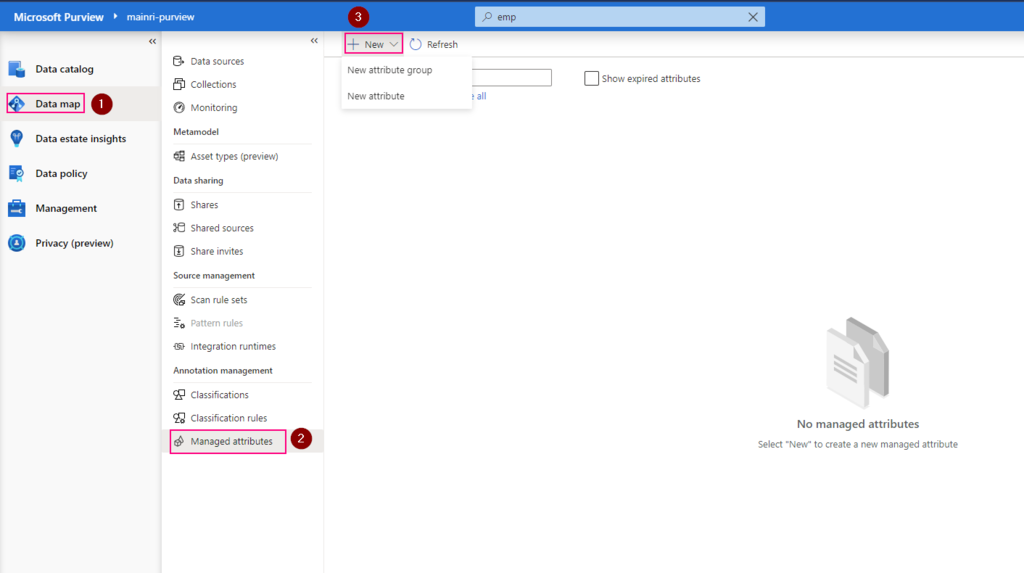
Select Role assignments tag

Add role assignments

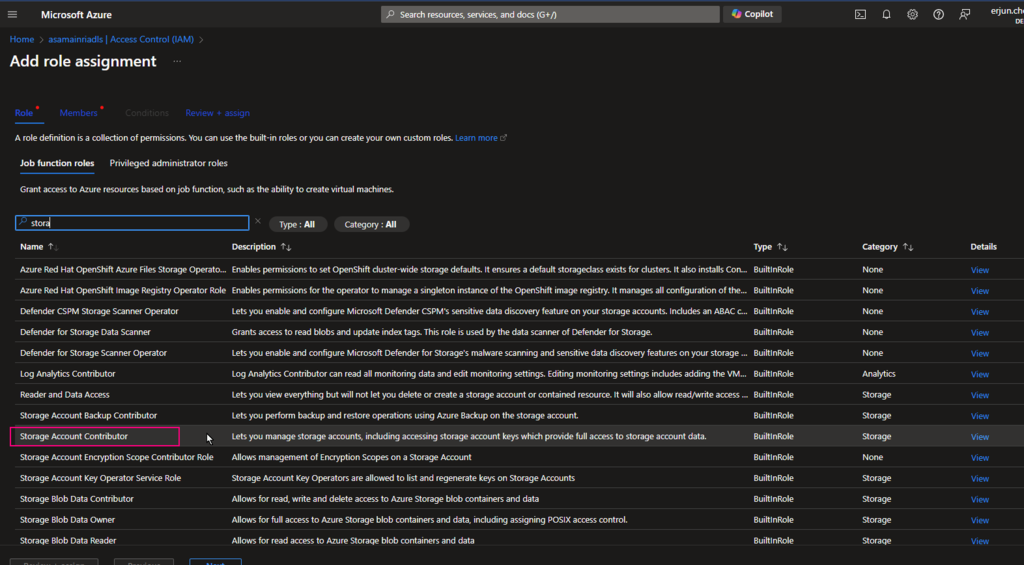
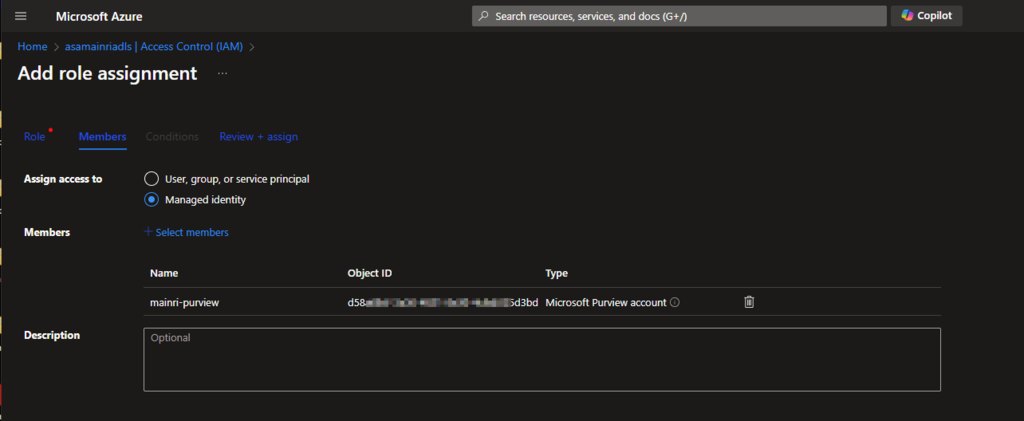
Give the “Storage Account Contributor” role

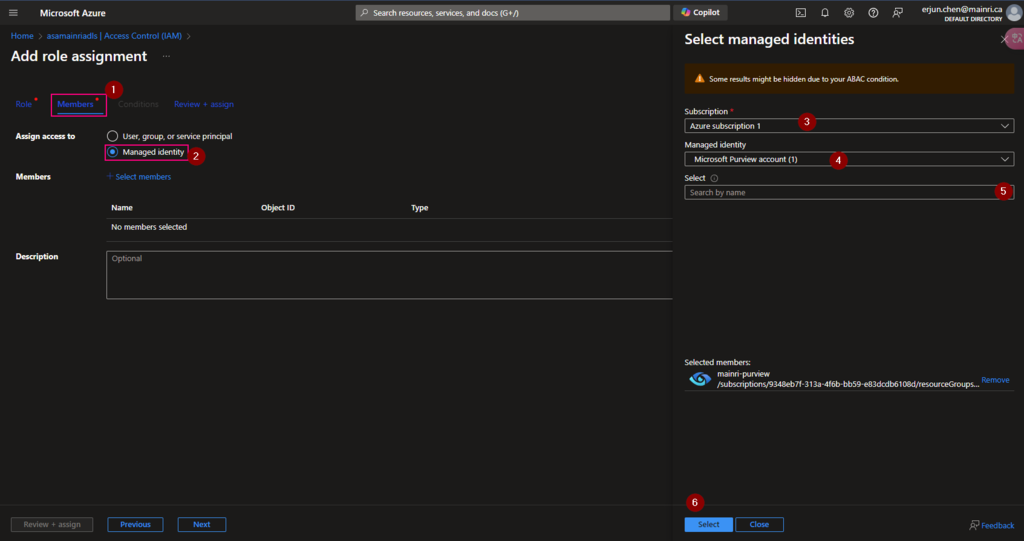
Then, select “Member” tag:

Select “Managed Identity”, fill in all properties, Find out the purview account

Now, the role assignments added.

If you have dedicated SQL pool, we need repeat these.

  • Create Serverless SQL database login account for Purview
  • Grant purview login account Sysadmin privilege

Let’s test the connection

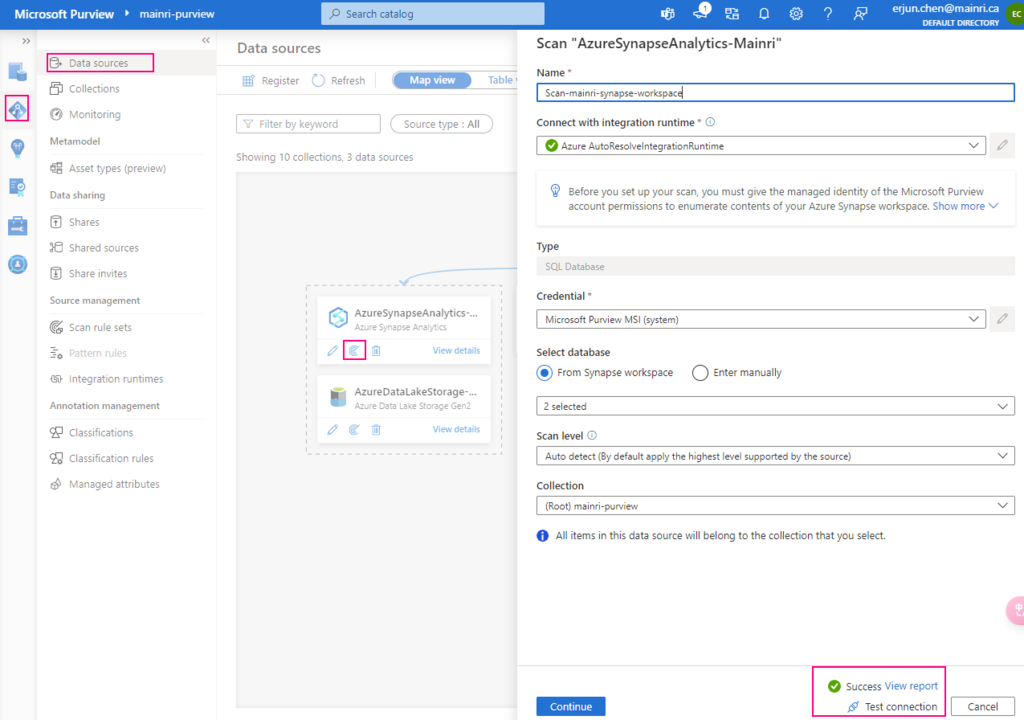
From Purview studio > scan

we got failed alert.

“Failed to validate the resource expansion. Either the expandable resource has no resources or the Purview account’s MSI has not been assigned to the ‘Reader’ role on it.”

Go back to Synapse portal

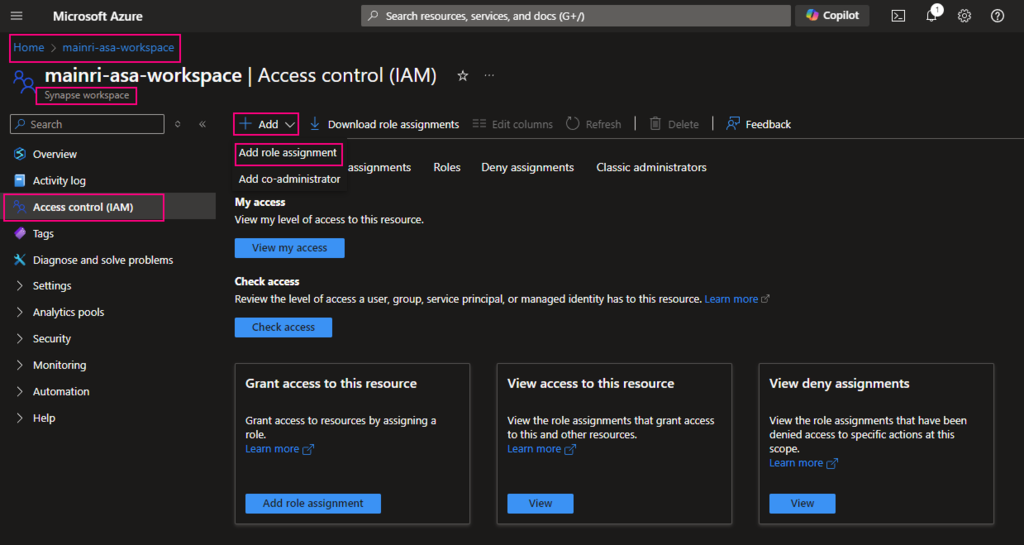
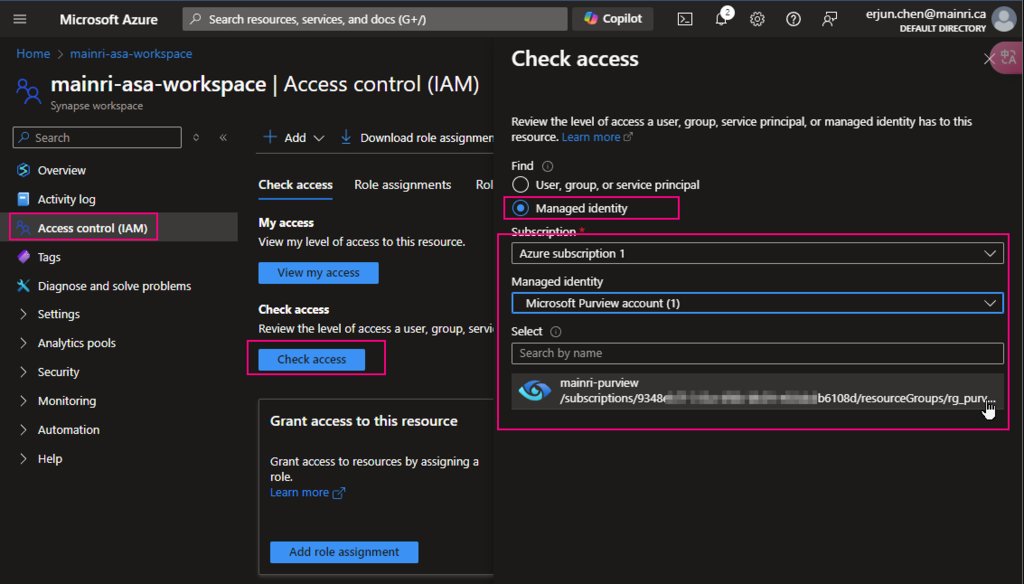
Azure Portal > Synapse workspace > Access control (IAM) > Add role assignments

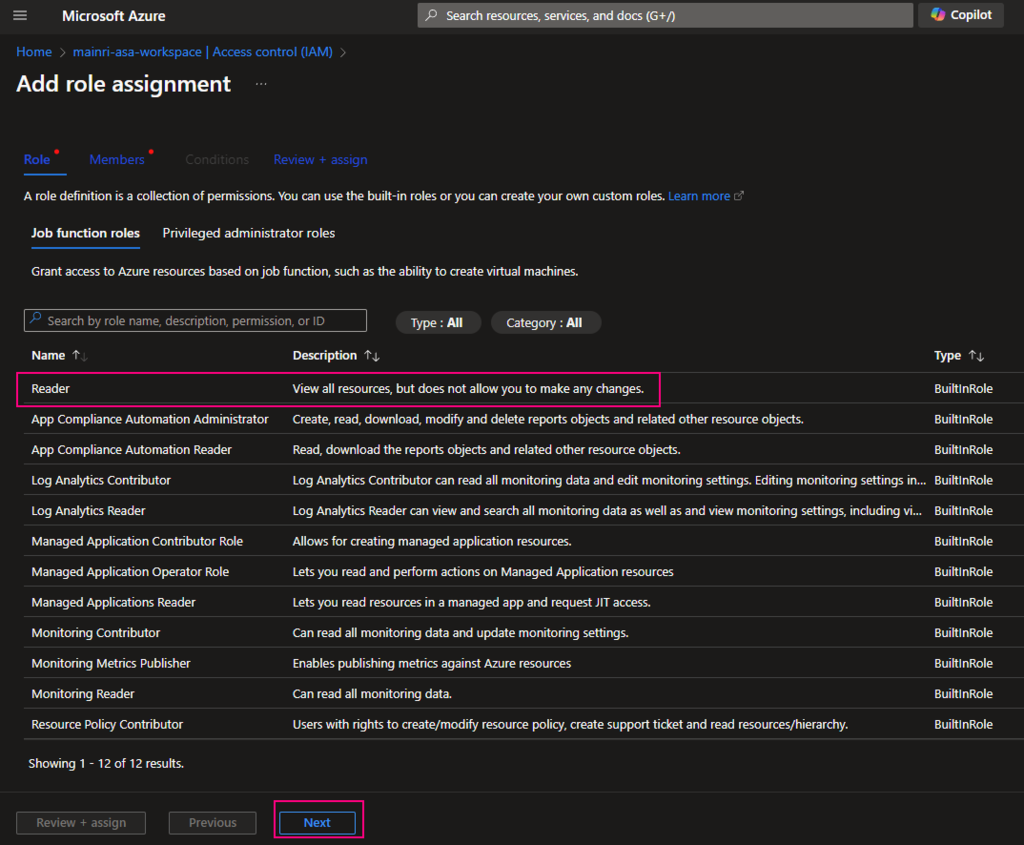
add “read” role

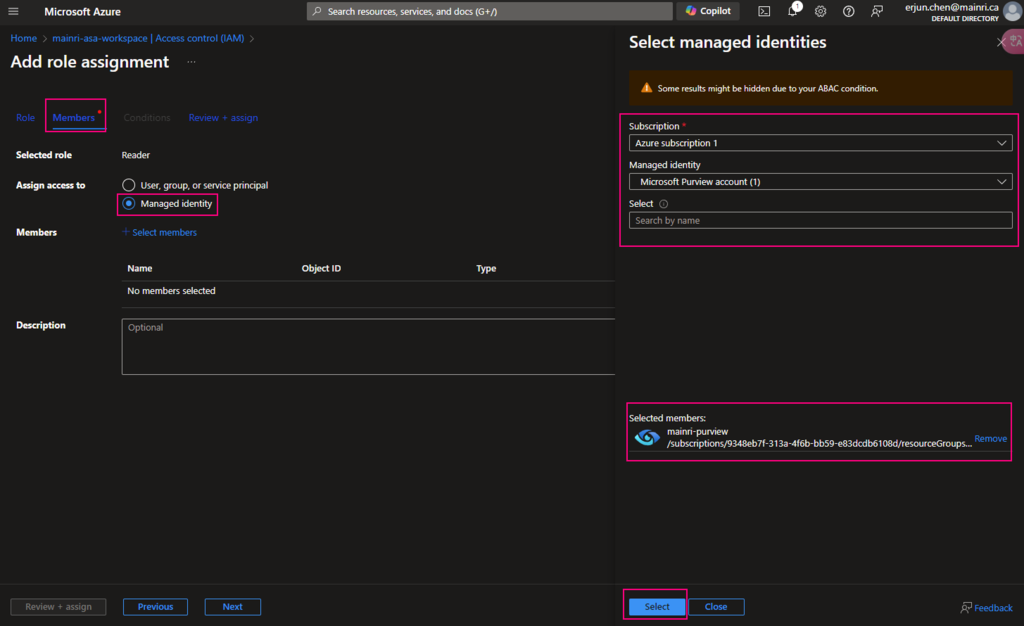
Add “managed Identity” member – Purview

Check Purview access,

we can see Mainri-purview assignments – mainri-asa-workspace has “read” role (my Synapse workspace named “mainri-asa-workspace”)

Go to Purview Studio test connection again.

Great! We successful connect to Synapse workspace.

We have gotten access to SQL; we’ve got access to storage account. we have add “read” role assignment to Purview

Alright, we are ready to go – scan.

Scan Synapse workspace

After registering the sources where your data assets are stored, you can scan each source to catalog the assets it contains. You can scan each source interactively, and you can schedule period scans to keep the data map up to date.

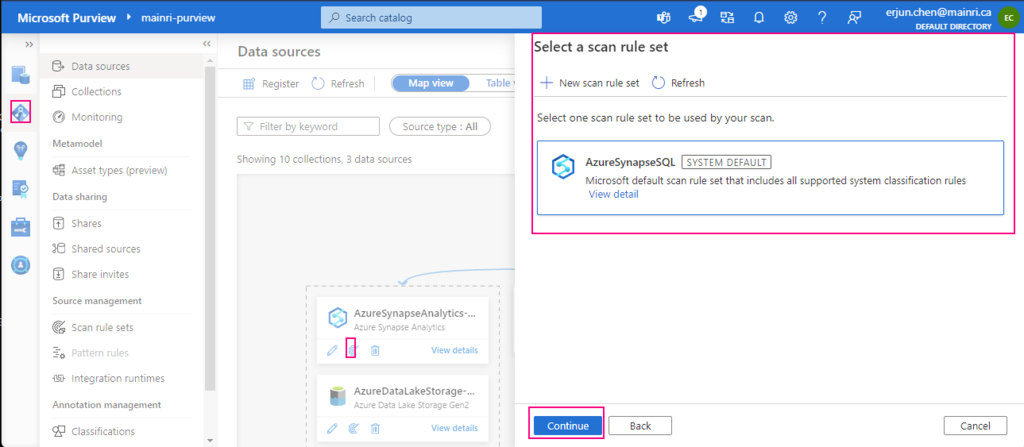
Select a scan rule set

If you like, you are able to add even more new scan rule set at this step.

For this demonstration, we select default scan rule set.

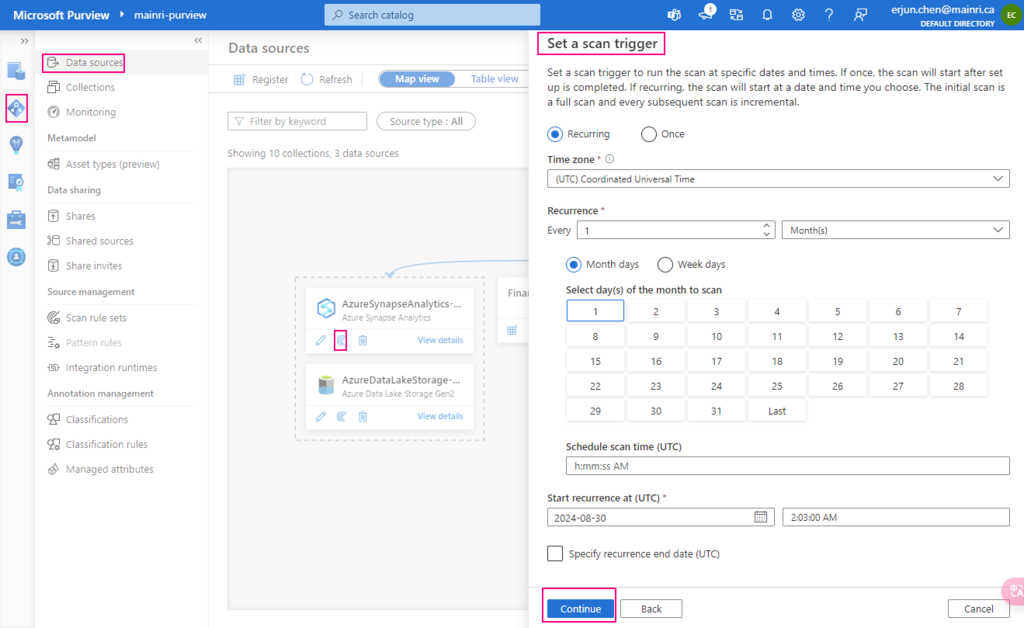
Set a scan trigger

We ca either scan once or schedule and recurring scan on schedule.

Monitoring the scan progress ….

Once the process done, we will see this:

Alright, we have done the Purview for scanning Azure Synapse Workspace. Now, we have those source in our Azure purview.

Next step: Day 7 – Day 7: Permission and Roles, Business Glossary and Collections Access Control in Purview

Please do not hesitate to contact me if you have any questions at William . chen @ mainri.ca

(remove all space from the email account 😊)