contains(), collect(), transform(), udf(), udf for sql

contains ()

The contains() function in PySpark is used to check if a string column contains a specific substring. It’s typically used in a filter() or select() operation to search within the contents of a column and return rows where the condition is true.

Syntax

Column.contains(substring: str)

Key Points

  • contains() is case-sensitive by default. For case-insensitive matching, use it with lower() or upper().
  • It works on string columns only. For non-string columns, you would need to cast the column to a string first.
sample DF
+-------+----------+
|   Name|Department|
+-------+----------+
|  James|     Sales|
|Michael|     Sales|
| Robert|        IT|
|  Maria|        IT|
+-------+----------+

# Filter rows where 'Department' contains 'Sales'
filtered_df = df.filter(df["Department"].contains("Sales"))
filtered_df.show()
+-------+----------+
|   Name|Department|
+-------+----------+
|  James|     Sales|
|Michael|     Sales|
+-------+----------+

# Add a new column 'Is_Sales' based on whether 'Department' contains 'Sales'
from pyspark.sql.functions import when
df_with_flag = df.withColumn(
    "Is_Sales",
    when(df["Department"].contains("Sales"), "Yes").otherwise("No")
)

df_with_flag.show()
+-------+----------+--------+
|   Name|Department|Is_Sales|
+-------+----------+--------+
|  James|     Sales|     Yes|
|Michael|     Sales|     Yes|
| Robert|        IT|      No|
|  Maria|        IT|      No|
+-------+----------+--------+

#Case-Insensitive Search
# Search for 'sales' in a case-insensitive manner
from pyspark.sql.functions import lower
df_lower_filtered = df.filter(lower(df["Department"]).contains("sales"))
df_lower_filtered.show()
+-------+----------+
|   Name|Department|
+-------+----------+
|  James|     Sales|
|Michael|     Sales|
+-------+----------+

collect ()

The collect () function simply gathers all rows from the DataFrame or RDD and returns them as a list of Row objects. It does not accept any parameters.

Syntax

DataFrame.collect()
not any parameter at all

Key Points

  • Use on Small Data: Since collect() brings all the data to the driver, it should be used only on small datasets. If you try to collect a very large dataset, it can cause memory issues or crash the driver..
  • For large datasets, consider using alternatives like take(n), toPandas(), show(n)
sample DF
+-------+---+
|   Name|Age|
+-------+---+
|  Alice| 25|
|    Bob| 30|
|Charlie| 35|
+-------+---+

# Collect all rows from the DataFrame
collected_data = df.collect()

# Access all rows
print(collected_data)
[Row(Name='Alice', Age=25), Row(Name='Bob', Age=30), Row(Name='Charlie', Age=35)]

# Access a row
print(collected_data[0])
Row(Name='Alice', Age=25)

# Access a cell
print(collected_data[0][0])
Alice

# Display the collected data
for row in collected_data:
    print(row)
==output==
Row(Name='Alice', Age=25)
Row(Name='Bob', Age=30)
Row(Name='Charlie', Age=35)

# Filter and collect
filtered_data = df.filter(df["Age"] > 30).collect()

# Process collected data
for row in filtered_data:
    print(f"{row['Name']} is older than 30.")
==output==
Charlie is older than 30.


# Access specific columns from collected data
for row in collected_data:
    print(f"Name: {row['Name']}, Age: {row.Age}")
==output==
Name: Alice, Age: 25
Name: Bob, Age: 30
Name: Charlie, Age: 35


transform ()

The transform () function in PySpark is a higher-order function introduced to apply custom transformations to columns in a DataFrame. It allows you to perform a transformation function on an existing column, returning the transformed data as a new column. It is particularly useful when working with complex data types like arrays or for applying custom logic to column values.

Syntax

df1 = df.transform(my_function)

Parameters

my_function: a python function

Key point

The transform() method takes a function as an argument. It automatically passes the DataFrame (in this case, df) to the function. So, you only need to pass the function namemy_function"

sample DF
+-------+---+
|   Name|Age|
+-------+---+
|  Alice| 25|
|    Bob| 30|
|Charlie| 35|
+-------+---+

from pyspark.sql.functions import upper
#Declare my function
def addTheAge(mydf):    
    return mydf.withColumn('age',mydf.age + 2)

def upcaseTheName(mydf):
    reture mydf.withColumn("Name", upper(mydf.Name))

#transforming: age add 2 years
df1=df.transform(addTheAge)
df1.show()
+-------+---+
|   Name|Age|
+-------+---+
|  Alice| 27|
|    Bob| 32|
|Charlie| 37|
+-------+---+

The transform () method takes a function as an argument. It automatically passes the DataFrame (in this case, df) to the function. So, you only need to pass the function name "my_function".


#transforming to upcase
df1=df.transform(upcaseTheName)
df1.show()
+-------+---+
|   Name|Age|
+-------+---+
|  ALICE| 25|
|    BOB| 30|
|CHARLIE| 35|
+-------+---+

#transforming to upcase and age add 2 years
df1=df.transform(addTheAge).transform(upcaseTheName)
df1.show()
+-------+---+
|   Name|Age|
+-------+---+
|  ALICE| 27|
|    BOB| 32|
|CHARLIE| 37|
+-------+---+


udf ()

The udf (User Defined Function) allows you to create custom transformations for DataFrame columns using Python functions. You can use UDFs when PySpark’s built-in functions don’t cover your use case or when you need more complex logic.

Syntax

from pyspark.sql.functions import udf
from pyspark.sql.types import DataType
# Define a UDF function ,
# Register the function as a UDF
my_udf = udf(py_function, returnType)

Parameters

  • py_function: A Python function you define to transform the data.
  • returnType: PySpark data type (e.g., StringType(), IntegerType(), DoubleType(), etc.) that indicates what type of data your UDF returns.
    • StringType(): For returning strings.
    • IntegerType(): For integers.
    • FloatType(): For floating-point numbers.
    • BooleanType(): For booleans.
    • ArrayType(DataType): For arrays.
    • StructType(): For structured data.

Key point

You need to specify the return type for the UDF, as PySpark needs to understand how to handle the results of the UDF.

sample DF
+-------+---+
|   Name|Age|
+-------+---+
|  Alice| 25|
|    Bob| 30|
|Charlie| 35|
+-------+---+


from pyspark.sql import SparkSession
from pyspark.sql.functions import udf
from pyspark.sql.types import StringType

# Define a Python function
def to_upper(name):
    return name.upper()

# Register the function as a UDF, specifying the return type as StringType
uppercase_udf = udf(to_upper, StringType())

# Apply the UDF using withColumn
df_upper = df.withColumn("Upper_Name", uppercase_udf(df["Name"]))

df_upper.show()
+-------+---+----------+
|   Name|Age|Upper_Name|
+-------+---+----------+
|  Alice| 25|     ALICE|
|    Bob| 30|       BOB|
|Charlie| 35|   CHARLIE|
+-------+---+----------+

# UDF Returning Boolean
from pyspark.sql.functions import udf
from pyspark.sql.types import BooleanType
# Define a Python function
def is_adult(age):
    return age > 30

# Register the UDF
is_adult_udf = udf(is_adult, BooleanType())

# Apply the UDF
df_adult = df.withColumn("Is_Adult", is_adult_udf(df["Age"]))

# Show the result
df_adult.show()
+-------+---+--------+
|   Name|Age|Is_Adult|
+-------+---+--------+
|  Alice| 25|   false|
|    Bob| 30|   false|
|Charlie| 35|    true|
+-------+---+--------+

# UDF with Multiple Columns (Multiple Arguments)
from pyspark.sql.functions import udf
from pyspark.sql.types import StringType

# Define a Python function that concatenates two columns
def concat_name_age(name, age):
    return f"{name} is {age} years old"

# Register the UDF
concat_udf = udf(concat_name_age, StringType())

# Apply the UDF to multiple columns
df_concat = df.withColumn("Description", concat_udf(df["Name"], df["Age"]))

# Show the result
df_concat.show()
+-------+---+--------------------+
|   Name|Age|         Description|
+-------+---+--------------------+
|  Alice| 25|Alice is 25 years...|
|    Bob| 30| Bob is 30 years old|
|Charlie| 35|Charlie is 35 yea...|
+-------+---+--------------------+

spark.udf.register(), Register for SQL query

in PySpark, you can use spark.udf.register() to register a User Defined Function (UDF) so that it can be used not only in DataFrame operations but also in SQL queries. This allows you to apply your custom Python functions directly within SQL statements executed against your Spark session.

Syntax

spark.udf.register(“registered_pyFun_for_sql”, original_pyFun, returnType)

parameter

  • registered_pyFun_for_sql: The name of the UDF, which will be used in SQL queries.
  • original_pyFun: The original Python function that contains the custom logic.
  • returnType: The return type of the UDF, which must be specified (e.g., StringType(), IntegerType()).
smaple df
+-------+---+
|   Name|Age|
+-------+---+
|  Alice| 25|
|    Bob| 30|
|Charlie| 35|
+-------+---+

from pyspark.sql import SparkSession
from pyspark.sql.types import StringType

# Register the DataFrame as a SQL temporary view
df.createOrReplaceTempView("people")

# Define a Python function
def original_myPythonFun(name):
    return name.upper()

# Register the function as a UDF for SQL with the return type StringType
spark.udf.register("registered_pythonFun_for_sql"\
                    , original_myPythonFun\
                    , StringType()\
                )

# Use the UDF - "registered_pythonFun_for_sql" in a SQL query
result = spark.sql(\
    "SELECT Name, registered_pythonFun_for_sql(Name) AS Upper_Name \
        FROM people"\
    )
result.show()
+-------+----------+
|   Name|Upper_Name|
+-------+----------+
|  Alice|     ALICE|
|    Bob|       BOB|
|Charlie|   CHARLIE|
+-------+----------+

we can directly use SQL style with magic %sql

%sql
SELECT Name
      , registered_pythonFun_for_sql(Name) AS Upper_Name 
  FROM people
+-------+----------+
|   Name|Upper_Name|
+-------+----------+
|  Alice|     ALICE|
|    Bob|       BOB|
|Charlie|   CHARLIE|
+-------+----------+
A complex python function declares, udf register, and apply example

Sample DataFrame

#Sample DataFrame
data = [    (1, 2, 3, 9, "alpha", "beta", "gamma"),    (4, 5, 6, 8, "delta", "epsilon", "zeta")]

df = spark.createDataFrame(data, ["col1", "col2", "col3", "col9", "str1", "str2", "str3"])
df.show()
+----+----+----+----+-----+-------+-----+
|col1|col2|col3|col9| str1|   str2| str3|
+----+----+----+----+-----+-------+-----+
|   1|   2|   3|   9|alpha|   beta|gamma|
|   4|   5|   6|   8|delta|epsilon| zeta|
+----+----+----+----+-----+-------+-----+

Define the Python function to handle multiple columns and scalars

# Define the Python function to handle multiple columns and scalars

def pyFun(col1, col2, col3, col9, int1, int2, int3, str1, str2, str3):
    # Example business logic
    re_value1 = col1 * int1 + len(str1)
    re_value2 = col2 + col9 + len(str2)
    re_value3 = col3 * int3 + len(str3)
    value4 = re_value1 + re_value2 + re_value3

    # Return multiple values as a tuple
    return re_value1, re_value2, re_value3, value4

Define the return schema for the UDF

# Define the return schema for the UDF

return_schema = StructType([
    StructField("re_value1", IntegerType(), True),
    StructField("re_value2", IntegerType(), True),
    StructField("re_value3", IntegerType(), True),
    StructField("value4", IntegerType(), True)
])

Register the UDF

# register the UDF

# for SQL use this 
# spark.udf.register("pyFun_udf", pyFun, returnType=return_schema)

pyFun_udf = udf(pyFun, returnType=return_schema)

Apply the UDF to the DataFrame, using ‘lit()’ for constant values

# Apply the UDF to the DataFrame, using 'lit()' for constant values

df_with_udf = df.select(
    col("col1"),
    col("col2"),
    col("col3"),
    col("col9"),
    col("str1"),
    col("str2"),
    col("str3"),
    pyFun_udf(
        col("col1"),
        col("col2"),
        col("col3"),
        col("col9"),
        lit(10),  # Use lit() for the constant integer values
        lit(20),
        lit(30),
        col("str1"),
        col("str2"),
        col("str3")
    ).alias("result")
)

# Show the result
df_with_udf.show(truncate=False)

==output==
+----+----+----+----+-----+-------+-----+------------------+
|col1|col2|col3|col9|str1 |str2   |str3 |result            |
+----+----+----+----+-----+-------+-----+------------------+
|1   |2   |3   |9   |alpha|beta   |gamma|{15, 15, 95, 125} |
|4   |5   |6   |8   |delta|epsilon|zeta |{45, 20, 184, 249}|
+----+----+----+----+-----+-------+-----+------------------+

Access the “result”

from pyspark.sql.functions import col
df_result_re_value3 = df_with_udf.select ('col1', 'result',col('result').re_value3.alias("re_value3"))
df_result_re_value3.show()
+----+------------------+---------+
|col1|            result|re_value3|
+----+------------------+---------+
|   1| {15, 15, 95, 125}|       95|
|   4|{45, 20, 184, 249}|      184|
+----+------------------+---------+

udf register for sql using

“sample dataframe”, “declare python function”, “Define the return schema for the UDF” are the same. only register udf different.

# register the UDF

spark.udf.register("pyFun_udf", pyFun, returnType=return_schema)

# create a temporary view for SQL query
df.createOrReplaceTempView("my_table")

notebook uses magic %sql


%sql
SELECT col1, col2, col3, col9, str1, str2, str3,            pyFun_udf(col1, col2, col3, col9, 10, 20, 30, str1, str2, str3) AS result    
FROM my_table

==output==
col1	col2	col3	col9	str1	str2	str3	result
1	2	3	9	alpha	beta	gamma	{"re_value1":15,"re_value2":15,"re_value3":95,"value4":125}
4	5	6	8	delta	epsilon	zeta	{"re_value1":45,"re_value2":20,"re_value3":184,"value4":249}

Using sp_MSforeachdb to Search for Objects Across All Databases

You are working on a project that requires migrating legacy stuffs from old environment to a new one, and requirement says upgrade business logic to latest. Unfortunately, not enough and clearly documents for you to refer. You did not even know an object where it is since there are so many databases resident in the same server, so many tables, so many views, stored procedure, user defined functions… etc. It is hard to find out the legacy business logics.

sp_MSforeachdb

The sp_MSforeachdb procedure is an undocumented procedure that allows you to run the same command against all databases. There are several ways to get creative with using this command and we will cover these in the examples below. This can be used to select data, update data and even create database objects. You can use the sp_MSforeachdb stored procedure to search for objects by their name across all databases:

EXEC sp_MSforeachdb
'USE [?];
SELECT ''?'' AS DatabaseName, name AS ObjectName
, type_desc AS ObjectType
, Type_desc as object_Desc
, Create_date
, Modify_date
FROM sys.objects
WHERE name = ''YourObjectName'';';

Replace ‘YourObjectName’ with the actual name of the object you’re searching for (table, view, stored procedure, etc.).

The type_desc column will tell you the type of the object (e.g., USER_TABLE, VIEW, SQL_STORED_PROCEDURE, etc.).

For example, find out the “tb” prefix objects

EXEC sp_MSforeachdb
'USE [?];
SELECT ''?'' AS DatabaseName
, name AS objectName
, type_desc as object_Desc
, create_date, Modify_date
FROM sys.objects
WHERE name like ''tb%'';'
go

Alternative – Loop Through Databases Using a Cursor

If sp_MSforeachdb is not available, you can use a cursor to loop through each database and search for the object:

DECLARE @DBName NVARCHAR(255);
DECLARE @SQL NVARCHAR(MAX);

DECLARE DB_Cursor CURSOR FOR
SELECT name
FROM sys.databases
WHERE state = 0;  -- Only look in online databases

OPEN DB_Cursor;
FETCH NEXT FROM DB_Cursor INTO @DBName;

WHILE @@FETCH_STATUS = 0
BEGIN
    SET @SQL = 
    'USE [' + @DBName + ']; 
     IF EXISTS (SELECT 1 FROM sys.objects WHERE name = ''YourObjectName'')
     BEGIN
         SELECT ''' + @DBName + ''' AS DatabaseName, name AS ObjectName, type_desc AS ObjectType
         FROM sys.objects
         WHERE name = ''YourObjectName'';
     END';

    EXEC sp_executesql @SQL;

    FETCH NEXT FROM DB_Cursor INTO @DBName;
END;

CLOSE DB_Cursor;
DEALLOCATE DB_Cursor;


You can modify the query to search for specific object types, such as tables or stored procedures:

Find the table

You can use the sp_MSforeachdb system stored procedure to search for the table across all databases.

EXEC sp_MSforeachdb 
'USE [?]; 
 SELECT ''?'' AS DatabaseName, name AS TableName 
 FROM sys.tables 
 WHERE name = ''YourTableName'';';

If sp_MSforeachdb is not enabled or available, you can use a cursor to loop through all databases and search for the table:

DECLARE @DBName NVARCHAR(255);
DECLARE @SQL NVARCHAR(MAX);

DECLARE DB_Cursor CURSOR FOR
SELECT name
FROM sys.databases
WHERE state = 0;  -- Only look in online databases

OPEN DB_Cursor;
FETCH NEXT FROM DB_Cursor INTO @DBName;

WHILE @@FETCH_STATUS = 0
BEGIN
    SET @SQL = 
    'USE [' + @DBName + ']; 
     IF EXISTS (SELECT 1 FROM sys.tables WHERE name = ''YourTableName'')
     BEGIN
         SELECT ''' + @DBName + ''' AS DatabaseName, name AS TableName
         FROM sys.tables
         WHERE name = ''YourTableName'';
     END';

    EXEC sp_executesql @SQL;

    FETCH NEXT FROM DB_Cursor INTO @DBName;
END;

CLOSE DB_Cursor;
DEALLOCATE DB_Cursor;

Find the View

You can use the sp_MSforeachdb system stored procedure to search for the view across all databases.

EXEC sp_MSforeachdb 
'USE [?];
SELECT ''?'' AS DatabaseName, name AS TableName
FROM sys.views
WHERE name = ''YourTableName'';';

Find the Stored Procedure

EXEC sp_MSforeachdb 
'USE [?]; 
 SELECT ''?'' AS DatabaseName, name AS ProcedureName 
 FROM sys.procedures 
 WHERE name = ''YourProcedureName'';';

Please do not hesitate to contact me if you have any questions at William . chen @ mainri.ca

(remove all space from the email account 😊)

Using SQL Server Change Data Capture (CDC) in pipeline to implement incrementally UPSERT

SQL Server Change Data Capture (CDC) is a feature that captures changes to data in SQL Server tables. It captures the changes in the source data and updates only the data in the destination that has changed. Any inserts, updates or deletes made to any of the tables made in a specified time window are captured for further use, such as in ETL processes. Here’s a step-by-step guide to enable and use CDC.

Preconditions

1. SQL Server Agent is running

Since CDC relies on SQL Server Agent, verify that the agent is up and running.

To check if SQL Server Agent is running, you can follow these steps:

  • Open SQL Server Management Studio (SSMS).
  • In the Object Explorer, expand the SQL Server Agent node.
    If you see a green icon next to SQL Server Agent, it means the Agent is running.
    If the icon is red or gray, it means the SQL Server Agent is stopped or disabled.

To start the Agent, right-click on SQL Server Agent and select Start.

Or start it from SSMS or by using the following command:


EXEC msdb.dbo.sp_start_job @job_name = 'SQLServerAgent';

Ensure the database is in FULL or BULK_LOGGED recovery model

CDC requires that the database be in the FULL or BULK_LOGGED recovery model. You can check the recovery model with:

SELECT name, recovery_model_desc
FROM sys.databases
WHERE name = 'YourDatabaseName';

If it’s in SIMPLE recovery mode, you need to change it:

ALTER DATABASE YourDatabaseName
SET RECOVERY FULL;

Let’s start show the fully processes, step by step and we will Focus on “how to use CDC, tracking changed, using in ETL”

Step 1: Enable CDC on the Database

CDC must first be enabled at the database level before you can enable it on individual tables.

Let’s use a database called TestDB. There is table called tb_person with schema dbo.

the tb_person looks like:

id name age sex
1 Alcy 32 f
2 Bob 24 f
3 Cary 27 f
4 David 36 m
5 Eric 40 m

Connect to SQL Server Management Studio (SSMS).

Step 1: Enable CDC on the Database


USE YourDatabaseName;
GO
EXEC sys.sp_cdc_enable_db;
GO
--- So, I do this:
USE testdb;
GO
EXEC sys.sp_cdc_enable_db;
GO

Step 2: Enable CDC on the Table

EXEC sys.sp_cdc_enable_table
@source_schema = N'dbo',
@source_name = N'tb_person',
@role_name = NULL; -- NULL allows access for all users
GO

This will create a change table cdc.tb_Person_CT for tracking changes to the tb_person table.

Step 3: Verify CDC is Enabled

1. Check if CDC is enabled on the database:

SELECT name, is_cdc_enabled
FROM sys.databases
WHERE name = 'testDB';

This query should return 1 under is_cdc_enabled, indicating that CDC is enabled on the database.

2. Check if CDC is enabled on the tb_person table:

SELECT * FROM cdc.change_tables;

Step 4: Insert, Update, and Delete Data to Capture Changes

Now let’s perform some operations (insert, update, and delete) on the tb_person table to capture changes.

1. Insert some data:

INSERT INTO dbo.tb_person ([id],[name],[age],[sex])
VALUES
(6, ‘TOM’, 29, ‘MALE’),
(7, ‘Mary’, 39, ‘Female’)

2. Update a row:

UPDATE dbo.tb_person
set Age=33
WHERE Name = 'TOM';
select * from tb_person;

3, Delete a row:

DELETE from dbo.tb_person
WHERE Name = 'Mary'
select * from tb_person;

Step 5: Query the CDC Change Table

Once CDC is enabled, SQL Server will start capturing insert, update, and delete operations on the tracked tables.

The CDC system creates specific change tables. The name of the change table is derived from the source table and schema. For example, for tb_Person in the dbo schema, the change table might be named something like cdc.dbo_tb_person_CT.

Querying the change table: To retrieve changes captured by CDC, you can query the change table directly:

SELECT *
FROM cdc.dbo_tb_person_CT;

This table contains:

  • __$operation: The type of operation:
    • 1: DELETE
    • 2: INSERT
    • 3: UPDATE (before image)
    • 4: UPDATE (after image)
  • __$start_lsn: The log sequence number (LSN) of the transaction.
  • Columns of the original table (e.g., OrderID, CustomerName, Product, etc.) showing the state of the data before and after the change.

Step 5: Manage CDC

As your tables grow, CDC will collect more data in its change tables. To manage this, SQL Server includes functions to clean up old change data.

1. Set up CDC clean-up jobs, Adjust the retention period (default is 3 days)

SQL Server automatically creates a cleanup job to remove old CDC data based on retention periods. You can modify the retention period by adjusting the @retention parameter.

EXEC sys.sp_cdc_change_job
@job_type = N'cleanup',
@retention = 4320; -- Retention period in minutes (default 3 days)

2. Disable CDC on a table:

If you no longer want to track changes on a table, disable CDC:

EXEC sys.sp_cdc_disable_table
@source_schema = N'dbo',
@source_name = N'SalesOrder',
@capture_instance = N'dbo_SalesOrder';

3. Disable CDC on a database:

If you want to disable CDC for the entire database, run:

USE YourDatabaseName;
GO
EXEC sys.sp_cdc_disable_db;
GO

Step 6: Monitor CDC

You can monitor CDC activity and performance using the following methods

1. Check the current status of CDC jobs:

EXEC sys.sp_cdc_help_jobs;

2. Monitor captured transactions:

You can query the cdc.lsn_time_mapping table to monitor captured LSNs and their associated times:

SELECT *
FROM cdc.lsn_time_mapping;

Step 7: Using CDC Data in ETL Processes

Once CDC is capturing data, you can integrate it into ETL processes or use it for auditing or tracking changes over time. Use change tables

cdc. [YourSchema]_[YourTableName]_CT

 to identify rows that have been modified, deleted, or inserted, and process the changes accordingly. e.g.

SELECT *
FROM cdc.dbo_tb_person_CT;

System function cdc.fn_cdc_get_all_changes_<Capture_Instance>

cdc.fn_cdc_get_all_changes_<capture_instance>

The function fn_cdc_get_all_changes_<capture_instance> is a system function that allows you to retrieve all the changes (inserts, updates, and deletes) made to a CDC-enabled table over a specified range of log sequence numbers (LSNs).

For your table tb_person, if CDC has been enabled, the function to use would be:

SELECT *FROM cdc.fn_cdc_get_all_changes_dbo_tb_person(@from_lsn, @to_lsn, N'all');

the Parameters:

  • @from_lsn: The starting log sequence number (LSN). This represents the point in time (or transaction) from which you want to begin retrieving changes.
  • @to_lsn: The ending LSN. This represents the point up to which you want to retrieve changes.
  • N'all': This parameter indicates that you want to retrieve all changes (including inserts, updates, and deletes).

Retrieve LSN Values

You need to get the LSN values for the time range you want to query. You can use the following system function to get the from_lsn and to_lsn values:

  • Get the minimum LSN for the CDC-enabled table:
    sys.fn_cdc_get_min_lsn(‘dbo_tb_person’)
    e.g.
    SELECT sys.fn_cdc_get_min_lsn(‘dbo_tb_person’);
  • Get the maximum LSN (which represents the latest changes captured):
    sys.fn_cdc_get_max_lsn();
    SELECT sys.fn_cdc_get_max_lsn();

Use the LSN Values in the Query

Now, you can use these LSNs to query the changes. Here’s an example:

DECLARE @from_lsn binary(10), @to_lsn binary(10);

SET @from_lsn = sys.fn_cdc_get_min_lsn('dbo_tb_person');
SET @to_lsn = sys.fn_cdc_get_max_lsn();

SELECT *
FROM cdc.fn_cdc_get_all_changes_dbo_tb_person(@from_lsn, @to_lsn, N'all');

The result set will include:

  • __$operation: The type of change (1 = delete, 2 = insert, 3 = update before, 4 = update after).
  • __$start_lsn: The LSN value at which the change occurred.
  • __$seqval: Sequence value for sorting the changes within a transaction.
  • __$update_mask: Binary value indicating which columns were updated.
  • All the columns from the original tb_person table.

Querying Only Inserts, Updates, or Deletes

If you want to query only a specific type of change, such as inserts or updates, you can modify the function’s third parameter:

Inserts only:

SELECT *
FROM cdc.fn_cdc_get_all_changes_dbo_tb_person(@from_lsn, @to_lsn, N'insert');

Updates only:

SELECT *
FROM cdc.fn_cdc_get_all_changes_dbo_tb_person(@from_lsn, @to_lsn, N'update');

Deletes only:

SELECT *
FROM cdc.fn_cdc_get_all_changes_dbo_tb_person(@from_lsn, @to_lsn, N'delete');

Map datetime to log sequence number (lsn)

sys.fn_cdc_map_time_to_lsn

The sys.fn_cdc_map_time_to_lsn function in SQL Server is used to map a datetime value to a corresponding log sequence number (LSN) in Change Data Capture (CDC). Since CDC captures changes using LSNs, this function is helpful to find the LSN that corresponds to a specific point in time, making it easier to query CDC data based on a time range.

Syntax

sys.fn_cdc_map_time_to_lsn ( 'lsn_time_mapping', datetime_value )

Parameters:

  • lsn_time_mapping: Specifies how you want to map the datetime_value to an LSN. It can take one of the following values:
    • smallest greater than or equal: Returns the smallest LSN that is greater than or equal to the specified datetime_value.
    • largest less than or equal: Returns the largest LSN that is less than or equal to the specified datetime_value.
  • datetime_value: The datetime value you want to map to an LSN.

Using sys.fn_cdc_map_time_to_lsn() in a CDC Query

Mapping a Date/Time to an LSN

-- Mapping a Date/Time to an LSN
DECLARE @from_lsn binary(10);
SET @from_lsn = sys.fn_cdc_map_time_to_lsn('smallest greater than or equal', '2024-09-06 12:00:00');

This will map the datetime '2024-09-06 12:00:00' to the corresponding LSN.

Finding the Largest LSN Before a Given Time

-- Finding the Largest LSN Before a Given Time
DECLARE @to_lsn binary(10);
SET @to_lsn = sys.fn_cdc_map_time_to_lsn('largest less than or equal', '2024-09-06 12:00:00');

This will return the largest LSN that corresponds to or is less than the datetime '2024-09-06 12:00:00'.

Querying Changes Between Two Time Points

cdc.fn_cdc_get_all_changes_<schem_tableName>

Syntax

cdc.fn_cdc_get_all_changes_dbo_tb_person (from_lsn, to_lsn, row_filter_option)

Parameters

from_lsn: The starting LSN in the range of changes to be retrieved.

to_lsn: The ending LSN in the range of changes to be retrieved.

row_filter_option: Defines which changes to return:

  • 'all': Returns both the before and after images of the changes for update operations.
  • 'all update old': Returns the before image of the changes for update operations.
  • 'all update new': Returns the after image of the changes for update operations.

Let’s say you want to find all the changes made to the tb_person table between
'2024-09-05 08:00:00' and '2024-09-06 18:00:00'.
You can map these times to LSNs and then query the CDC changes.

-- Querying Changes Between Two Time Points
DECLARE @from_lsn binary(10), @to_lsn binary(10);

-- Map the datetime range to LSNs
SET @from_lsn = sys.fn_cdc_map_time_to_lsn('smallest greater than or equal', '2024-09-05 08:00:00');
SET @to_lsn = sys.fn_cdc_map_time_to_lsn('largest less than or equal', '2024-09-06 18:00:00');

-- Query the CDC changes for the table tb_person within the LSN range
SELECT * 
FROM cdc.fn_cdc_get_all_changes_dbo_tb_person(@from_lsn, @to_lsn, N'all');

Output:

This query will return the following data for changes between the specified LSN range:

  • __$operation: Indicates whether the row was inserted, updated, or deleted.
  • __$start_lsn: The LSN at which the change occurred.
  • Other columns: Any other columns that exist in the tb_person table.

Using sys.fn_cdc_map_lsn_to_time () convert an LSN value to a readable datetime

In SQL Server, Change Data Capture (CDC) tracks changes using Log Sequence Numbers (LSNs), but these LSNs are in a binary format and are not directly human-readable. However, you can map LSNs to timestamps (datetime values) using the system function sys.fn_cdc_map_lsn_to_time

Syntax

sys.fn_cdc_map_lsn_to_time (lsn_value)

Example: Mapping LSN to Datetime

Get the LSN range for the cdc.fn_cdc_get_all_changes function:


DECLARE @from_lsn binary(10), @to_lsn binary(10);
-- Get minimum and maximum LSN for the table
SET @from_lsn = sys.fn_cdc_get_min_lsn('dbo_tb_person');
SET @to_lsn = sys.fn_cdc_get_max_lsn();

Query the CDC changes and retrieve the LSN values:

-- Query CDC changes for the tb_person table
SELECT $start_lsn, $operation, PersonID, FirstName, LastName
FROM cdc.fn_cdc_get_all_changes_dbo_tb_person(@from_lsn, @to_lsn, 'all');

Convert the LSN to a datetime using sys.fn_cdc_map_lsn_to_time


-- Convert the LSN to datetime
SELECT $start_lsn, sys.fn_cdc_map_lsn_to_time($start_lsn) AS ChangeTime,
__$operation,
PersonID,
FirstName,
LastName
FROM cdc.fn_cdc_get_all_changes_dbo_tb_person(@from_lsn, @to_lsn, 'all');

Output

$start_lsn ChangeTime __$operation PersonID FirstName LastName
0x000000240000005A 2024-09-06 10:15:34.123 2 1 John Doe
0x000000240000005B 2024-09-06 10:18:45.321 4 1 John Smith
0x000000240000005C 2024-09-06 10:25:00.789 1 2 Jane Doe

Explanation

sys.fn_cdc_map_lsn_to_time(__$start_lsn) converts the LSN from the CDC changes to a human-readable datetime.


This is useful for analyzing the time at which changes were recorded.

Notes:

  • CDC vs Temporal Tables: CDC captures only DML changes (inserts, updates, deletes), while temporal tables capture a full history of changes.
  • Performance: Capturing changes can add some overhead to your system, so it’s important to monitor CDC’s impact on performance.

Summary

  • Step 1: Enable CDC at the database level.
  • Step 2: Enable CDC on the SalesOrder table.
  • Step 3: Verify CDC is enabled.
  • Step 4: Perform data changes (insert, update, delete).
  • Step 5: Query the CDC change table to see captured changes.
  • Step 6: Manage CDC retention and disable it when no longer needed.
  • Step 7: Using CDC Data in ETL Processes

This step-by-step example shows how CDC captures data changes, making it easier to track, audit, or integrate those changes into ETL pipelines.

Please do not hesitate to contact me if you have any questions at William . chen @ mainri.ca

(remove all space from the email account 😊)

Configuring Azure Entra ID Authentication in Azure SQL Database

Azure SQL Database can be integrated with Azure Entra ID to provide identity and access management. With this integration, users can sign in to Azure SQL Database using their Azure Entra ID credentials, enabling a centralized and secure way to manage database access.

Register the SQL Server in Azure Entra ID

Enable Azure Entra ID Admin

Register your SQL Server (or SQL Database) as an application in Azure Entra ID.

Azure Portal > find out the SQL Server that you want to register with Azure Entra ID >

Settings > Microsoft Entra ID (Active Directory Admin)

Assign Users/Groups

You can assign Azure Entra ID users or groups to specific roles within the SQL Database, such as db_owner, db_datareader, or db_datawriter.

Then, Click Save to apply the changes.

Configure Azure Entra ID Authentication in Azure SQL Database

Connect to SQL Database using Azure Entra ID

You can connect to your Azure SQL Database using Azure Entra ID by selecting the “Azure Active Directory – Universal with MFA support” authentication method in tools like SQL Server Management Studio (SSMS).

Assign Roles to Azure Entra ID Users

Use a SQL query to assign roles to Azure Entra ID users or groups. For example:

CREATE USER [your_username@yourdomain.com] FROM EXTERNAL PROVIDER;
ALTER ROLE db_datareader ADD MEMBER [your_username@yourdomain.com];

This command creates an Azure Entra ID user in your SQL Database and adds them to the db_datareader role.

Set Up Role-Based Access Control (RBAC)

You can manage permissions through Azure Entra ID roles and assign these roles to your SQL Database resources.

Assign Roles via Azure Portal

Azure portal > your SQL Database > Access control (IAM) > Add role assignment.

Choose the appropriate role, such as “SQL DB Contributor“.

and assign it to the desired Azure Entra ID user or group

Considerations

  • No Password Management: Since authentication is managed via Azure Entra ID, there’s no need to manage passwords directly within the database.
  • Integration with Conditional Access: This allows you to enforce compliance requirements, such as requiring MFA or ensuring connections only come from specific locations.

Please do not hesitate to contact me if you have any questions at William . chen @ mainri.ca

(remove all space from the email account 😊)
Day 9: Managed attributes in Data Map

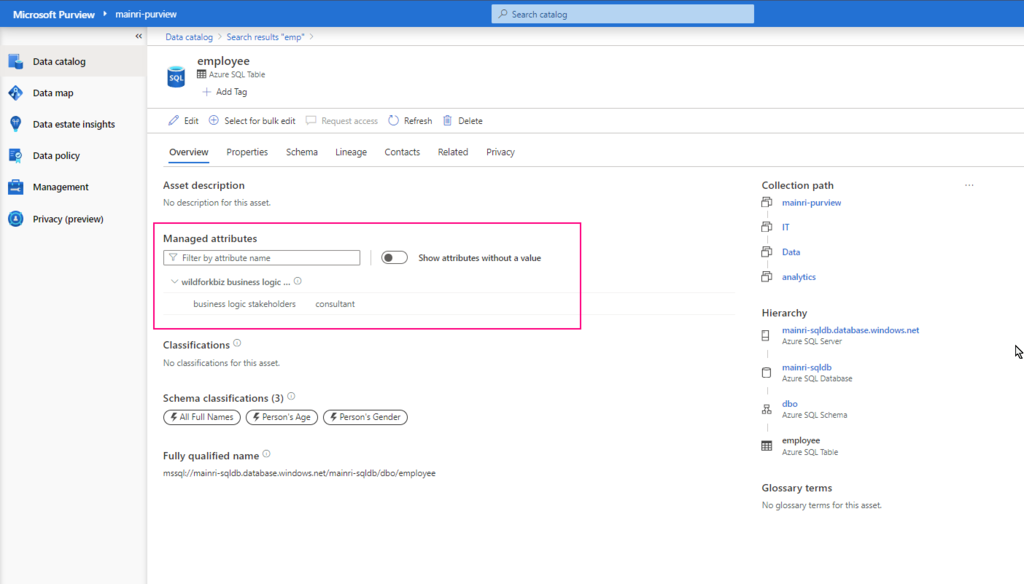
With “Managed Attributes” we can add own attributes (groups of attributes) and provide data stewards with the functionality to improve the content of data catalog.

  • create a new attribute group
  • create a new attribute
  • learn more about the available field types
  • assign and manage attributes for your data assets

Create a new attribute group

Create attribute group if there is no attribute group

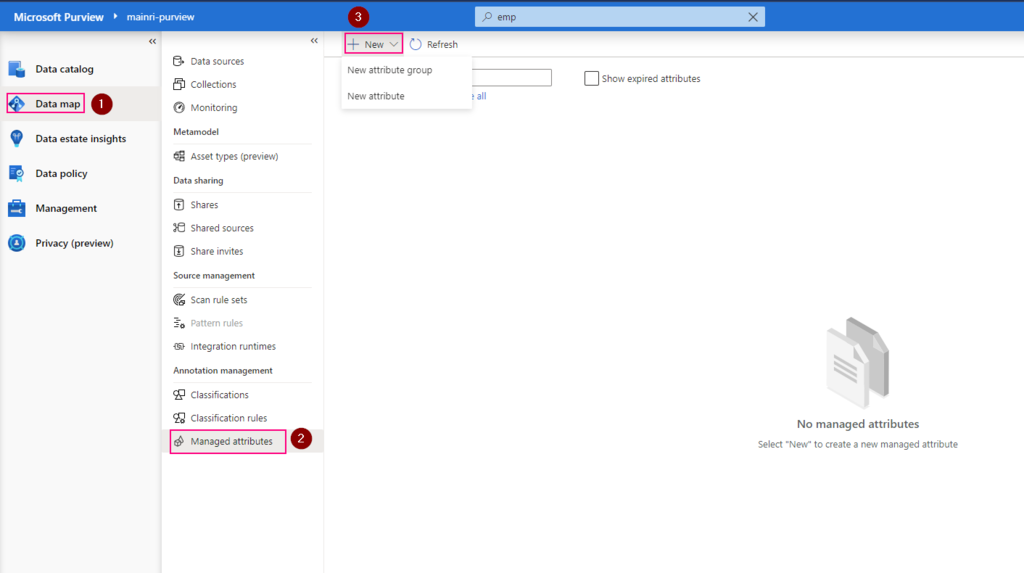
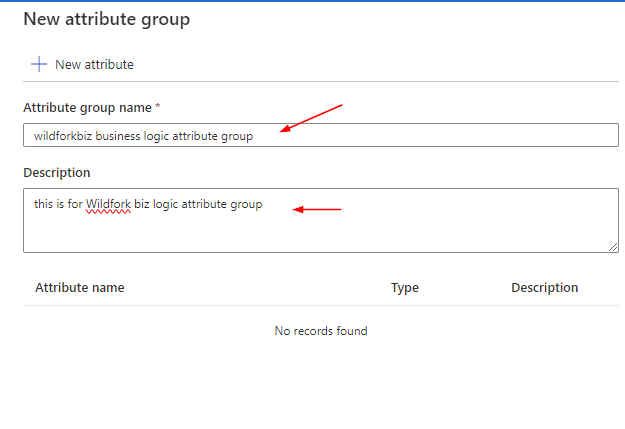
Purview studio > Data Map > Managed attributes > New attribute group

Fill in

Create a new attribute

File in those fields
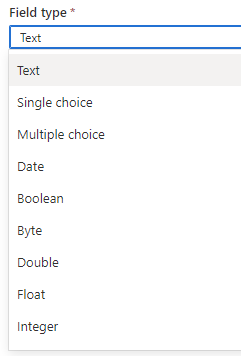
For field group: There are those can be selected

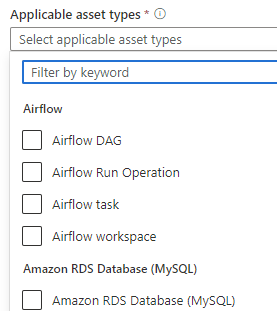
For applicable asset types, many options out of box to be used

Now, new attributes created

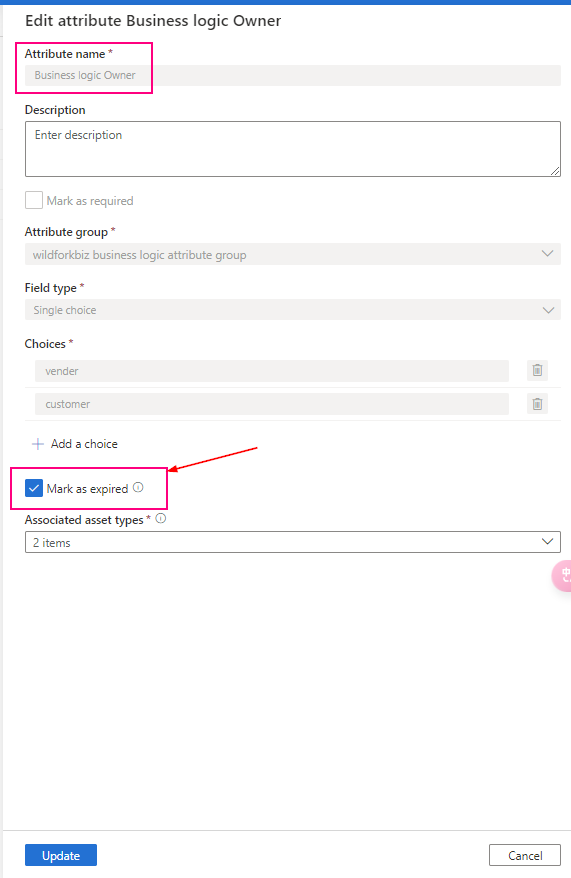
In the managed attribute management experience, managed attributes can’t be deleted, only expired. Expired attributes can’t be applied to any assets and are, by default, hidden in the user experience. Once an attribute created, it cannot change. Only mark them as “expired” and create a new, undated one.

Add value for managed attribute

Once a managed attribute has been created, you’ll need to add a value for each of your assets. You can add values to your assets by:

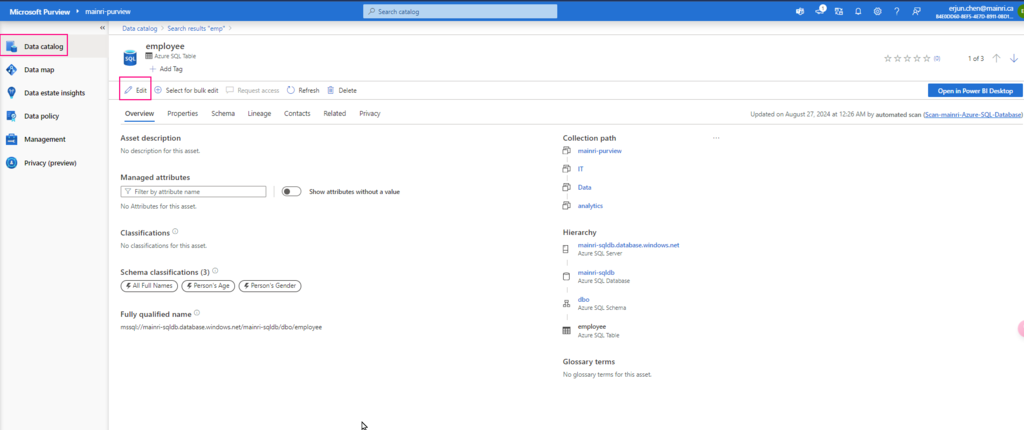
  1. Search for your data asset in the Microsoft Purview Data Catalog
  2. On the overview for your asset, you should see the managed attributes section with all attributes that have values. (You can see attributes without values by using the Show attributes without a value toggle.)
  3. Select the Edit button.

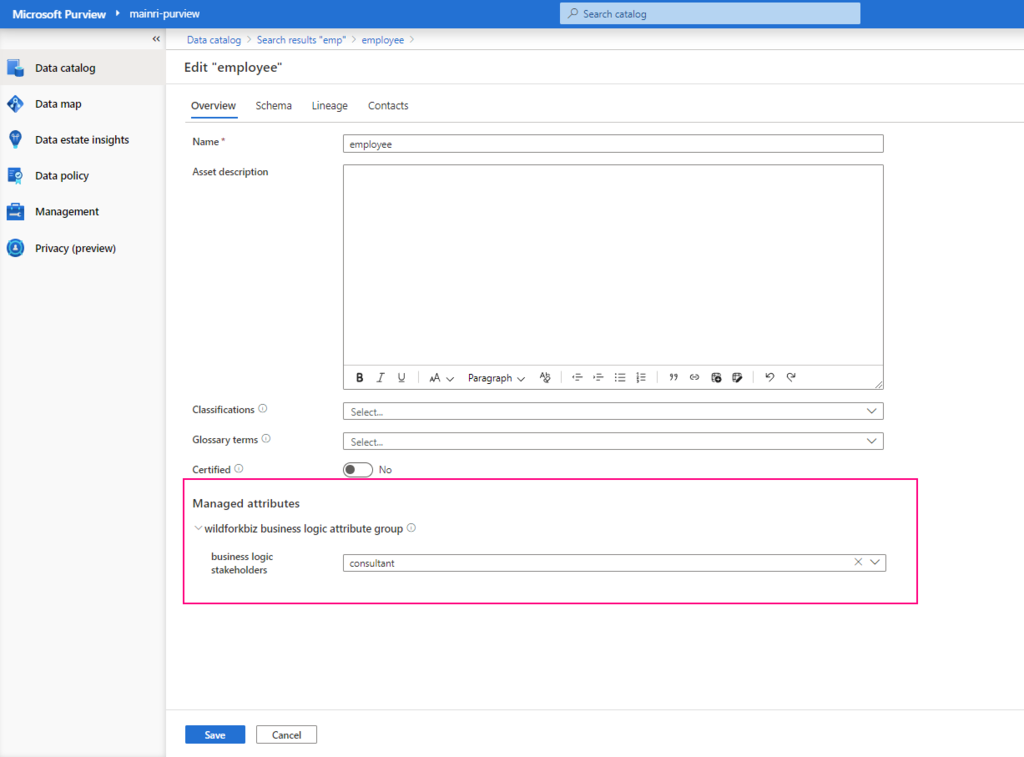
Under Managed attributes, add values for each of your attributes.

If any attributes are Required you will not be able to save until you’ve added a value for that attribute.

Now, managed attribute added

Summary

Managed attribute: A set of user-defined attributes that provide a business or organization level context to an asset. A managed attribute has a name and a value. For example, ‘Department’ is an attribute name and ‘Finance’ is its value. Attribute group: A grouping of managed attributes that allow for easier organization and consumption.

Please do not hesitate to contact me if you have any questions at William . chen @ mainri.ca

(remove all space from the email account 😊)

Next step: Day 10 – Collections access control and management

Day 8 – Data Lineage, Extract SQL, ADF and Synapse Pipeline Lineage

Microsoft Purview provides an overview of data lineage in the Data Catalog. It also details how data systems can integrate with the catalog to capture lineage of data.

Lineage is represented visually to show data moving from source to destination including how the data was transformed. Given the complexity of most enterprise data environments.

Microsoft Purview supports lineage for views and stored procedures from Azure SQL Database. While lineage for views is supported as part of scanning, you will need to turn on the Lineage extraction toggle to extract stored procedure lineage when you’re setting up a scan.

Lineage collection

Metadata collected in Microsoft Purview from enterprise data systems are stitched across to show an end to end data lineage. Data systems that collect lineage into Microsoft Purview are broadly categorized into following three types:

  • Data processing systems
  • Data storage systems
  • Data analytics and reporting systems

Each system supports a different level of lineage scope.  

Data estate might include systems doing data extraction, transformation (ETL/ELT systems), analytics, and visualization systems. Each of the systems captures rich static and operational metadata that describes the state and quality of the data within the systems boundary. The goal of lineage in a data catalog is to extract the movement, transformation, and operational metadata from each data system at the lowest grain possible.

The following example is a typical use case of data moving across multiple systems, where the Data Catalog would connect to each of the systems for lineage.

  • Data Factory copies data from on-prem/raw zone to a landing zone in the cloud.
  • Data processing systems like Synapse, Databricks would process and transform data from landing zone to Curated zone using notebooks.
  • Further processing of data into analytical models for optimal query performance and aggregation.
  • Data visualization systems will consume the datasets and process through their meta model to create a BI Dashboard, ML experiments and so on.

Lineage for SQL DB views

Starting 6/30/24, SQL DB metadata scan will include lineage extraction for views. Only new scans will include the view lineage extraction. Lineage is extracted at all scan levels (L1/L2/L3). In case of an incremental scan, whatever metadata is scanned as part of incremental scan, the corresponding static lineage for tables/views will be extracted.

Prerequisites for setting up a scan with Stored Procedure lineage extraction

<Purview-Account> can access SQL Database and in db_owner group

To check whether the Account Exists in the Database


SELECT name, type_desc
FROM sys.database_principals
WHERE name = 'YourUserName';

Replace ‘YourUserName’ with the actual username you’re checking for.

If the user exists, it will return the name and type (e.g., SQL_USER or WINDOWS_USER).

If it does not exist, create one.

Sign in to Azure SQL Database with your Microsoft Entra account, create a <Purview-account> account and assign db_owner permissions to the Microsoft Purview managed identity.

You can review my previous article Configuring Azure Entra ID Authentication in Azure SQL Database If you are not sure how to enable Azure Entra ID login.


Create user <purview-account> FROM EXTERNAL PROVIDER
GO
EXEC sp_addrolemember 'db_owner', <purview-account> 
GO

replace <purview-account> with the actual purview account name.

Master Key

Check whether master exists or not.

To check if the Database Master Key (DMK) exists or not


SELECT * FROM sys.symmetric_keys
WHERE name = '##MS_DatabaseMasterKey##';Create master key
Go

if the query returns a result, it means the Database Master Key already exists.

If no rows are returned, it means the Database Master Key does not exist, and you may need to create one if required for encryption-related operations.

Create a master key


Create master key
Go

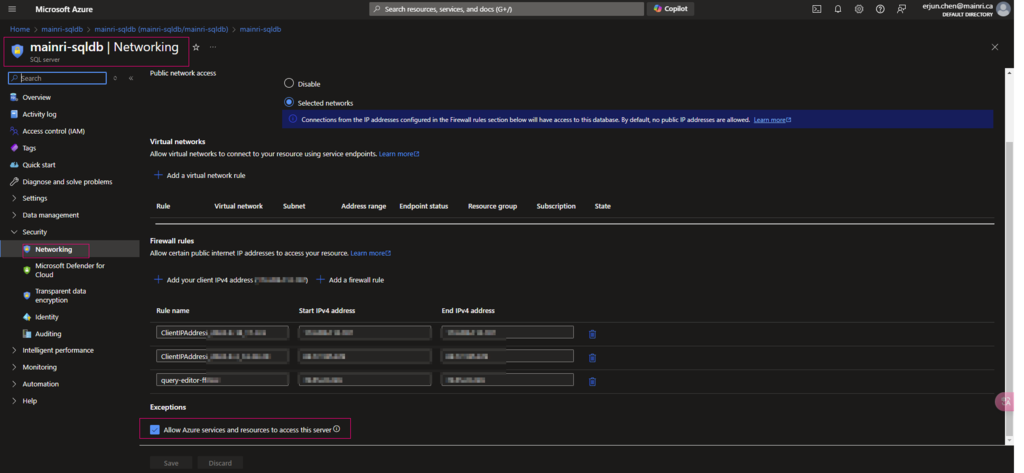
Allow Azure services and resources to access this server 

Ensure that Allow Azure services and resources to access this server is enabled under networking/firewall for your Azure SQL resource.

Previously, we have discussed create a scan for Azure SQL Database at Registering Azure SQL Database and Scan in Purview, that scan progress is disabled “Lineage extraction” in that article.

To allow purview extract lineage, we need set to on

Extract Azure Data Factory/Synapse pipeline lineage

When we connect an Azure Data Factory to Microsoft Purview, whenever a supported Azure Data Factory activity is run, metadata about the activity’s source data, output data, and the activity will be automatically ingested into the Microsoft Purview Data Map.

Microsoft Purview captures runtime lineage from the following Azure Data Factory activities:

  • Copy Data
  • Data Flow
  • Execute SSIS Package

If a data source has already been scanned and exists in the data map, the ingestion process will add the lineage information from Azure Data Factory to that existing source. If the source or output doesn’t exist in the data map and is supported by Azure Data Factory lineage Microsoft Purview will automatically add their metadata from Azure Data Factory into the data map under the root collection.

This can be an excellent way to monitor your data estate as users move and transform information using Azure Data Factory.

Connect to Microsoft Purview account in Data Factory

Set up authentication

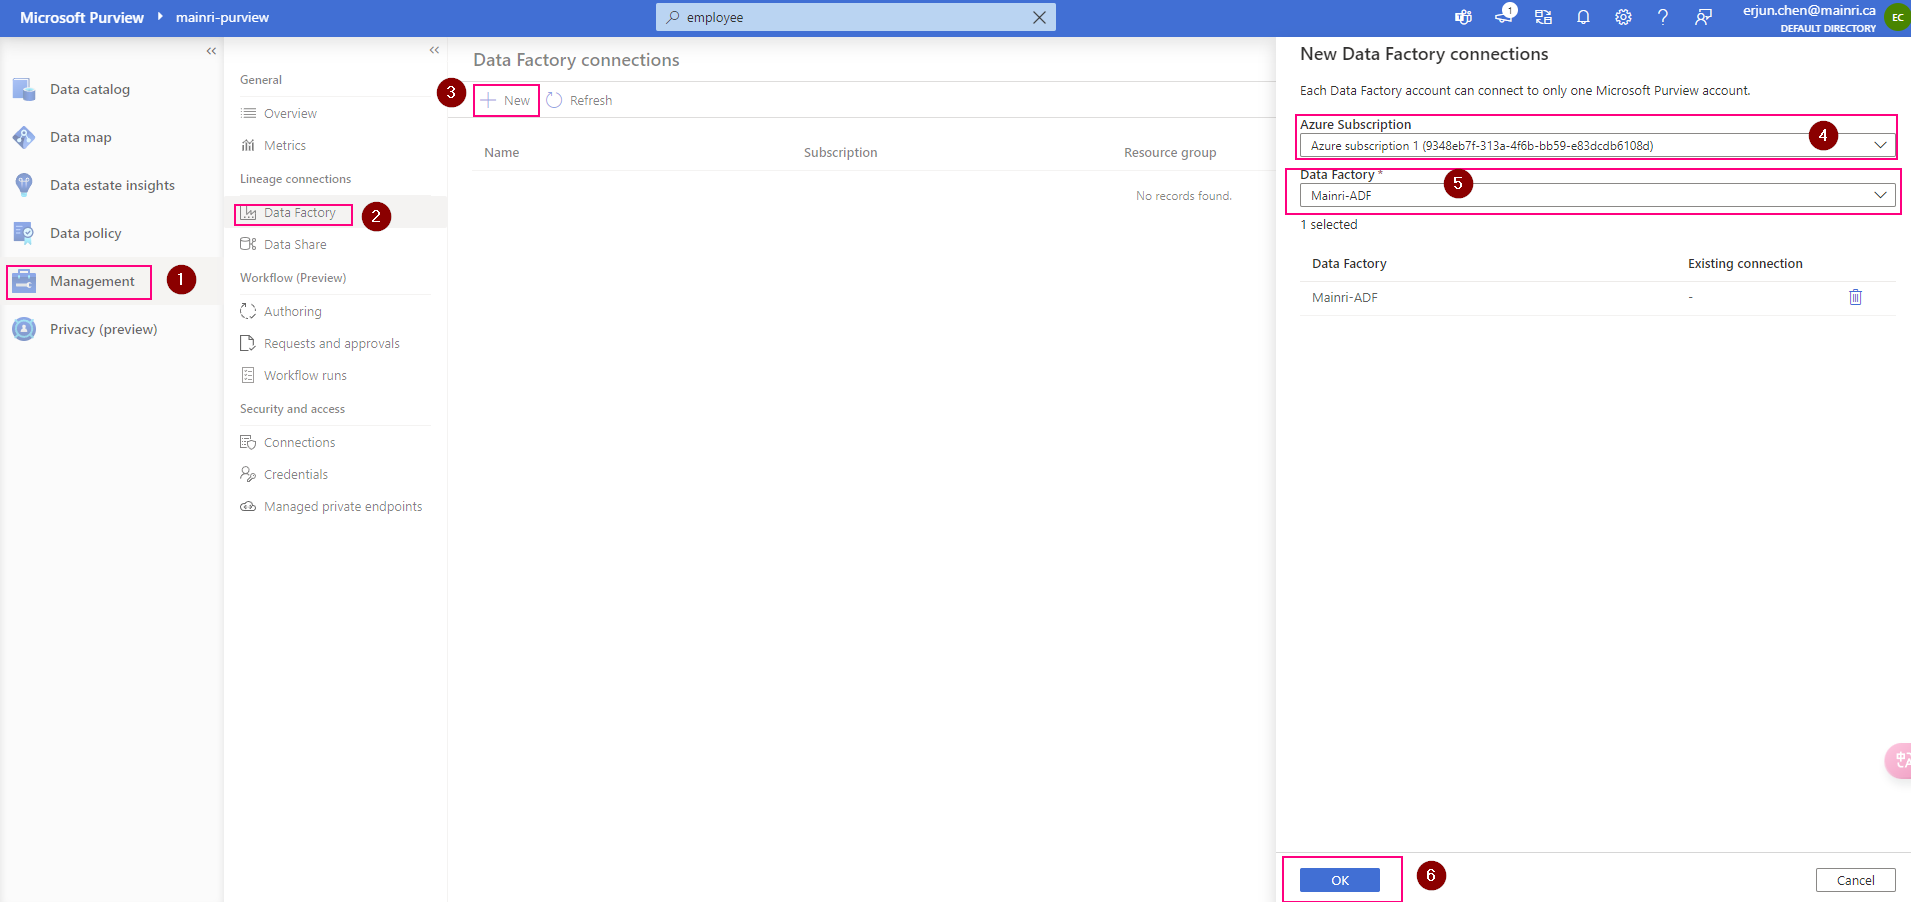
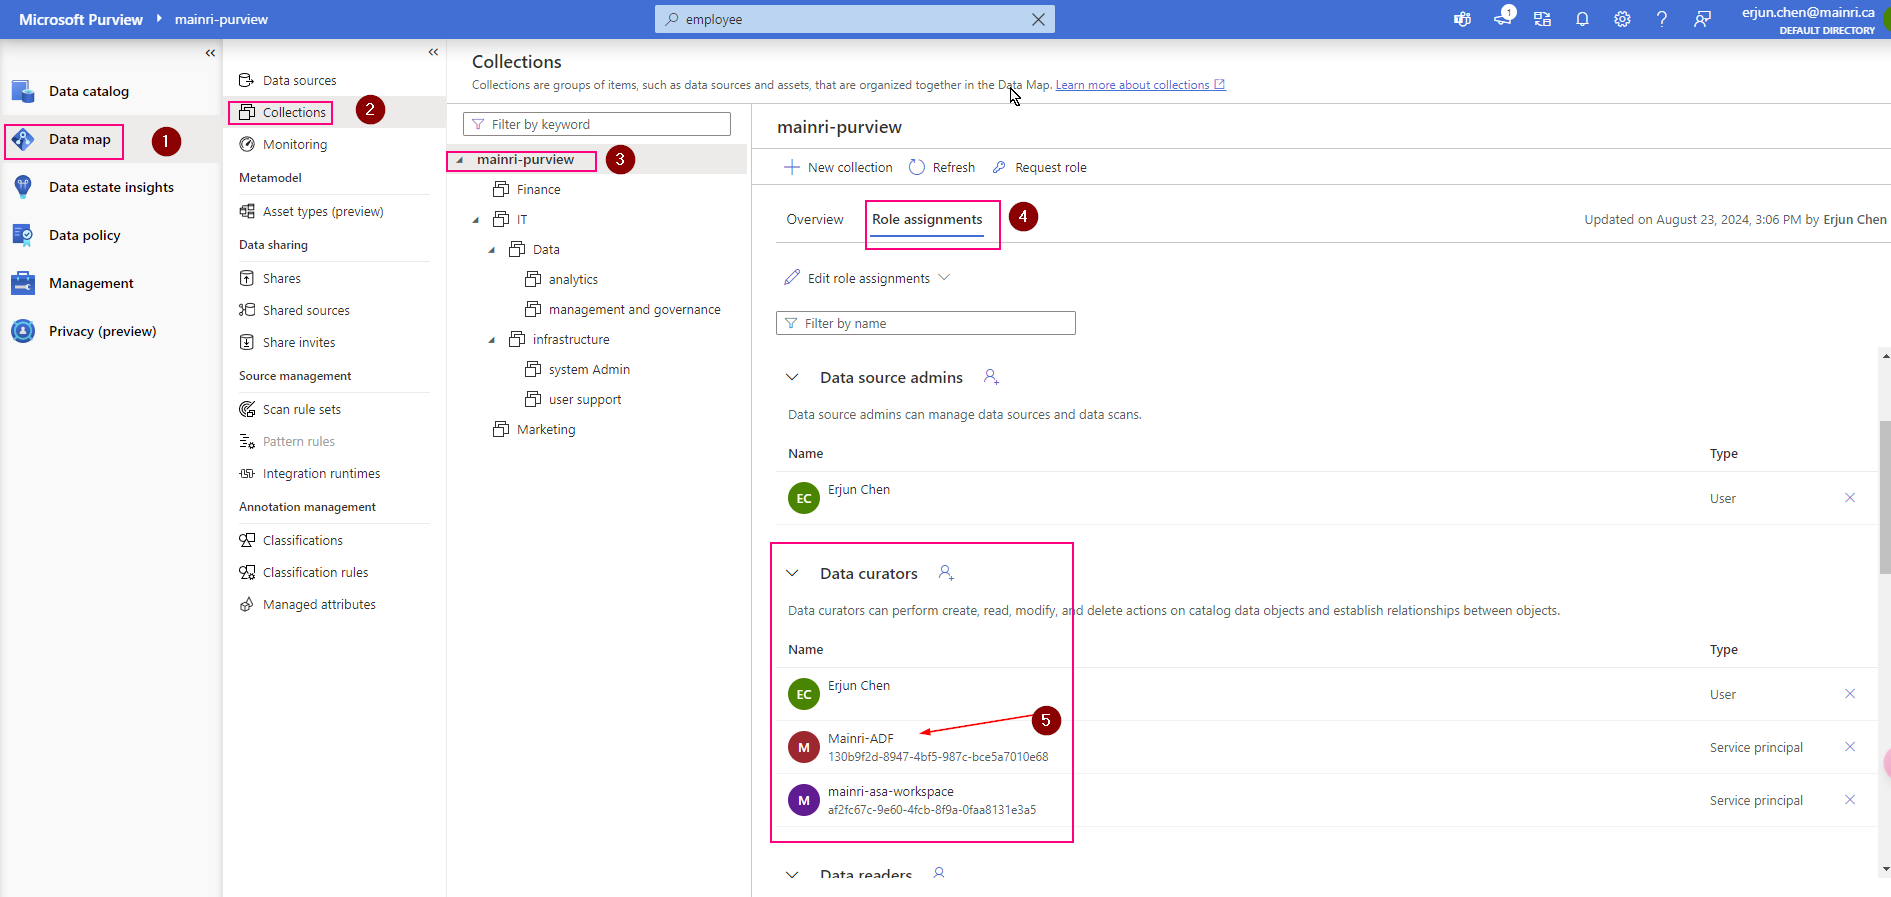
Data factory’s managed identity is used to authenticate lineage push operations from data factory to Microsoft Purview. Grant the data factory’s managed identity Data Curator role on Microsoft Purview root collection.

Purview > Management > Lineage connections > Data Factory > new

Validation: Purview > Data map > Collection > Root collection > Role assignments >

Check, the ADF is under “data Curators” section. That’s OK

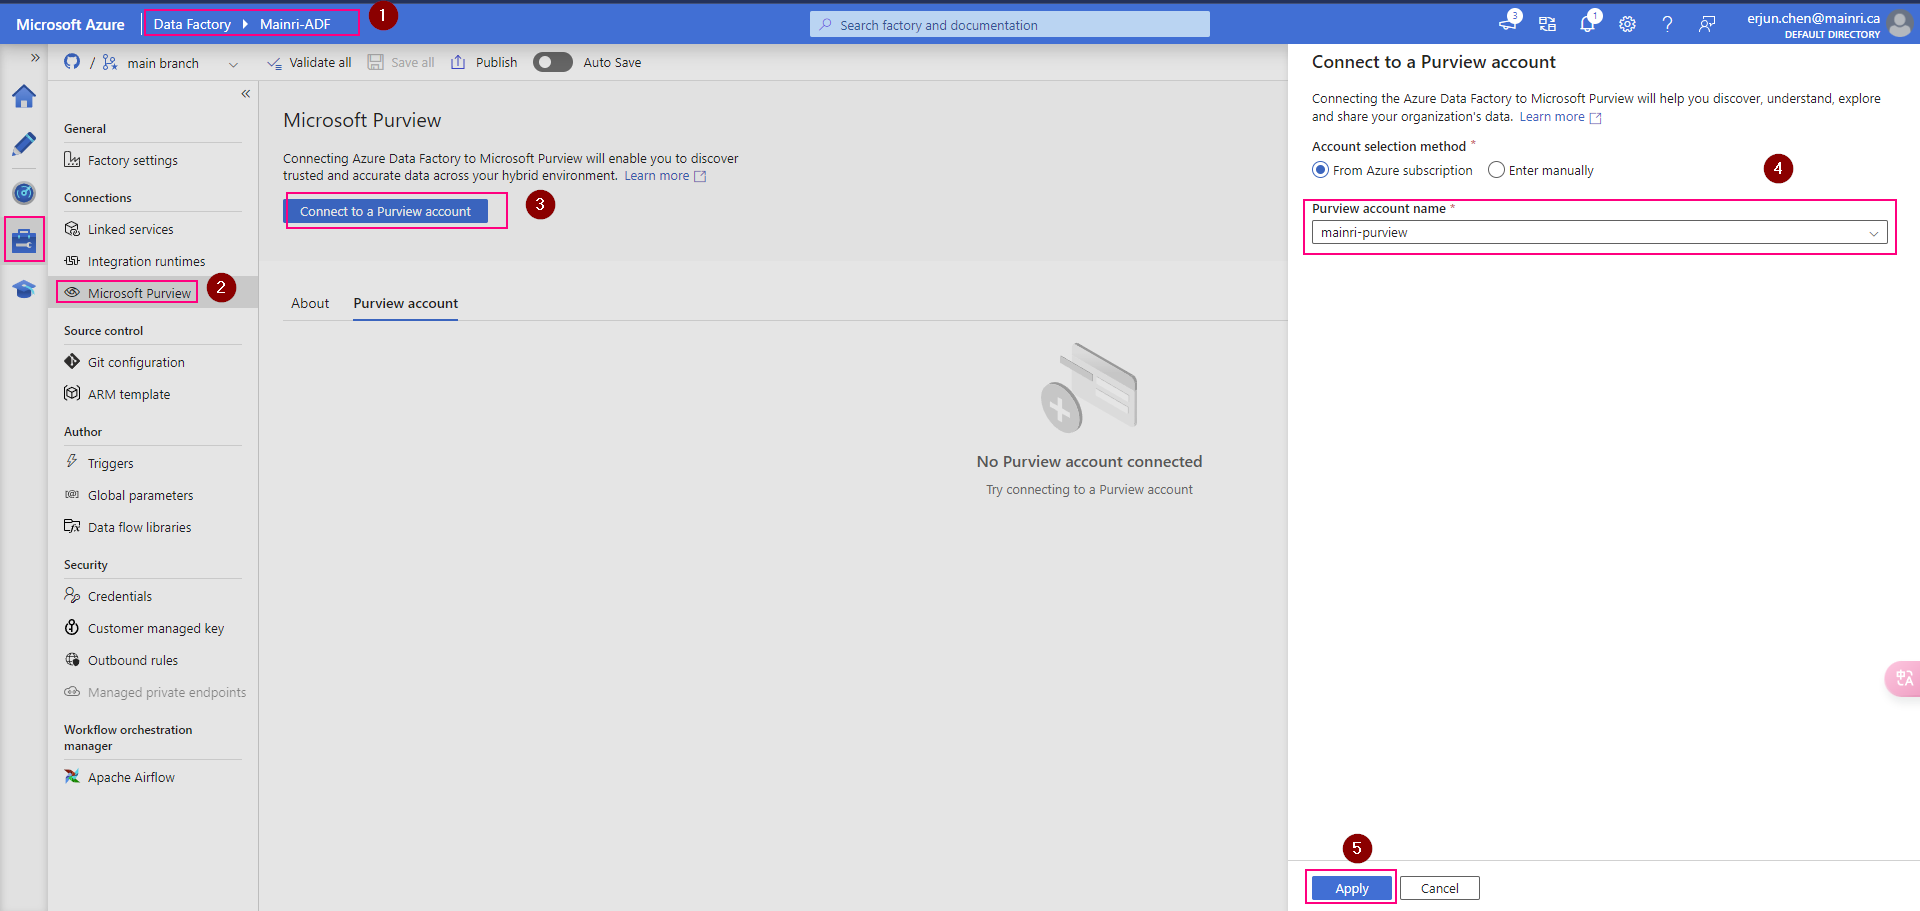
ADF connect to purview

In the ADF studio: Manage -> Microsoft Purview, and select Connect to a Microsoft Purview account

We will see this

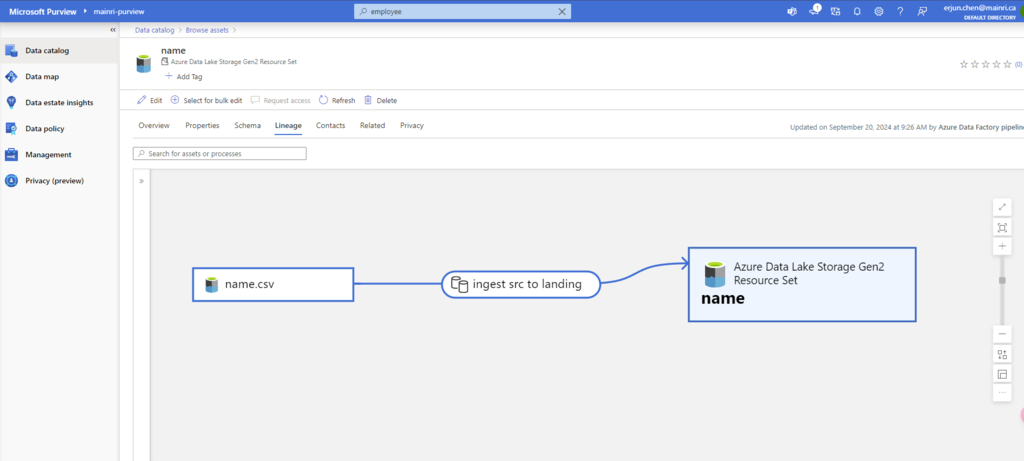
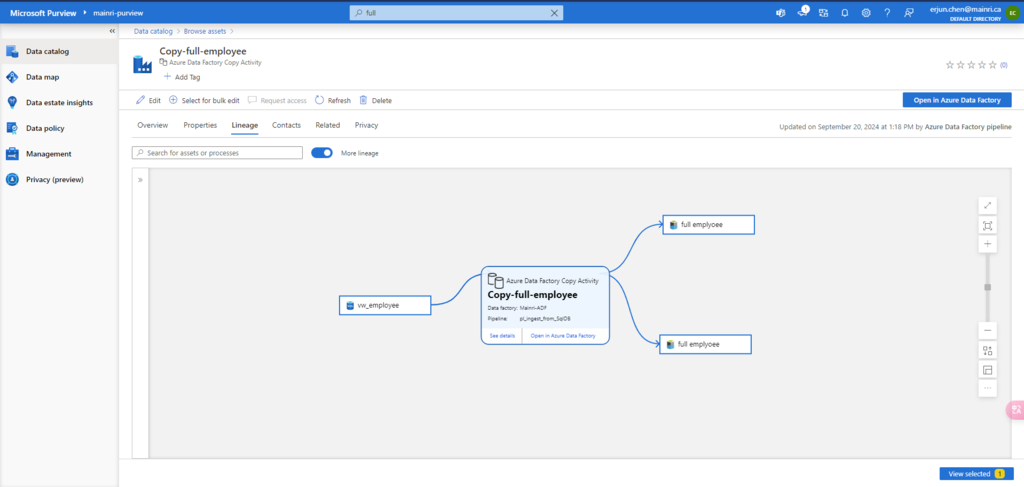
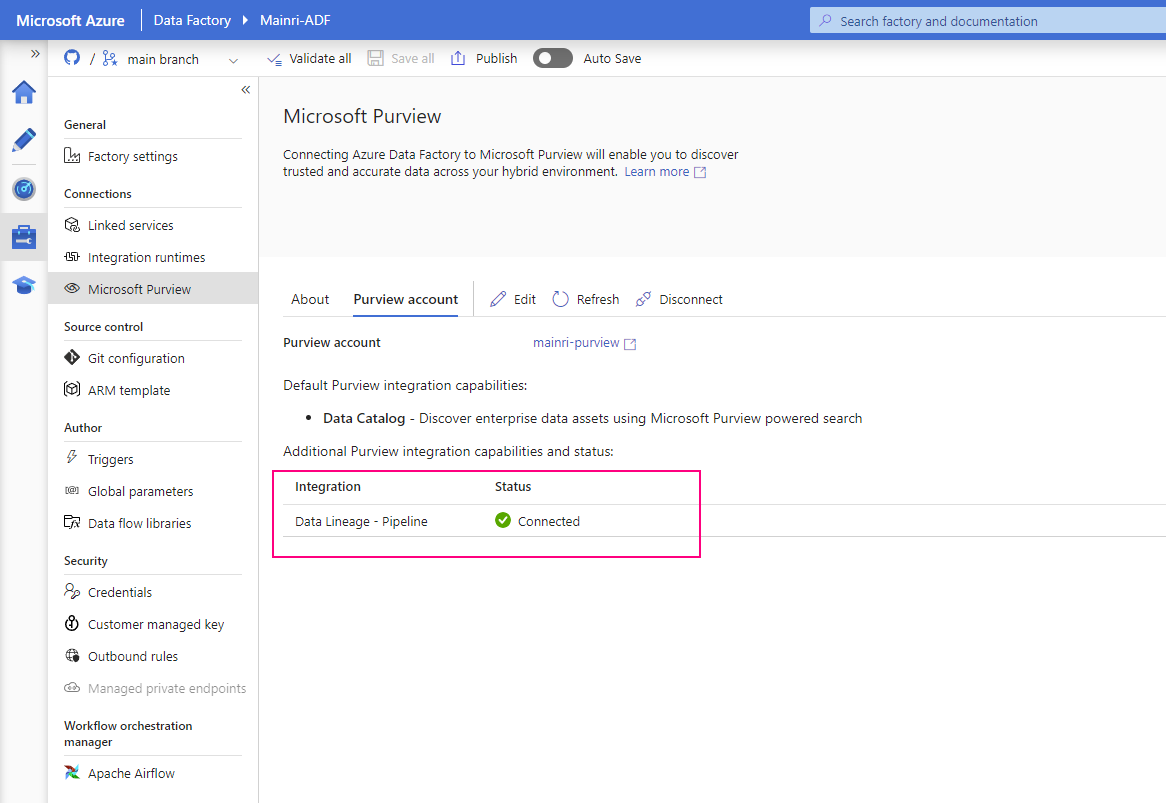
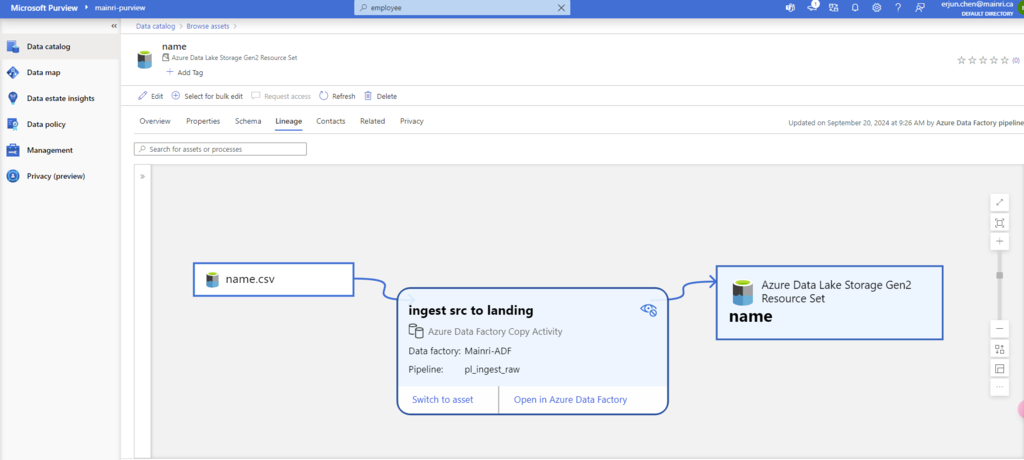
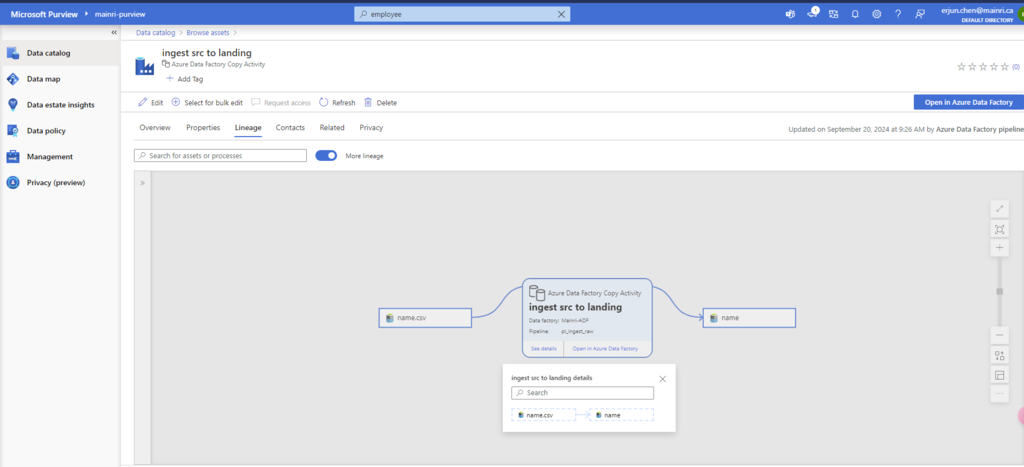
Once pipeline successfully runs, activity will be caught, extracted lineage look this.

that’s all for extracting ADF pipeline lineage.

Next step: Day 9 – Managed attributes in Data Map

Please do not hesitate to contact me if you have any questions at William . chen @ mainri.ca

(remove all space from the email account 😊)