Using Key Vault services in Azure Ecosystem

Azure Key Vault safeguards encryption keys and secrets like certificates, connection strings, and passwords. 

Key vaults define security boundaries for stored secrets. It allows you to securely store service or application credentials like passwords and access keys as secrets. All secrets in your key vault are encrypted with a software key. When you use Key Vault, you no longer need to store security information in your applications. Not having to store security information in applications eliminates the need to make this information part of the code.

What is a secret in Key Vault?

In Key Vault, a secret is a name-value pair of strings. Secret names must be 1-127 characters long, contain only alphanumeric characters and dashes, and must be unique within a vault. A secret value can be any UTF-8 string up to 25 KB in size.

Vault authentication and permissions

Developers usually only need Get and List permissions to a development-environment vault. Some engineers need full permissions to change and add secrets, when necessary.

For apps, often only Get permissions are required. Some apps might require List depending on the way the app is implemented. The app in this module’s exercise requires the List permission because of the technique it uses to read secrets from the vault.

In this article, we will focus on 2 sections, set up secrets in Key Vault and application retrieves secrets that ware saved in Key vault.

Create a Key Vault and store secrets

Creating a vault requires no initial configuration. You can start adding secrets immediately. After you have a vault, you can add and manage secrets from any Azure administrative interface, including the Azure portal, the Azure CLI, and Azure PowerShell. When you set up your application to use the vault, you need to assign the correct permissions to it

Create a Key Vault service

To create Azure Key Vault service, you can follow the steps.

From Azure Portal, search “key Vault”
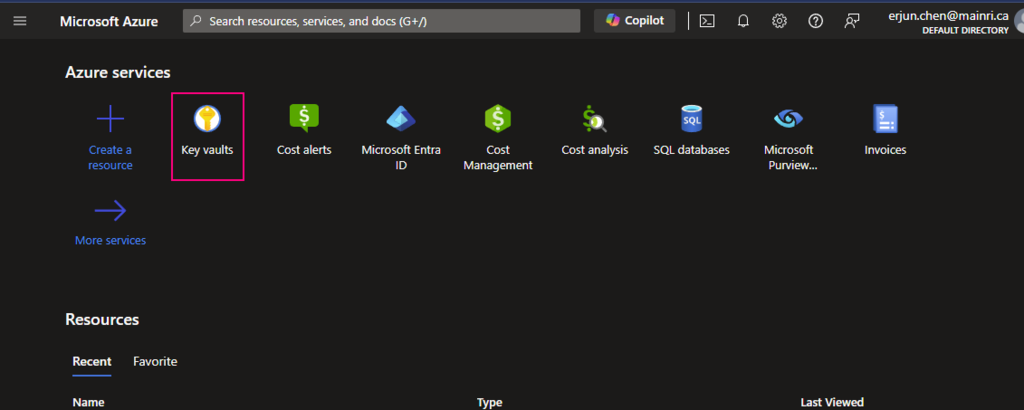
click “key Vault”

Fill in all properties

Click review + create. That’s all. Quite simple, right?

Create secrets and save in Key Vault

There are two ways to create secret and save in Key vault.

  • Access control, Identity and Access management (IAM)
  • Access Policies

Using Access Control (IAM) create a secret

From Key Vault> Access Control (IAM) > Add role Assignment
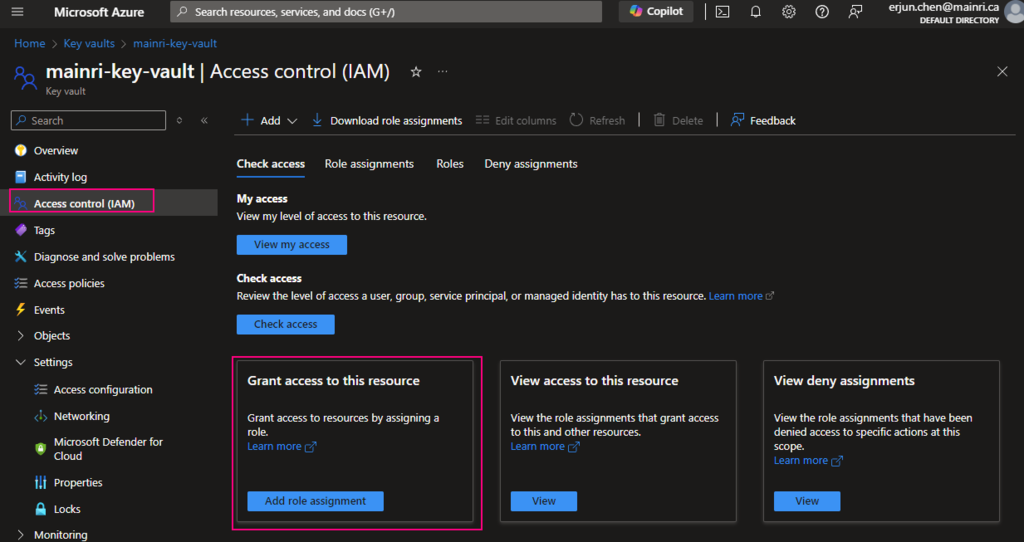
In most cases, if you create and save secrets in key-vault for your users to use, you only need add the “Key vault secrets user” role assignment.
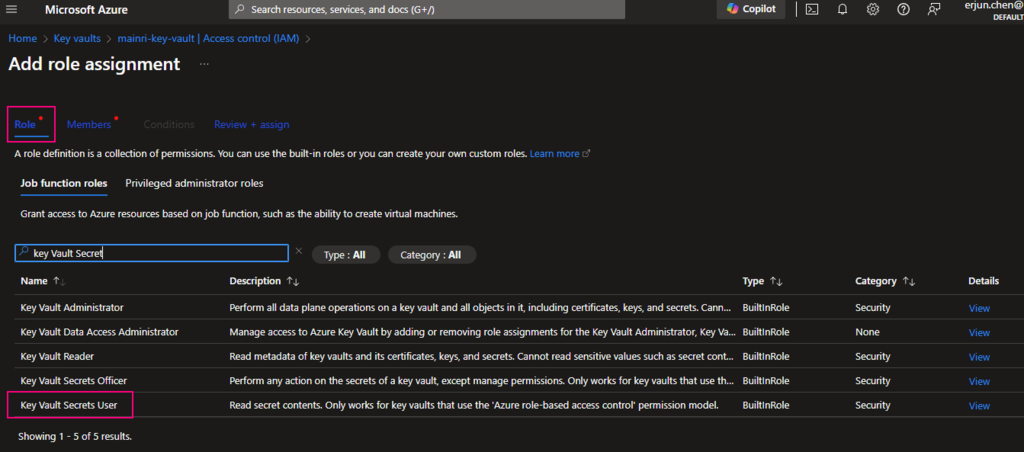
click “next” select a member or group
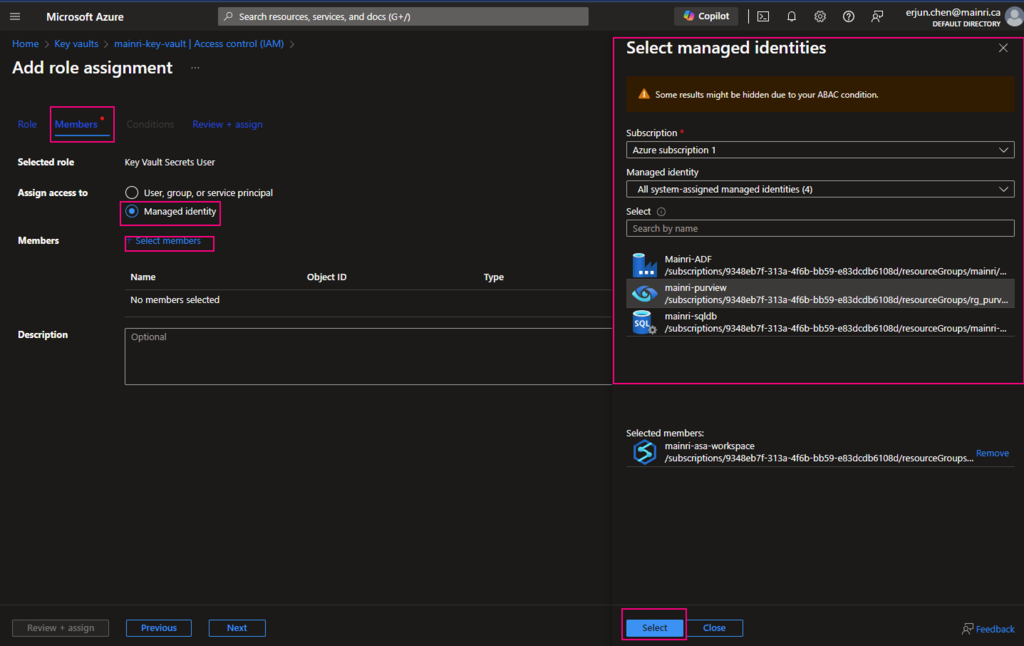
Pay attention to here, if your organization has multiple instances of the same services, for example, different teams are independently using different ADF instants, make sure you correctly, accurately add the right service instant to access policies.

Once it’s down, check the access.
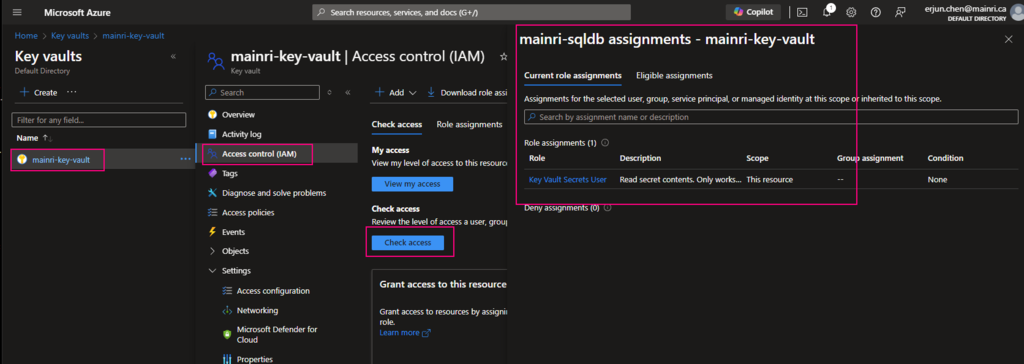
Create a Secret

From “Key Vault” > “Object” > “Secrets” > “+ Generate/Import”

Fill in all properties, :Create”

Secrets key and value created That’s all.
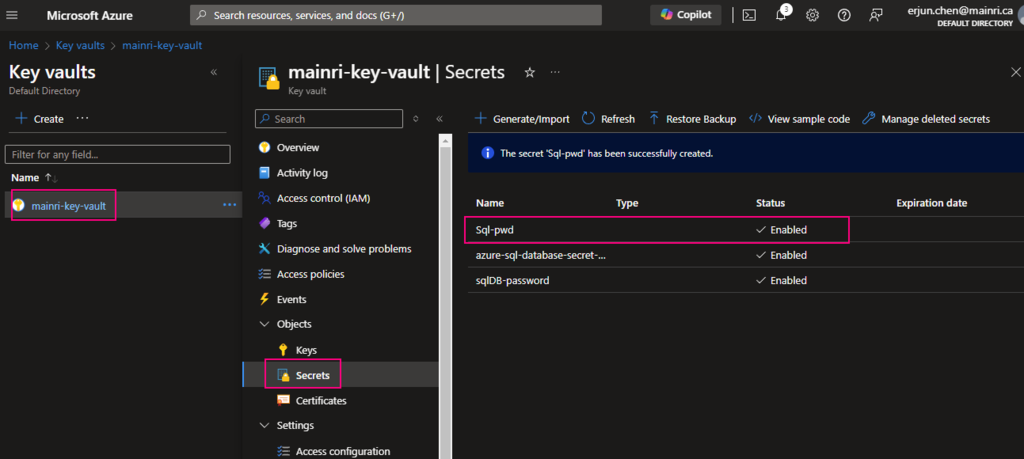
If you want to update the secret, simply click the key, follow the UI guide, you will not miss it.

Click the “version” that you want to update. Update the content > apply it.
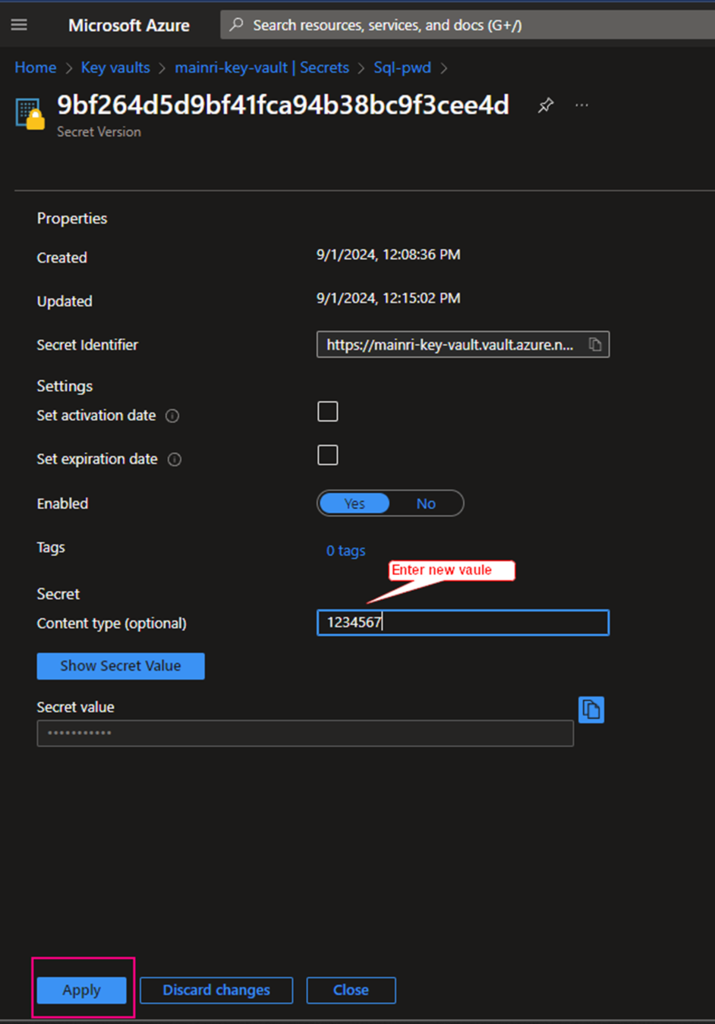
That’s all.

Using Access Policies create a secret

There is another way “Access Policies” to create a secret.

Select the permissions you want under Key permissionsSecret permissions, and Certificate permissions.

If you create a key secret for users to use in their application or other azure services, usually you give “get” and “list” in  the “Secret permissions” enough. Otherwise, check Microsoft official documentation.

Under the Principal selection pane, enter the name of the user, app or service principal in the search field and select the appropriate result.

Using Azure SQL Database as an example
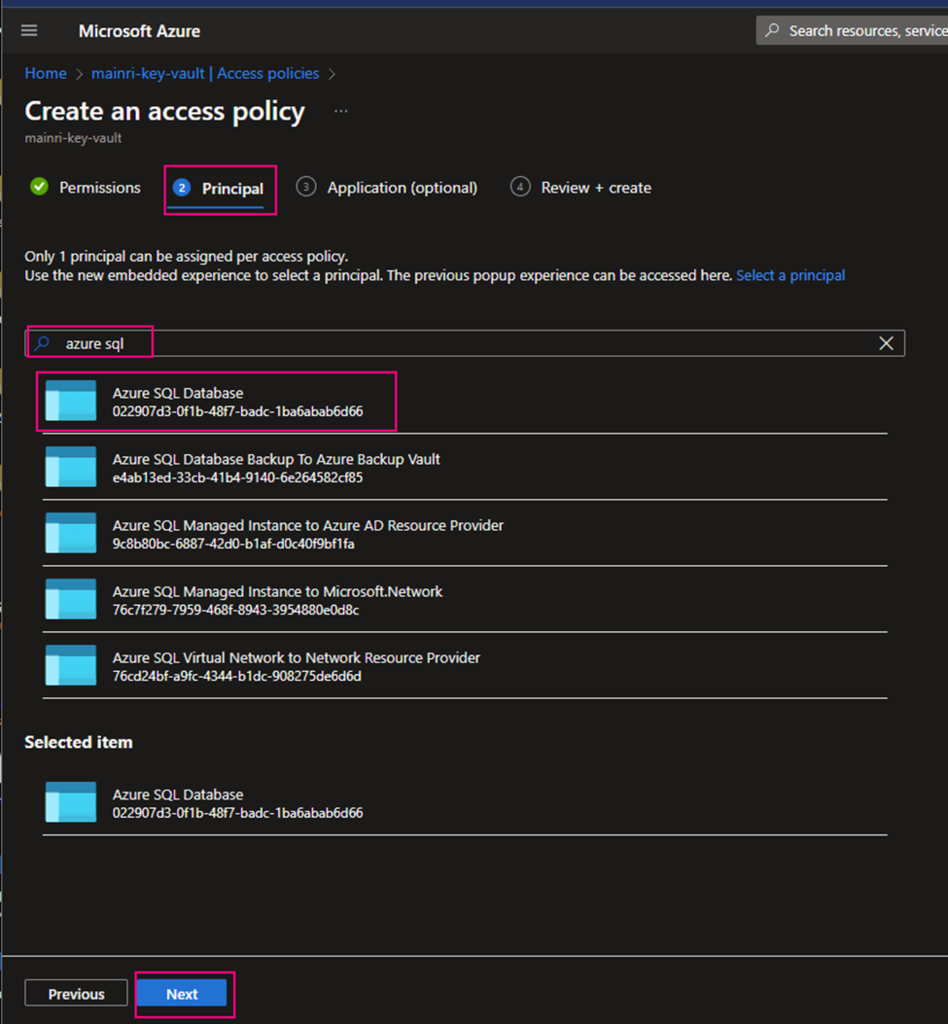
Caution: when you add principal, make sure you select right service instant. Especially you act as a infrastructure administer, your organization has multiple teams that they are independently using different service instants, e.g. different Synapse Workspace. select correct instant. I have been asked to help trouble shotting this scenario a few time. Azure admin says, he has added policies to key-vault, but the use cannot access there yet. that is a funny mistake made, he has added ADF to kay-vault policies, unfortunately, the ADF is NOT team A used, team B is using it. 🙂

Back on the Access policies page, verify that your access policy is listed.
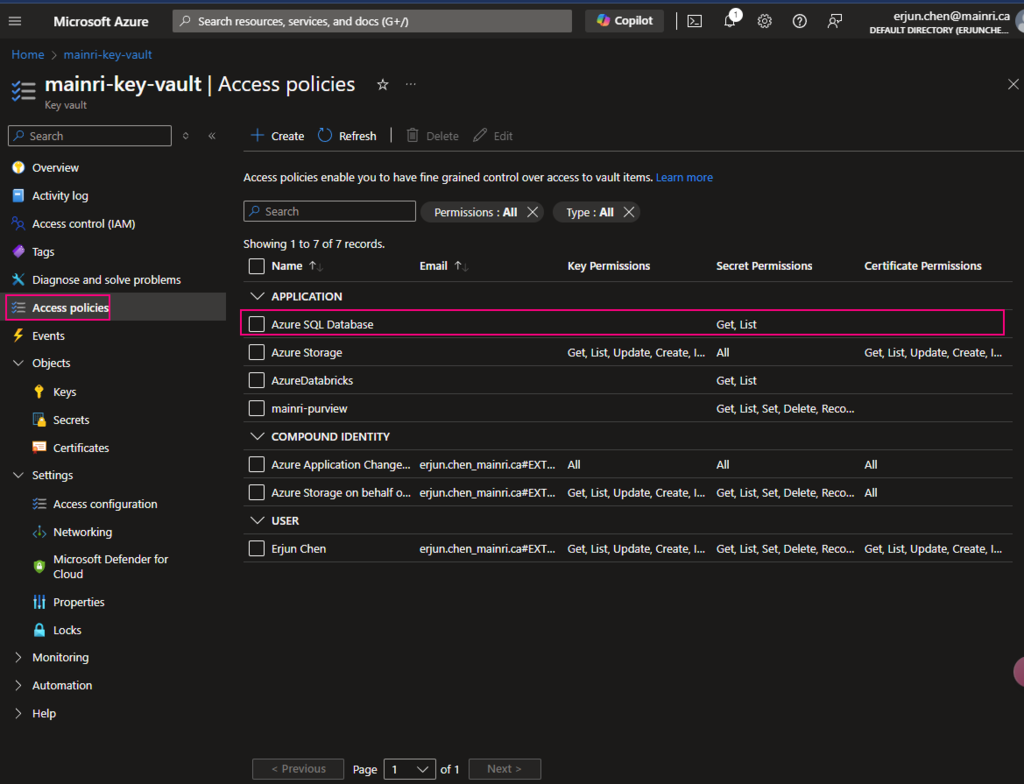
Create secret key and value

We have discussed it above. Need not verbose.

Done!

Using secrets that were saved in Key Vault

Using secrets usually have 2 major scenarios, directly use, or use REST API call to retrieve the saved secret value.

Let’s use Data Factory as an example to discuss.

Scenario 1, directly use it

For example, when you create linked service to connect Azure Sql Database

 You have to make sure that Key Vault’s access policies has this ADF access policies, get and list
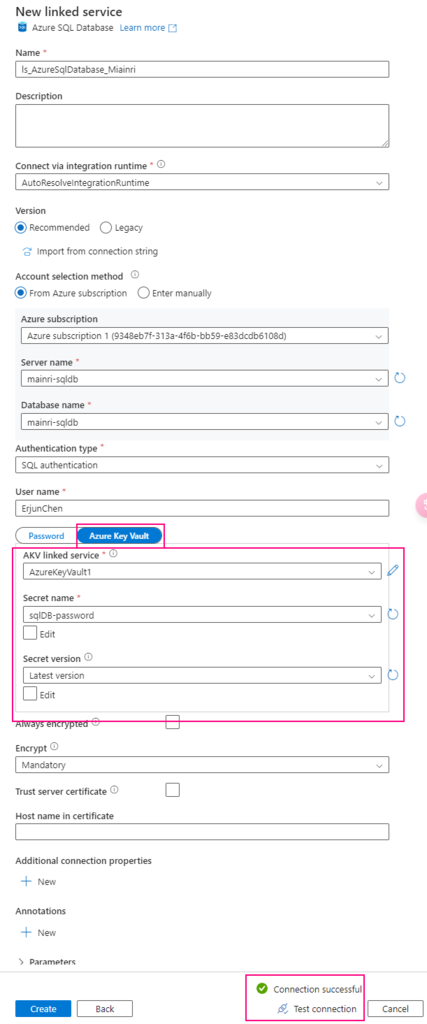
one more example, System workspaces use key-vault.

Once again, make sure your Synapse Workspace has access policies, “Key Vault Secrets User“, “get” and “List”

Scenario 2, REST API call Key Vault to use secret

Many engineers want to call the key Vault to retrieve the secret value for a certain purpose, e.g.  Synapse pipeline to get SharePoint Online list or files that resident in SharePoint Library, you need an application secret value to build the query string. Normally, the application’s secret value is saved in Key Vault. In this case, you have to make a http call to Key value.

Get a specified secret from a given key vault.
The GET operation is applicable to any secret stored in Azure Key Vault. This operation requires the secrets/get permission.

GET {vaultBaseUrl}/secrets/{secret-name}/{secret-version}?api-version=7.4

for this example,

{vaultBaseUrl} https://mainri-key-vault.vault.azure.net

{secret-name} mySecretName

{secret-version} can skipped, if you skipped it, it will use “Latest Version”

Look at the pipeline

This web activity calls Azure Key Vault to retrieve secret value.

URL: https://mainri-key-vault.vault.azure.net/secrets/mySecretName?api-version=7.4

Method: Get

Authentication: Get

Resource: https://vault.azure.net

Caution, ?api-version=7.4 is very important, you have to add it to the URL.

all done.

Please do not hesitate to contact me if you have any questions at William . chen @ mainri.ca

(remove all space from the email account 😊)

Appendix:

MS document Get Secret – Get Secret

Day 5: Registering Azure SQL Database and Scan in Purview

In the previous article, we discussed Managed Identity, registering ADLS, and scanning it in Azure Purview. In this article, I will focus on scanning an Azure SQL Database, including how to register and scan it in Azure Purview. The process differs from that of ADLS. You will be required to provide Azure SQL Database credentials.

We will learn the best practice of storing the Azure SQL Database credentials in an Azure Key Vault and use that Key Vault in Purview.    

Azure Key Vault provides a way to securely store credentials, secrets, and other keys, but your code must authenticate to Key Vault to retrieve them. 

We must follow these steps to register and scan Azure SQL Database:

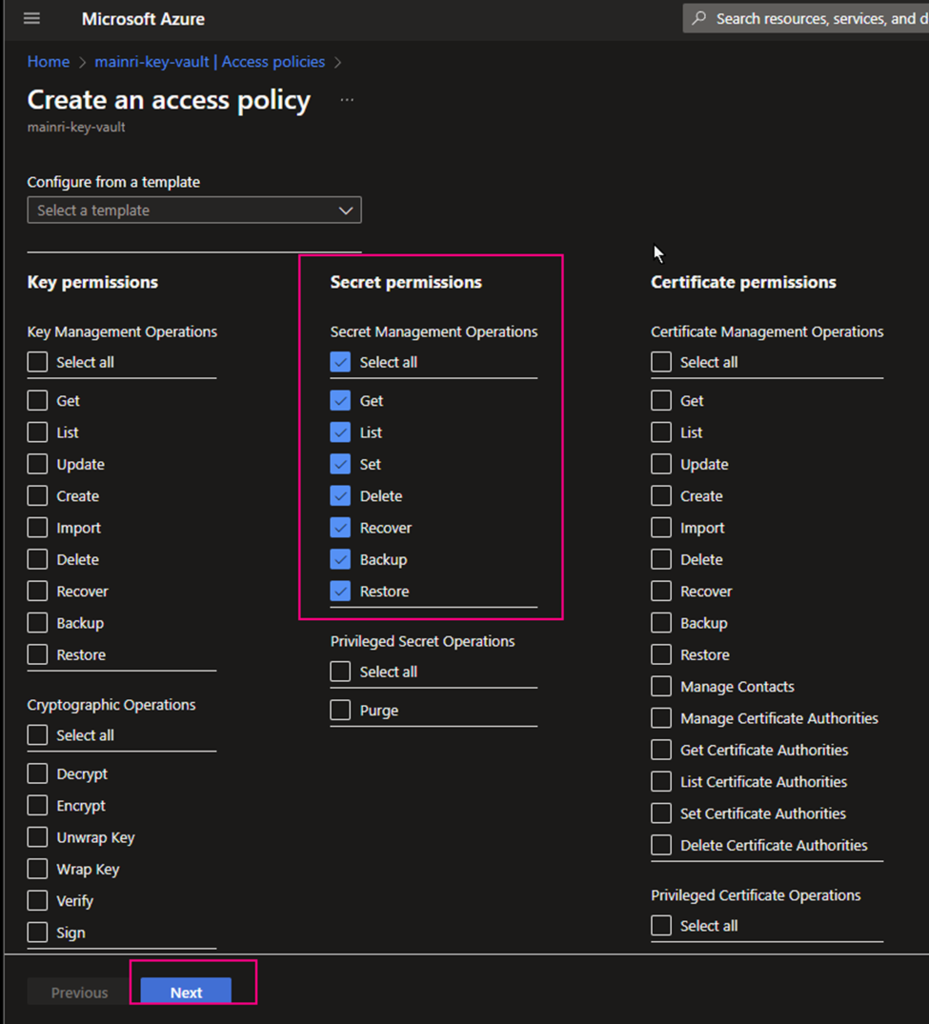
  1. Grant your Azure Account access to Key Vault by adding a new access policy. We will have to grant all the secret permissions.
  2. Grant Purview Managed identity access to Key Vault by adding a new access policy. Here we will have to grant Get and List permissions so purview can get(retrieve) and list down all the secrets.
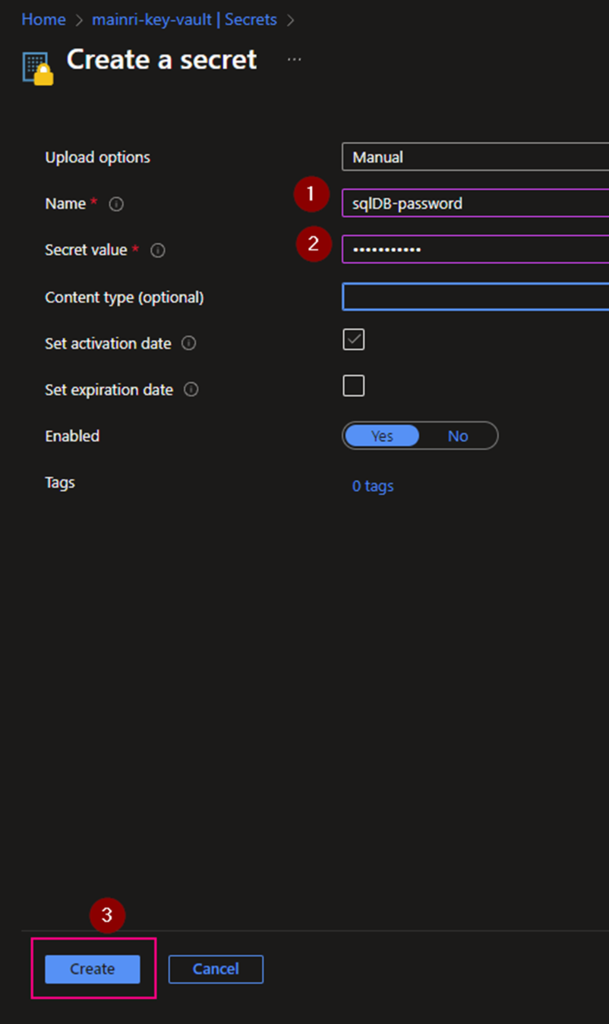
  3. Generate a Secret for SQL Admin in Azure Key Vault. This secret will be used to log in to Azure SQL DB.
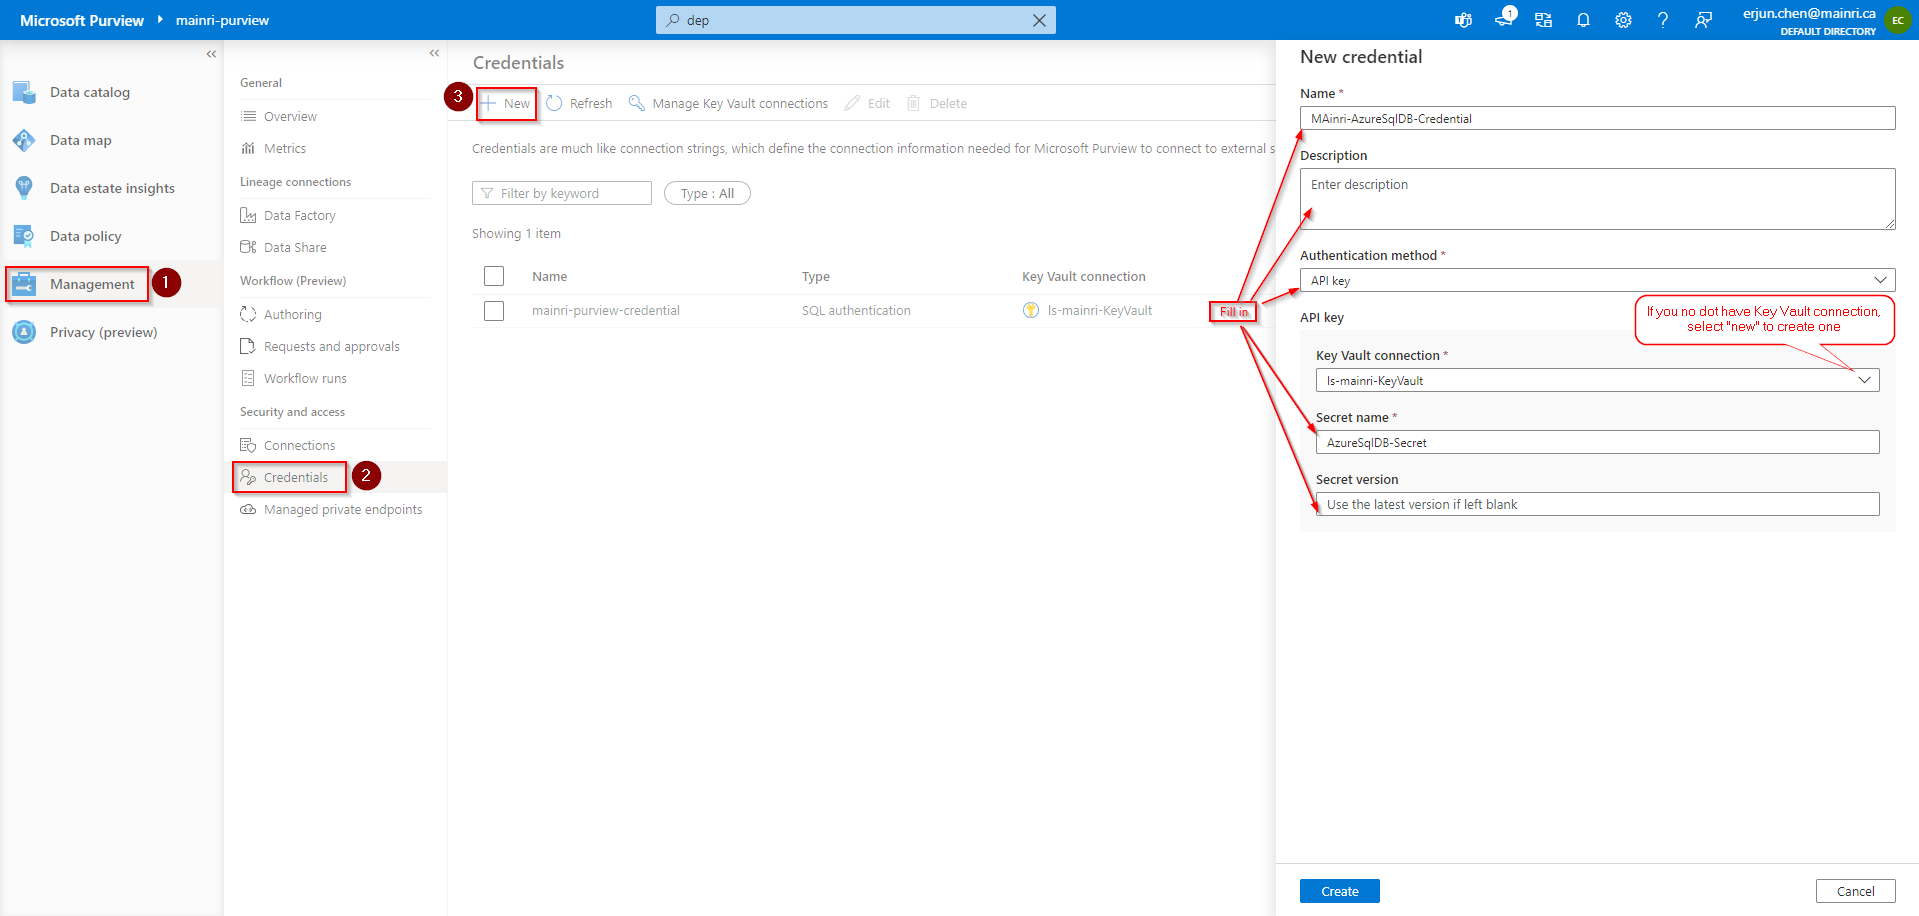
  4. Add SQL Credentials (created above) in Purview so we can use the same credential.
  5. Register Azure SQL DB in Microsoft Purview.
  6. Scan Azure SQL Database as a data source with Azure Key Vault Credentials.
  7. Verify that Purview is able to see tables in the Azure SQL database.

Discover and govern Azure SQL Database in Microsoft Purview

This article outlines the process to register an Azure SQL database source in Microsoft Purview. It includes instructions to authenticate and interact with the SQL database.

When you’re scanning Azure SQL Database, Microsoft Purview supports extracting technical metadata from these sources:

  • Server
  • Database
  • Schemas
  • Tables, including columns
  • Views, including columns (with lineage extraction enabled, as part of scanning)
  • Stored procedures (with lineage extraction enabled)
  • Stored procedure runs (with lineage extraction enabled)

When you’re setting up a scan, you can further scope it after providing the database name by selecting tables and views as needed.

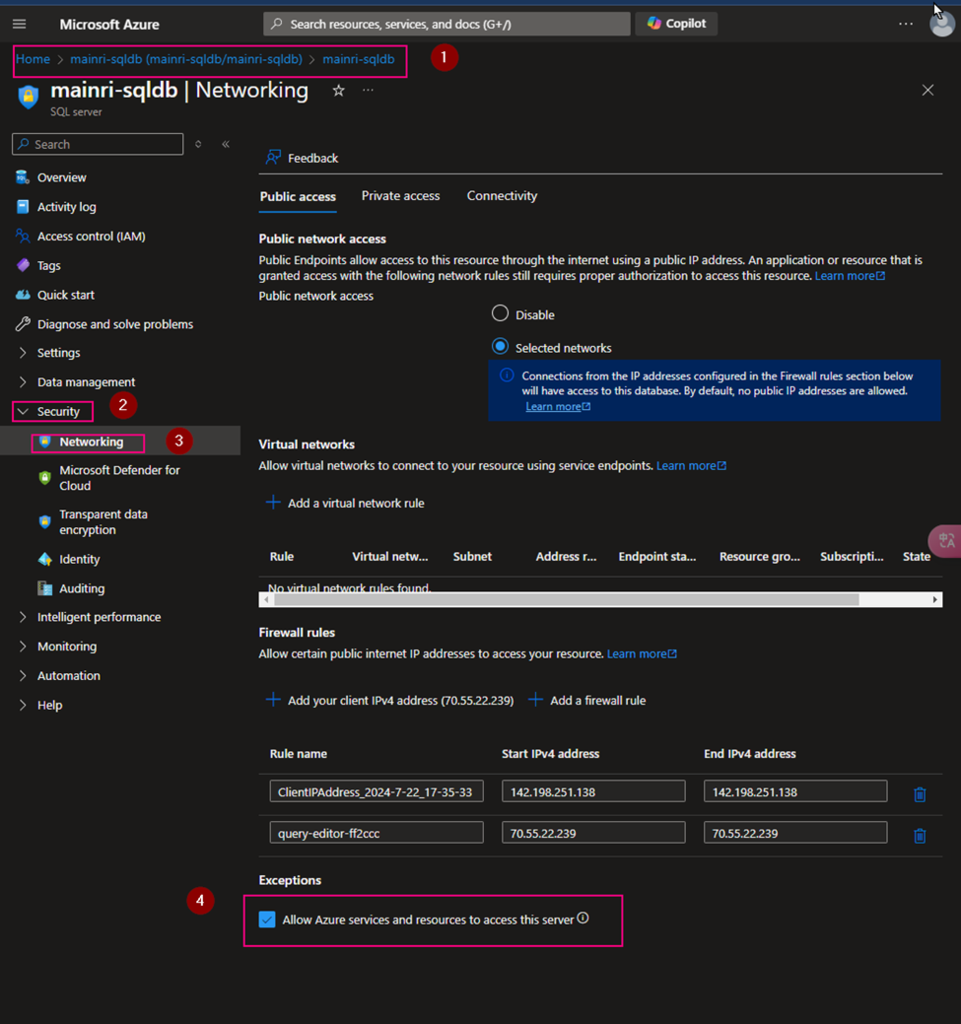
Update firewall settings.

If your database server has a firewall enabled, you need to update the firewall to allow access. Simply show you here.

Azure Portal > SQL Database > Set Server Firewall> Security > Networking

Check “Allow Azure services and resources to access this server”

Key Vault Set up

Create access policies

From Azure Portal > [ your key vault ] > Access Policies

Secret permissions

select all.

Principal

find out “[your purview]”.

Type your purview account to search. For me, I use “mainri-purview” as an example.

Click “next” … create

Create a Secrets

[your key vault] > Objects > Secrets

Generate a secret

We completed the Azure Key vault configuration.

It’s time for configuration of Purview for scanning SQL Database.

Configure authentication for a scan

Azure Purview > Management > Credentials

Manage Key vault connection

Add a new.

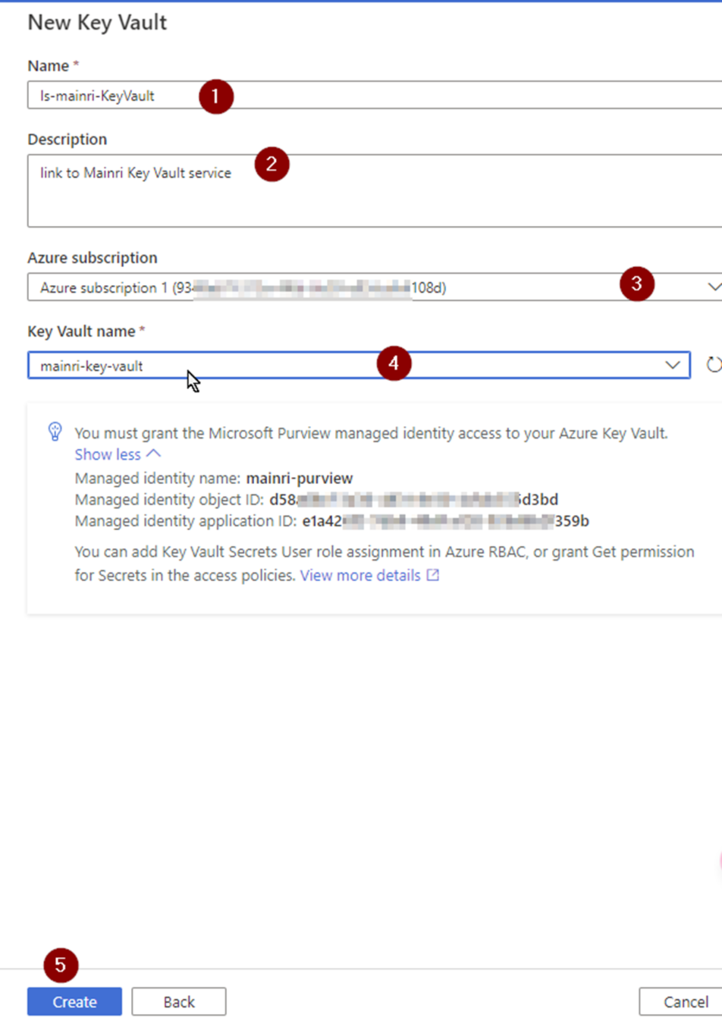
If you do not have linked service to your key vault, select “new” create a new one.

Fill in all values, click “Create” , Key-vault connection created.

Then, you will back to “new credential” screen.

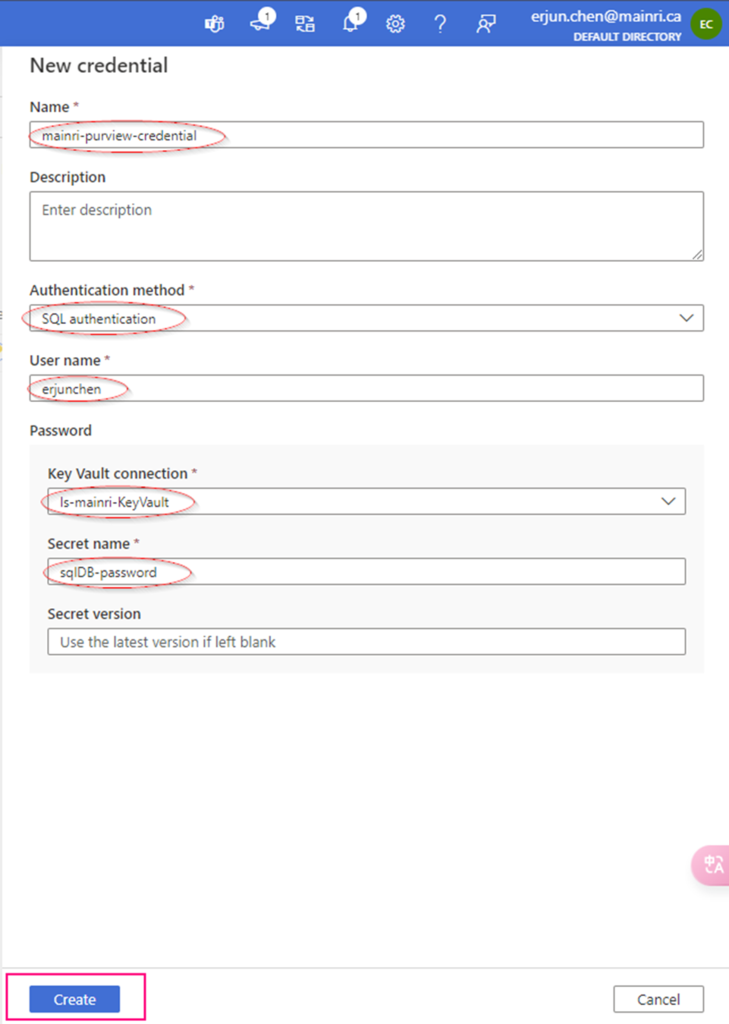
Create Credential

Fill in all values, click “create”

Now, the credential created

Setup Scan

Did you remember we have created collections previously?

Go back: Data Map >  Data Source >

Create a scan

Full screen

Pay attention here: Lineage extraction (preview)

I choose “off”.

To successfully turn on Lineage extraction, you must do the following:

  • Provide the db_owner role in Azure SQL Database for Microsoft Purview MSI
  • Run “create Master Key” in Azure SQL Database (only if not already exists)

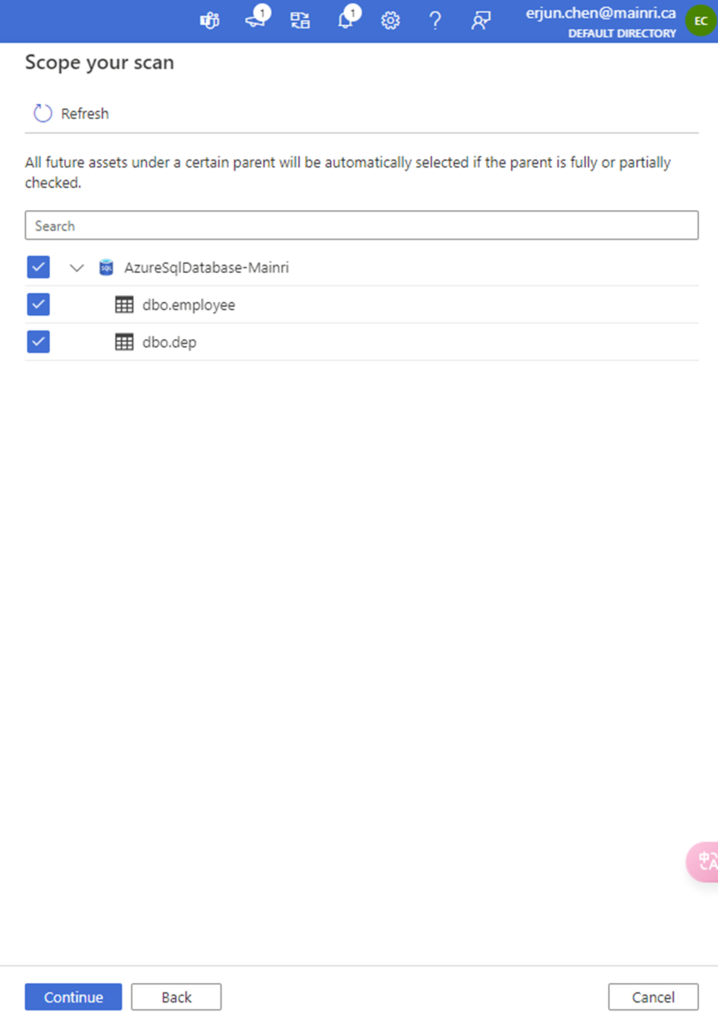
Scope your scan

Check to see what Entity you want to scan.

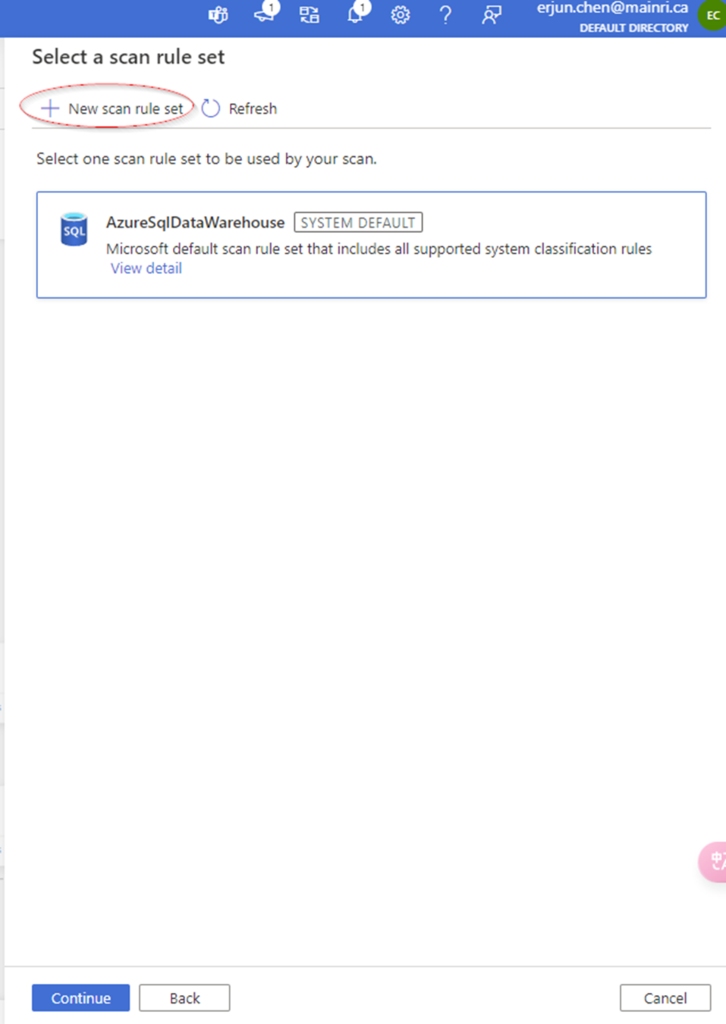
Select a scan rule set.

At here, you are able to add new scan rule set if you like. For me I selected azure purview system default SQL data warehouse scan rule set.

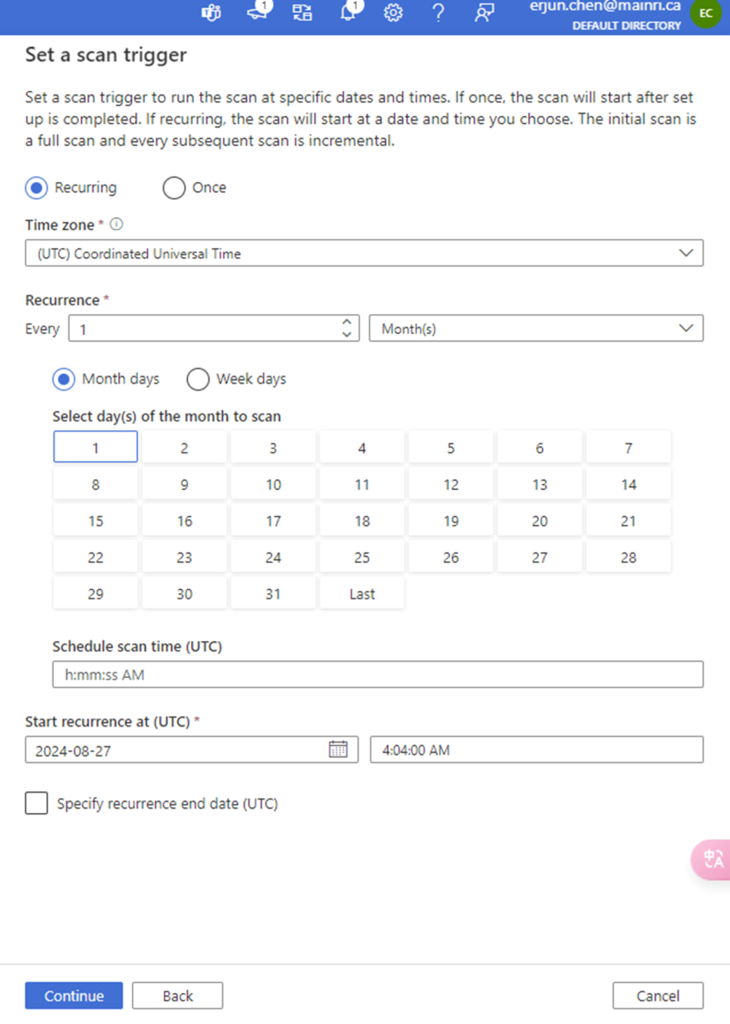
Set a scan trigger

You can either schedule the scan or once. This is very straight forward.

Once the process is complete, you can view detail

Alright, we’ve done the scan SQL Database in Azure Purview.

Next step: Day 6 – Registering Azure Synapse Analytics workspaces and scan in Microsoft Purview

Please do not hesitate to contact me if you have any questions at William . chen @ mainri.ca

(remove all space from the email account 😊)

Create Service Principle, Register an application on Azure Entra ID (former Active Directory)

A Service Principal in Azure is an identity used by applications, services, or automated tools to access specific Azure resources. It’s tied to an Azure App Registration and is used for managing permissions and authentication.

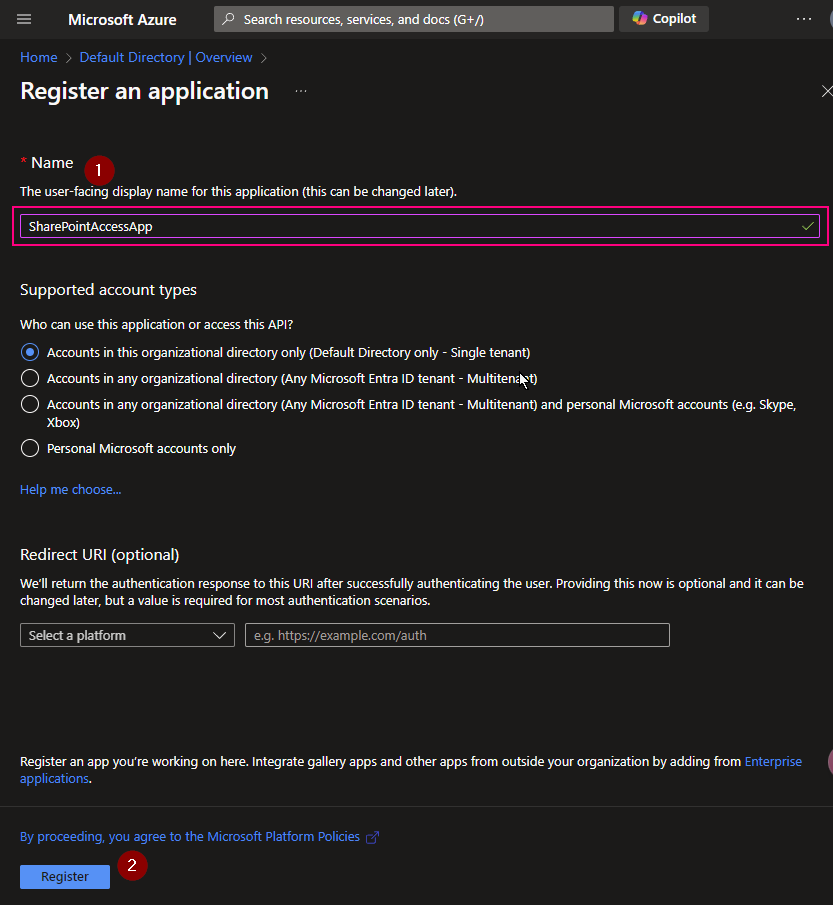
The Microsoft identity platform performs identity and access management (IAM) only for registered applications. Whether it’s a client application like a ADF or Synapse, Wen Application or mobile app, or it’s a web API that backs a client app, registering establishes a trust relationship between your application and the identity provider, the Microsoft identity platform.

This article is talking on registering an application in the Microsoft Entra admin center. I outline the registration procedure step by step.

Summary steps:

  1. Navigate to Azure Entra ID (Azure Active Directory)
  2. Create an App Registration
  3. Generate Client Secret,
    note down Important the Application (client) ID and Directory (tenant) ID,  Client-Secret-value.
  4. Using the Service Principle – Assign Roles to the Service Principal
    Navigate to the Azure resource (e.g., Storage Account, Key Vault, SQL Database) you want your Service Principal to access.

Step by Step Demo

Register a new Application on Azure Entra ID (formerly called Azure Active Directory), get an Application ID and Client Secret value.

Azure Portal >> Azure Entra ID (formerly called Azure Active Directory) 

(1)  Copy Tenant ID.

We need this Tenant ID later.

(2) App Registration

(3) Copy Application ID. We will use it later

(4) Create Client Secret

Generate a new client Secret,

(5) copy the Client Secret Value

Copy client-secret-value, we need it later.

Cause: the Client Secret Value you HAVE TO COPY IT RIGHT NOW! IMMEDIATELY copy NOW. And put it to a secure place. Since the Value WILL NOT reappear anymore. IMOPRTANT!

(6) Using the Service Principle – Assign Roles to the Service Principal

Assign Roles to the Service Principal

Now, assign permissions to your Service Principal so it can access specific Azure resources:

  1. Navigate to the Azure resource (e.g., Storage Account, Key Vault, SQL Database) you want your Service Principal to access.
  2. Go to Access Control (IAM).
  3. Click Add and choose Add role assignment.
  4. Choose a role (e.g., Contributor, Reader, or a custom role).
  5. Search for your App Registration by its name and select it.
  6. Save

We have finished all at Azure Entra ID (Former Azure Active Directory) 

Please do not hesitate to contact me if you have any questions at william . chen @mainri.ca

(remove all space from the email account 😊)

Appendix: Microsoft: Register an application with the Microsoft identity platform