Comparison of the Hive Metastore, Unity Catalog Metastore, and a general Metastore

Hive Metastore: A traditional metadata store mainly used in Hadoop and Spark ecosystems. It’s good for managing tables and schemas, but lacks advanced governance, security, and multi-tenant capabilities.

Unity Catalog Metastore: Databricks’ modern, cloud-native metastore designed for multi-cloud and multi-tenant environments. It has advanced governance, auditing, and fine-grained access control features integrated with Azure, AWS, and GCP.

General Metastore: Refers to any metadata storage system used to manage table and schema definitions. The implementation and features can vary, but it often lacks the governance and security features found in Unity Catalog.

Side by side comparison

Here’s a side-by-side comparison of the Hive Metastore, Unity Catalog Metastore, and a general Metastore:

FeatureHive MetastoreUnity Catalog MetastoreGeneral Metastore (Concept)
PurposeManages metadata for Hive tables, typically used in Hadoop/Spark environments.Manages metadata across multiple workspaces with enhanced security and governance in Databricks.A general database that stores metadata about databases, tables, schemas, and data locations.
Integration ScopeMainly tied to Spark, Hadoop, and Hive ecosystems.Native to Databricks and integrates with cloud storage (Azure, AWS, GCP).Can be used by different processing engines (e.g., Hive, Presto, Spark) based on the implementation.
Access ControlLimited. Generally relies on external systems like Ranger or Sentry for fine-grained access control.Fine-grained access control at the column, table, and catalog levels via Databricks and Entra ID integration.Depends on the implementation—typically role-based, but not as granular as Unity Catalog.
Catalogs SupportNot supported. Catalogs are not natively part of the Hive Metastore architecture.Supports multiple catalogs, which are logical collections of databases or schemas.Catalogs are a newer feature, generally not part of traditional Metastore setups.
MultitenancySingle-tenant, tied to one Spark cluster or instance.Multi-tenant across Databricks workspaces, providing unified governance across environments.Can be single or multi-tenant depending on the architecture.
Metadata Storage LocationTypically stored in a relational database (MySQL, Postgres, etc.).Stored in the cloud and managed by Databricks, with integration to Azure Data Lake, AWS S3, etc.Varies. Could be stored in RDBMS, cloud storage, or other systems depending on the implementation.
Governance & AuditingLimited governance capabilities. External tools like Apache Ranger may be needed for auditing.Built-in governance and auditing features with lineage tracking, access logs, and integration with Azure Purview.Governance features are not consistent across implementations. Often relies on external tools.
Data LineageRequires external tools for lineage tracking (e.g., Apache Atlas, Cloudera Navigator).Native support for data lineage and governance through Unity Catalog and Azure Purview.Data lineage is not typically part of a standard metastore and requires integration with other tools.
Schema Evolution SupportSupported but basic. Schema changes can cause issues in downstream applications.Schema evolution is supported with versioning and governance controls in Unity Catalog.Varies depending on implementation—generally more manual.
Cloud IntegrationUsually requires manual setup for cloud storage access (e.g., Azure Data Lake, AWS S3).Natively integrates with cloud storage like Azure, AWS, and GCP, simplifying external location management.Cloud integration support varies based on the system, but it often requires additional configuration.
Auditing and ComplianceRequires external systems for compliance. Auditing capabilities are minimal.Native auditing and compliance capabilities, with integration to Microsoft Entra ID and Azure Purview.Depends on implementation—auditing may require third-party tools.
CostLower cost, typically open source.Managed and more feature-rich, but can have additional costs as part of Databricks Premium tier.Varies depending on the technology used. Often incurs cost for storage and external tools.
PerformanceGood performance for traditional on-prem and Hadoop-based setups.High performance with cloud-native optimizations and scalable architecture across workspaces.Performance depends on the system and how it’s deployed (on-prem vs. cloud).
User and Role ManagementRelies on external tools for user and role management (e.g., Apache Ranger).Native role-based access control (RBAC) with integration to Microsoft Entra ID for identity management.User and role management can vary significantly based on the implementation.

Unity Catalog: Create Metastore and Enabling Unity Catalog in Azure

A metastore is the top-level container for data in Unity Catalog. Unity Catalog metastore register metadata about securable objects (such as tables, volumes, external locations, and shares) and the permissions that govern access to them.

Each metastore exposes a three-level namespace (catalog.schema.table) by which data can be organized. You must have one metastore for each region in which your organization operates. 

Microsoft said that Databricks began to enable new workspaces for Unity Catalog automatically on November 9, 2023, with a rollout proceeding gradually across accounts. Otherwise, we must follow the instructions in this article to create a metastore in your workspace region.

Preconditions

Before we begin

1. Microsoft Entra ID Global Administrator

The first Azure Databricks account admin must be a Microsoft Entra ID Global Administrator 

The first Azure Databricks account admin must be a Microsoft Entra ID Global Administrator at the time that they first log in to the Azure Databricks account console.

https://accounts.azuredatabricks.net

Upon first login, that user becomes an Azure Databricks account admin and no longer needs the Microsoft Entra ID Global Administrator role to access the Azure.

2. Premium Tire

Databricks workspaces Pricing tire must be Premium Tire.

3. The same region

Databricks region is in the same as ADLS’s region. Each region allows one metastore only.

Manual create metastore and enable unity catalog process

  1. Create an ADLS G2  (if you did not have)
    Create storage account and container to store manage table and volume data at the metastore level, the container will be the root storage for the unity catalog metastore
  2. Create an Access Connector for Azure Databricks
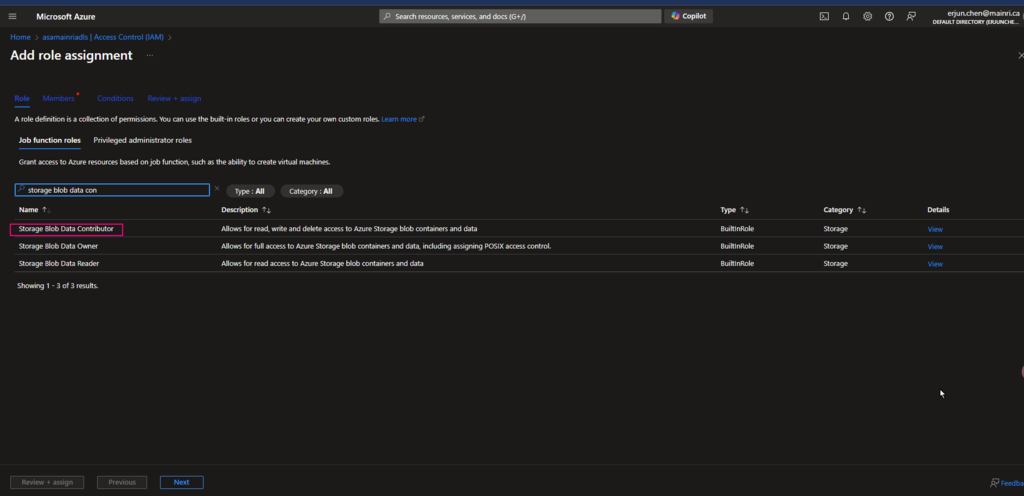
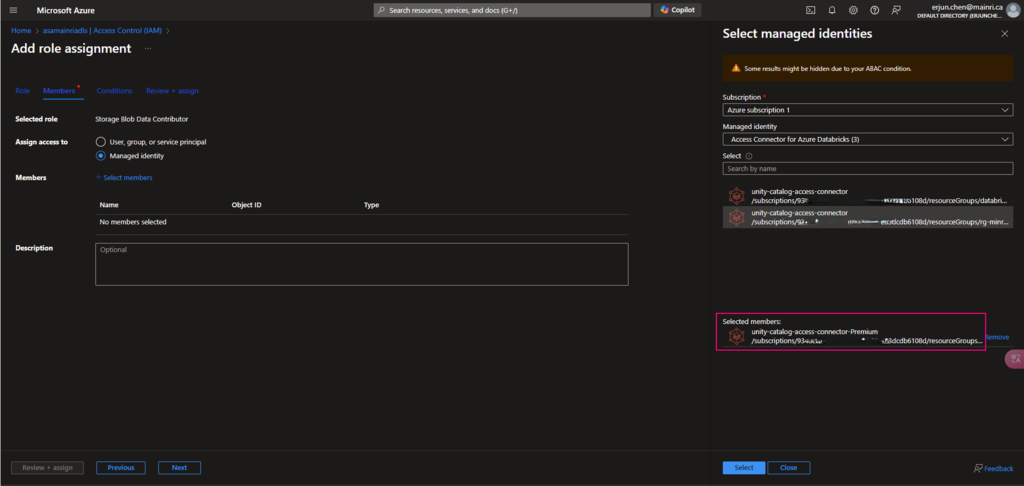
  3. Grant “Storage Blob Data Contributor” role to access Connector for Azure Databricks on ADLS G2 storage Account
  4. Enable Unity Catalog by creating Metastore and assigning to workspace

Step by step Demo

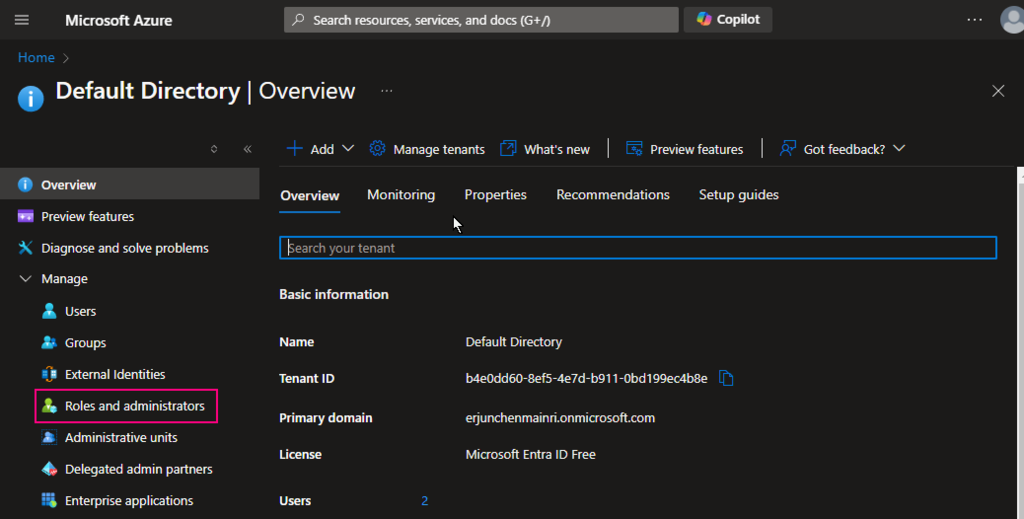
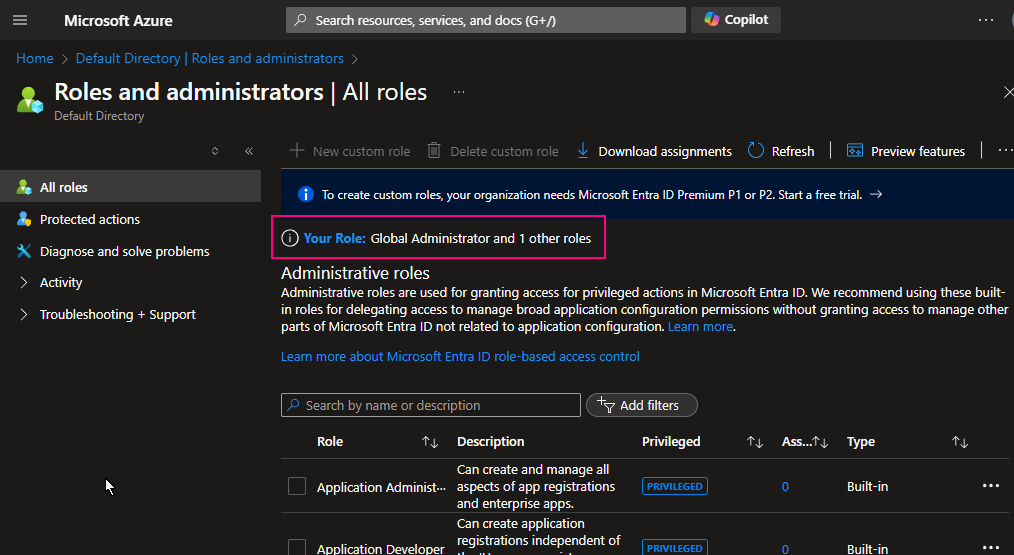
1. Check Entra ID role.

To check whether I am a Microsoft Entra ID Global Administrator role.

Azure Portal > Entra ID > Role and administrators

I am a Global Administrator

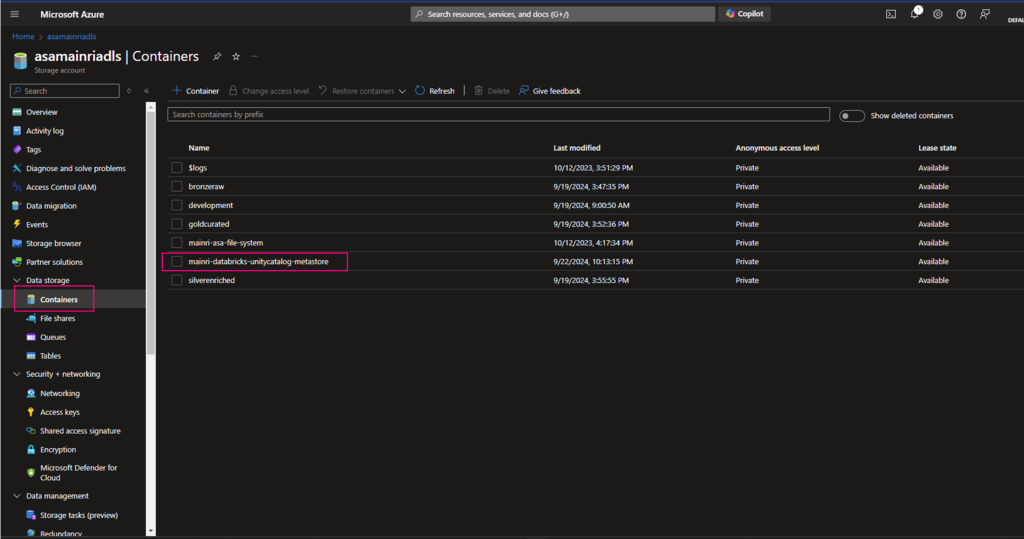
2. Create a container for saving metastore

Create a container at ROOT of ADLS Gen2

Since we have created an ADLS Gen2, directly move to create a container at root of ADLS.

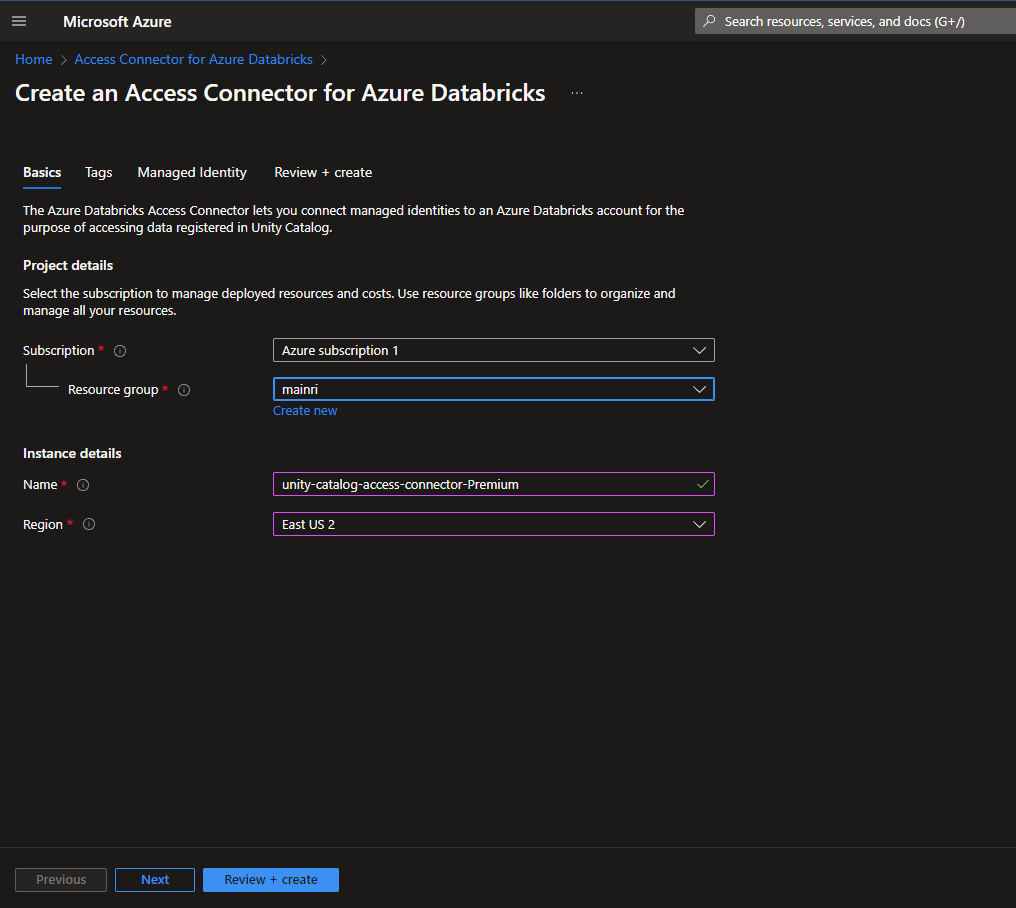
3. Create an Access Connector for Databricks

If it did not automatically create while you create Azure databricks service, manual create one.

Azure portal > Access Connector for Databricks

once all required fields filled, we can see a new access connector created.

4. Grant Storage Blob Data Contributor to access Connector

Add “storage Blob data contributor” role assign to “access connector for Azure Databricks” I just created.

Azure Portal > ADLS Storage account > Access Control (IAM) > add role

Continue to add role assignment

5. Create a metastore

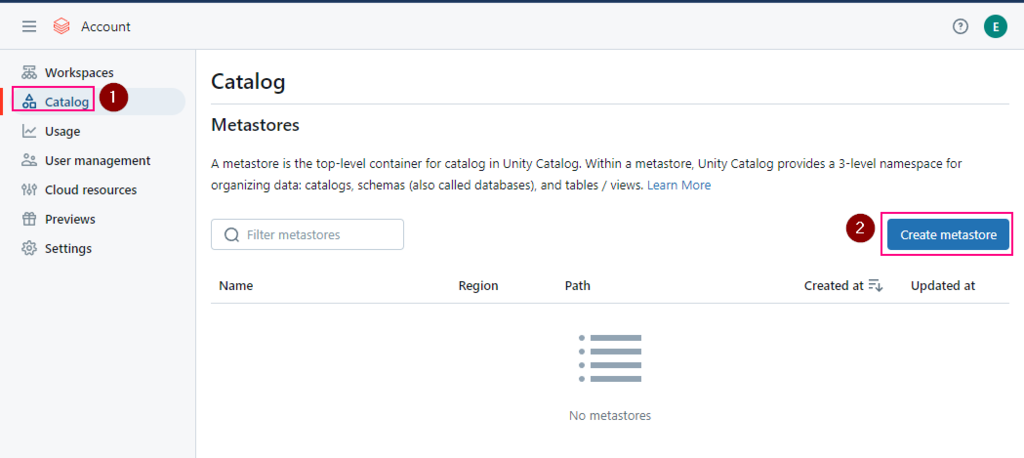
If you are an account admin, you can login accounts console, otherwise, ask your account admin to help.

before you begin to create a metastore, make sure

  • You must be an Azure Databricks account admin.
    The first Azure Databricks account admin must be a Microsoft Entra ID Global Administrator at the time that they first log in to the Azure Databricks account console. Upon first login, that user becomes an Azure Databricks account admin and no longer needs the Microsoft Entra ID Global Administrator role to access the Azure Databricks account. The first account admin can assign users in the Microsoft Entra ID tenant as additional account admins (who can themselves assign more account admins). Additional account admins do not require specific roles in Microsoft Entra ID.
  • The workspaces that you attach to the metastore must be on the Azure Databricks Premium plan.
  • If you want to set up metastore-level root storage, you must have permission to create the following in your Azure tenant

Login to azure databricks console 

azure databricks console: https://accounts.azuredatabricks.net/

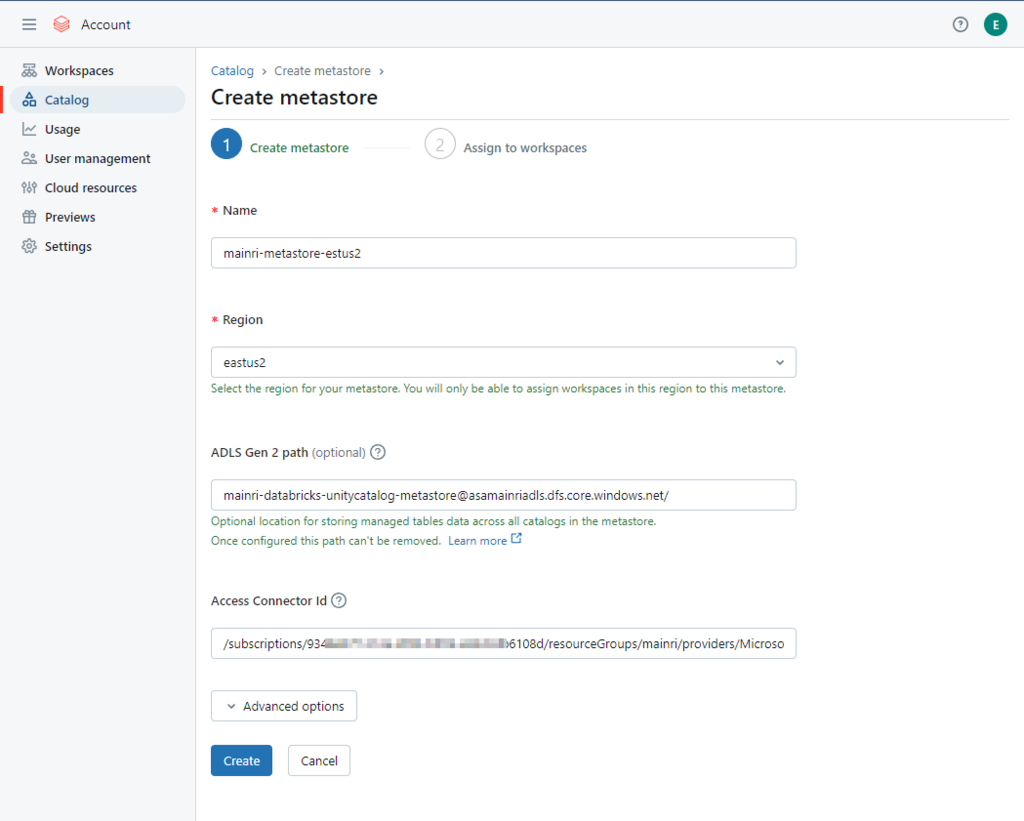
Azure Databricks account console > Catalog > Create metastore.

  • Select the same region for your metastore.
    You will only be able to assign workspaces in this region to this metastore.
  • Container name and path
    The pattern is:
    <contain_name>@<storage_account_name>.dfs.core.windows.net/<path>
    For this demo I used this
    mainri-databricks-unitycatalog-metastore-eastus2@asamainriadls.dfs.core.windows.net/
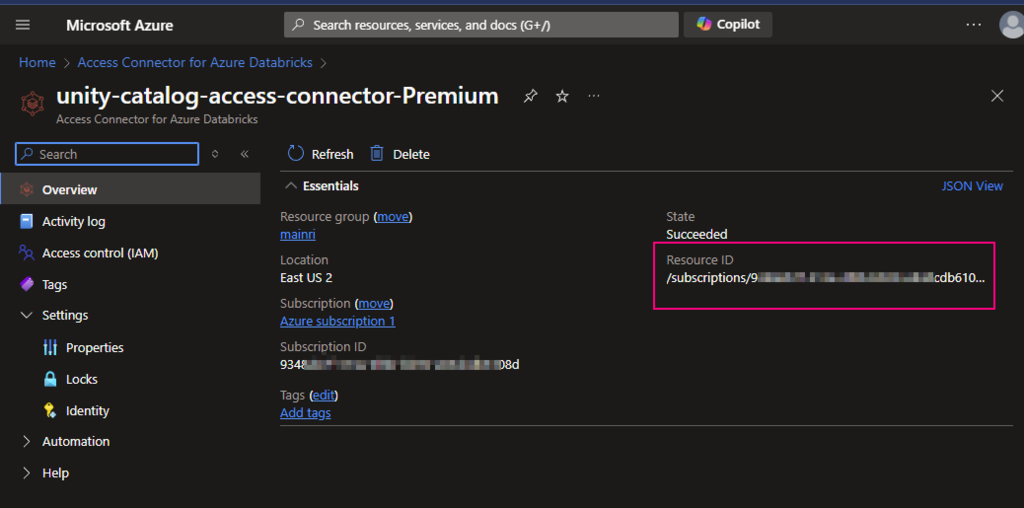
  • Access connector ID
    The pattern is:
    /subscriptions/{sub-id}/resourceGroups/{rg-name}/providers/Microsoft.databricks/accessconnects/<connector-name>

Find out the Access connector ID

Azure portal > Access Connector for Azure Databricks

For this demo I used this
/subscriptions/9348XXXXXXXXXXX6108d/resourceGroups/mainri/providers/Microsoft.Databricks/accessConnectors/unity-catalog-access-connector-Premiu

Looks like this

Enable Unity catalog

Assign to workspace

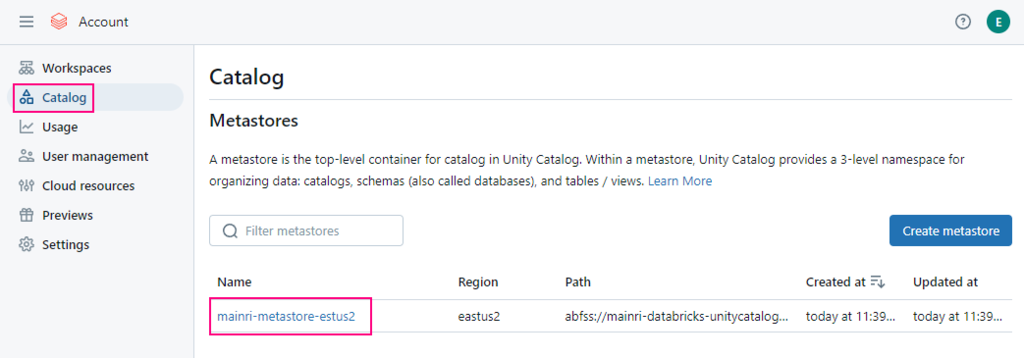
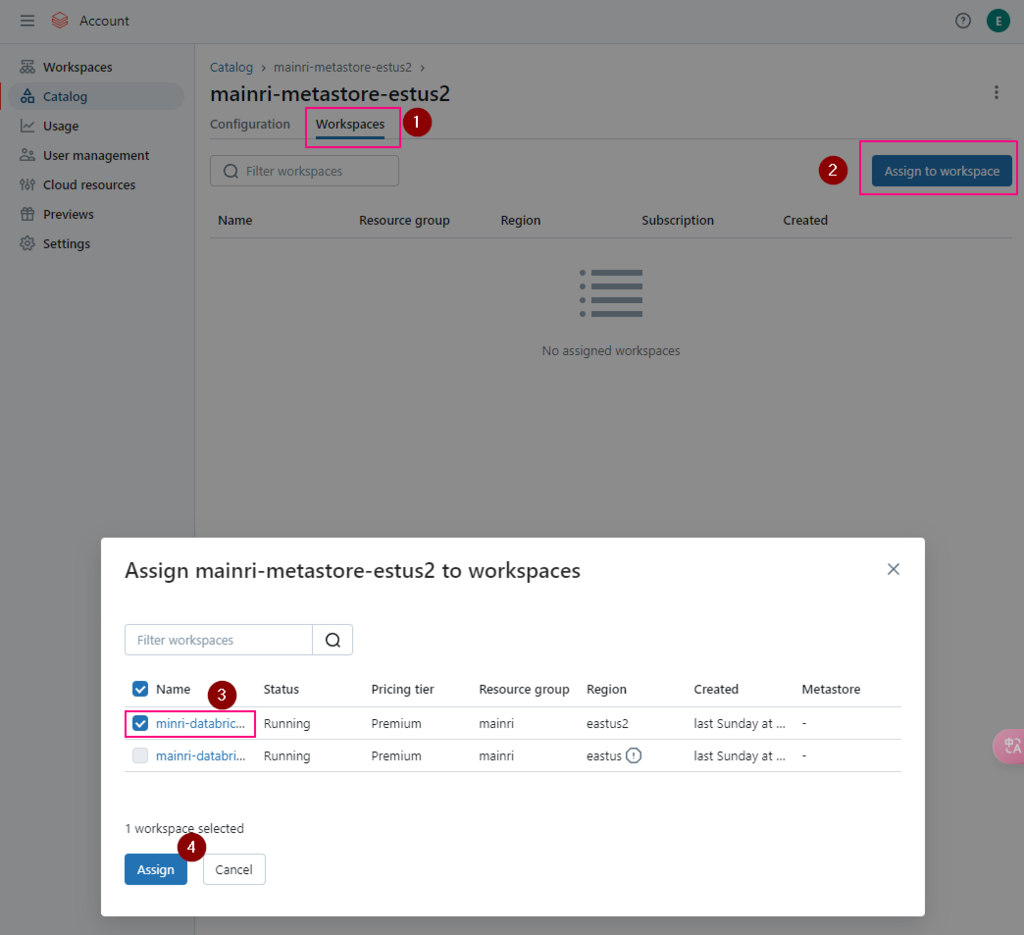
To enable an Azure Databricks workspace for Unity Catalog, you assign the workspace to a Unity Catalog metastore using the account console:

  1. As an account admin, log in to the account console.
  2. Click Catalog.
  3. Click the metastore name.
  4. Click the Workspaces tab.
  5. Click Assign to workspace.
  6. Select one or more workspaces. You can type part of the workspace name to filter the list.
  7. Scroll to the bottom of the dialog, and click Assign.
  8. On the confirmation dialog, click Enable.

Account console > Catalog > select the metastore >

Workspace tag > Assign to workspace

click assign

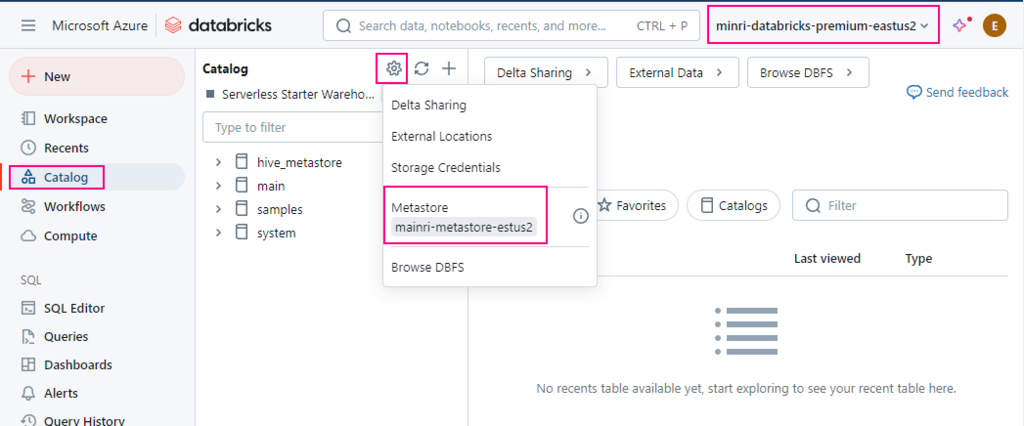
Validation the unity catalog enabled

Open workspace, we can see the metastore has been assigned to workspace.

Now, we have successfully created metastore and enabled unity catalog.

Please do not hesitate to contact me if you have any questions at William . chen @ mainri.ca

(remove all space from the email account 😊)

Day 9: Managed attributes in Data Map

With “Managed Attributes” we can add own attributes (groups of attributes) and provide data stewards with the functionality to improve the content of data catalog.

  • create a new attribute group
  • create a new attribute
  • learn more about the available field types
  • assign and manage attributes for your data assets

Create a new attribute group

Create attribute group if there is no attribute group

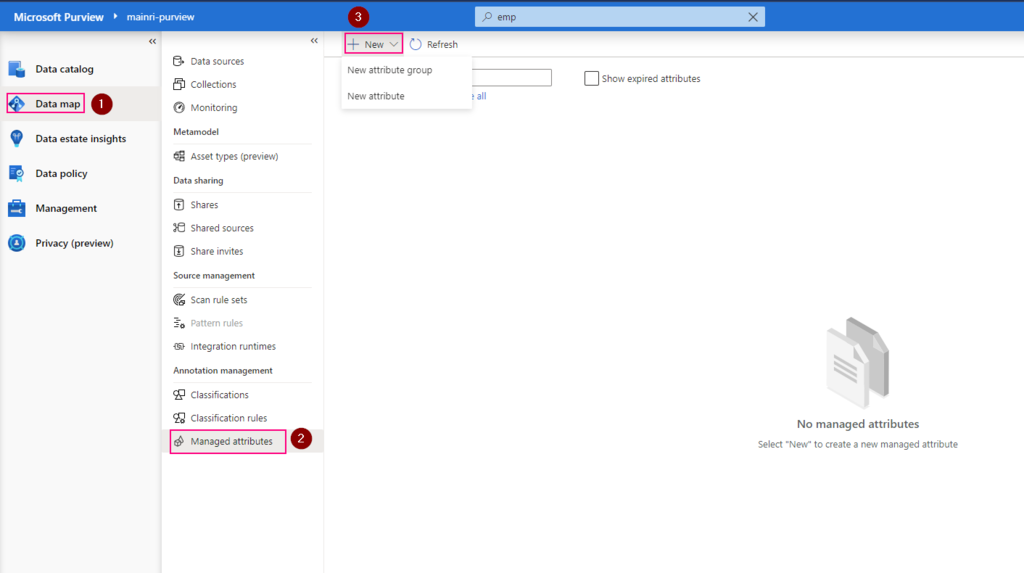
Purview studio > Data Map > Managed attributes > New attribute group

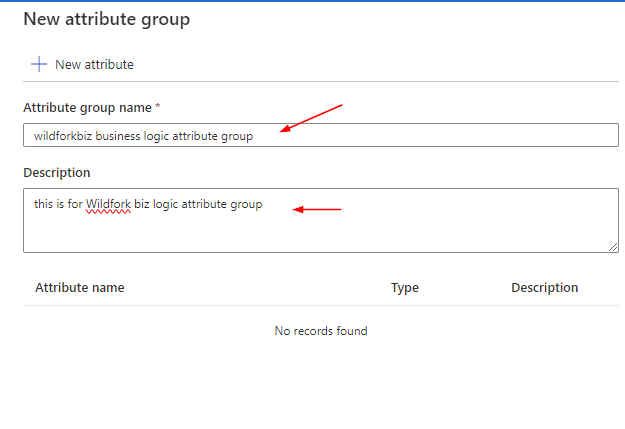
Fill in

Create a new attribute

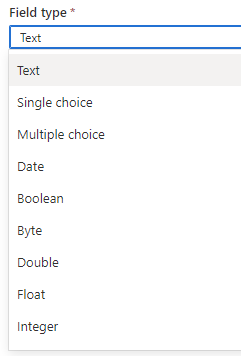
File in those fields
For field group: There are those can be selected

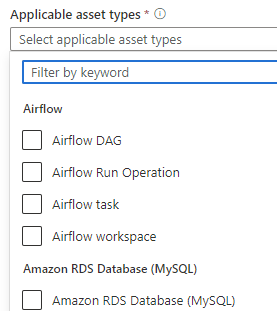
For applicable asset types, many options out of box to be used

Now, new attributes created

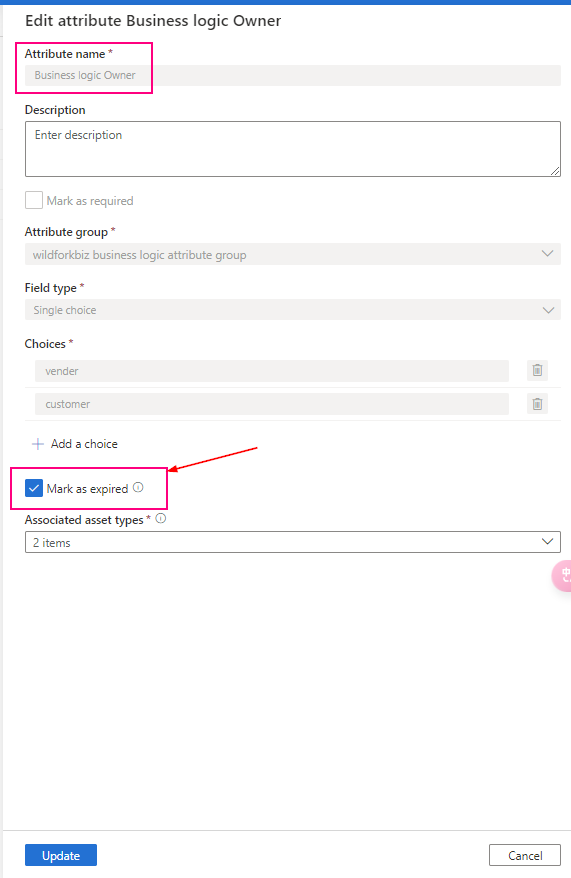
In the managed attribute management experience, managed attributes can’t be deleted, only expired. Expired attributes can’t be applied to any assets and are, by default, hidden in the user experience. Once an attribute created, it cannot change. Only mark them as “expired” and create a new, undated one.

Add value for managed attribute

Once a managed attribute has been created, you’ll need to add a value for each of your assets. You can add values to your assets by:

  1. Search for your data asset in the Microsoft Purview Data Catalog
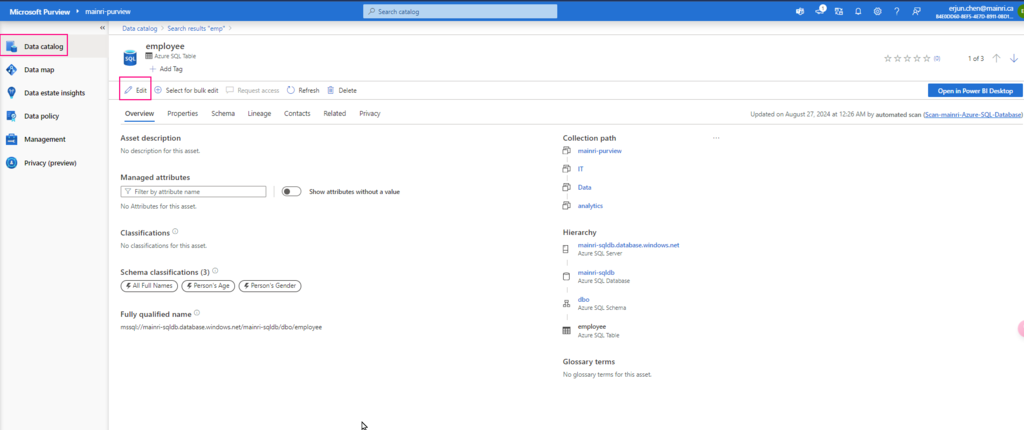
  2. On the overview for your asset, you should see the managed attributes section with all attributes that have values. (You can see attributes without values by using the Show attributes without a value toggle.)
  3. Select the Edit button.

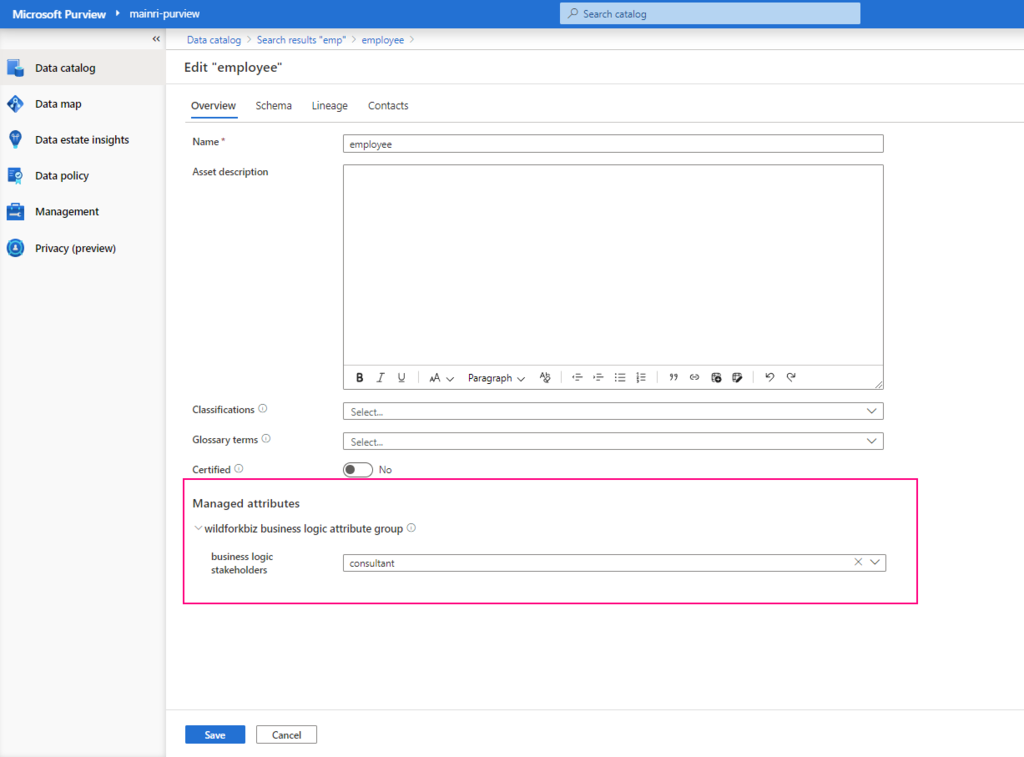
Under Managed attributes, add values for each of your attributes.

If any attributes are Required you will not be able to save until you’ve added a value for that attribute.

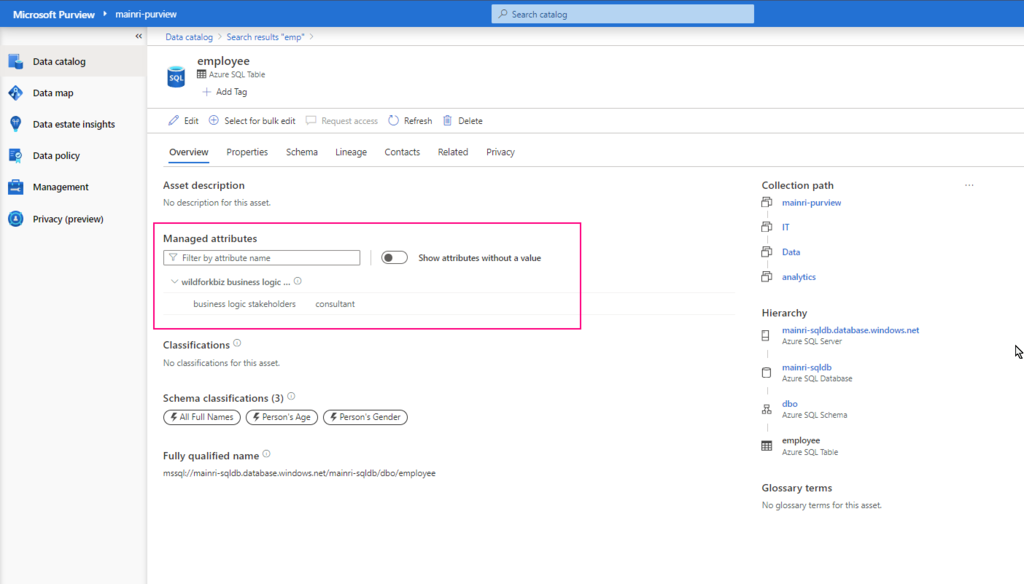
Now, managed attribute added

Summary

Managed attribute: A set of user-defined attributes that provide a business or organization level context to an asset. A managed attribute has a name and a value. For example, ‘Department’ is an attribute name and ‘Finance’ is its value. Attribute group: A grouping of managed attributes that allow for easier organization and consumption.

Please do not hesitate to contact me if you have any questions at William . chen @ mainri.ca

(remove all space from the email account 😊)

Next step: Day 10 – Collections access control and management

Day 8 – Data Lineage, Extract SQL, ADF and Synapse Pipeline Lineage

Microsoft Purview provides an overview of data lineage in the Data Catalog. It also details how data systems can integrate with the catalog to capture lineage of data.

Lineage is represented visually to show data moving from source to destination including how the data was transformed. Given the complexity of most enterprise data environments.

Microsoft Purview supports lineage for views and stored procedures from Azure SQL Database. While lineage for views is supported as part of scanning, you will need to turn on the Lineage extraction toggle to extract stored procedure lineage when you’re setting up a scan.

Lineage collection

Metadata collected in Microsoft Purview from enterprise data systems are stitched across to show an end to end data lineage. Data systems that collect lineage into Microsoft Purview are broadly categorized into following three types:

  • Data processing systems
  • Data storage systems
  • Data analytics and reporting systems

Each system supports a different level of lineage scope.  

Data estate might include systems doing data extraction, transformation (ETL/ELT systems), analytics, and visualization systems. Each of the systems captures rich static and operational metadata that describes the state and quality of the data within the systems boundary. The goal of lineage in a data catalog is to extract the movement, transformation, and operational metadata from each data system at the lowest grain possible.

The following example is a typical use case of data moving across multiple systems, where the Data Catalog would connect to each of the systems for lineage.

  • Data Factory copies data from on-prem/raw zone to a landing zone in the cloud.
  • Data processing systems like Synapse, Databricks would process and transform data from landing zone to Curated zone using notebooks.
  • Further processing of data into analytical models for optimal query performance and aggregation.
  • Data visualization systems will consume the datasets and process through their meta model to create a BI Dashboard, ML experiments and so on.

Lineage for SQL DB views

Starting 6/30/24, SQL DB metadata scan will include lineage extraction for views. Only new scans will include the view lineage extraction. Lineage is extracted at all scan levels (L1/L2/L3). In case of an incremental scan, whatever metadata is scanned as part of incremental scan, the corresponding static lineage for tables/views will be extracted.

Prerequisites for setting up a scan with Stored Procedure lineage extraction

<Purview-Account> can access SQL Database and in db_owner group

To check whether the Account Exists in the Database


SELECT name, type_desc
FROM sys.database_principals
WHERE name = 'YourUserName';

Replace ‘YourUserName’ with the actual username you’re checking for.

If the user exists, it will return the name and type (e.g., SQL_USER or WINDOWS_USER).

If it does not exist, create one.

Sign in to Azure SQL Database with your Microsoft Entra account, create a <Purview-account> account and assign db_owner permissions to the Microsoft Purview managed identity.

You can review my previous article Configuring Azure Entra ID Authentication in Azure SQL Database If you are not sure how to enable Azure Entra ID login.


Create user <purview-account> FROM EXTERNAL PROVIDER
GO
EXEC sp_addrolemember 'db_owner', <purview-account> 
GO

replace <purview-account> with the actual purview account name.

Master Key

Check whether master exists or not.

To check if the Database Master Key (DMK) exists or not


SELECT * FROM sys.symmetric_keys
WHERE name = '##MS_DatabaseMasterKey##';Create master key
Go

if the query returns a result, it means the Database Master Key already exists.

If no rows are returned, it means the Database Master Key does not exist, and you may need to create one if required for encryption-related operations.

Create a master key


Create master key
Go

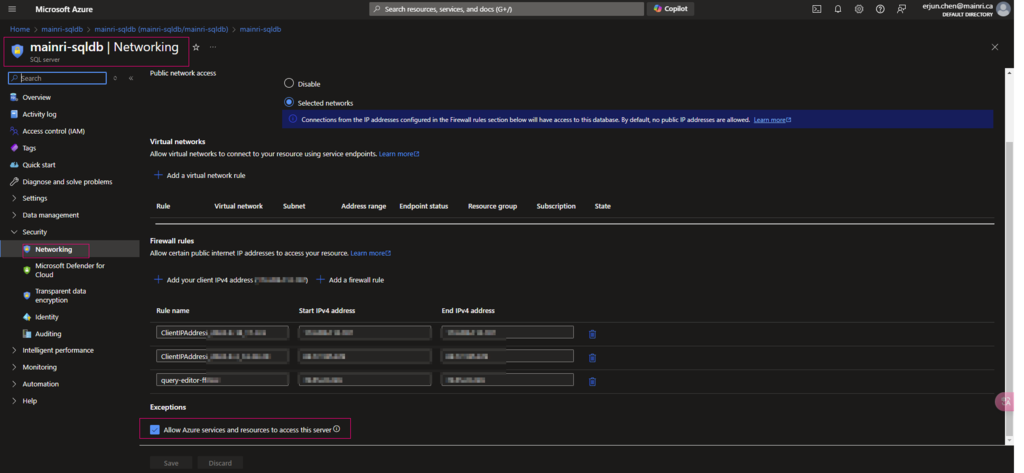
Allow Azure services and resources to access this server 

Ensure that Allow Azure services and resources to access this server is enabled under networking/firewall for your Azure SQL resource.

Previously, we have discussed create a scan for Azure SQL Database at Registering Azure SQL Database and Scan in Purview, that scan progress is disabled “Lineage extraction” in that article.

To allow purview extract lineage, we need set to on

Extract Azure Data Factory/Synapse pipeline lineage

When we connect an Azure Data Factory to Microsoft Purview, whenever a supported Azure Data Factory activity is run, metadata about the activity’s source data, output data, and the activity will be automatically ingested into the Microsoft Purview Data Map.

Microsoft Purview captures runtime lineage from the following Azure Data Factory activities:

  • Copy Data
  • Data Flow
  • Execute SSIS Package

If a data source has already been scanned and exists in the data map, the ingestion process will add the lineage information from Azure Data Factory to that existing source. If the source or output doesn’t exist in the data map and is supported by Azure Data Factory lineage Microsoft Purview will automatically add their metadata from Azure Data Factory into the data map under the root collection.

This can be an excellent way to monitor your data estate as users move and transform information using Azure Data Factory.

Connect to Microsoft Purview account in Data Factory

Set up authentication

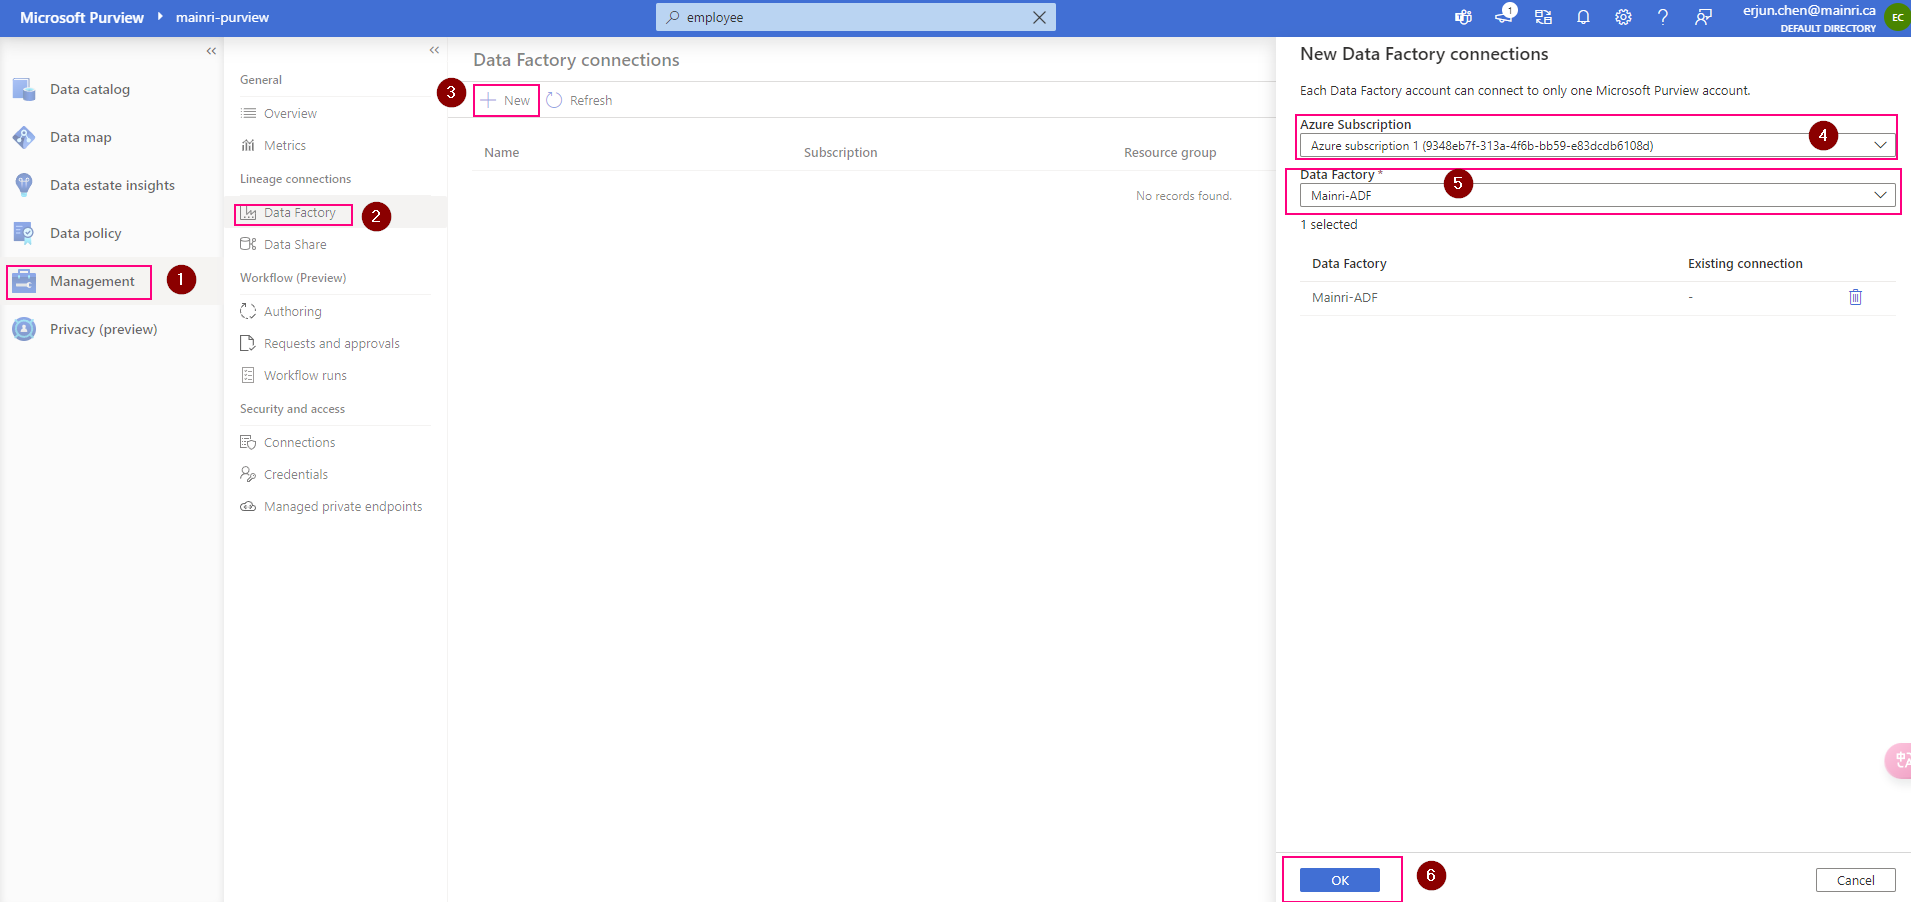
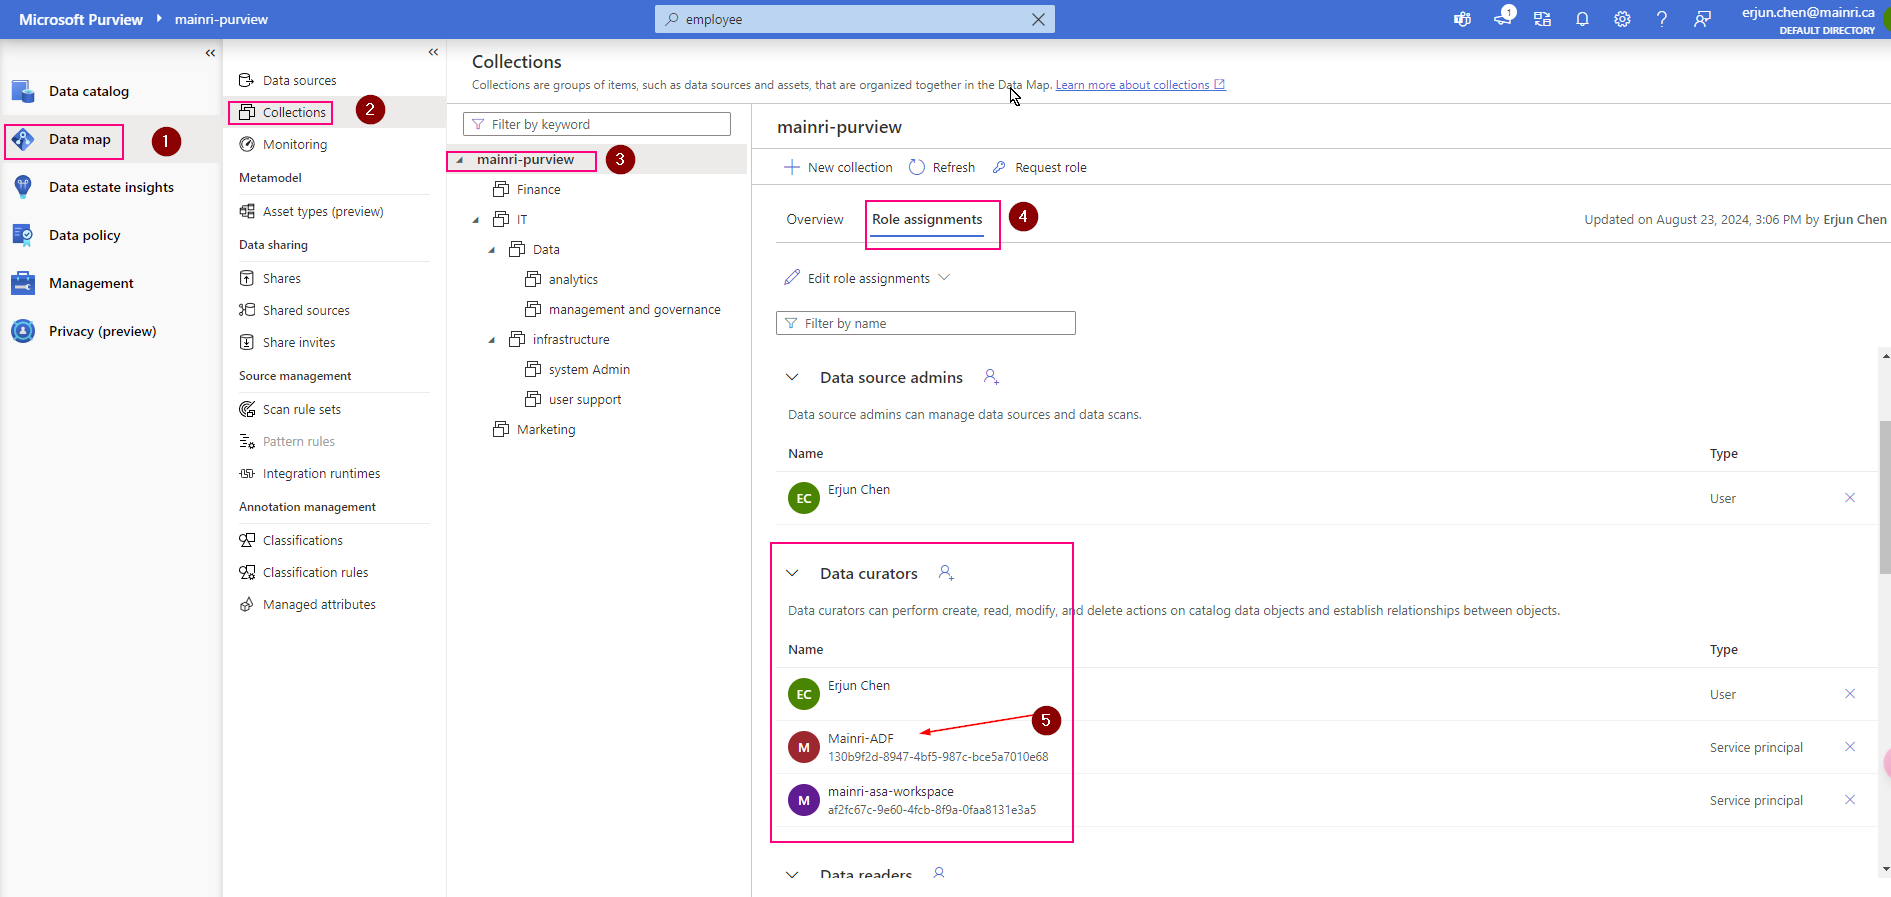
Data factory’s managed identity is used to authenticate lineage push operations from data factory to Microsoft Purview. Grant the data factory’s managed identity Data Curator role on Microsoft Purview root collection.

Purview > Management > Lineage connections > Data Factory > new

Validation: Purview > Data map > Collection > Root collection > Role assignments >

Check, the ADF is under “data Curators” section. That’s OK

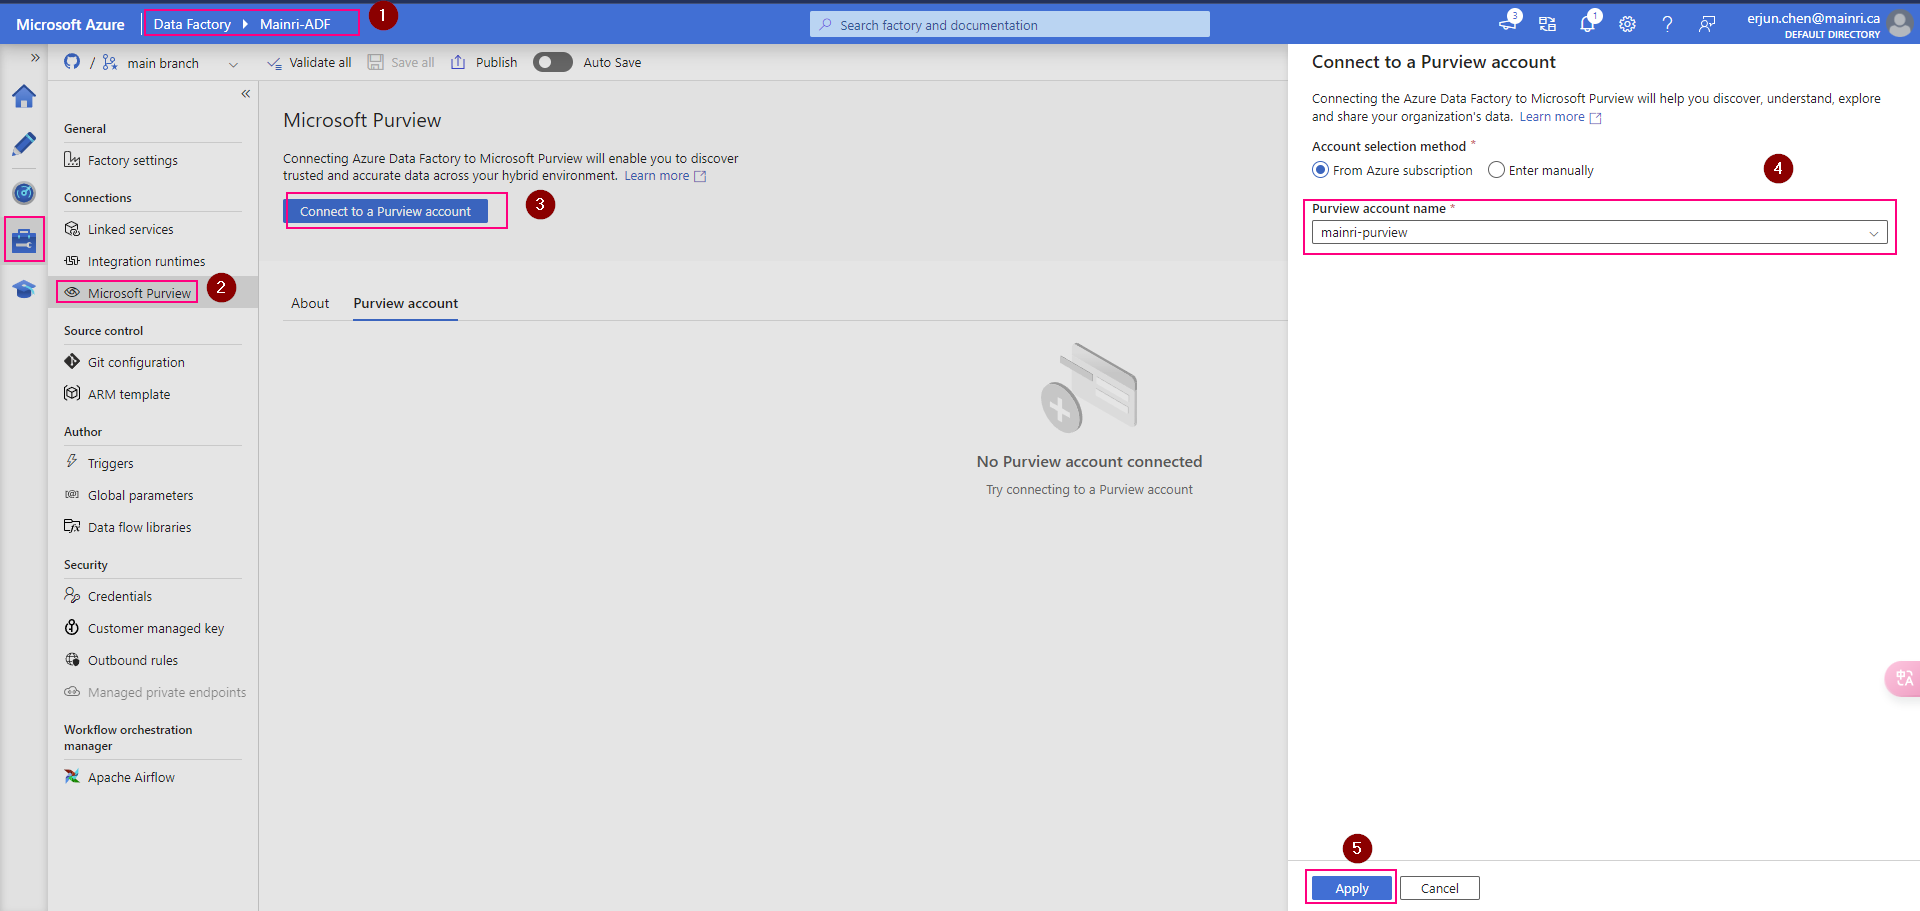
ADF connect to purview

In the ADF studio: Manage -> Microsoft Purview, and select Connect to a Microsoft Purview account

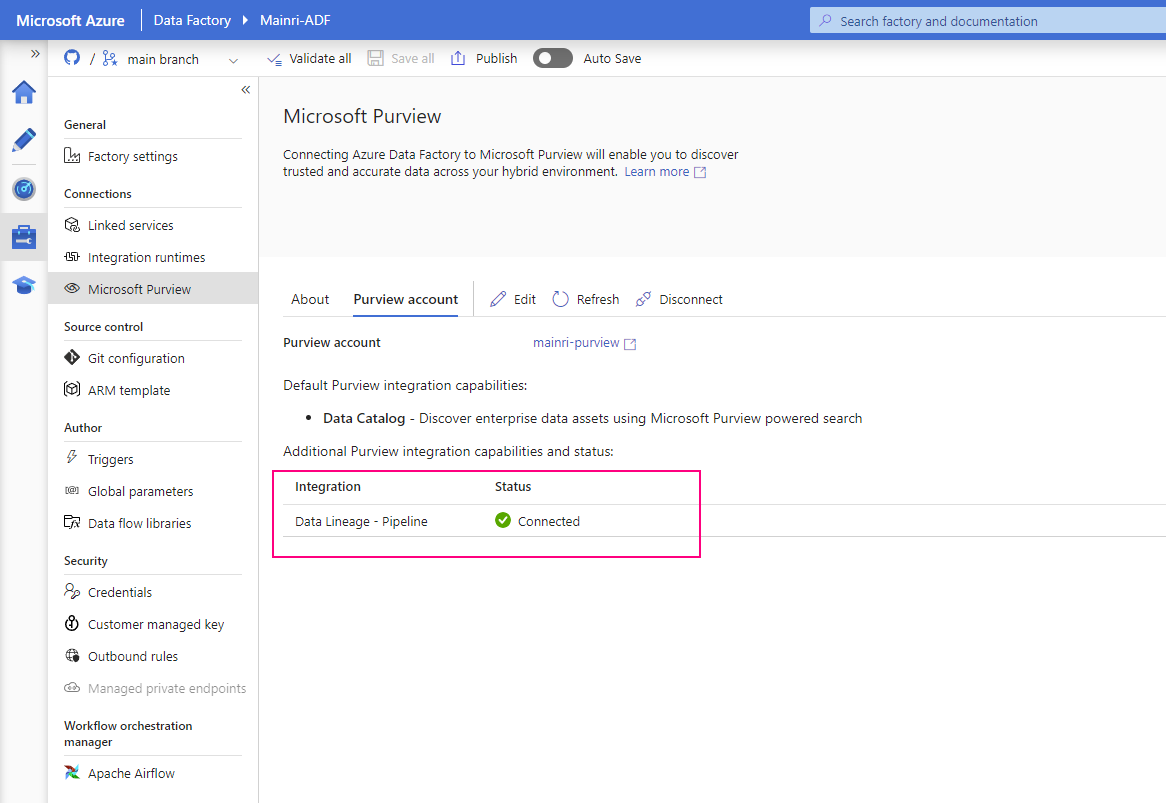
We will see this

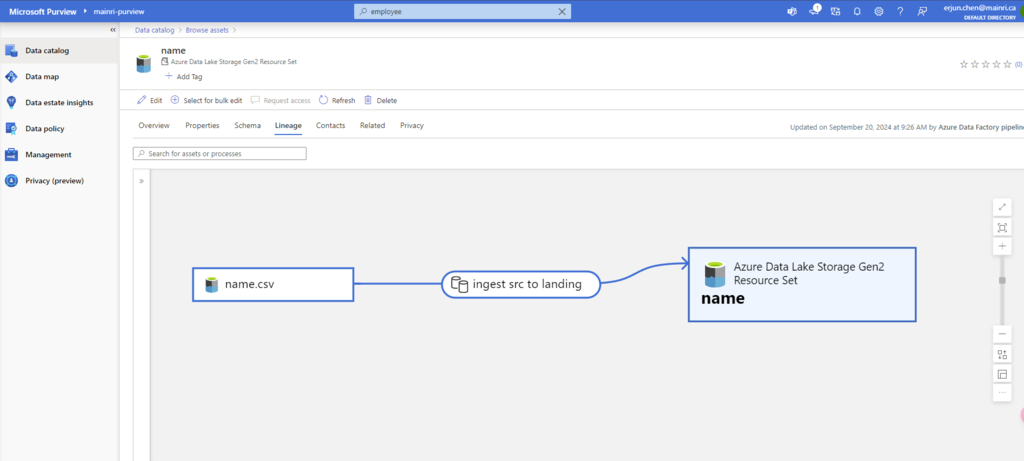
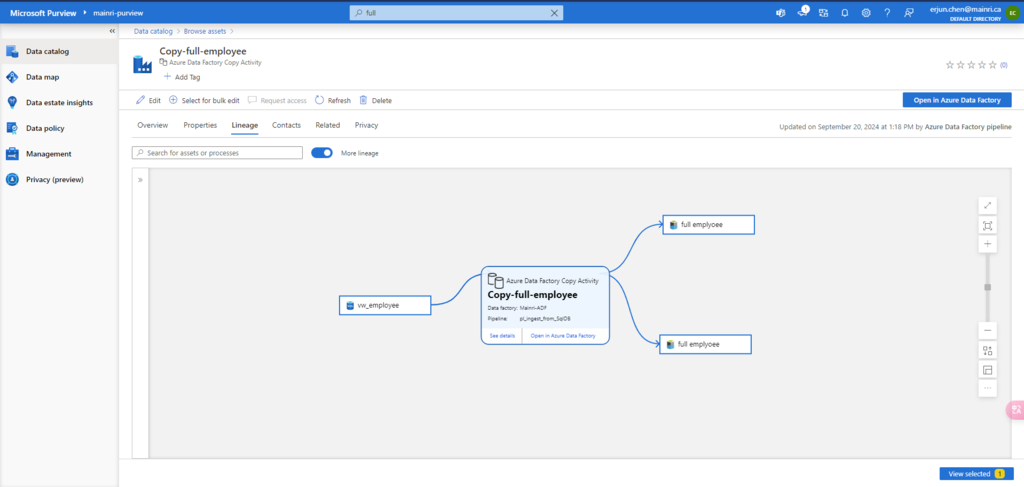
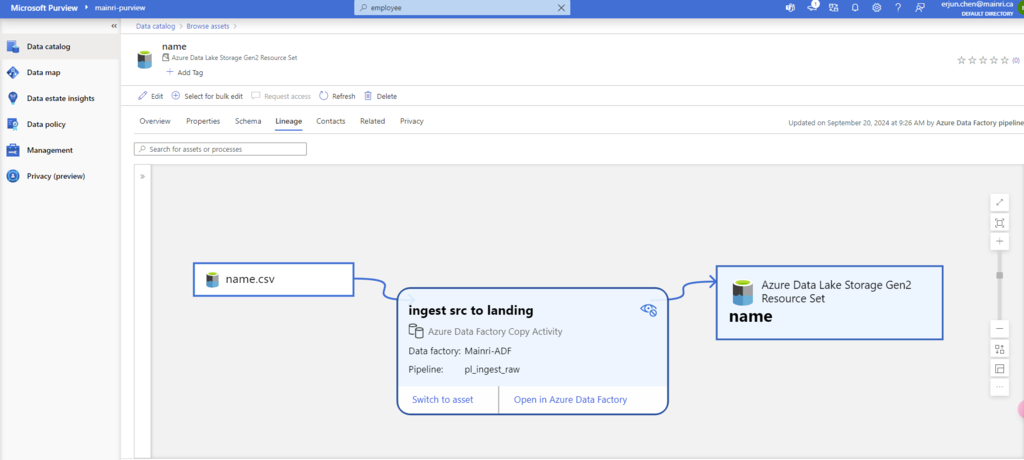
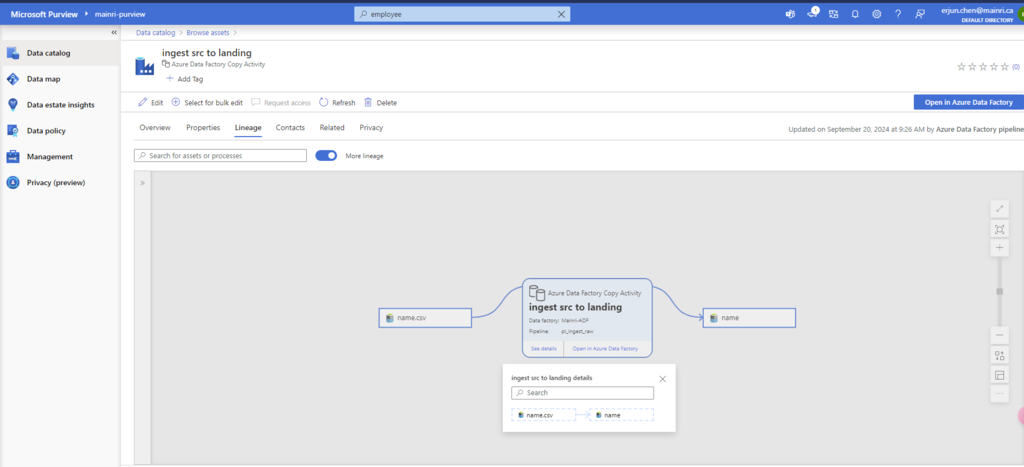
Once pipeline successfully runs, activity will be caught, extracted lineage look this.

that’s all for extracting ADF pipeline lineage.

Next step: Day 9 – Managed attributes in Data Map

Please do not hesitate to contact me if you have any questions at William . chen @ mainri.ca

(remove all space from the email account 😊)

Day 7: Permission and Roles, Business Glossary and Collections Access Control in Purview

Role and roles and responsibilities in Purview

When working with a data catalog, different users and roles are involved. The permission concept in an Azure Purview data map is quite simple.

  • Permissions can be applied at collection level
  • Permission inheritance is possible (but can be restricted)
  • As of today, four roles (admins, data source admins, curators and readers) are available

The Microsoft Purview governance portal uses Collections in the Microsoft Purview Data Map to organize and manage access across its sources, assets, and other artifacts.

Collections

A collection is a tool that the Microsoft Purview Data Map uses to group assets, sources, and other artifacts into a hierarchy to manage access control. All accesses to the Microsoft Purview governance portal’s resources are managed from collections in the Microsoft Purview Data Map.

Role

The Microsoft Purview governance portal uses a set of predefined roles to control who can access what within the account.

These roles are currently:

  • Collection administrator 
  • Data curators
  • Data readers
  • Data source administrator
  • Insights reader
  • Policy author
  • Workflow administrator 

Detail definition please review Microsoft Purview official documentation.

Here is a summary of roles and responsibilities

Add or move Role assignments

Select the Role assignments tab to see all the roles in a collection. Only a collection admin can manage role assignments.

Type in the textbox to search for users you want to add to the role member. Select X to remove members you don’t want to add.

Restrict inheritance

Collection permissions are inherited automatically from the parent collection. For example, any permissions on the root collection (the collection at the top of the list that has the same name as your account), will be inherited by all collections below it. You can restrict inheritance from a parent collection at any time, using the restrict inherited permissions option.

After restriction, inherited members are removed from the roles expect for collection admin.

Select the Restrict inherited permissions toggle button again to revert.

Business Glossary

glossary provides vocabulary for business users. It consists of business terms that can be related to each other and allow them to be categorized so that they can be understood in different contexts. 

business glossary is a collection of terms. Each term represents an object in an organization and it’s highly likely that there are multiple terms representing the same object.

There are some out of box templates that have predefined.

Add new glossary

Purview studio > Data Catalog > Glossary > new Glossary

Fill in all properties.

Next step: Day 8 – Data Lineage – Extract SQL, ADF and Synapse Pipeline Lineage

Please do not hesitate to contact me if you have any questions at William . chen @ mainri.ca

(remove all space from the email account 😊)

Day 6: Registering Azure Synapse Analytics workspaces and scan in Microsoft Purview

Previously, we’ve talked about how Purview connect to ADLS and SQL Database, scan in Purview. Today, we focused on Azure Synapse Analytics with Purview.

A comprehensive data analytics solution can include many folders and files in a data lake, and multiple databases that each contain many tables, each with multiple fields. For a data analyst, finding and understanding the data assets associated with a Synapse Analytics workspace can present a significant challenge before any analysis or reporting can even begin.

As we know the Azure Synapse Analytics is a platform for cloud-scale analytics workloads that process data in multiple sources; including:

  • Relational databases in serverless and dedicated SQL pools
  • Files in Azure Data Lake Storage Gen2

Microsoft Purview can help in this scenario by cataloging the data assets in a data map, and enabling data stewards to add metadata, categorization, subject matter contact details, and other information that helps data analysts identify and understand data.

Before you scan Synapse workspace, you need Azure Synapse Analytics connects Purview account.

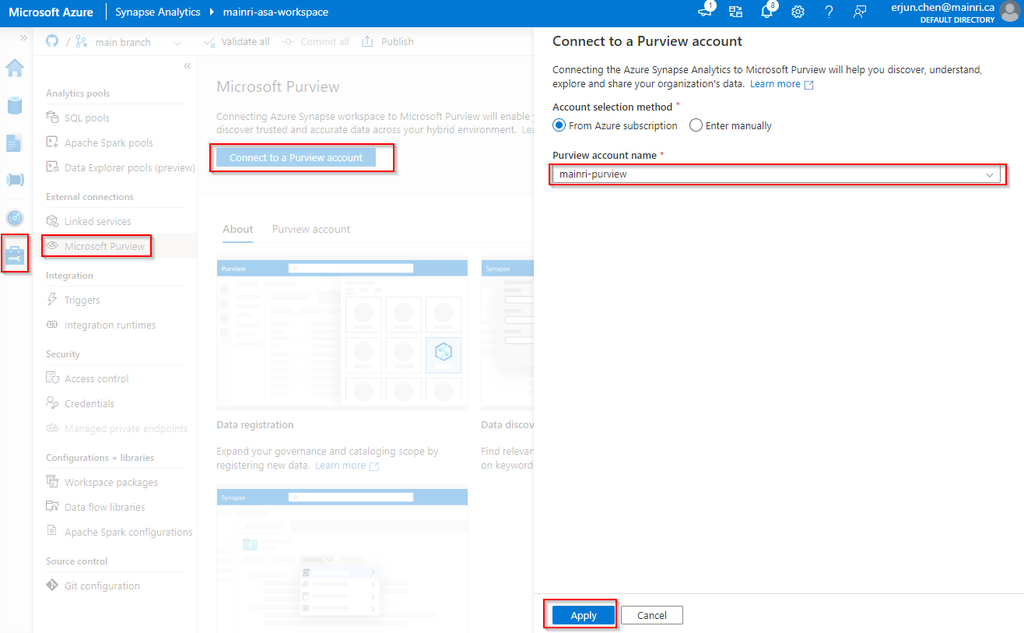
Azure Synapse Analytics connects to Purview account.

Synapse Studio > Manage > External connection > Microsoft Purview

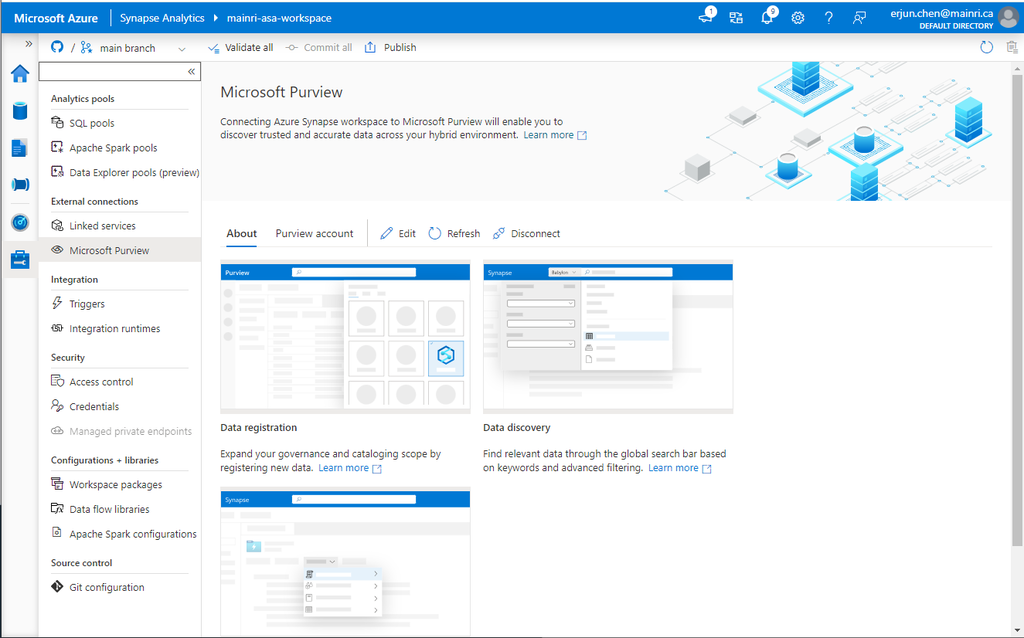
after you click “apply” you will see:

Select “Purview account” tag

Successfully connected with Purview.

To validation, we check what we have in ADLS and SQL Database.

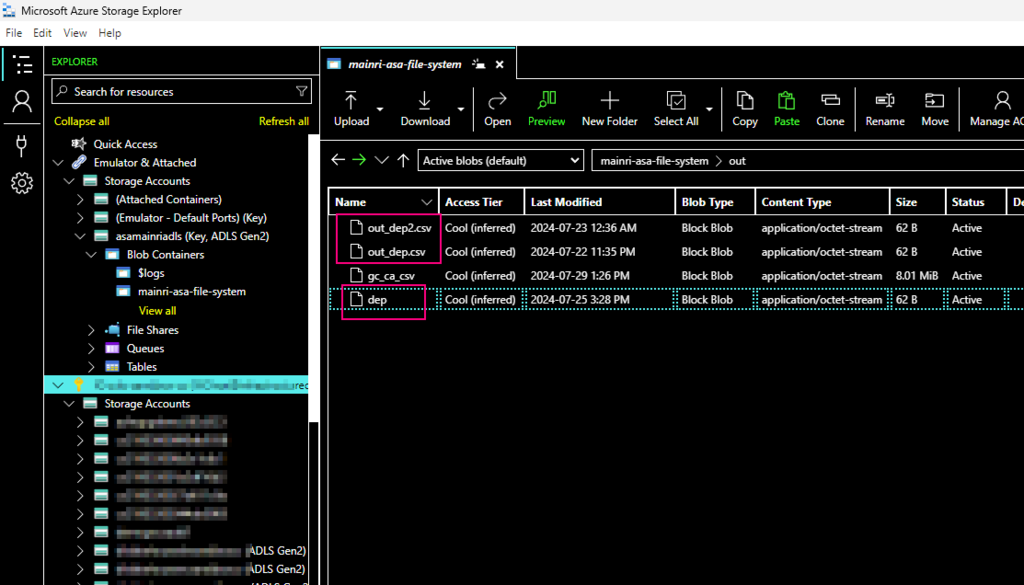
We have in ADLS and Azure SQL Database. There are one table called “dep” in the SQL Database, 3 files in the ADLS.

There is one table in SQL Database:

and there are 3 file related the key word “dep” in ADLS,

using Azure Storage Explore:

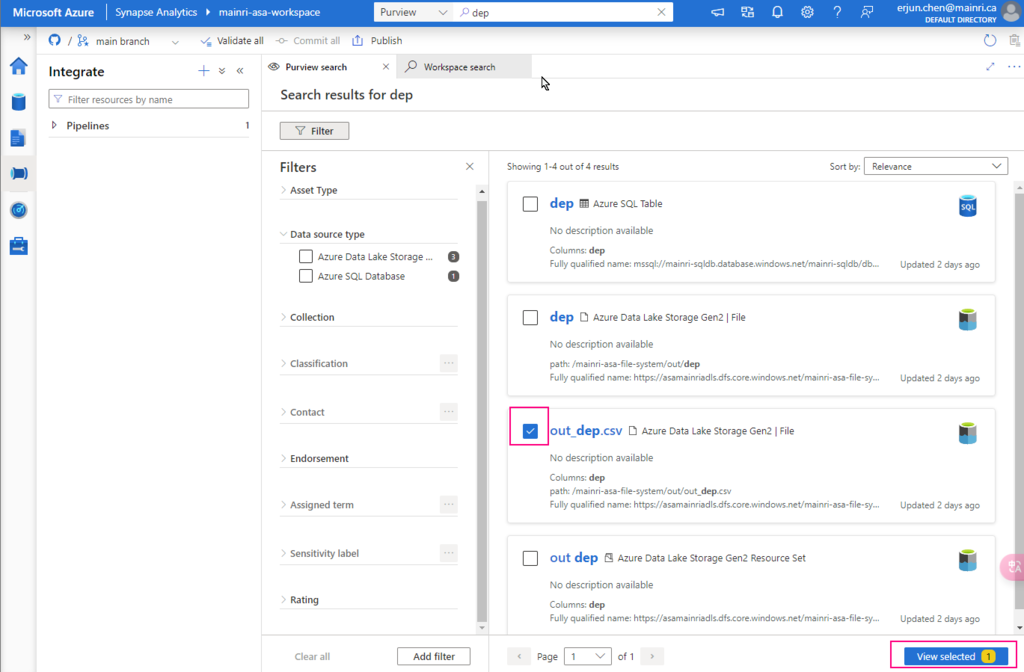
Let’s search “dep” the key from Synapse Studio.

Synapse Studio > from the dropdown > select “Purview” > type “dep”

We find out the objects related to the key words – “dep”

 A table in SQL Database, 3 files in ADLS.

Great, we successfully connected to Purview.

choose either of them to view in detail

There are so many powerful and interesting functions regarding the “Searching”, “discovering”, we will talk about them late.  

Now, let’s switch to Purview studio.

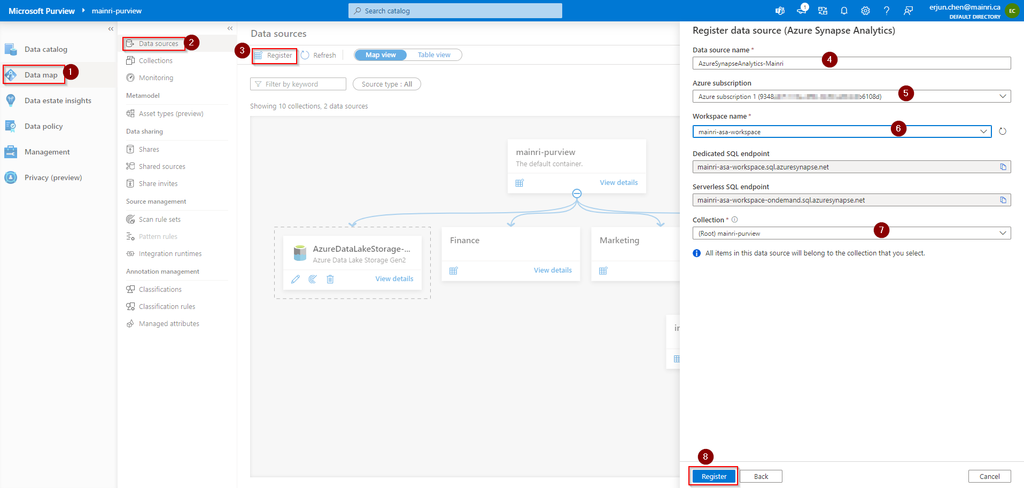
Register Synapse Analytics Workspace

Assuming you have created Collects, we directly jump into register Azure Synapse Analytics Workspace (ASA).

Purview Studio > Data Map > Data Source

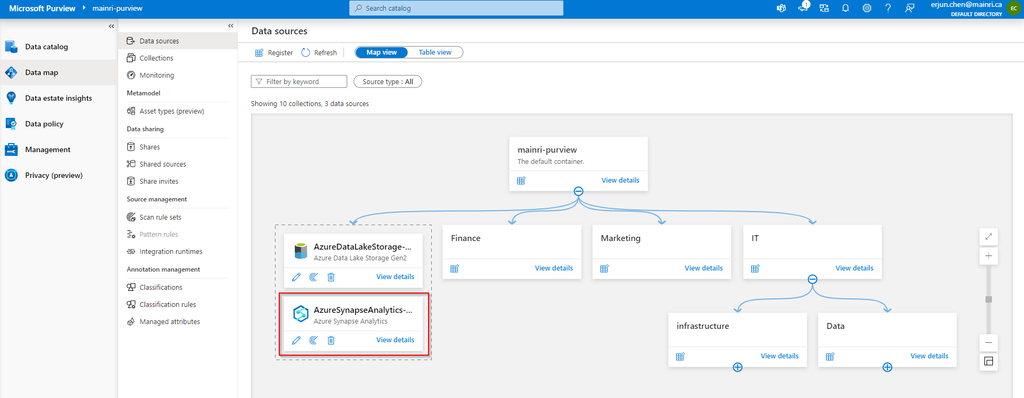
After filling in above values, click “register”, you will this

After registering the sources where your data assets are stored, you can scan each source to catalog the assets it contains. You can scan each source interactively, and you can schedule period scans to keep the data map up to date.

You may or may not see this error or alerts:

Read:

“Failed to load serverless databases from Synapse workspace, please give the managed identity of the Microsoft Purview account permissions or apply the correct credential to enumerate serverless databases.”

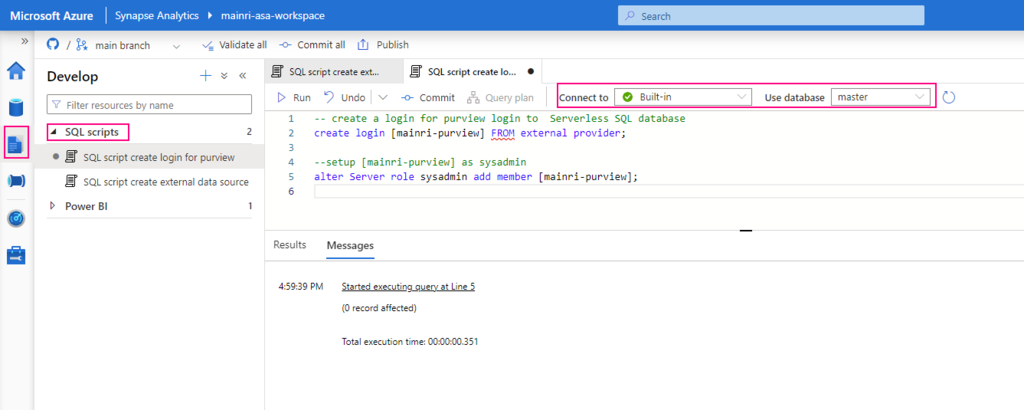
If you see it, you need create a login account for purview account to connect Serverless SQL:

Create Serverless SQL database login account for Purview

— create a login for purview login to  Serverless SQL database


create login [mainri-purview] from external provider;

Synapse Studio > Develop > SQL Script >
select: “connect to Built-in” and use database “master”

Grant purview login account Sysadmin privilege

Add managed identity to the storage account

Then, add managed identity to the storage account.

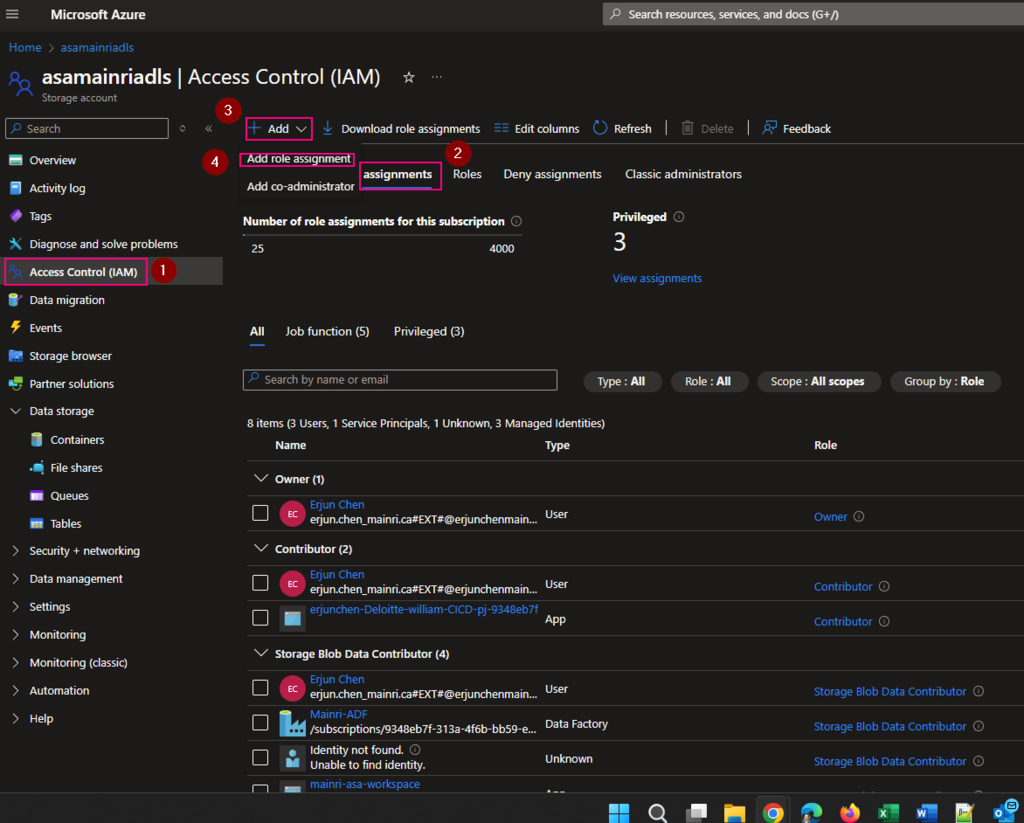
From Azure portal > storage account > Access Control (IAM)

Select Role assignments tag

Add role assignments

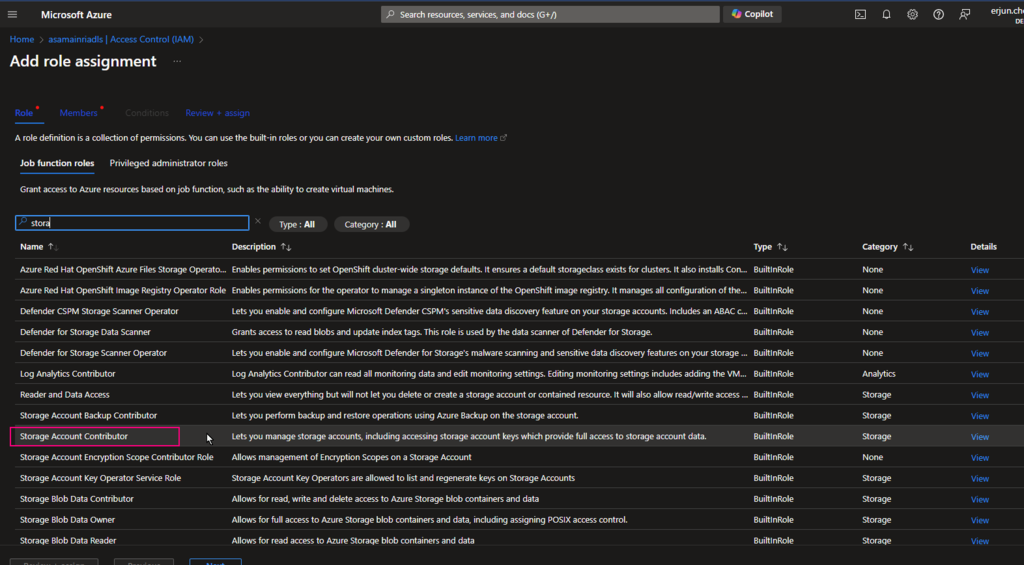
Give the “Storage Account Contributor” role

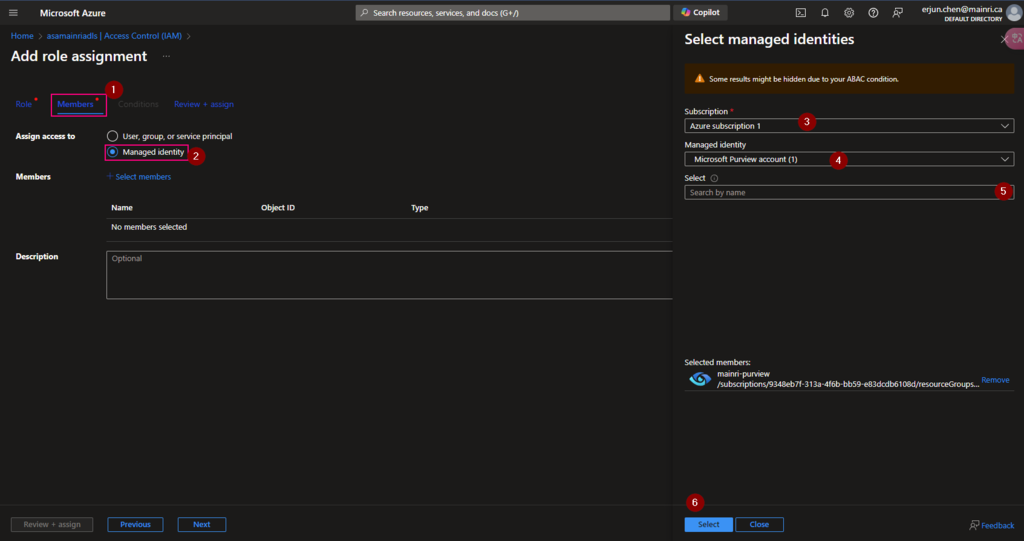
Then, select “Member” tag:

Select “Managed Identity”, fill in all properties, Find out the purview account

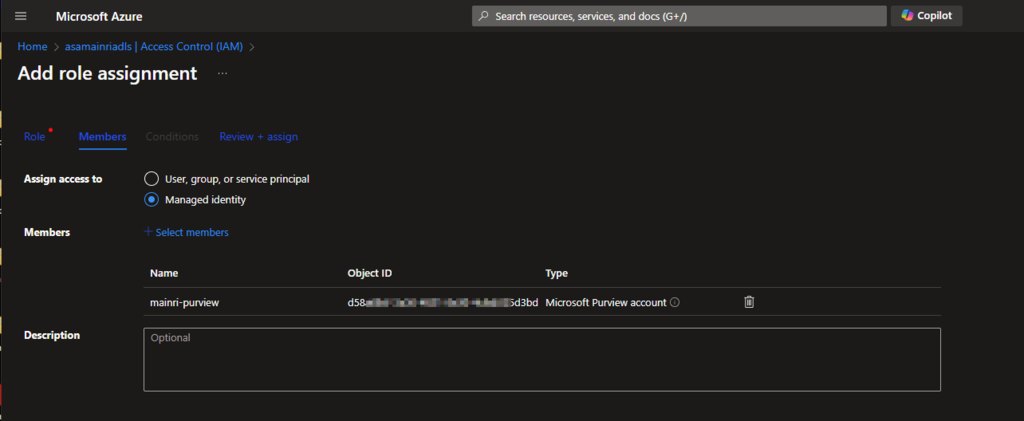
Now, the role assignments added.

If you have dedicated SQL pool, we need repeat these.

  • Create Serverless SQL database login account for Purview
  • Grant purview login account Sysadmin privilege

Let’s test the connection

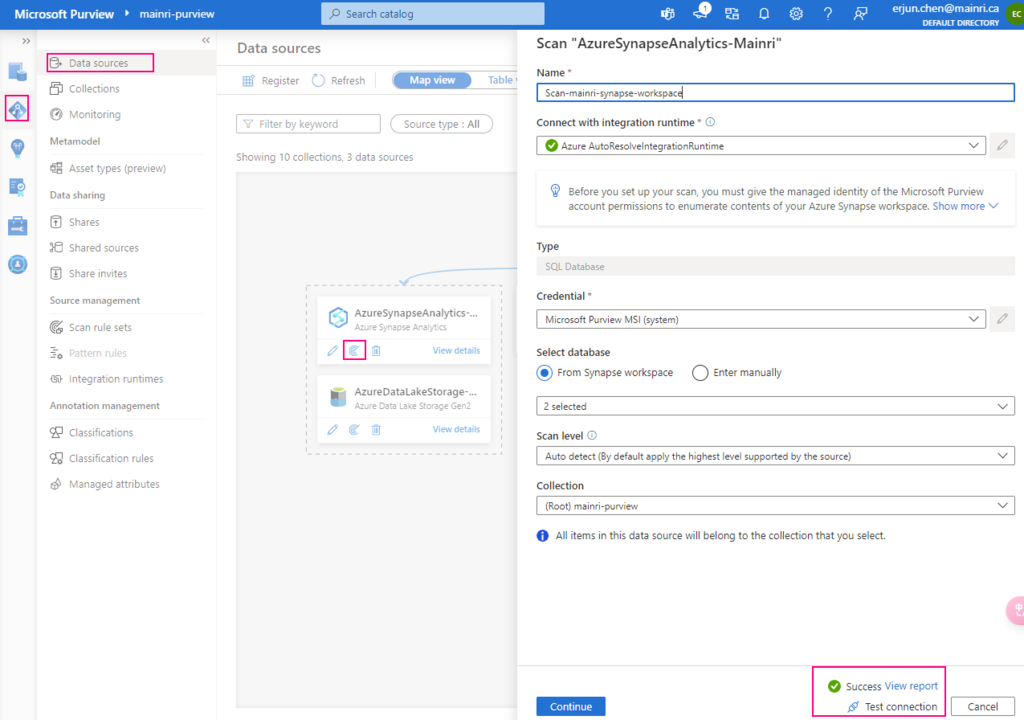
From Purview studio > scan

we got failed alert.

“Failed to validate the resource expansion. Either the expandable resource has no resources or the Purview account’s MSI has not been assigned to the ‘Reader’ role on it.”

Go back to Synapse portal

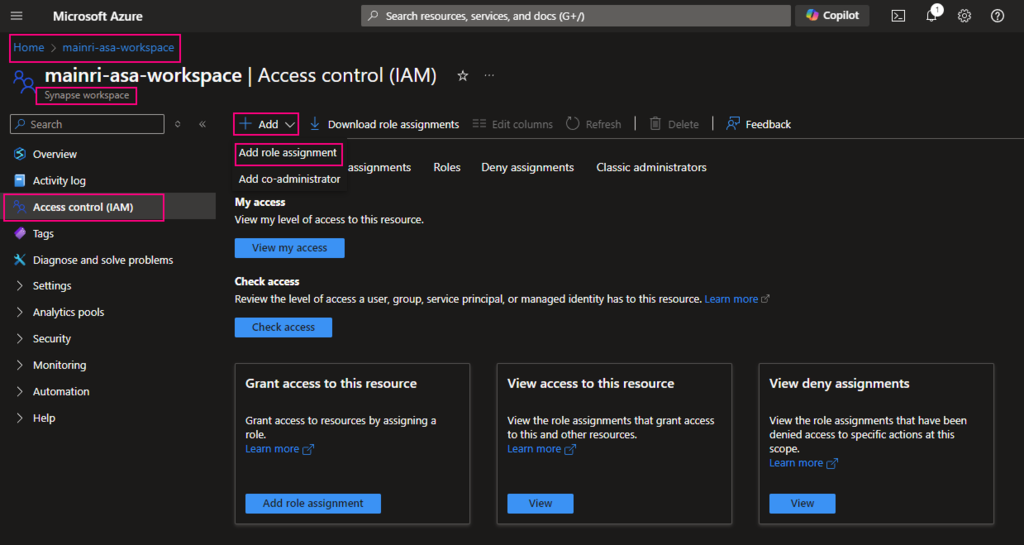
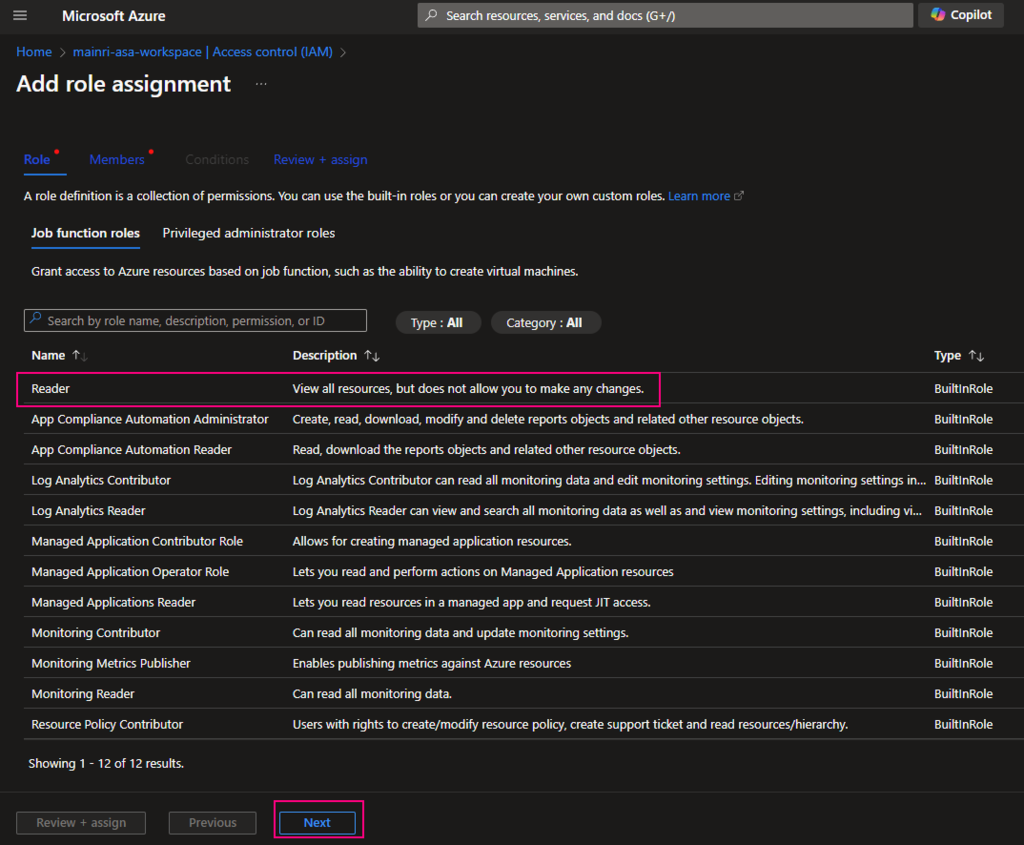
Azure Portal > Synapse workspace > Access control (IAM) > Add role assignments

add “read” role

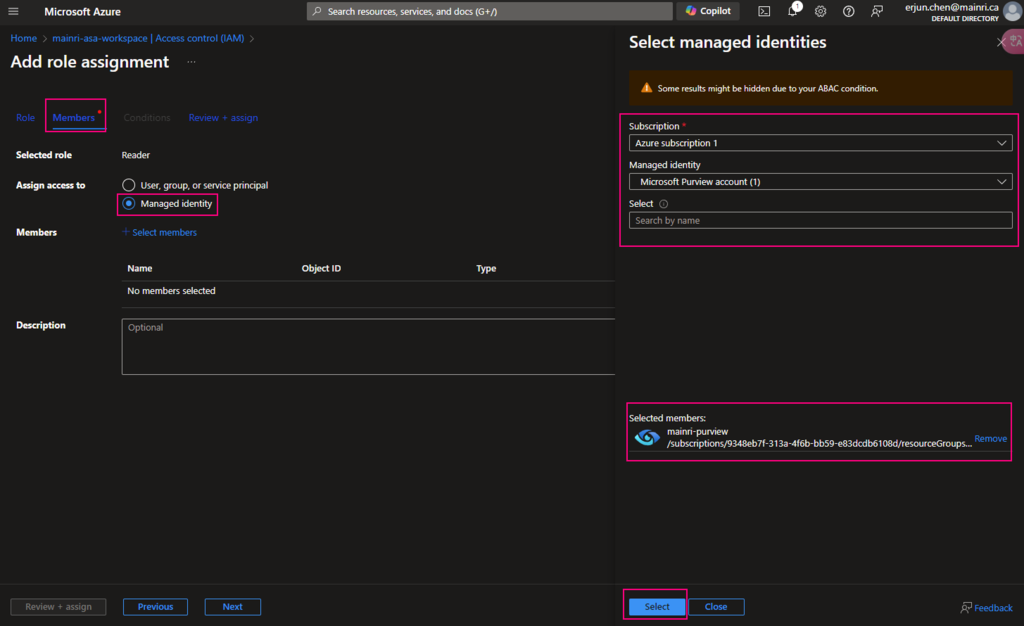
Add “managed Identity” member – Purview

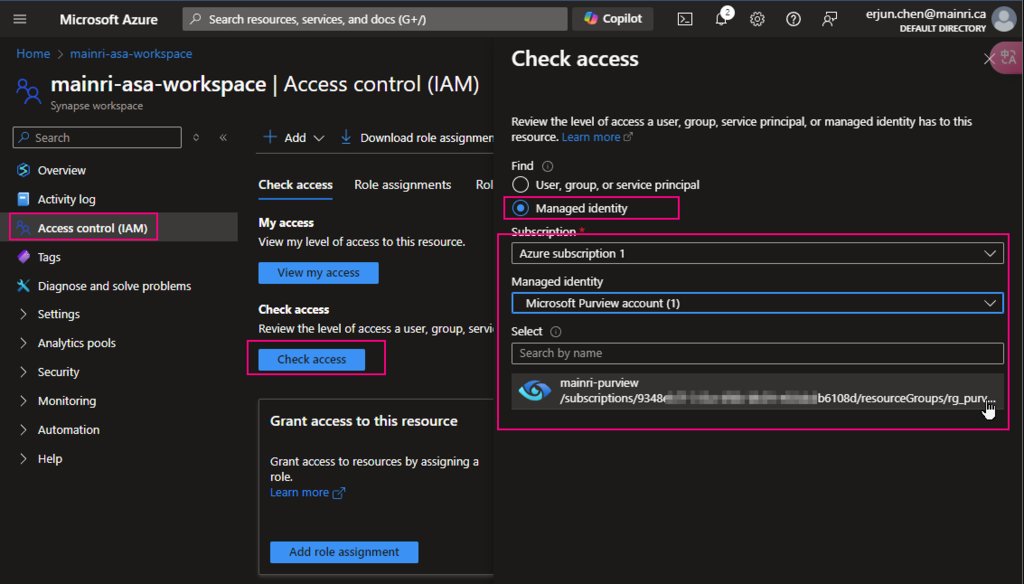
Check Purview access,

we can see Mainri-purview assignments – mainri-asa-workspace has “read” role (my Synapse workspace named “mainri-asa-workspace”)

Go to Purview Studio test connection again.

Great! We successful connect to Synapse workspace.

We have gotten access to SQL; we’ve got access to storage account. we have add “read” role assignment to Purview

Alright, we are ready to go – scan.

Scan Synapse workspace

After registering the sources where your data assets are stored, you can scan each source to catalog the assets it contains. You can scan each source interactively, and you can schedule period scans to keep the data map up to date.

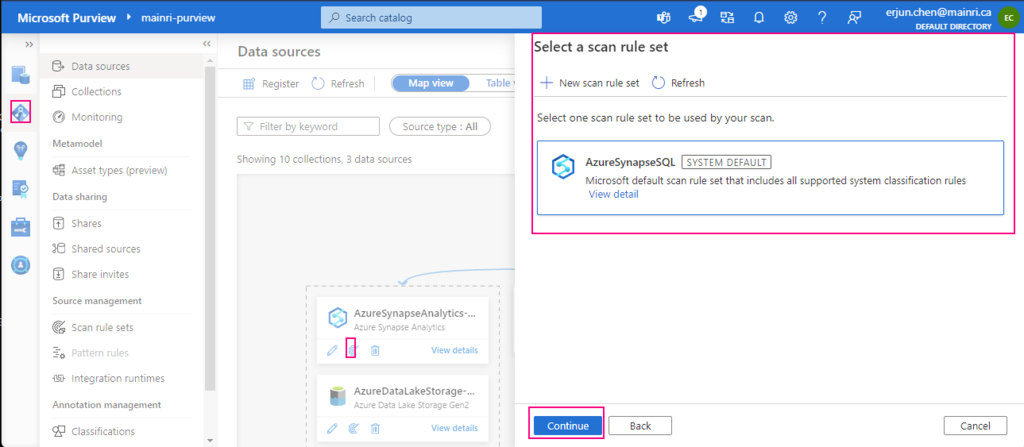
Select a scan rule set

If you like, you are able to add even more new scan rule set at this step.

For this demonstration, we select default scan rule set.

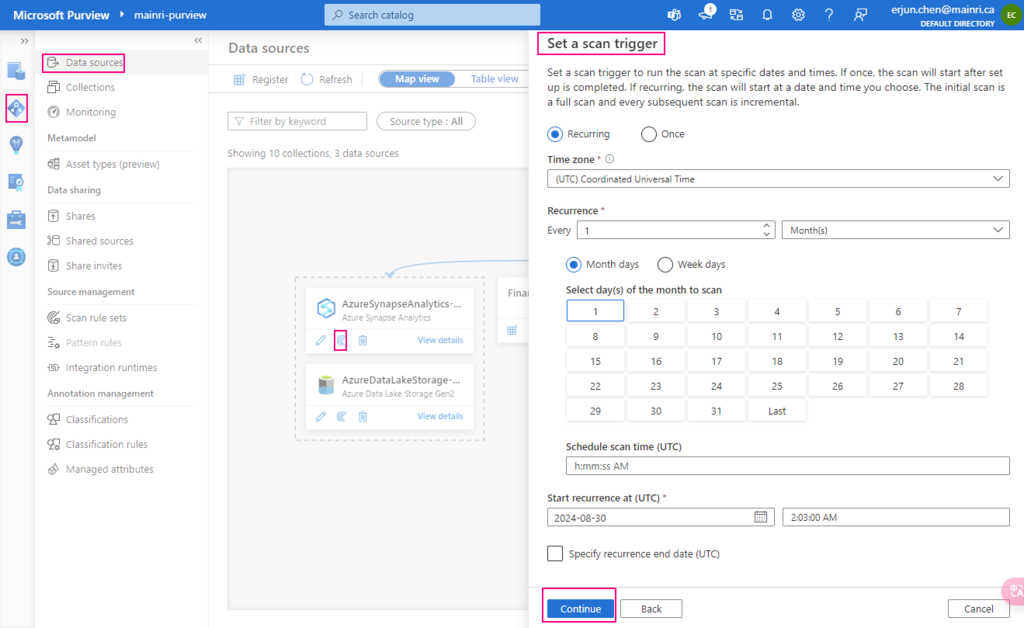
Set a scan trigger

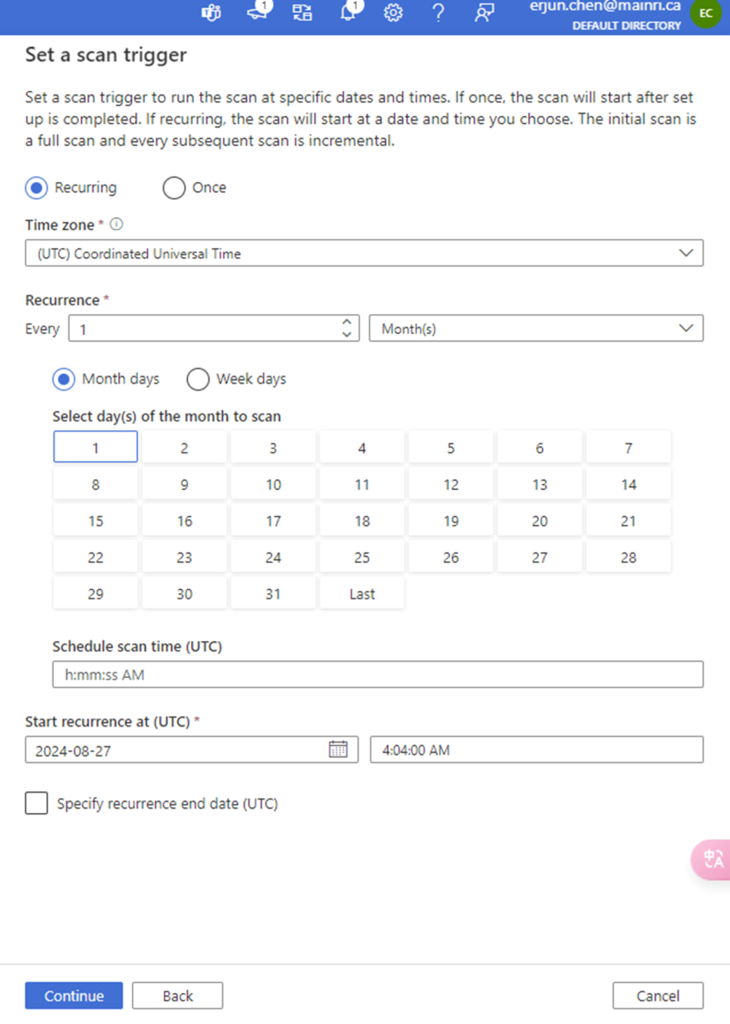
We ca either scan once or schedule and recurring scan on schedule.

Monitoring the scan progress ….

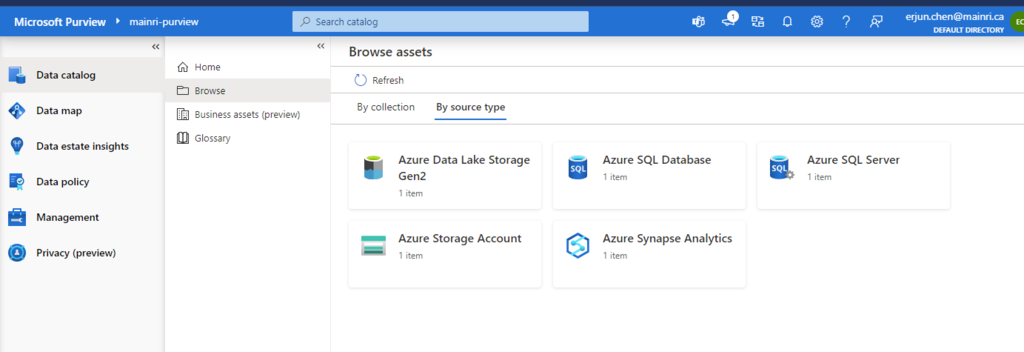
Once the process done, we will see this:

Alright, we have done the Purview for scanning Azure Synapse Workspace. Now, we have those source in our Azure purview.

Next step: Day 7 – Day 7: Permission and Roles, Business Glossary and Collections Access Control in Purview

Please do not hesitate to contact me if you have any questions at William . chen @ mainri.ca

(remove all space from the email account 😊)

Day 5: Registering Azure SQL Database and Scan in Purview

In the previous article, we discussed Managed Identity, registering ADLS, and scanning it in Azure Purview. In this article, I will focus on scanning an Azure SQL Database, including how to register and scan it in Azure Purview. The process differs from that of ADLS. You will be required to provide Azure SQL Database credentials.

We will learn the best practice of storing the Azure SQL Database credentials in an Azure Key Vault and use that Key Vault in Purview.    

Azure Key Vault provides a way to securely store credentials, secrets, and other keys, but your code must authenticate to Key Vault to retrieve them. 

We must follow these steps to register and scan Azure SQL Database:

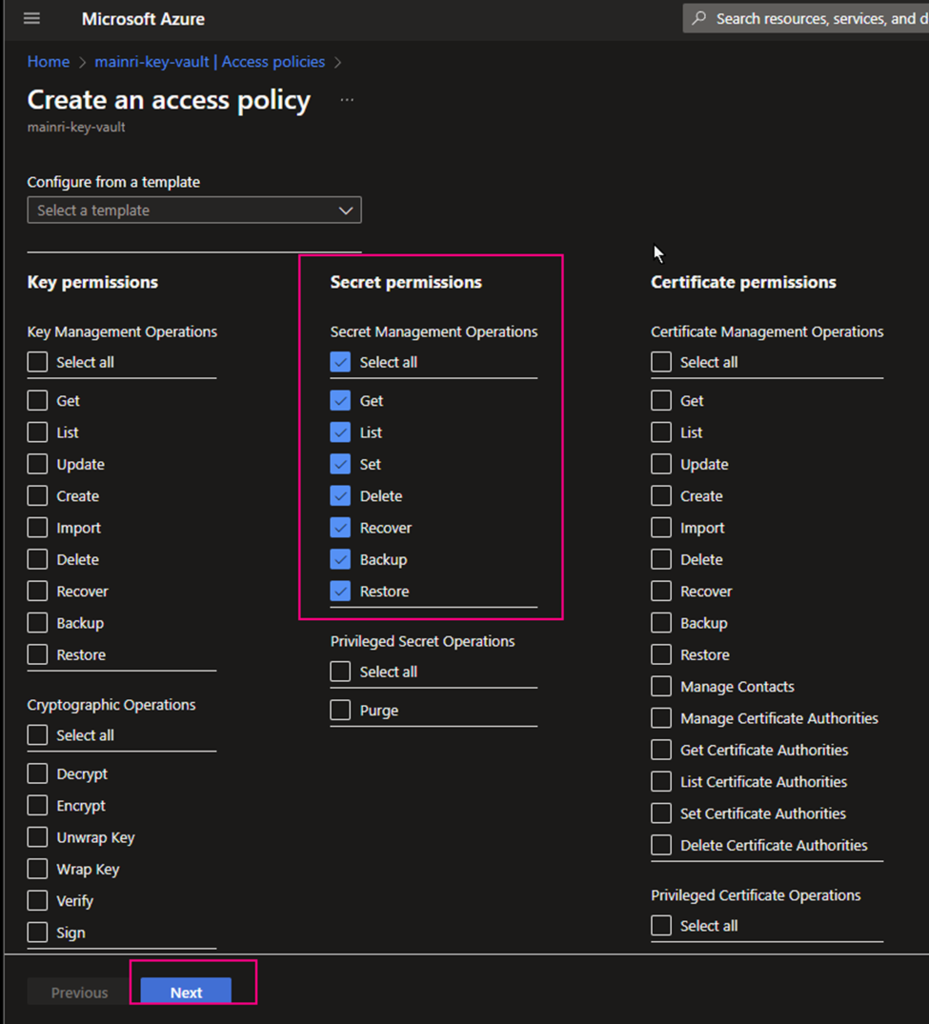
  1. Grant your Azure Account access to Key Vault by adding a new access policy. We will have to grant all the secret permissions.
  2. Grant Purview Managed identity access to Key Vault by adding a new access policy. Here we will have to grant Get and List permissions so purview can get(retrieve) and list down all the secrets.
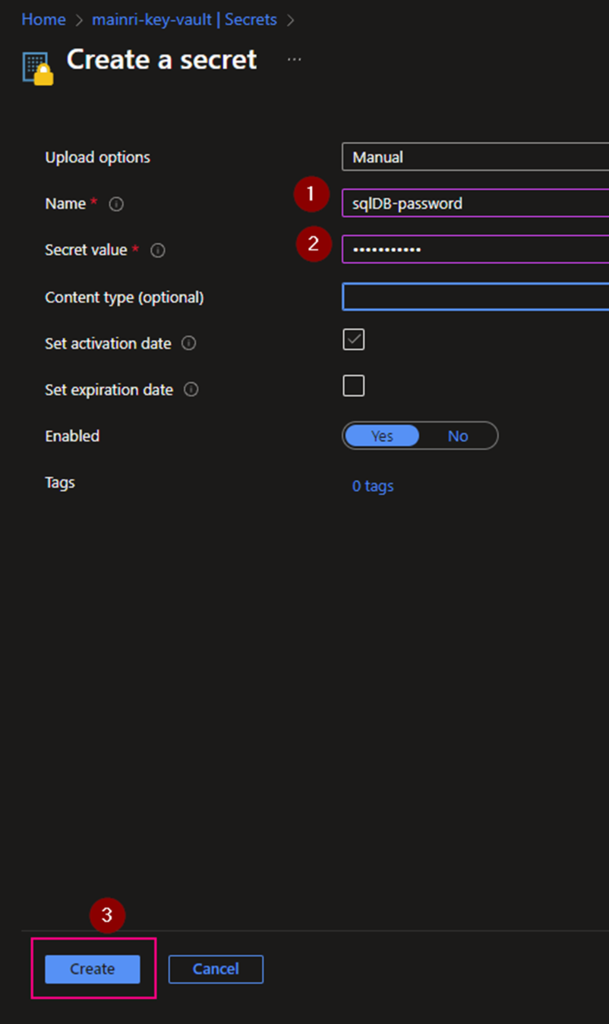
  3. Generate a Secret for SQL Admin in Azure Key Vault. This secret will be used to log in to Azure SQL DB.
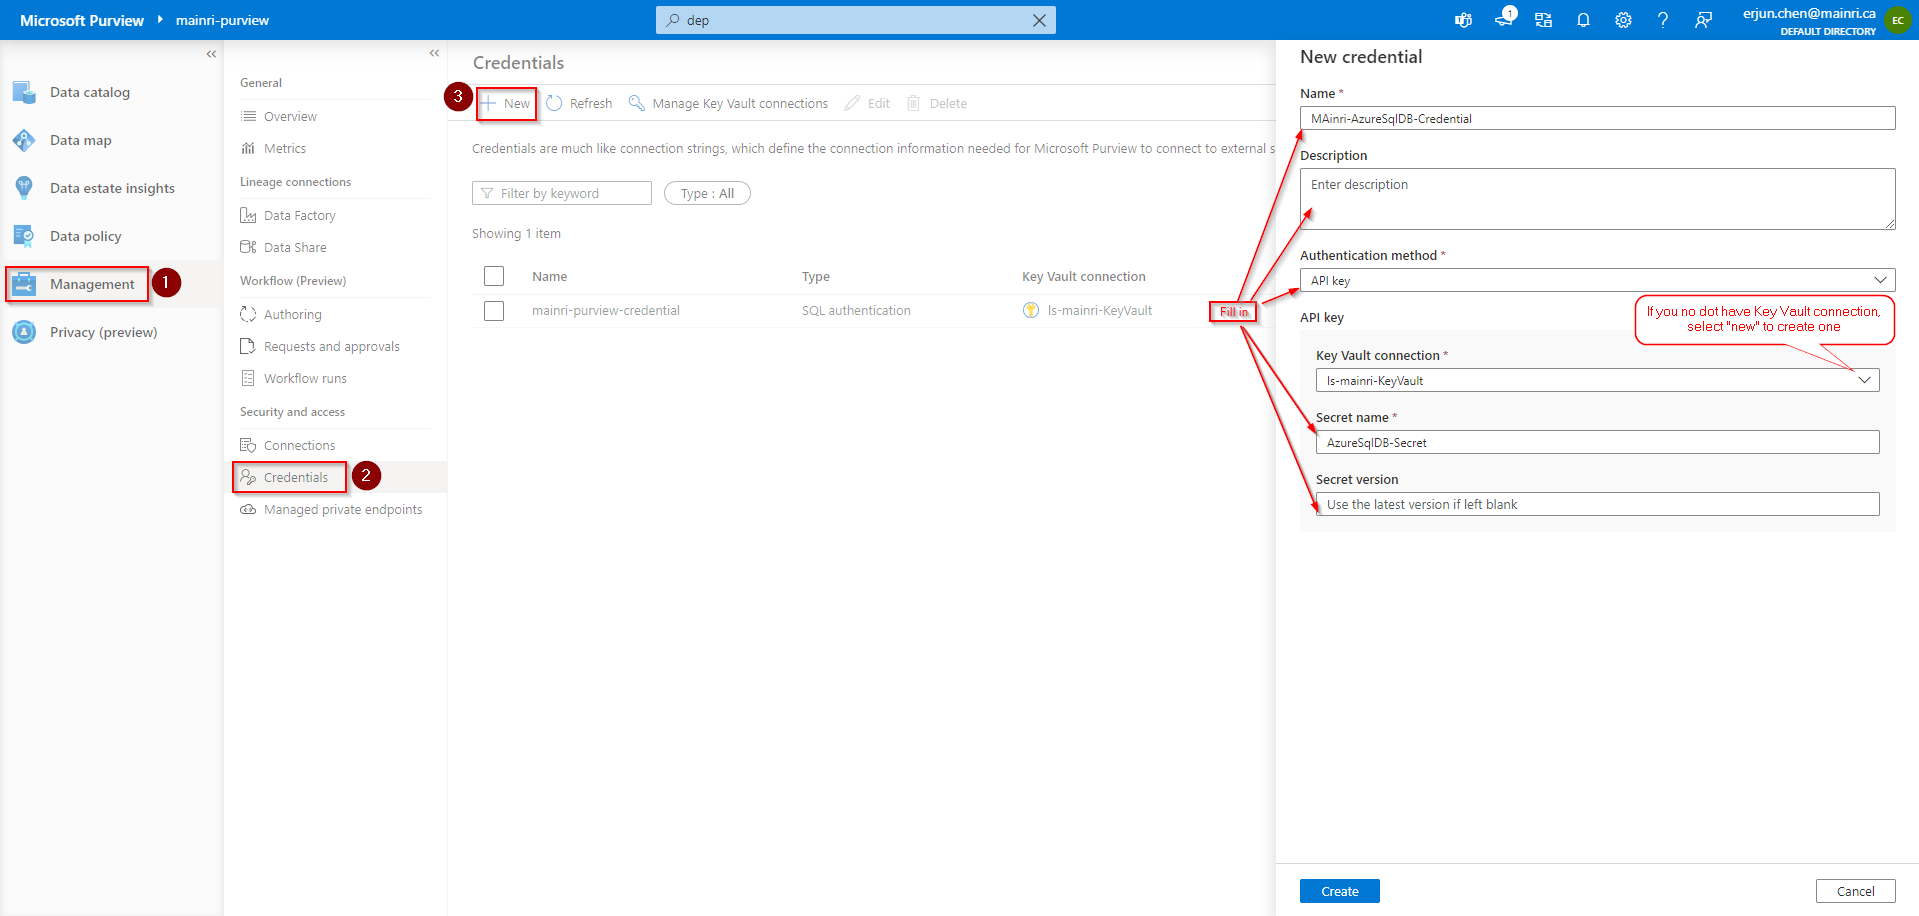
  4. Add SQL Credentials (created above) in Purview so we can use the same credential.
  5. Register Azure SQL DB in Microsoft Purview.
  6. Scan Azure SQL Database as a data source with Azure Key Vault Credentials.
  7. Verify that Purview is able to see tables in the Azure SQL database.

Discover and govern Azure SQL Database in Microsoft Purview

This article outlines the process to register an Azure SQL database source in Microsoft Purview. It includes instructions to authenticate and interact with the SQL database.

When you’re scanning Azure SQL Database, Microsoft Purview supports extracting technical metadata from these sources:

  • Server
  • Database
  • Schemas
  • Tables, including columns
  • Views, including columns (with lineage extraction enabled, as part of scanning)
  • Stored procedures (with lineage extraction enabled)
  • Stored procedure runs (with lineage extraction enabled)

When you’re setting up a scan, you can further scope it after providing the database name by selecting tables and views as needed.

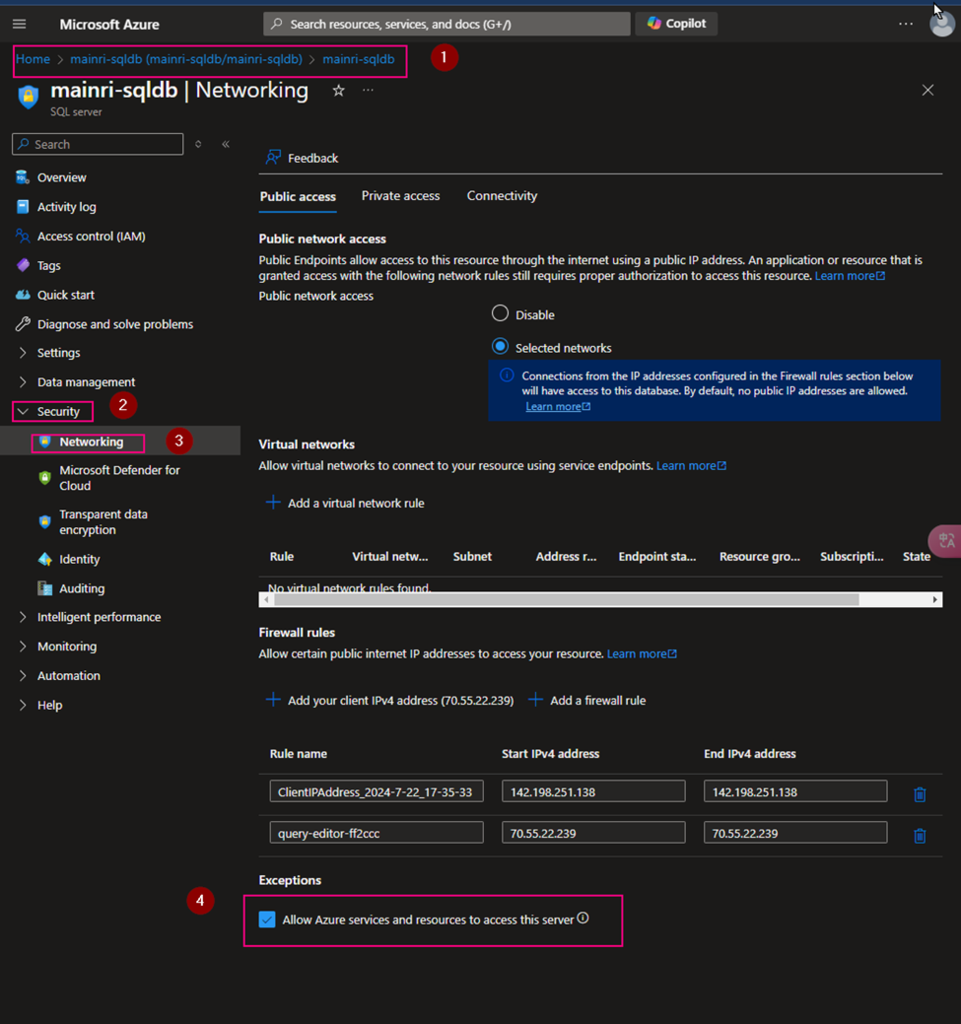
Update firewall settings.

If your database server has a firewall enabled, you need to update the firewall to allow access. Simply show you here.

Azure Portal > SQL Database > Set Server Firewall> Security > Networking

Check “Allow Azure services and resources to access this server”

Key Vault Set up

Create access policies

From Azure Portal > [ your key vault ] > Access Policies

Secret permissions

select all.

Principal

find out “[your purview]”.

Type your purview account to search. For me, I use “mainri-purview” as an example.

Click “next” … create

Create a Secrets

[your key vault] > Objects > Secrets

Generate a secret

We completed the Azure Key vault configuration.

It’s time for configuration of Purview for scanning SQL Database.

Configure authentication for a scan

Azure Purview > Management > Credentials

Manage Key vault connection

Add a new.

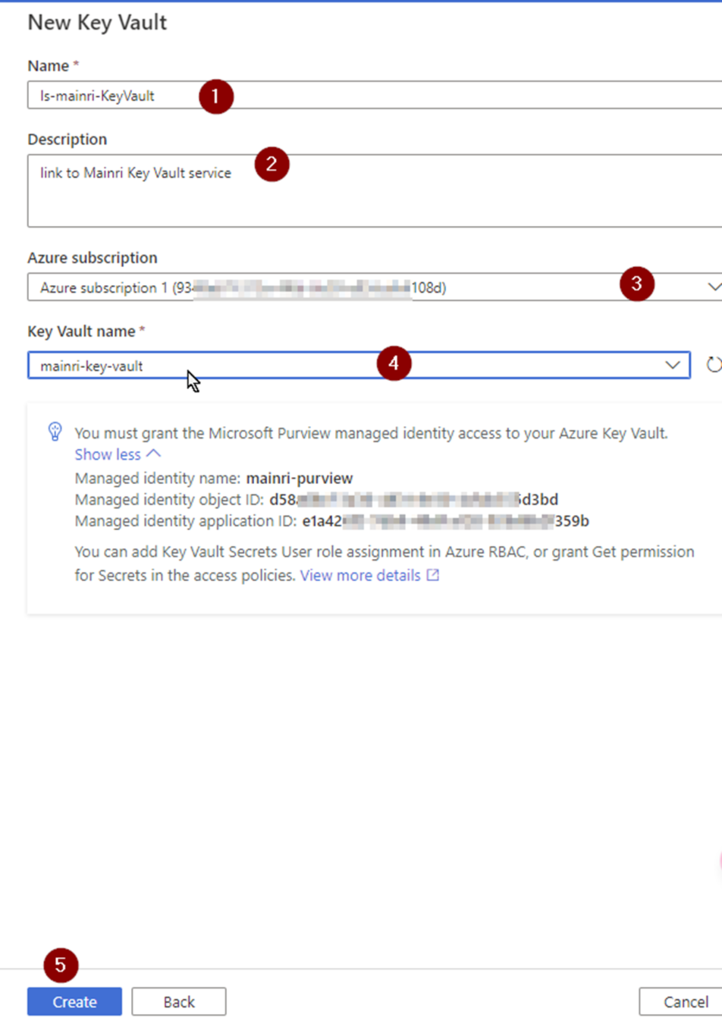
If you do not have linked service to your key vault, select “new” create a new one.

Fill in all values, click “Create” , Key-vault connection created.

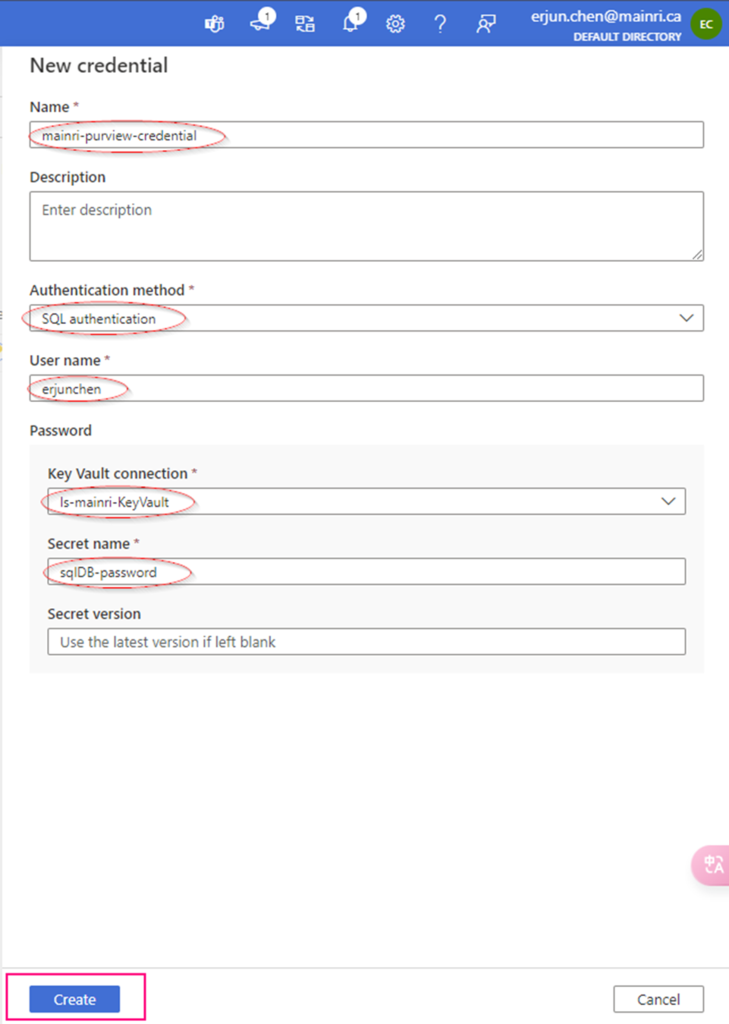
Then, you will back to “new credential” screen.

Create Credential

Fill in all values, click “create”

Now, the credential created

Setup Scan

Did you remember we have created collections previously?

Go back: Data Map >  Data Source >

Create a scan

Full screen

Pay attention here: Lineage extraction (preview)

I choose “off”.

To successfully turn on Lineage extraction, you must do the following:

  • Provide the db_owner role in Azure SQL Database for Microsoft Purview MSI
  • Run “create Master Key” in Azure SQL Database (only if not already exists)

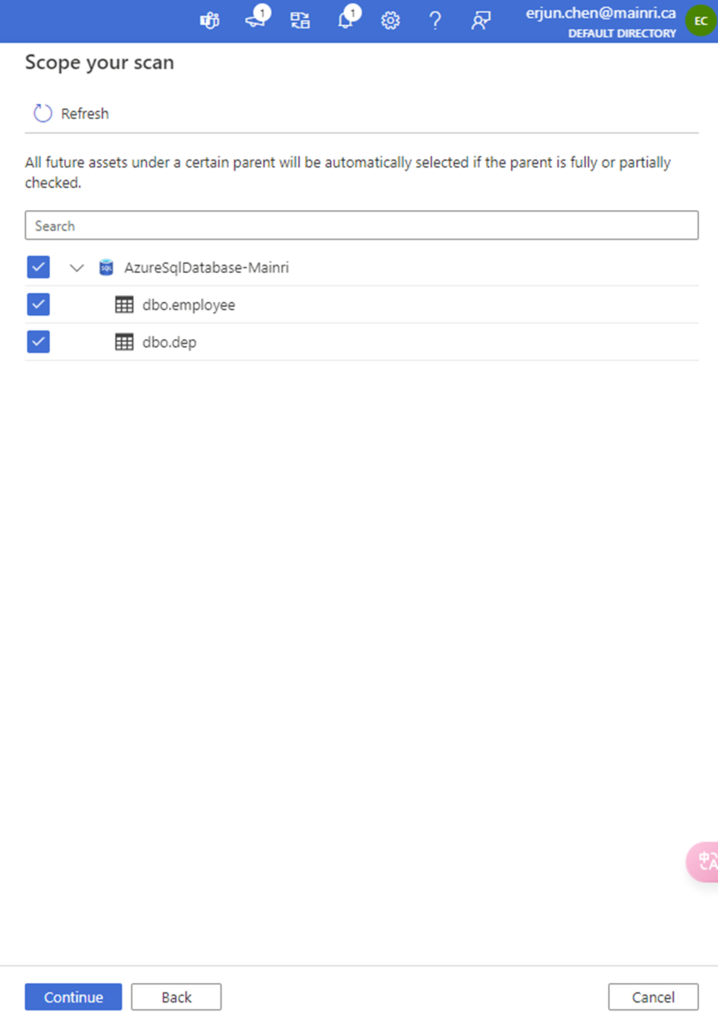
Scope your scan

Check to see what Entity you want to scan.

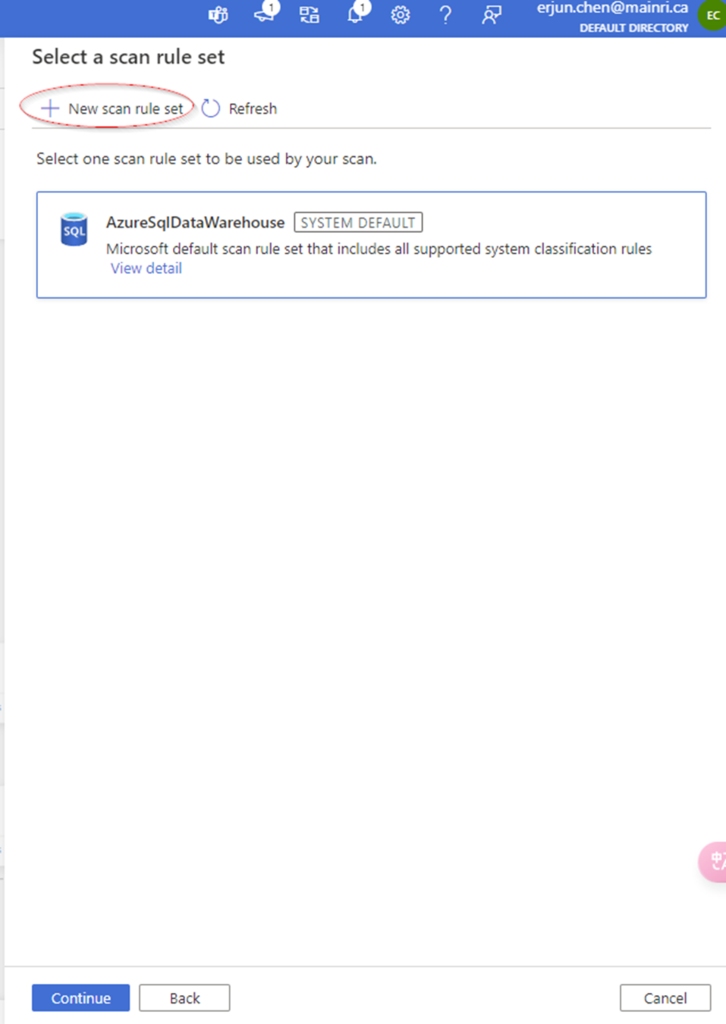
Select a scan rule set.

At here, you are able to add new scan rule set if you like. For me I selected azure purview system default SQL data warehouse scan rule set.

Set a scan trigger

You can either schedule the scan or once. This is very straight forward.

Once the process is complete, you can view detail

Alright, we’ve done the scan SQL Database in Azure Purview.

Next step: Day 6 – Registering Azure Synapse Analytics workspaces and scan in Microsoft Purview

Please do not hesitate to contact me if you have any questions at William . chen @ mainri.ca

(remove all space from the email account 😊)

Day 4: Registering ADLS Gen2 and Scan in Purview

Before we scan data sources in Azure Purview, we have to register data
resources that to be scanned.

First, we will learn the concept of managed identity and how Azure purview uses it.

Second, we will learn the steps involved in registering ADLS Gen2.

Azure Purview Managed Identity

We will use Azure Purview Managed Identity that is an Azure resource feature found in Azure Active Directory (Azure AD). The managed identities for Azure resources feature is free and there’s no additional cost.

We can use the identity to authenticate to any service that supports Azure AD authentication, including Key Vault, without any credentials in your code. We will use Azure Purview Managed Identity.

Let’s register source data first.

We have to follow these steps to register and scan ADLS Gen 2 account:

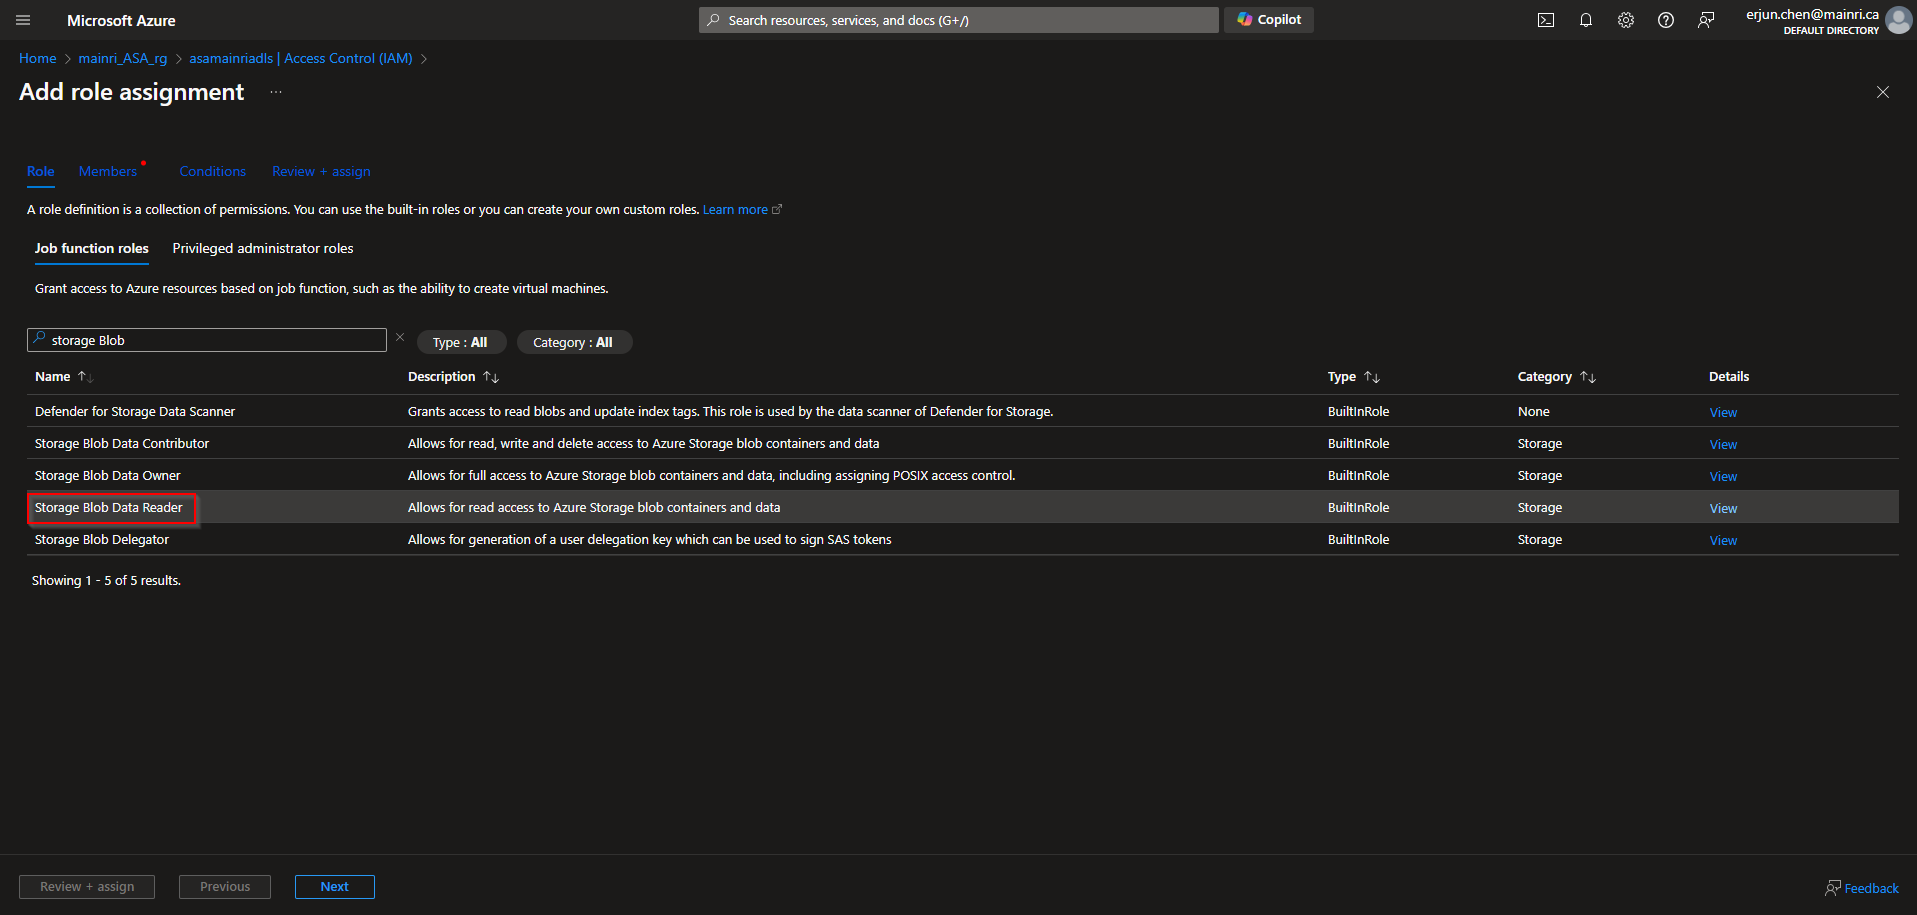
  1. Grant the Azure Purview Managed Identity access to ADLS Gen2 so purview can have access to it. Preview managed identity should have storage blob reader permission on ADLS Gen2
  2. Scan ADLS Gen2 with the Purview Managed Identity registered in step 1

Register an Azure Data Lake Storage Gen2 account

Azure Portal > ADLS > Access Control > Add role assignment

> storage BLOB Data

>Select managed Identities

>next > next > review + assign

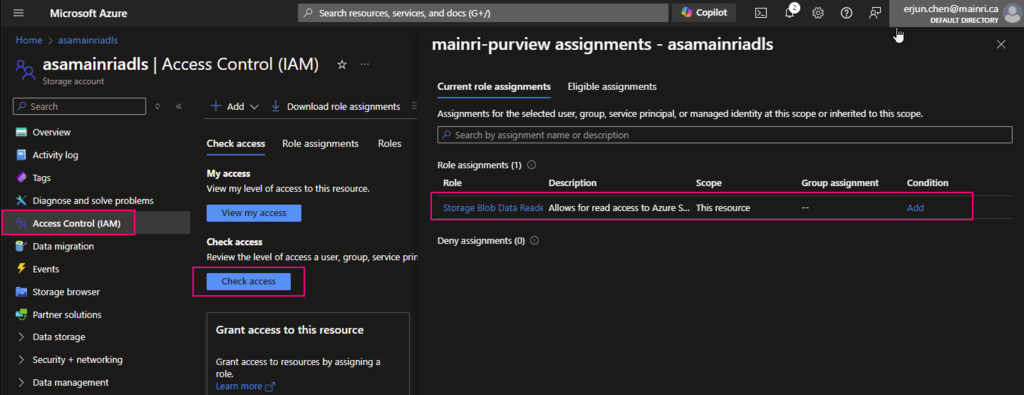
Now, you can “check access”, Now, you can “check access”. It’s added/

Scan data resource

We have talked about creating collection previously, if you need please review “How Microsoft Purview works – Data Source, Rule Sets, and Classification

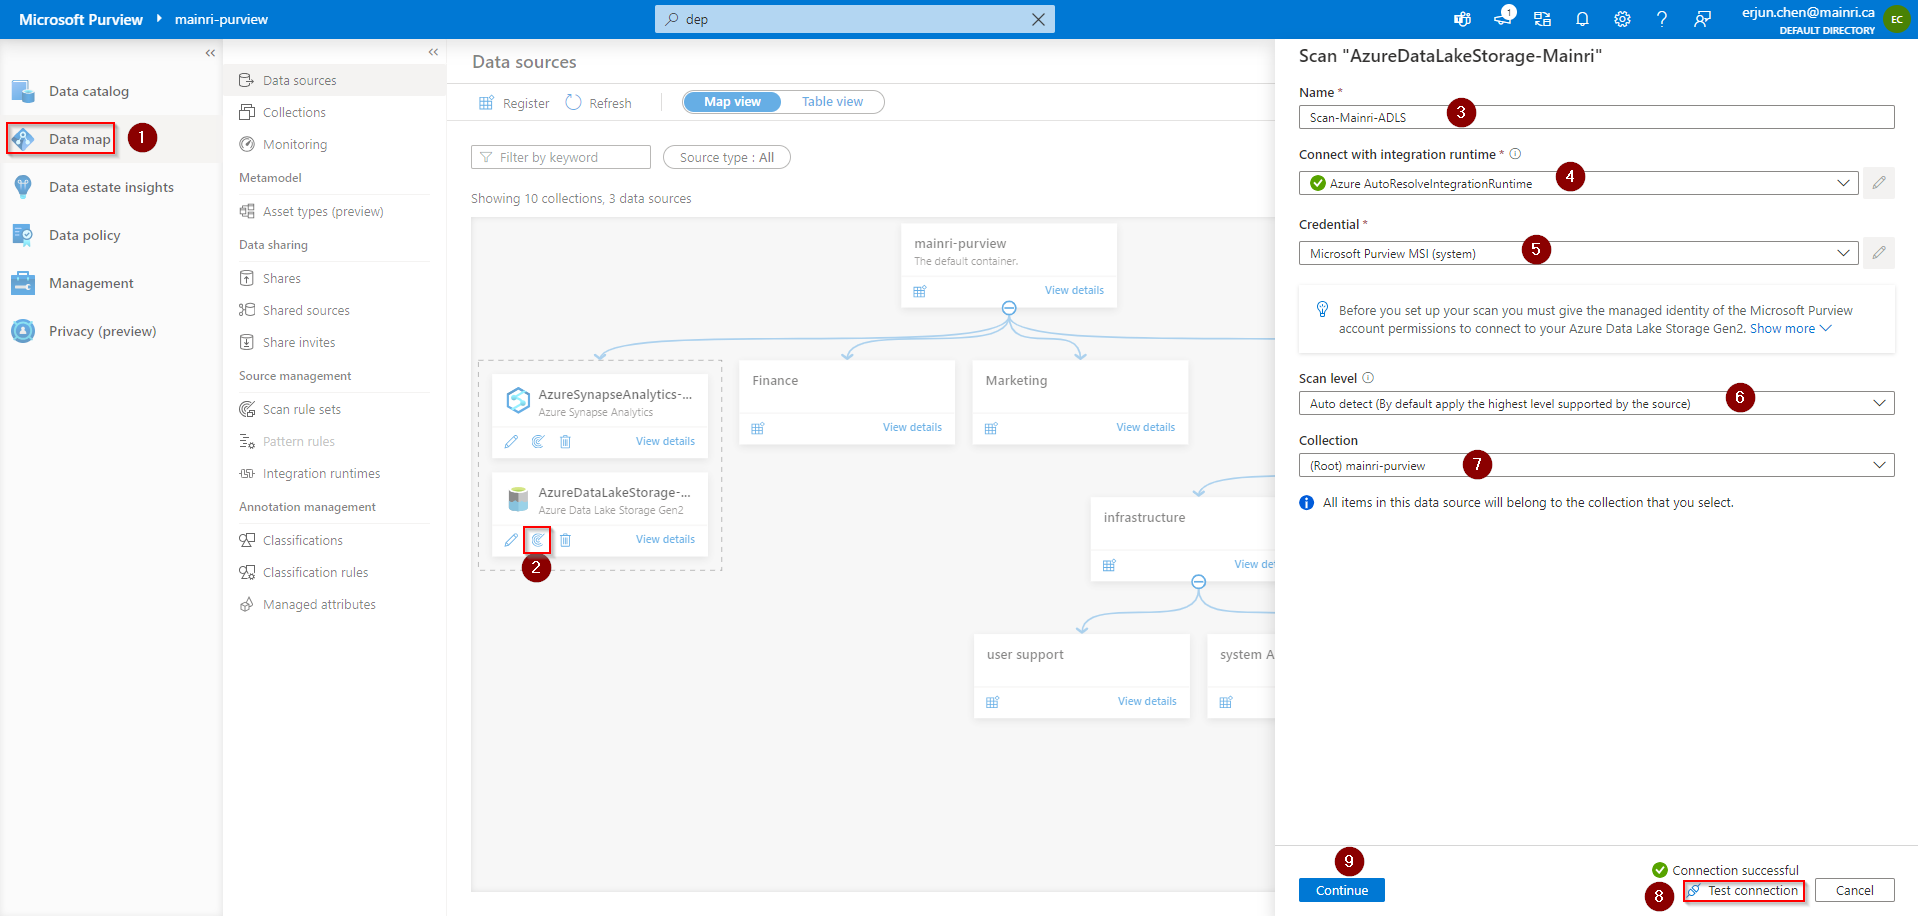
now, it’s time for scanning. from Azure Purview Studio

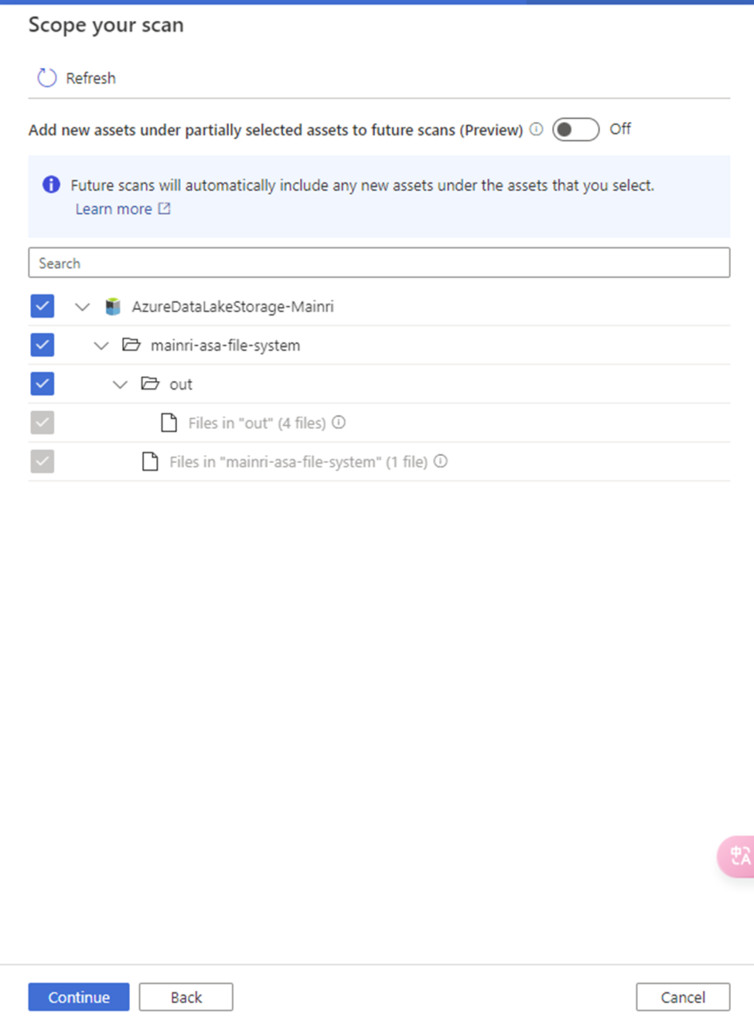
Scope your scan

You will see “scope your scan”. Now we can see all my data and directory structure on ADLS appear.

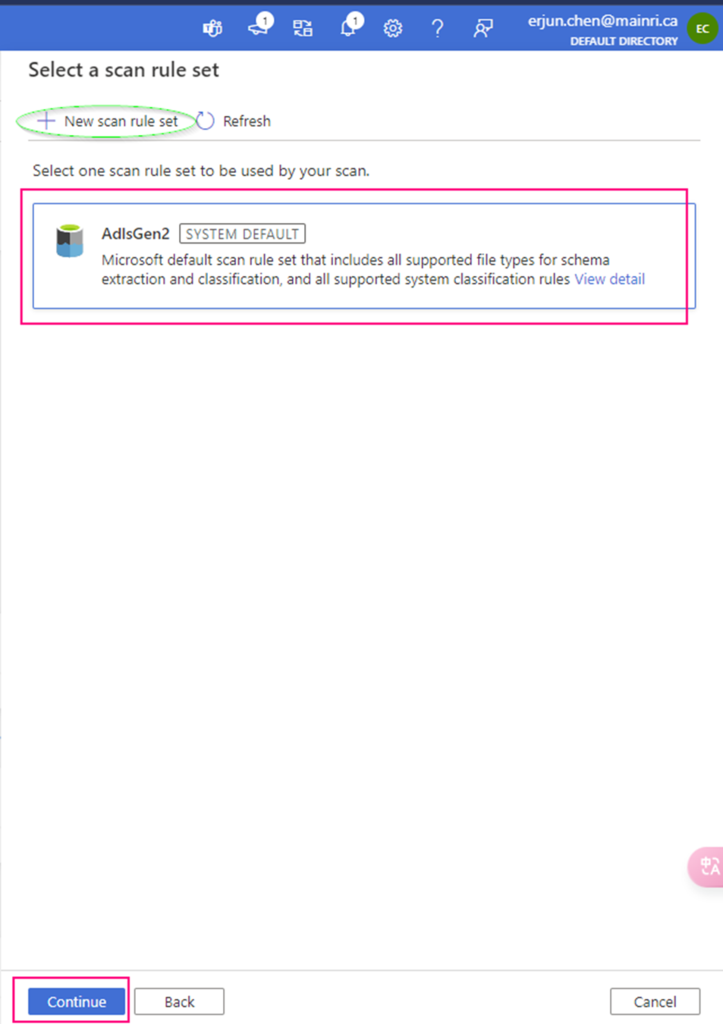
Select scan rule set

We have talked the rile sets in last article. You are able to add even more new scan rule set at this step if you like, or use default Azure System default scan rule set.

Set a scan trigger

Click the continue, you can setup trigger to scan, either once or recurring.

We complete the scan configuration. We have chance to review the configuration if ok save and run the scan progress or back to change it.

You can see this by clicking “view detail”

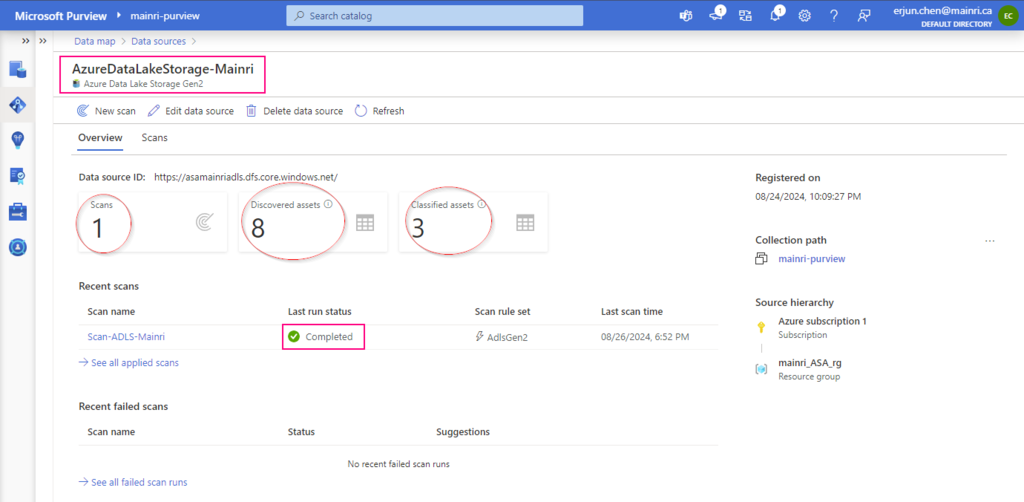
You will see this once the scan progress completed.

Next step: Registering Azure SQL Database and Scan in Purview

Please do not hesitate to contact me if you have any questions at William . chen @ mainri.ca

(remove all space from the email account 😊)

Day 3: How Microsoft Purview works – Data Source, Rule Sets, and Classification

Purview provides a robust platform for organizations to govern their data effectively, ensuring data quality, compliance, and accessibility across the enterprise.

In this article, will not discuss creating Azure Purview account, services, open purview UI … etc. Although they are important, they are not having special than subscripting, creating, opening those things for other services in Azure environment. Simply sign in Azure portal, find out purview service, follow guide on the azure portal UI, I strongly believe you will not meet challenge.

Roughly says, Purview has two key steps:

  • Load data in the data map
  • Browse and search information in the data catalog

Load data in the data map

  • Connect to Data Sources: Administrators connect Microsoft Purview to various data sources within their organization, setting up scanning schedules.
  • Scan and Classify Data: Purview scans these sources, discovers data assets, and classifies them automatically or based on custom rules.

Browse and search information in the data catalog.

  • View and Manage Data Catalog: Users access the Purview data catalog to search for and manage data assets, using the business glossary to understand the data in context.
  • Track Lineage and Ensure Compliance: Data lineage is visualized to understand data flow, and governance policies are enforced to ensure data is handled correctly.
  • Leverage Insights for Decision-Making: The insights provided by Purview help data stewards, analysts, and business users make informed decisions based on governed, trusted data.

 Of course, this is too general to let users understand and catch up in detail.  

Load data in the data map

Purview Data Map is a unified map of your data assets and their relationships.  It’s easier for you and your users to visualize and govern. It also houses the metadata that underpins the Microsoft Purview Data Catalog and Data Estate Insights. You can use it to govern your data estate in a way that makes the most sense for your business.

Map Data

The data map is the foundational platform for Microsoft Purview. The data map consists of:

  • Data assets.
  • Data lineage.
  • Data classifications.
  • Business context.

Customers create a knowledge graph of data that comes in from a range of sources. Microsoft Purview makes it easy to register and automatically scan and classify data at scale. Within a data map, you can identify the type of data source, along with other details around security and scanning.

The data map uses collections to organize these details.

Collection

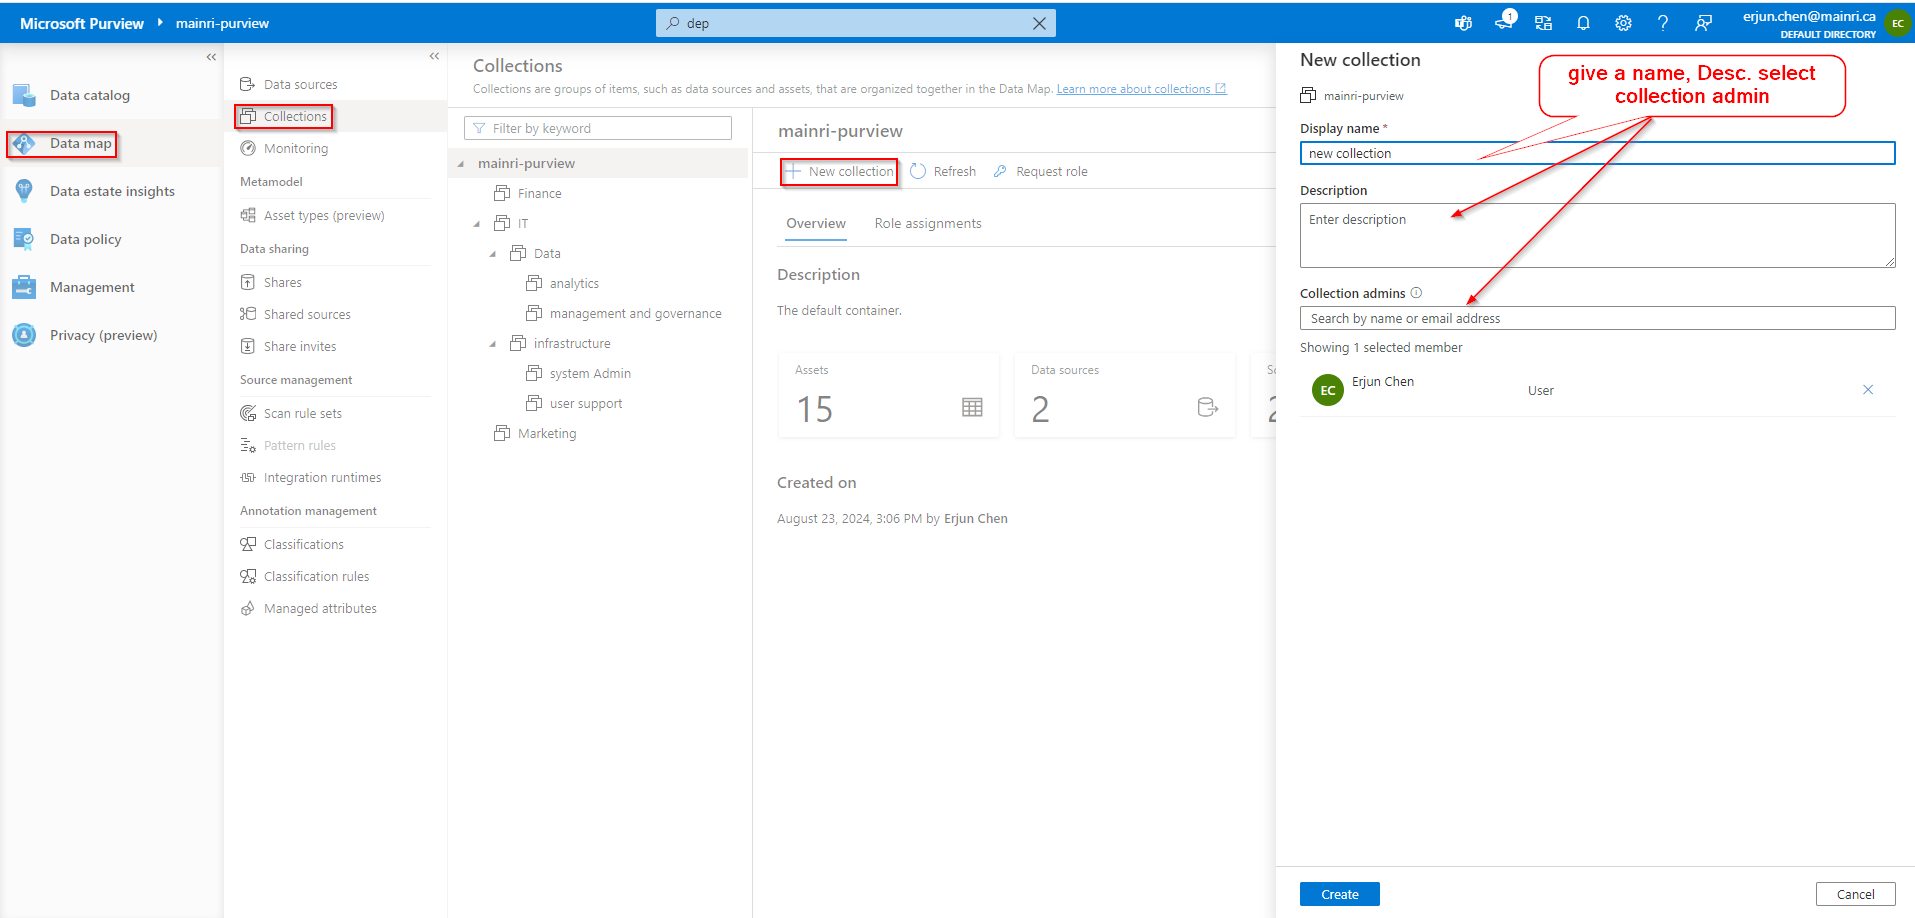
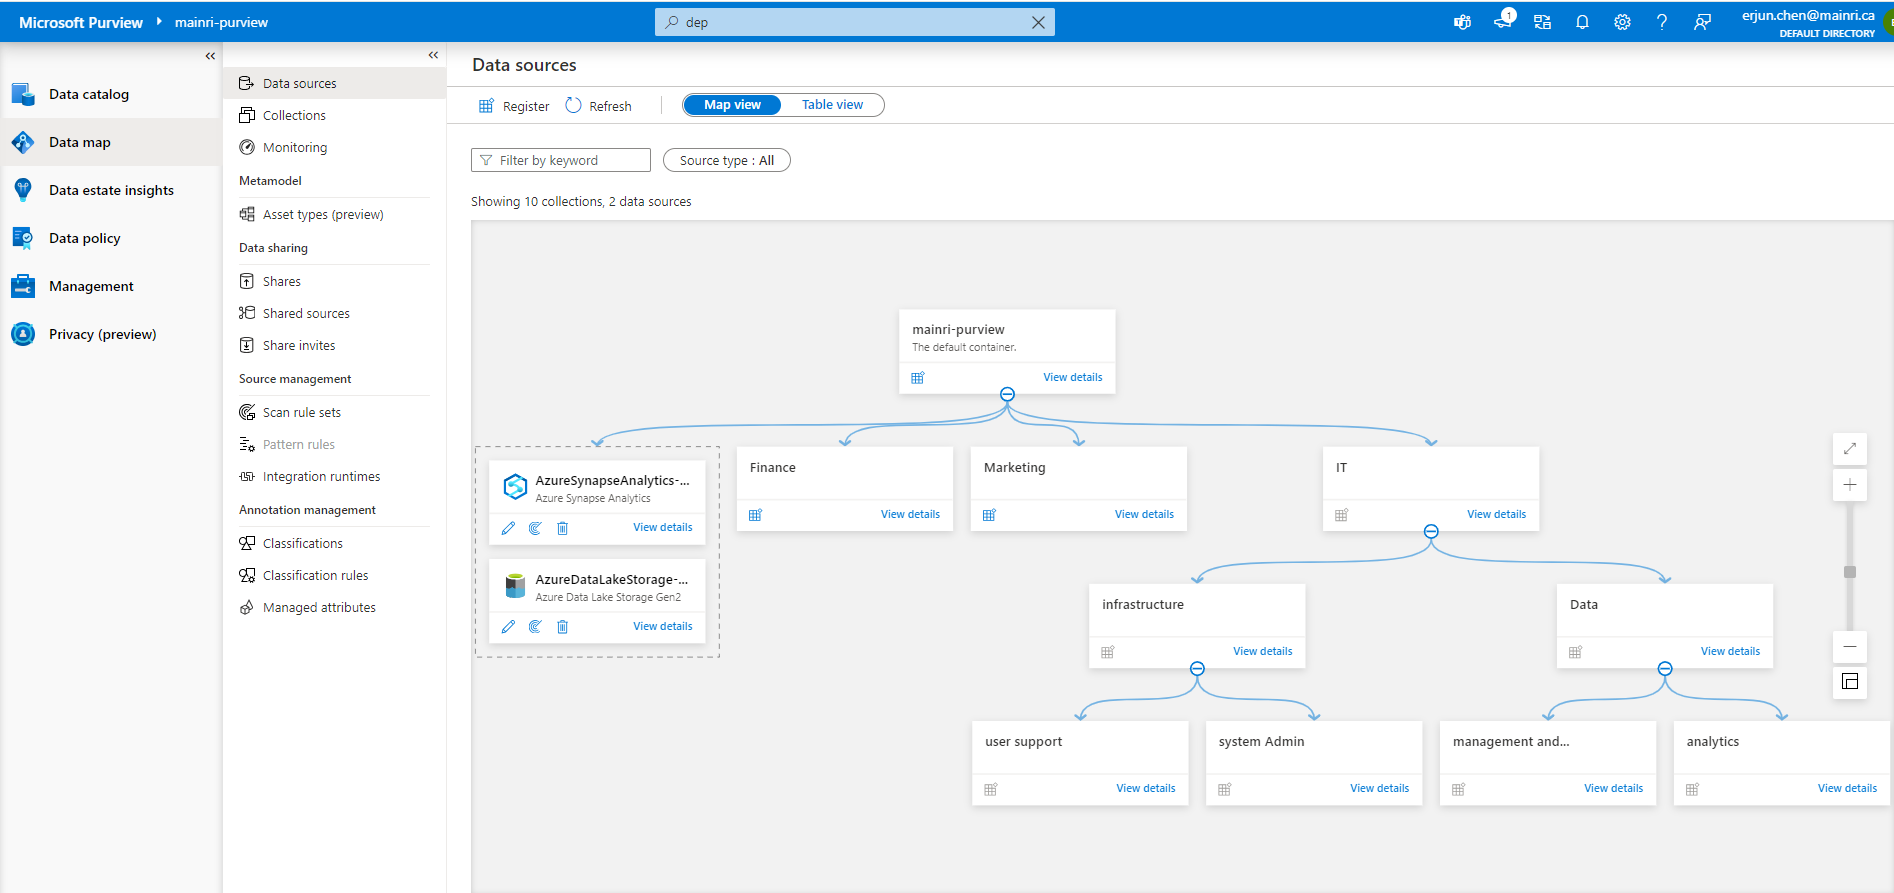
Collections are groups of items, such as data sources and assets, that are organized together in the Data Map. It is a way of grouping data assets into logical categories to simplify management and discovery of assets within the catalog. You also use collections to manage access to the metadata that’s available in the data map.

now, collections are created, looks like

Source data

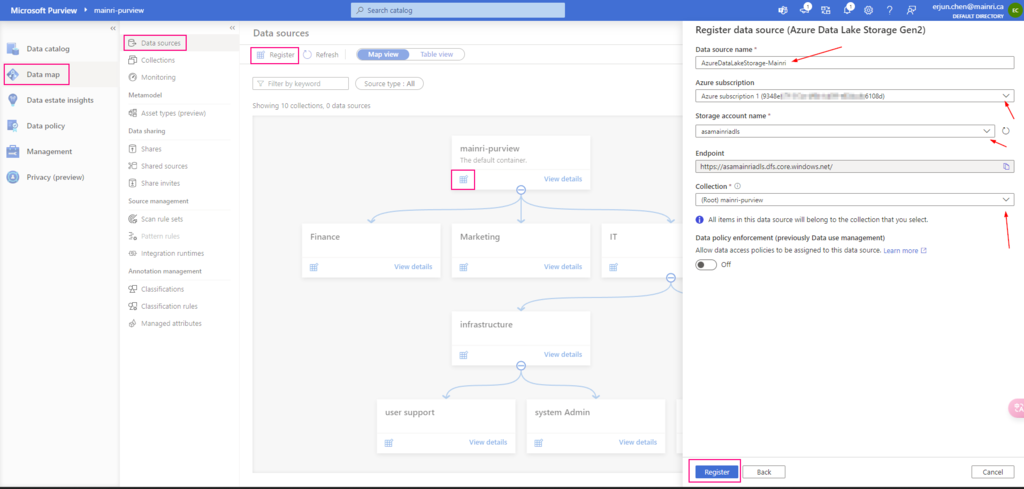
Sourcing your data starts with a process where you register data sources. Microsoft Purview supports an array of data sources that span on-premises, multi-cloud, and software-as-a-service (SaaS) options. You register the various data sources so that Microsoft Purview is aware of them. The data remains in its location and isn’t migrated to any other platform.

Each type of data source you choose requires specific information to complete the registration.

Below is a small sample of available connectors in Microsoft Purview Data Catalog. See supported data sources and file types for an up-to-date list of supported data sources and connectors.

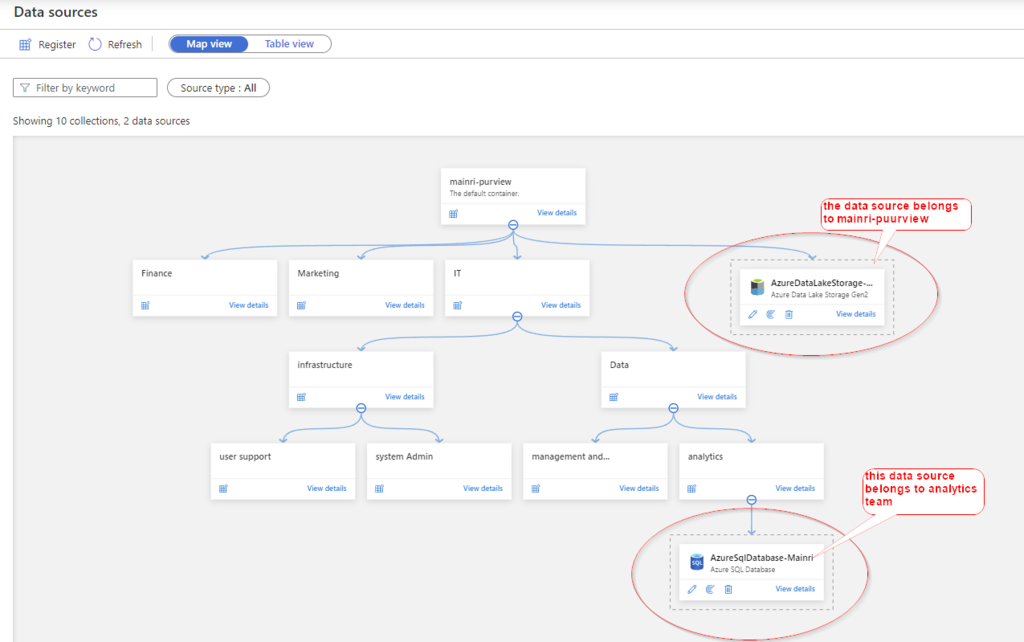
The same way creates another data source – AzureSQLDatabase that belongs to “analytics team”

Rule Sets

After we register our data sources, we will need to run a scan to access their metadata and browse the asset information.

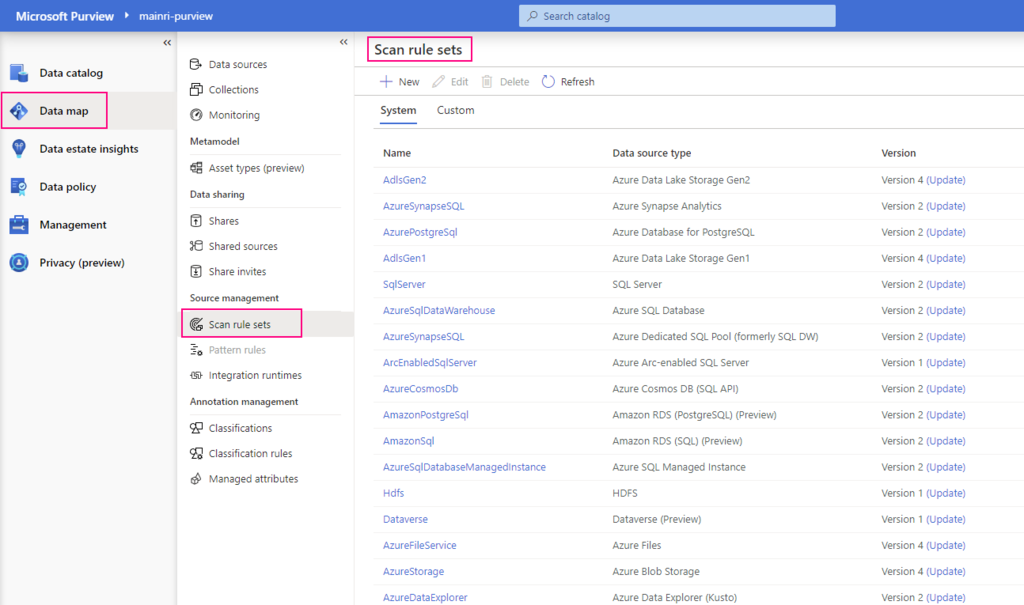
Before you can scan the data sources, you’re required to enter the credentials for these sources. You can use Azure Key Vault to store the credentials for security and ease of access by your scan rules. The Microsoft Purview governance portal comes with existing system scan rule sets that you can select when you create a new scan rule. You can also specify a custom scan rule set.

scan rule set is a container for grouping scan rules together to use the same rules repeatedly. A scan rule set lets you select file types for schema extraction and classification. It also lets you define new custom file types. You might create a default scan rule set for each of your data source types. Then you can use these scan rule sets by default for all scans within your company.

For example, you might want to scan only the .csv files in an Azure Data Lake Storage account. Or you might want to check your data only for credit card numbers rather than all the possible classifications. You might also want users with the right permissions to create other scan rule sets with different configurations based on business needs.

Scan

Once you have data sources registered in the Microsoft Purview governance portal and displayed in the data map, you can set up scanning. The scanning process can be triggered to run immediately or can be scheduled to run on a periodic basis to keep your Microsoft Purview account up to date.

Scanning assets is as simple as selecting New scan from the resource as displayed in the data map.

You’ll now need to configure your scan and assign the following details:

  • Assign a friendly name.
  • Define which integration runtime to use to perform the scan.
  • Create credentials to authenticate to your registered data sources.
  • Choose a collection to send scan results.

Once a scan is complete, you can refer to the scan details to view information about the number of scans completed, assets detected, assets classified, Scan information. It’s a good place to monitor scan progress, including success or failure.

Recap,

Purview Scan means:

  • Where to scan
  • Scan rule set
  • Type (Full, Increments)
  • Schedule

Scan Rule Set means:

  • What to scan (txt, json, parquet,,,,,)?
  • What to look for (classification rules)?
  • Specific to source type (ADLS, Database,,,,,)?
  • System defined ones
  • Custom

Classification

Metadata is used to help describe the data that’s being scanned and made available in the catalog. During the configuration of a scan set, you can specify classification rules to apply during the scan that also serve as metadata. The classification rules fall under five major categories:

  • Government: Attributes such as government identity cards, driver license numbers, and passport numbers.
  • Financial: Attributes such as bank account numbers or credit card numbers.
  • Personal: Personal information such as a person’s age, date of birth, email address, and phone number.
  • Security: Attributes like passwords that can be stored.
  • Miscellaneous: Attributes not included in the other categories.

You can use several system classifications to classify your data. These classifications align with the sensitive information types in the Microsoft Purview compliance portal. You can also create custom classifications to identify other important or sensitive information types in your data estate.

After you register a data source, you can enrich its metadata. With proper access, you can annotate a data source by providing descriptions, ratings, tags, glossary terms, identifying experts, or other metadata for requesting data-source access. This descriptive metadata supplements the structural metadata, such as column names and data types, that’s registered from the data source.

Discovering and understanding data sources and their use is the primary purpose of registering the sources. If you’re an enterprise user, you might need data for business intelligence, application development, data science, or any other task where the right data is required. You can use the data catalog discovery experience to quickly find data that matches your needs. You can evaluate the data for its fitness for the purpose and then open the data source in your tool of choice.

At the same time, you can contribute to the catalog by tagging, documenting, and annotating data sources that have already been registered. You can also register new data sources, which are then discovered, evaluated, and used by the community of catalog users.

In the following separate articles, I would like to use ADLS, Azure SQL Database and Azure Synapse Analytics as examples to step by step show you how to register and scan data source in Purview.

Next step: Day 4 – Registering ADLS Gen2 and Scan in Purview

Please do not hesitate to contact me if you have any questions at William . chen @ mainri.ca

(remove all space from the email account 😊)

Day 2: Quick start, what is inside

Azure Purview is a unified data governance service provided by Microsoft. It helps organizations manage and govern their on-premises, multi-cloud, and software as a service (SaaS) data. The primary purpose of Azure Purview is to provide a comprehensive understanding of an organization’s data landscape through data discovery, classification, and lineage tracking.

Before you can develop data-governance plans for usage and storage, you need to understand the data your organization uses.

Without the ability to track data from end to end, you must spend time tracing problems created by data pipelines that other teams own. If you make changes to your datasets, you can accidentally affect related reports that are business or mission critical.

Microsoft Purview is designed to address these issues and help enterprises get the most value from their existing information assets. Its catalog makes data sources easy to discover and understand by the users who manage the data.

Key Features of Azure Purview:

  1. Data Cataloging: Automatically discover data assets across your data estate and register them in a unified catalog.
  2. Data Lineage: Track the lineage of data to understand how it flows through different systems.
  3. Data Classification: Apply built-in and custom classifiers to categorize your data based on sensitivity and type.
  4. Business Glossary: Create and manage a business glossary to standardize terms and definitions across your organization.
  5. Data Insights: Gain insights into the distribution of your data, data owners, and data usage patterns.
  6. Integration with Azure Data Services: Integrate with other Azure services like Azure Synapse Analytics, Power BI, and more for seamless data governance.

Microsoft Purview has three main elements:

Data Map:

The data map provides a structure for your data estate in Microsoft Purview, where you can map your existing data stores into groups and hierarchies.

Data Catalog

The data catalog allows your users to browse the metadata stored in the data map so that they can find reliable data and understand its context.

Users can see where the data comes from and who are the experts they can contact about that data source. 

The data catalog also integrates with other Azure products, like the Azure Synapse Analytics workspace, so that users can search for the data they need from the applications they need it in.

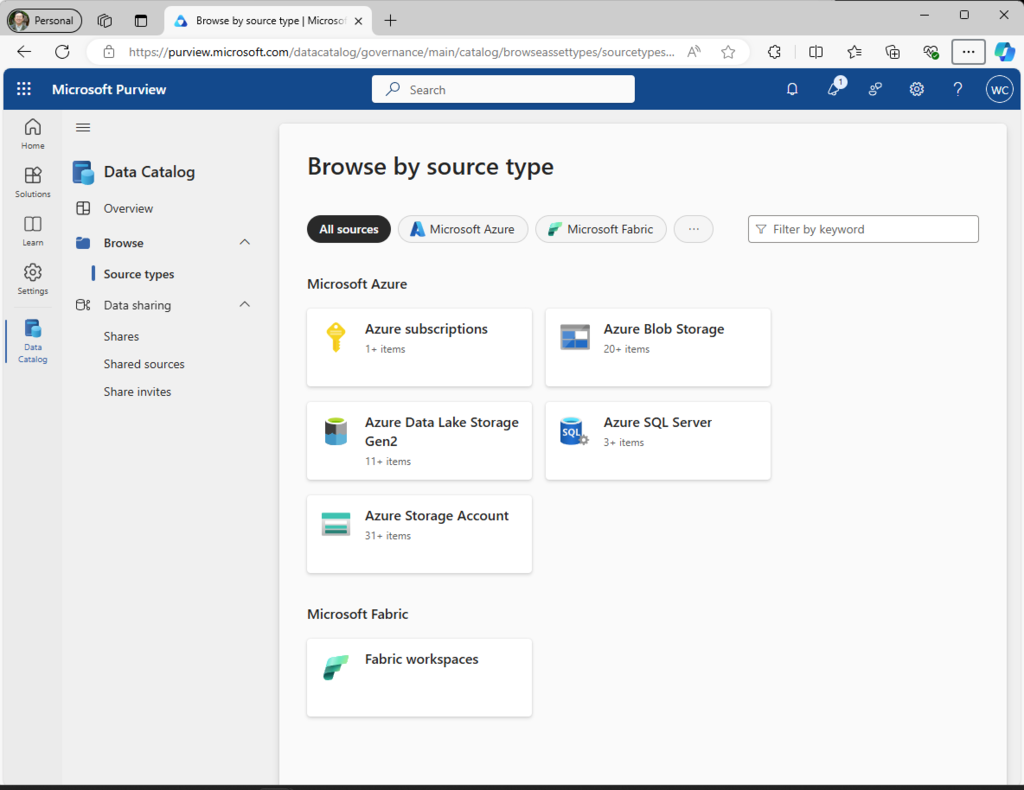
Catalog browse by Azure Subscriptions example:

Catalog browse by Azure Data Lake example

Catalog browser by Blob Storage:

Catalog browser by SQL Server:

Data Estate Insights

Insights offer a high-level view into your data catalog, covering these key facets:

  • Data stewardship: A report on how curated your data assets are so that you can track your governance progress.
  • Catalog adoption: A report on the number of active users in your data catalog, their top searches, and your most viewed assets.
  • Asset insights: A report on the data estate and source-type distribution. You can view by source type, classification, and file size. View the insights as a graph or as key performance indicators.
  • Scan insights: A report that provides information on the health of your scans (successes, failures, or canceled).
  • Glossary insights: A status report on the glossary to help users understand the distribution of glossary terms by status, and view how the terms are attached to assets.
  • Classification insights: A report that shows where classified data is located. It allows security administrators to understand the types of information found in their organization’s data estate.
  • Sensitivity insights: A report that focuses on sensitivity labels found during scans. Security administrators can make use of this information to ensure security is appropriate for the data estate.

Search the Microsoft Purview data catalog

From Purview Studio home, we can type keys to search

We can filter the search from left hand section

Understand a single asset

Asset overview

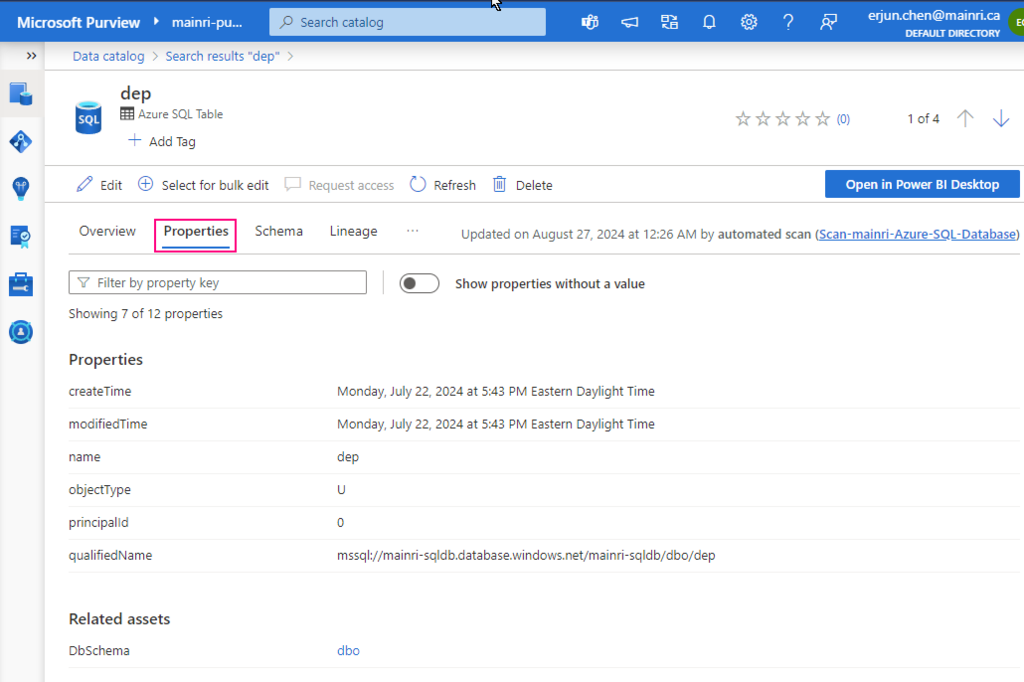
Select an asset to see the overview. The overview displays information at a glance, including a description, asset classification, schema classification, collection path, asset hierarchy, and glossary terms.

Properties:

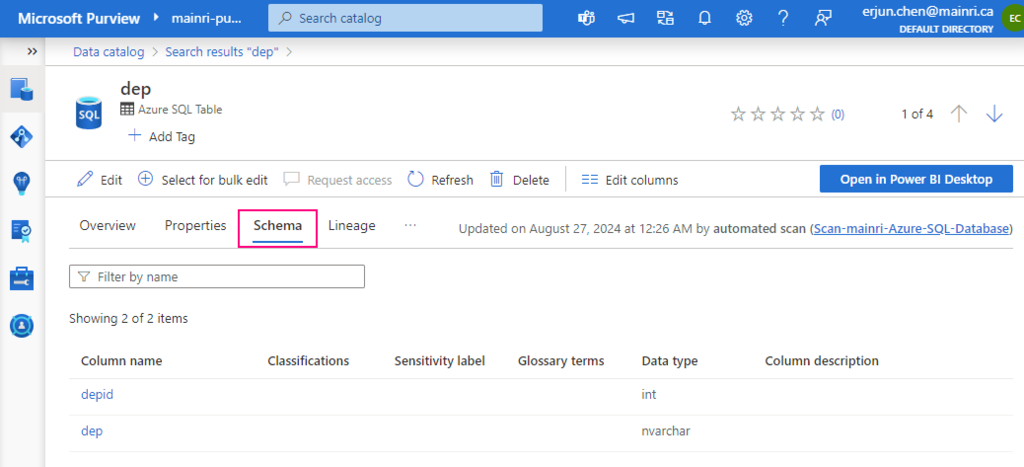
Schema

The schema view of the asset includes more granular details about the asset, such as column names, data types, column level classifications, terms, and descriptions.

Lineage

Asset lineage gives you a clear view of how the asset is populated and where data comes from. Data lineage is broadly understood as the lifecycle that spans the data’s origin, and where it moves over time across the data estate. Data lineage is important to analysts because it enables understanding of where data is coming from, what upstream changes may have occurred, and how it flows through the enterprise data systems.

contacts

contacts provide you contact details of experts or dataset owners with any questions.

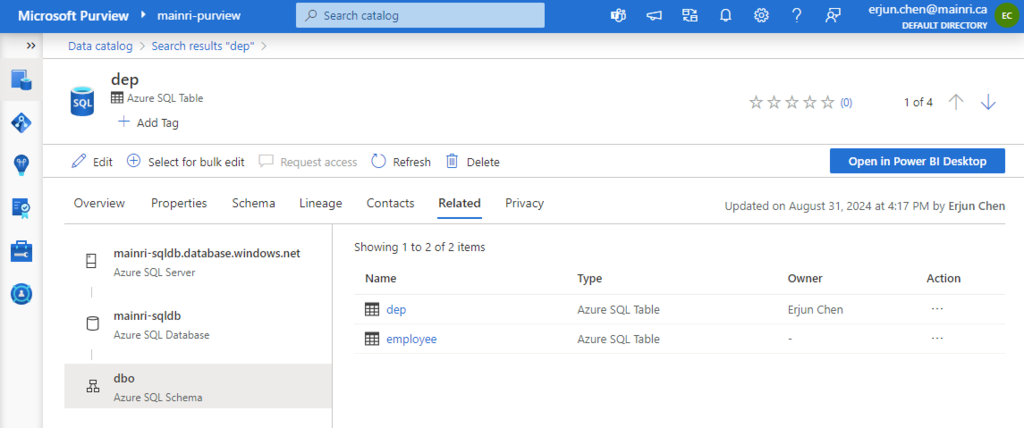
Related

We will discuss above in the coming articles.

Next step: Day 3: How Microsoft Purview works – Data Source, Rule Sets, and Classification

Please do not hesitate to contact me if you have any questions at William . chen @ mainri.ca

(remove all space from the email account 😊)