Configuring Azure Entra ID Authentication in Azure SQL Database

Azure SQL Database can be integrated with Azure Entra ID to provide identity and access management. With this integration, users can sign in to Azure SQL Database using their Azure Entra ID credentials, enabling a centralized and secure way to manage database access.

Register the SQL Server in Azure Entra ID

Enable Azure Entra ID Admin

Register your SQL Server (or SQL Database) as an application in Azure Entra ID.

Azure Portal > find out the SQL Server that you want to register with Azure Entra ID >

Settings > Microsoft Entra ID (Active Directory Admin)

Assign Users/Groups

You can assign Azure Entra ID users or groups to specific roles within the SQL Database, such as db_owner, db_datareader, or db_datawriter.

Then, Click Save to apply the changes.

Configure Azure Entra ID Authentication in Azure SQL Database

Connect to SQL Database using Azure Entra ID

You can connect to your Azure SQL Database using Azure Entra ID by selecting the “Azure Active Directory – Universal with MFA support” authentication method in tools like SQL Server Management Studio (SSMS).

Assign Roles to Azure Entra ID Users

Use a SQL query to assign roles to Azure Entra ID users or groups. For example:

CREATE USER [your_username@yourdomain.com] FROM EXTERNAL PROVIDER;
ALTER ROLE db_datareader ADD MEMBER [your_username@yourdomain.com];

This command creates an Azure Entra ID user in your SQL Database and adds them to the db_datareader role.

Set Up Role-Based Access Control (RBAC)

You can manage permissions through Azure Entra ID roles and assign these roles to your SQL Database resources.

Assign Roles via Azure Portal

Azure portal > your SQL Database > Access control (IAM) > Add role assignment.

Choose the appropriate role, such as “SQL DB Contributor“.

and assign it to the desired Azure Entra ID user or group

Considerations

  • No Password Management: Since authentication is managed via Azure Entra ID, there’s no need to manage passwords directly within the database.
  • Integration with Conditional Access: This allows you to enforce compliance requirements, such as requiring MFA or ensuring connections only come from specific locations.

Please do not hesitate to contact me if you have any questions at William . chen @ mainri.ca

(remove all space from the email account 😊)

Day 5: Registering Azure SQL Database and Scan in Purview

In the previous article, we discussed Managed Identity, registering ADLS, and scanning it in Azure Purview. In this article, I will focus on scanning an Azure SQL Database, including how to register and scan it in Azure Purview. The process differs from that of ADLS. You will be required to provide Azure SQL Database credentials.

We will learn the best practice of storing the Azure SQL Database credentials in an Azure Key Vault and use that Key Vault in Purview.    

Azure Key Vault provides a way to securely store credentials, secrets, and other keys, but your code must authenticate to Key Vault to retrieve them. 

We must follow these steps to register and scan Azure SQL Database:

  1. Grant your Azure Account access to Key Vault by adding a new access policy. We will have to grant all the secret permissions.
  2. Grant Purview Managed identity access to Key Vault by adding a new access policy. Here we will have to grant Get and List permissions so purview can get(retrieve) and list down all the secrets.
  3. Generate a Secret for SQL Admin in Azure Key Vault. This secret will be used to log in to Azure SQL DB.
  4. Add SQL Credentials (created above) in Purview so we can use the same credential.
  5. Register Azure SQL DB in Microsoft Purview.
  6. Scan Azure SQL Database as a data source with Azure Key Vault Credentials.
  7. Verify that Purview is able to see tables in the Azure SQL database.

Discover and govern Azure SQL Database in Microsoft Purview

This article outlines the process to register an Azure SQL database source in Microsoft Purview. It includes instructions to authenticate and interact with the SQL database.

When you’re scanning Azure SQL Database, Microsoft Purview supports extracting technical metadata from these sources:

  • Server
  • Database
  • Schemas
  • Tables, including columns
  • Views, including columns (with lineage extraction enabled, as part of scanning)
  • Stored procedures (with lineage extraction enabled)
  • Stored procedure runs (with lineage extraction enabled)

When you’re setting up a scan, you can further scope it after providing the database name by selecting tables and views as needed.

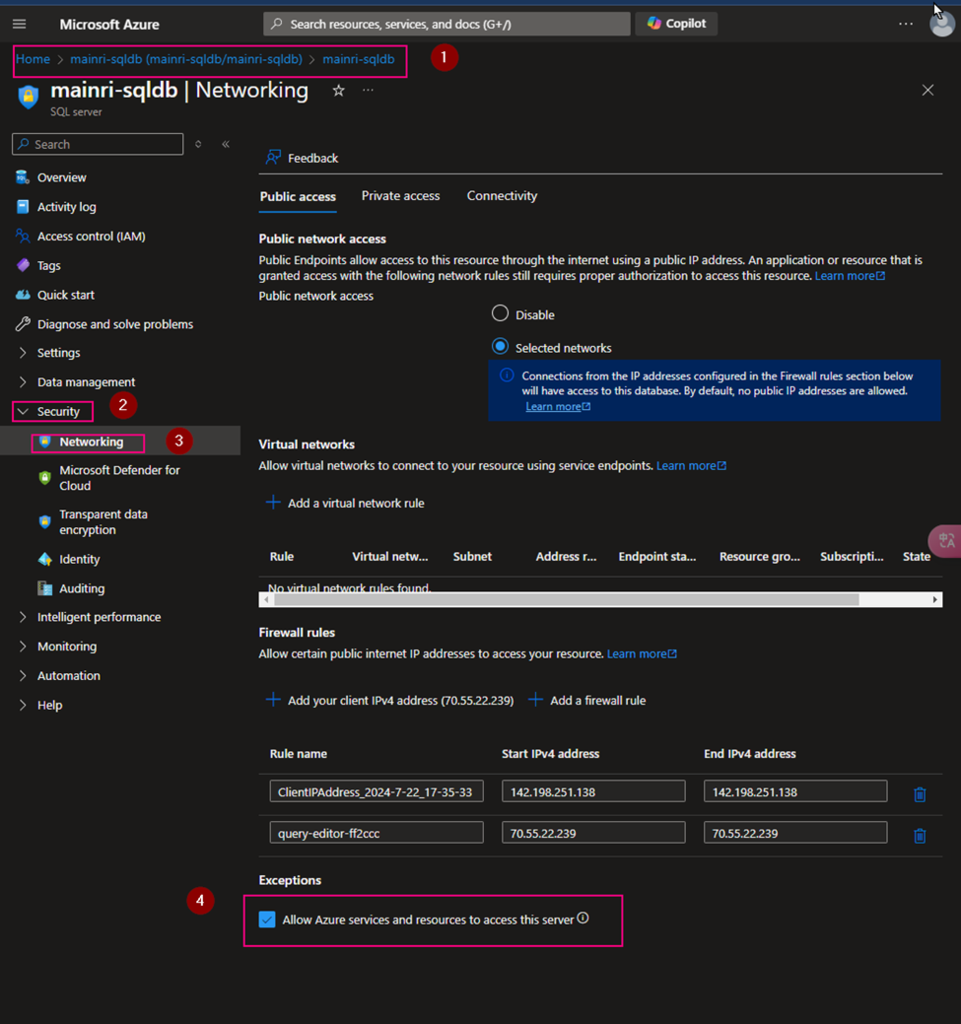
Update firewall settings.

If your database server has a firewall enabled, you need to update the firewall to allow access. Simply show you here.

Azure Portal > SQL Database > Set Server Firewall> Security > Networking

Check “Allow Azure services and resources to access this server”

Key Vault Set up

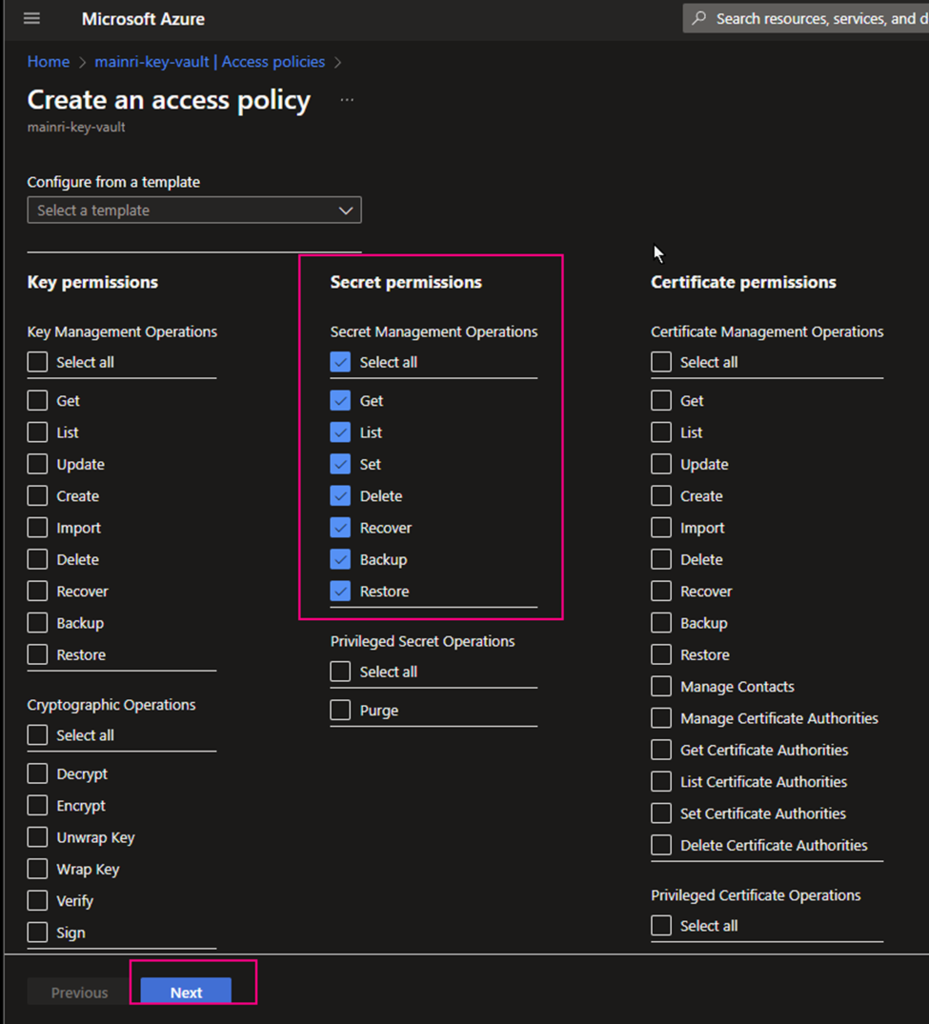
Create access policies

From Azure Portal > [ your key vault ] > Access Policies

Secret permissions

select all.

Principal

find out “[your purview]”.

Type your purview account to search. For me, I use “mainri-purview” as an example.

Click “next” … create

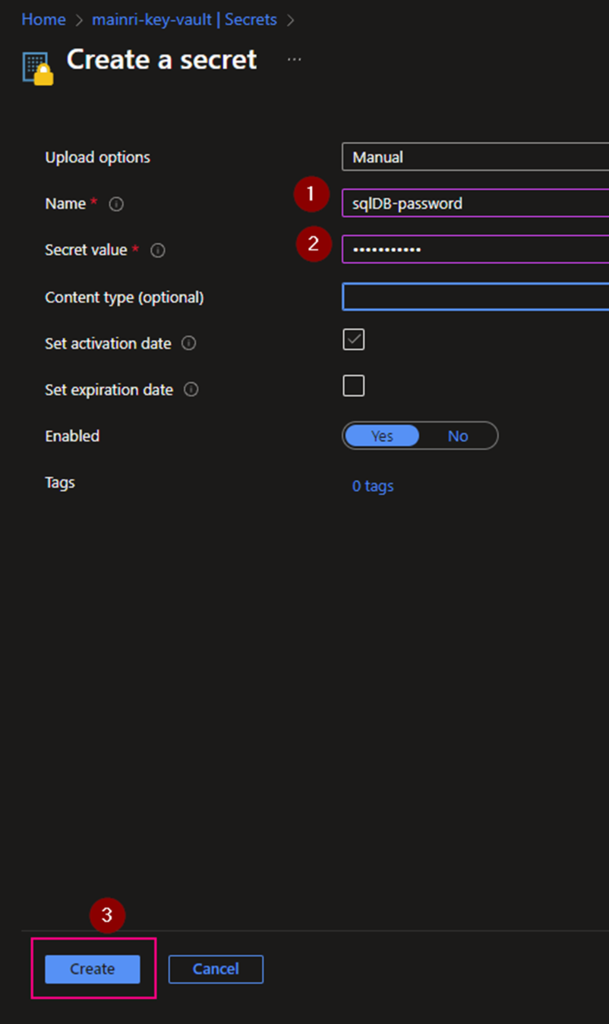
Create a Secrets

[your key vault] > Objects > Secrets

Generate a secret

We completed the Azure Key vault configuration.

It’s time for configuration of Purview for scanning SQL Database.

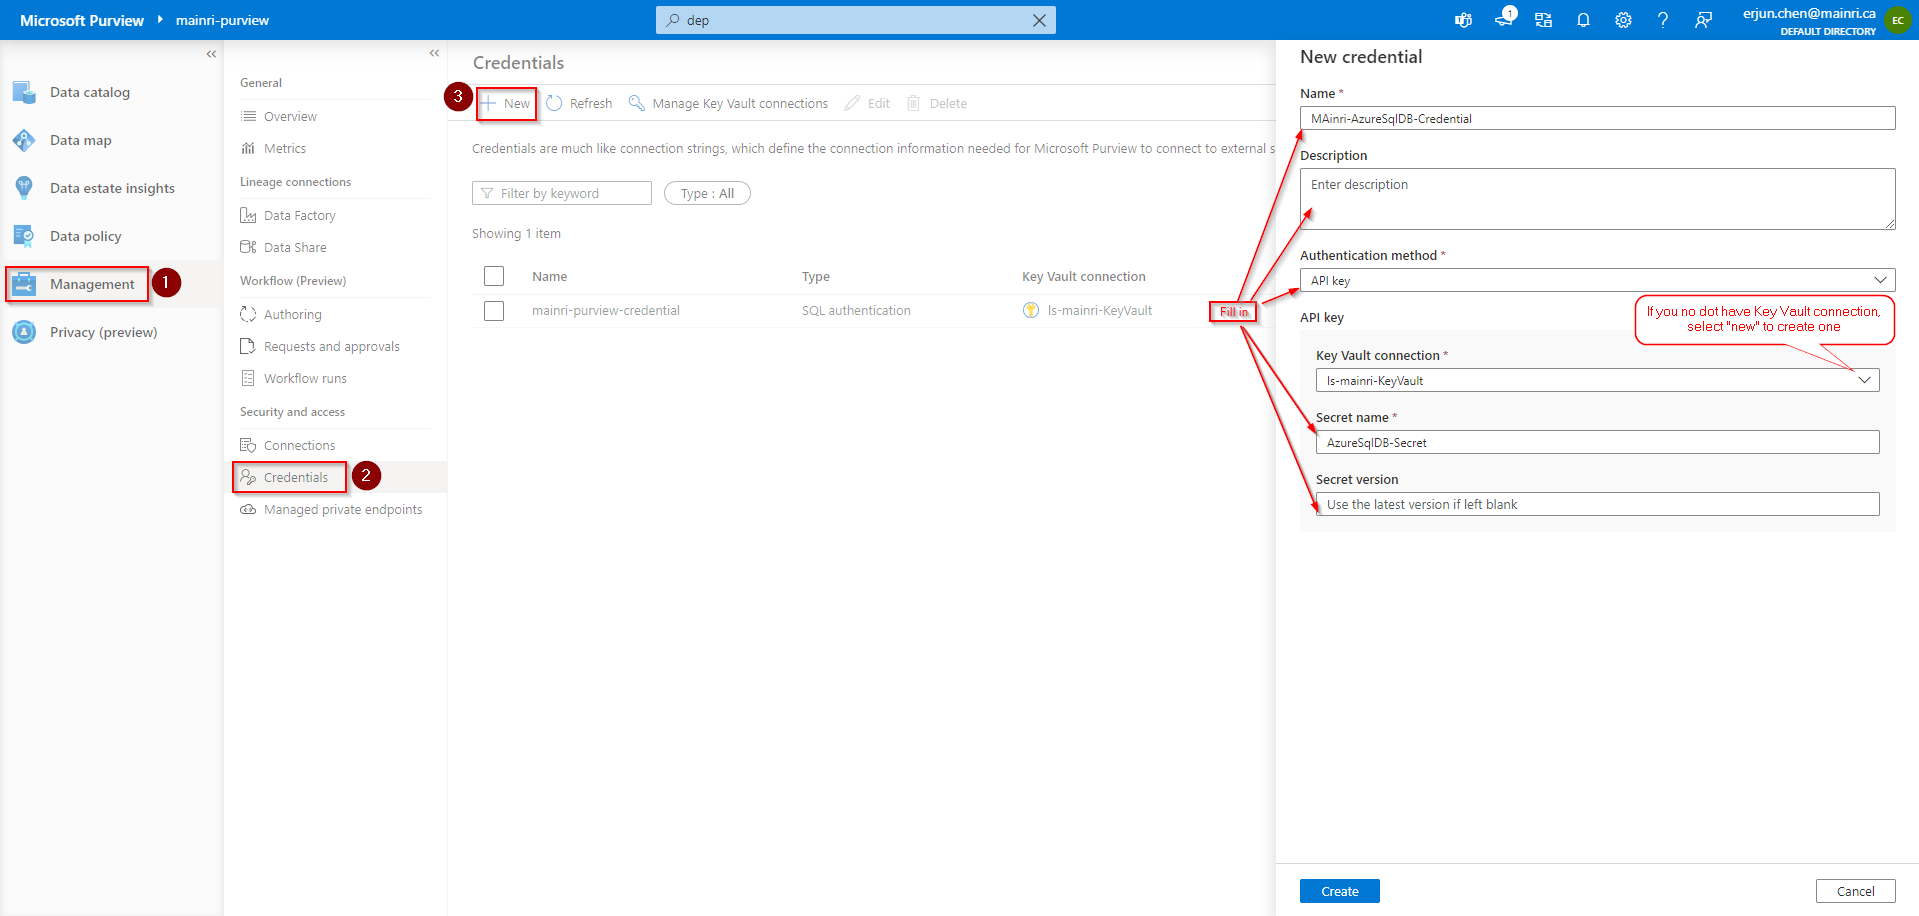
Configure authentication for a scan

Azure Purview > Management > Credentials

Manage Key vault connection

Add a new.

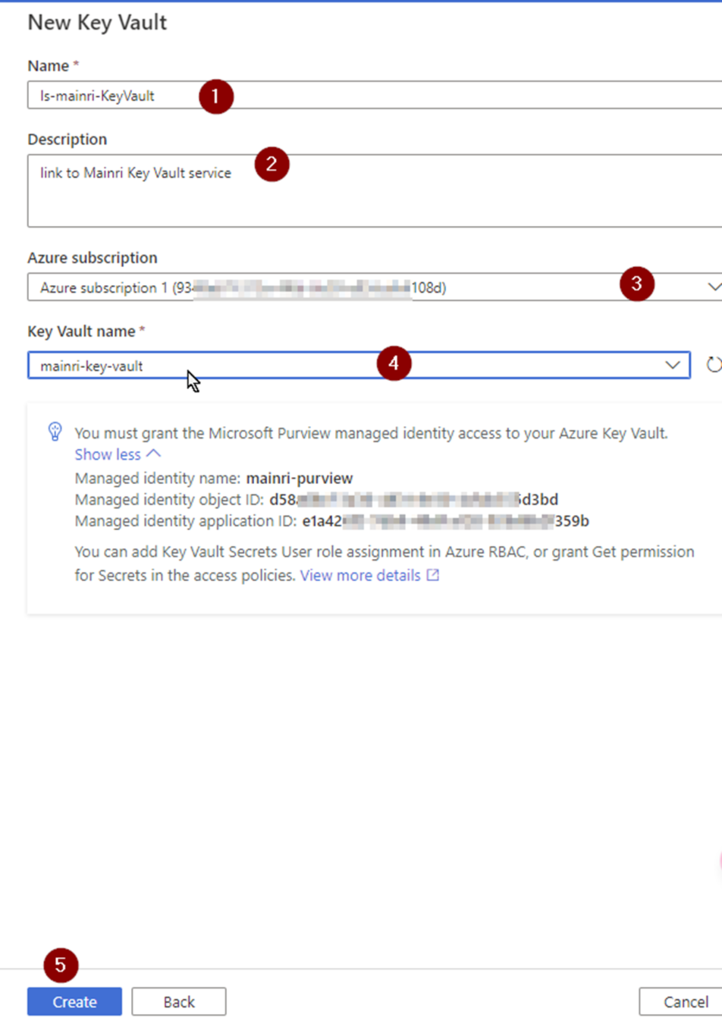
If you do not have linked service to your key vault, select “new” create a new one.

Fill in all values, click “Create” , Key-vault connection created.

Then, you will back to “new credential” screen.

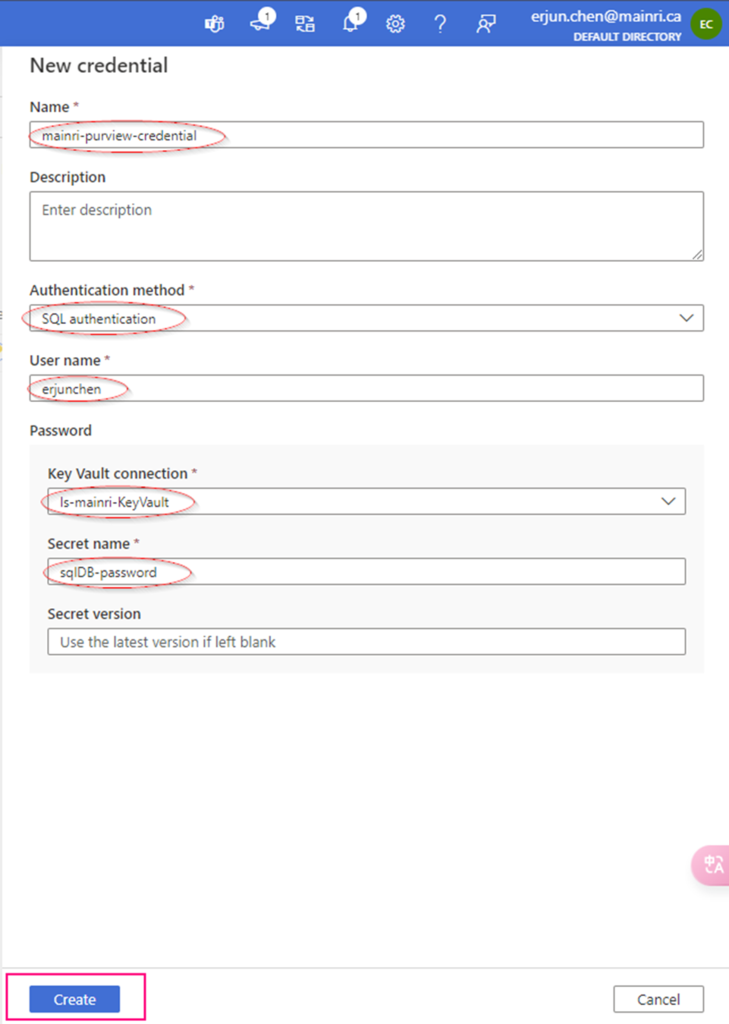
Create Credential

Fill in all values, click “create”

Now, the credential created

Setup Scan

Did you remember we have created collections previously?

Go back: Data Map >  Data Source >

Create a scan

Full screen

Pay attention here: Lineage extraction (preview)

I choose “off”.

To successfully turn on Lineage extraction, you must do the following:

  • Provide the db_owner role in Azure SQL Database for Microsoft Purview MSI
  • Run “create Master Key” in Azure SQL Database (only if not already exists)

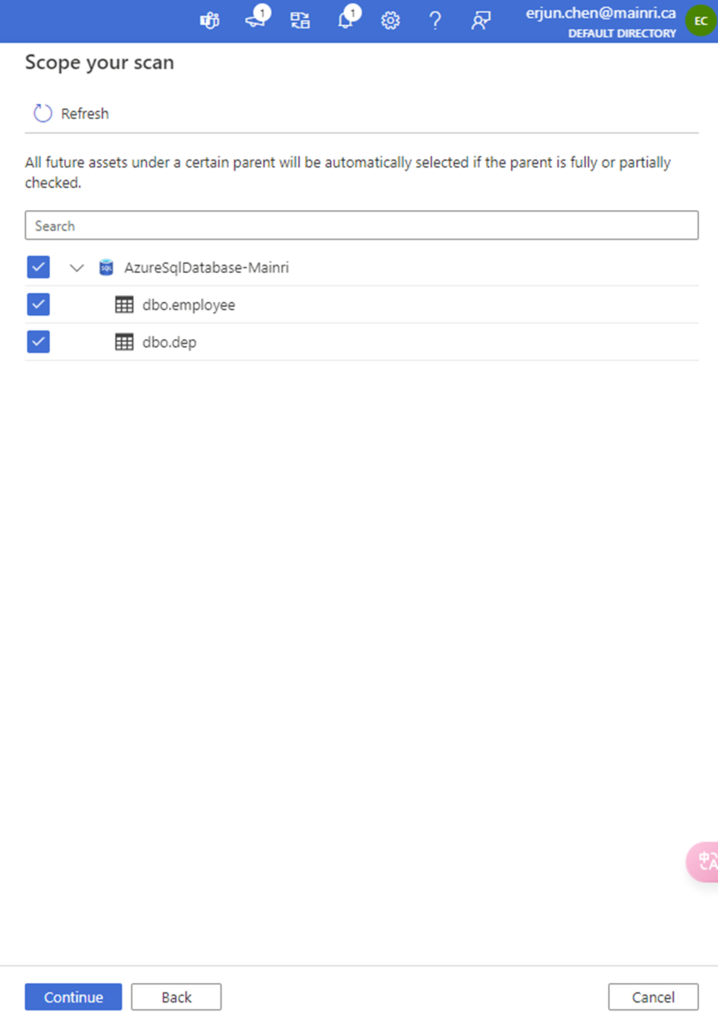
Scope your scan

Check to see what Entity you want to scan.

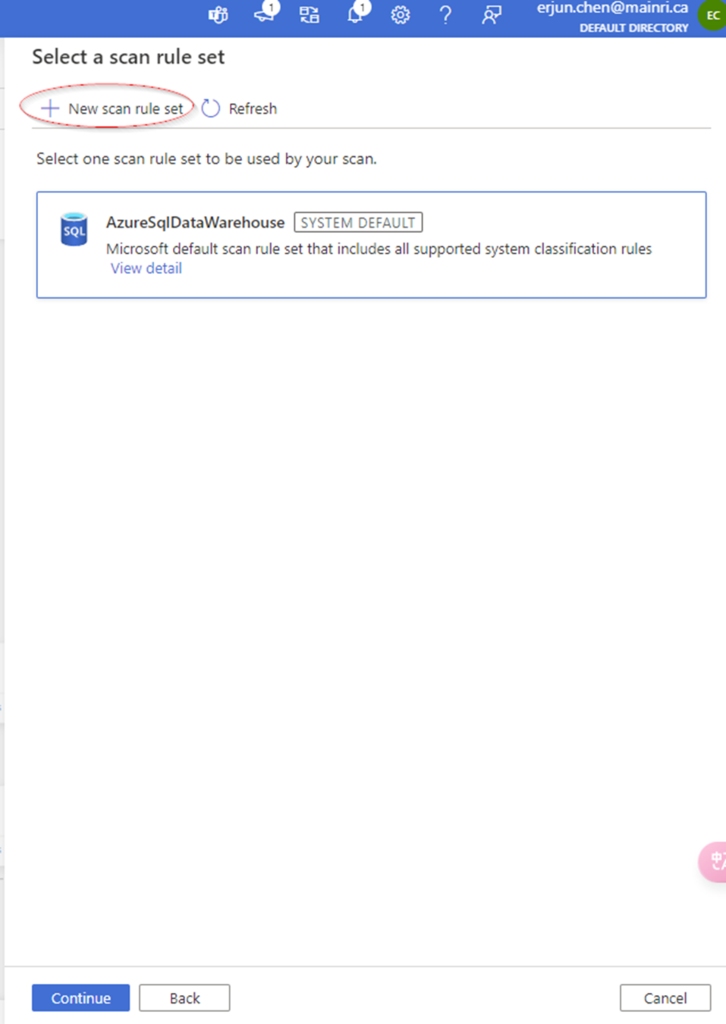
Select a scan rule set.

At here, you are able to add new scan rule set if you like. For me I selected azure purview system default SQL data warehouse scan rule set.

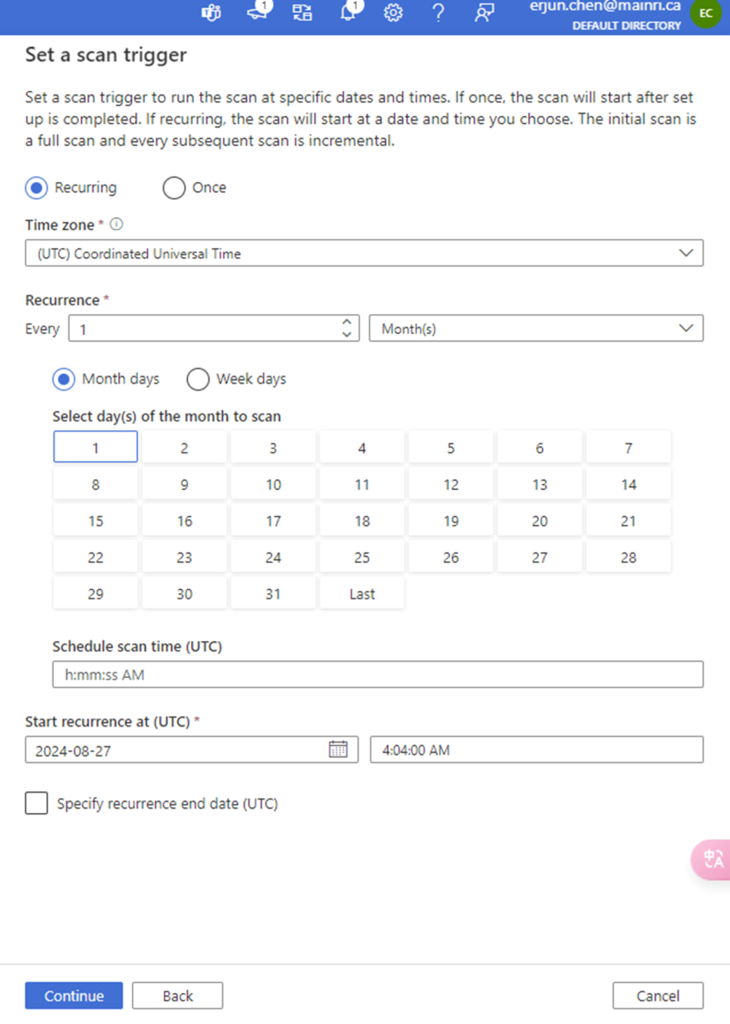
Set a scan trigger

You can either schedule the scan or once. This is very straight forward.

Once the process is complete, you can view detail

Alright, we’ve done the scan SQL Database in Azure Purview.

Next step: Day 6 – Registering Azure Synapse Analytics workspaces and scan in Microsoft Purview

Please do not hesitate to contact me if you have any questions at William . chen @ mainri.ca

(remove all space from the email account 😊)