In Azure Data Factory (ADF) or Synapse, using Copy Activity with a File System as a source or sink is common when dealing with on-premises file systems, network file shares, or even cloud-based file storage systems. Here’s an overview of how it works, key considerations, and steps to set it up.
Key Components and setup with File System:
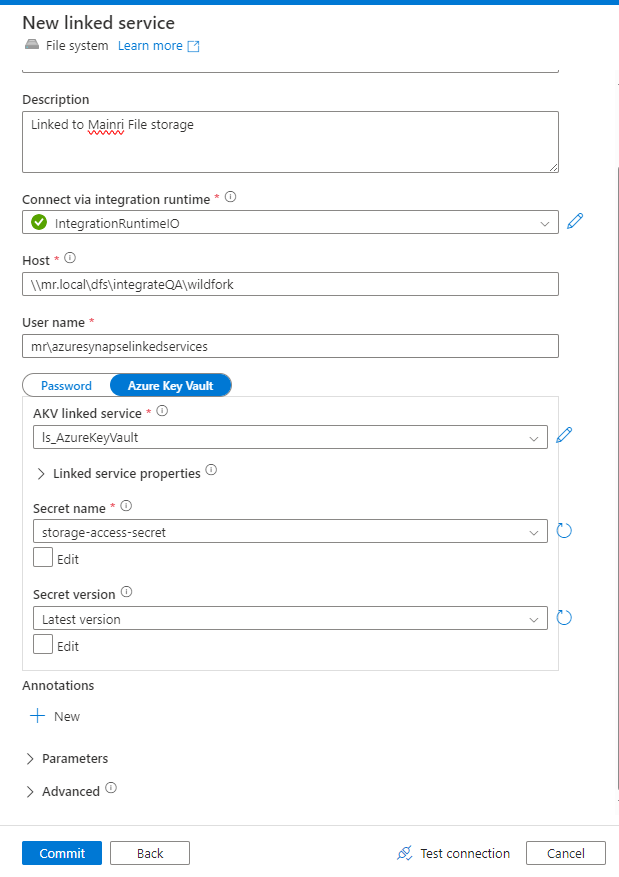
Create a File System Linked Service
Linked Service: For on-premises or network file systems, you typically need a Self-hosted Integration Runtime (SHIR).
Fill in the required fields:
Connection: Specify the file system type (e.g., network share or local path).
Authentication: Provide the appropriate credentials, such as username/password, or key-based authentication.
If the file system is on-premises, configure the Self-hosted Integration Runtime to access it.
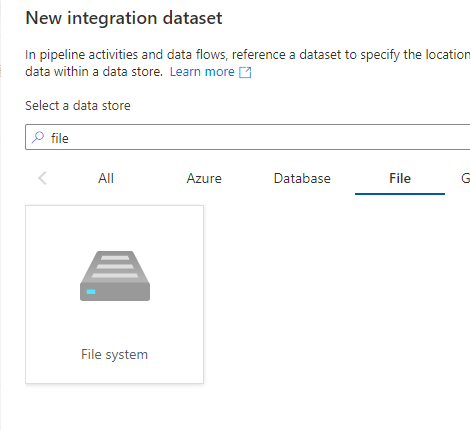
Create File System Dataset
Go to Datasets in ADF and create a new dataset. Select File System as the data source.
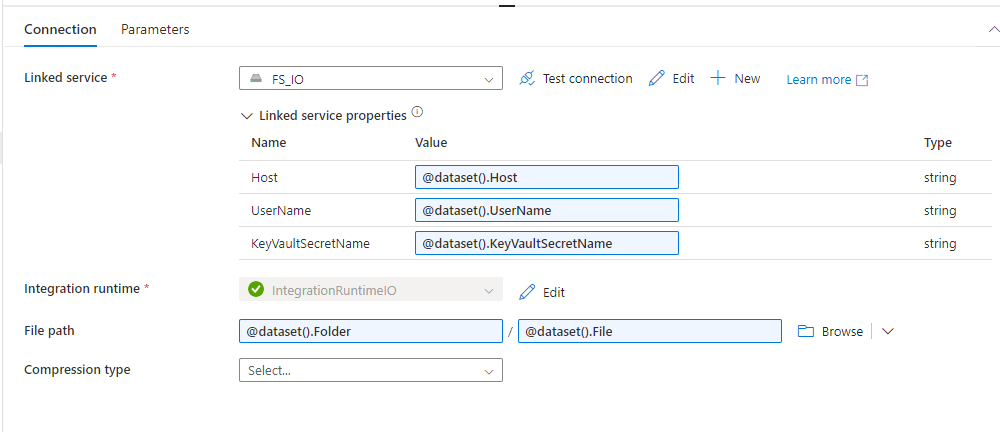
Configure the dataset to point to the correct file or folder:
Specify the File Path.
Define the file format (e.g., CSV, JSON, XML).
Set any schema information if required (for structured data like CSV).
Considerations:
Integration Runtime: For on-premises file systems, the Self-hosted Integration Runtime (SHIR) is essential to securely move data from private networks.
Performance: Data transfer speeds depend on network configurations (for on-prem) and ADF’s parallelism settings.
File Formats: Ensure proper handling of different file formats (e.g., CSV, JSON, Binary etc.) and schema mapping for structured files.
Security: Ensure credentials and network configurations are correctly set up, and consider encryption if dealing with sensitive data.
Common Errors:
Connection issues: If the SHIR is not correctly configured, or if there are issues with firewall or network settings, ADF may not be able to access the file system.
Permission issues: Ensure that the correct permissions are provided to access the file system (file share, SMB, FTP, etc.).
Please do not hesitate to contact me if you have any questions at William . chen @ mainri.ca
side-by-side comparison of “All-Purpose Cluster”, “Job Cluster”, “SQL Warehouse” and Instance Pools in Azure Databricks, covering their key features, use cases, and differences:
Key Differences
All-Purpose Cluster: Best for interactive workloads, collaborative notebooks, and exploration. It stays running until you manually stop it or it hits the idle timeout. Not as cost-effective for long-running or scheduled tasks.
Job Cluster: Best for scheduled and automated jobs. It starts automatically when the job begins and shuts down after the job finishes, which makes it cost-efficient and ideal for production ETL or data processing jobs.
SQL Warehouse: Best for SQL analytics and BI tool integration. It is specifically optimized for SQL queries, offering auto-scaling based on query load and cost-efficient SQL query execution on Delta Lake tables.
Instance Pools: Reducing startup times for frequently created clusters. Sharing resources among multiple teams or clusters.
Side by side comparison
All-Purpose Cluster
Job Cluster
SQL Warehouse (formerly SQL Endpoints)
Instance Pools
Purpose
General-purpose compute environment for interactive workloads.
Dedicated to run a specific job or task. Automatically terminates after the job.
Optimized for running SQL queries, dashboards, and BI analytics on Delta Lake.
resource management feature that pre-allocate virtual machines (VMs) to reduce cluster startup times and optimize costs.
Usage
For interactive development in notebooks, collaboration, and ad-hoc analysis.
For scheduled or automated jobs (e.g., ETL tasks) that need to run Spark-based processing.
For SQL-based workloads, querying data in Delta Lake, and BI tools (e.g., Power BI, Tableau).
Supporting clusters
Primary Workload
Interactive development (notebooks, data exploration, ad-hoc queries).
Automated Spark jobs with dedicated, isolated clusters for each job.
SQL analytics and dashboards, running SQL queries against Delta Lake tables.
Resource optimization
Cluster Lifecycle
Remains active until manually terminated or idle timeout is reached.
Created automatically when a job is triggered, and terminated when the job is done.
SQL Warehouses scale up/down based on query demand; remain active based on usage settings.
Pre-warmed VMs (idle terminate)
Resource Allocation
Configurable resources, manual start/stop, and autoscaling available.
Dynamically allocated resources based on job requirements, with autoscaling.
Autoscaling based on SQL query demand; optimized for SQL workloads.
Cost
Always running unless manually stopped or auto-terminated, can be expensive if left running.
More cost-efficient for scheduled jobs, as the cluster runs only during the job execution.
Efficient for SQL queries with autoscaling; cost based on query execution.
Optimizes cluster creation
Performance
Good for interactive, collaborative workloads but may incur higher costs if not optimized.
Highly performant for running isolated, parallel jobs without interference from other workloads.
Optimized for low-latency SQL query performance and concurrent query execution.
Scaling
Can scale automatically based on workload demand (within limits set by the user).
Scales based on the job’s needs; new clusters can be created for each job.
Scales automatically to accommodate concurrent SQL queries.
Isolation
Not isolated — multiple users can share the cluster, which may impact performance.
Fully isolated — each job runs on a separate cluster.
Isolated SQL queries but shared resources for concurrent workloads.
Shared resource pool
Ideal For
Data exploration, notebook development, machine learning experiments, ad-hoc queries.
Scheduled ETL/ELT jobs, production jobs, or one-time data processing tasks.
SQL analytics, dashboards, and BI tool integration for querying Delta Lake.
Supporting clusters
Supported Languages
Python, Scala, R, SQL, and more via notebooks.
Python, Scala, R, SQL (job-specific).
SQL only.
Management
Requires manual monitoring and termination.
Automatic termination after job completion.
Automatically managed scaling and uptime based on usage.
Faster cluster launches
Example Use Case
Running notebooks to explore and analyze data, performing machine learning experiments.
Running a scheduled Spark job that processes data in a pipeline or transformation.
Running SQL queries on Delta Lake, powering dashboards, or connecting to BI tools.
Restart Behavior
Can be manually stopped and restarted; the Cluster ID remains the same.
Automatically created and terminated for each job run; new Cluster ID for each job.
SQL Warehouse remains active based on usage, auto-scaling handles load; Warehouse ID remains the same.
Faster cluster launches
Side by side clusters comparisons.
Summary:
All-Purpose Clusters are ideal for interactive data exploration and multi-user environments, but they can be costly if left running for too long.
Job Clusters are used for single, isolated tasks (like scheduled ETL jobs) and are cost-effective since they are automatically created and terminated.
SQL Warehouses are specialized for SQL queries and business intelligence reporting, offering cost efficiency through on-demand scaling for SQL analytics.
Please do not hesitate to contact me if you have any questions at William . chen @ mainri.ca
Defines who can access or perform actions on resources.
Defines what actions are allowed for principals on securable objects.
Defines where privileges apply (i.e., what resources are being accessed).
Roles in Security Model
Principals represent users, groups, or roles that need permissions to access objects.
Privileges are permissions or grants that specify the actions a principal can perform.
Securable objects are the data resources and define the scope of where privileges are applied.
Granularity
Granularity depends on the level of access required for individual users or groups.
Granular permissions such as SELECT, INSERT, UPDATE, DELETE, or even specific column-level access.
Granular levels of objects from the entire catalog down to individual tables or columns.
Hierarchy
– Principals can be individual users, but more commonly, groups or roles are used to simplify management.
– Privileges can be granted at various levels (catalog, schema, table) and can be inherited from parent objects.
– Securable objects are structured hierarchically: catalogs contain schemas, which contain tables, etc.
Management
– Principals are typically managed by identity providers (e.g., Azure Entra ID, Databricks users, Active Directory).
– Privileges are managed through SQL commands like GRANT or REVOKE in systems like Unity Catalog.
– Securable objects are resources like catalogs, schemas, and tables that need to be protected with permissions.
Databricks Example
– User: databricks-user – Group: DataScientists
– GRANT SELECT ON TABLE sales TO DataScientists`;
– Catalog: main – Schema: sales_db – Table: transactions
Side by side Comparison
Securable objects in Unity Catalog are hierarchical, and privileges are inherited downward. The highest level object that privileges are inherited from is the catalog. This means that granting a privilege on a catalog or schema automatically grants the privilege to all current and future objects within the catalog or schema.
Show grants on objects in a Unity Catalog metastore
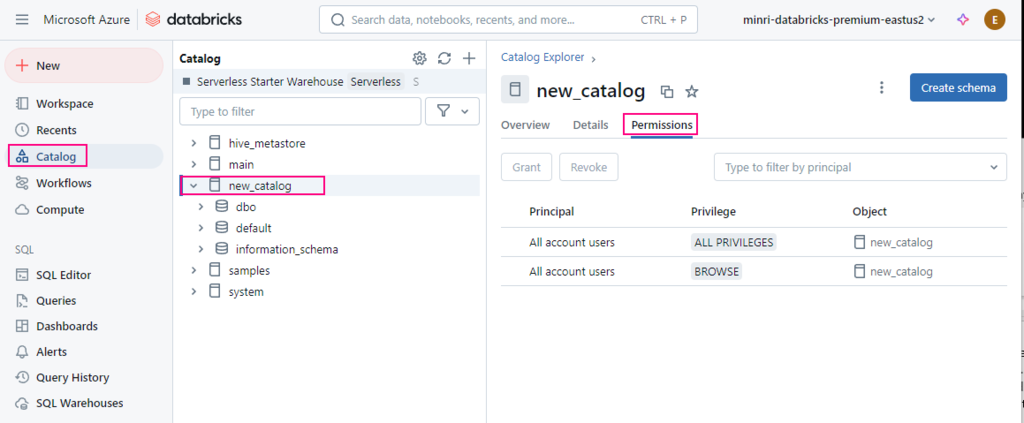
Catalog Explorer
In your Azure Databricks workspace, click Catalog.
Select the object, such as a catalog, schema, table, or view.
Go to the Permissions tab.
SQL
Run the following SQL command in a notebook or SQL query editor. You can show grants on a specific principal, or you can show all grants on a securable object.
SHOW GRANTS [principal] ON <securable-type> <securable-name>
For example, the following command shows all grants on a schema named default in the parent catalog named main:
SHOW GRANTS ON SCHEMA main.default;
Please do not hesitate to contact me if you have any questions at William . chen @ mainri.ca
A catalog is the primary unit of data organization in the Azure Databricks Unity Catalog data governance model. it is the first layer in Unity Catalog’s three-level namespace (catalog.schema.table-etc). They contain schemas, which in turn can contain tables, views, volumes, models, and functions. Catalogs are registered in a Unity Catalog metastore in your Azure Databricks account.
Catalogs
Organize my data into catalogs
Each catalog should represent a logical unit of data isolation and a logical category of data access, allowing an efficient hierarchy of grants to flow down to schemas and the data objects that they contain.
Catalogs therefore often mirror organizational units or software development lifecycle scopes. You might choose, for example, to have a catalog for production data and a catalog for development data, or a catalog for non-customer data and one for sensitive customer data.
Data isolation using catalogs
Each catalog typically has its own managed storage location to store managed tables and volumes, providing physical data isolation at the catalog level.
Catalog-level privileges
grants on any Unity Catalog object are inherited by children of that object, owning a catalog
Catalog types
Standard catalog: the typical catalog, used as the primary unit to organize your data objects in Unity Catalog.
Foreign catalog: a Unity Catalog object that is used only in Lakehouse Federation scenarios.
Default catalog
If your workspace was enabled for Unity Catalog automatically, the pre-provisioned workspace catalog is specified as the default catalog. A workspace admin can change the default catalog as needed.
Workspace-catalog binding
If you use workspaces to isolate user data access, you might want to use workspace-catalog bindings. Workspace-catalog bindings enable you to limit catalog access by workspace boundaries.
Create catalogs
Requirements: be an Azure Databricks metastore admin or have the CREATE CATALOG privilege on the metastore
To create a catalog, you can use Catalog Explorer, a SQL command, the REST API, the Databricks CLI, or Terraform. When you create a catalog, two schemas (databases) are automatically created: default and information_schema.
Catalog Explorer
Log in to a workspace that is linked to the metastore.
Click Catalog.
Click the Create Catalog button.
On the Create a new catalog dialog, enter a Catalog name and select the catalog Type that you want to create: Standard catalog: a securable object that organizes data and AI assets that are managed by Unity Catalog. For all use cases except Lakehouse Federation and catalogs created from Delta Sharing shares.
Foreign catalog: a securable object that mirrors a database in an external data system using Lakehouse Federation.
Shared catalog: a securable object that organizes data and other assets that are shared with you as a Delta Sharing share. Creating a catalog from a share makes those assets available for users in your workspace to read.
SQL
standard catalog
CREATE CATALOG [ IF NOT EXISTS ] <catalog-name>
   [ MANAGED LOCATION '<location-path>' ]
   [ COMMENT <comment> ];
<catalog-name>: A name for the catalog.
<location-path>: Optional but strongly recommended. e.g. <location-path>: ‘abfss://my-container-name@storage-account-name.dfs.core.windows.net/finance’ or ‘abfss://my-container-name@storage-account-name.dfs.core.windows.net/finance/product’
shared catalog
CREATE CATALOG [IF NOT EXISTS] <catalog-name>
USING SHARE <provider-name>.<share-name>;
[ COMMENT <comment> ];
foreign catalog
CREATE FOREIGN CATALOG [IF NOT EXISTS] <catalog-name> USING CONNECTION <connection-name>
OPTIONS [(database '<database-name>') | (catalog '<external-catalog-name>')];
<catalog-name>: Name for the catalog in Azure Databricks.
<connection-name>: The connection object that specifies the data source, path, and access credentials.
<database-name>: Name of the database you want to mirror as a catalog in Azure Databricks. Not required for MySQL, which uses a two-layer namespace. For Databricks-to-Databricks Lakehouse Federation, use catalog ‘<external-catalog-name>’ instead.
<external-catalog-name>: Databricks-to-Databricks only: Name of the catalog in the external Databricks workspace that you are mirroring.
Schemas
Schema is a child of a catalog and can contain tables, views, volumes, models, and functions. Schemas provide more granular categories of data organization than catalogs.
Precondition
Have a Unity Catalog metastore linked to the workspace where you perform the schema creation
Have the USE CATALOG and CREATE SCHEMA data permissions on the schema’s parent catalog
To specify an optional managed storage location for the tables and volumes in the schema, an external location must be defined in Unity Catalog, and you must have the CREATE MANAGED STORAGE privilege on the external location.
Create a schema
To create a schema in Unity Catalog, you can use Catalog Explorer or SQL commands.
To create a schema in Hive metastore, you must use SQL commands.
Catalog Explorer
Log in to a workspace that is linked to the Unity Catalog metastore.
Click Catalog.
In the Catalog pane on the left, click the catalog you want to create the schema in.
In the detail pane, click Create schema.
Give the schema a name and add any comment that would help users understand the purpose of the schema.
(Optional) Specify a managed storage location. Requires the CREATE MANAGED STORAGE privilege on the target external location. See Specify a managed storage location in Unity Catalog and Managed locations for schemas.
Click Create.
Grant privileges on the schema. See Manage privileges in Unity Catalog.
A metastore is the top-level container for data in Unity Catalog. Unity Catalog metastore register metadata about securable objects (such as tables, volumes, external locations, and shares) and the permissions that govern access to them.
Each metastore exposes a three-level namespace (catalog.schema.table) by which data can be organized. You must have one metastore for each region in which your organization operates.
Microsoft said that Databricks began to enable new workspaces for Unity Catalog automatically on November 9, 2023, with a rollout proceeding gradually across accounts. Otherwise, we must follow the instructions in this article to create a metastore in your workspace region.
Preconditions
Before we begin
1. Microsoft Entra ID Global Administrator
The first Azure Databricks account admin must be a Microsoft Entra ID Global Administrator
The first Azure Databricks account admin must be a Microsoft Entra ID Global Administrator at the time that they first log in to the Azure Databricks account console.
Upon first login, that user becomes an Azure Databricks account admin and no longer needs the Microsoft Entra ID Global Administrator role to access the Azure.
2. Premium Tire
Databricks workspaces Pricing tire must be Premium Tire.
3. The same region
Databricks region is in the same as ADLS’s region. Each region allows one metastore only.
Manual create metastore and enable unity catalog process
Create an ADLS G2 (if you did not have) Create storage account and container to store manage table and volume data at the metastore level, the container will be the root storage for the unity catalog metastore
Create an Access Connector for Azure Databricks
Grant “Storage Blob Data Contributor” role to access Connector for Azure Databricks on ADLS G2 storage Account
Enable Unity Catalog by creating Metastore and assigning to workspace
Step by step Demo
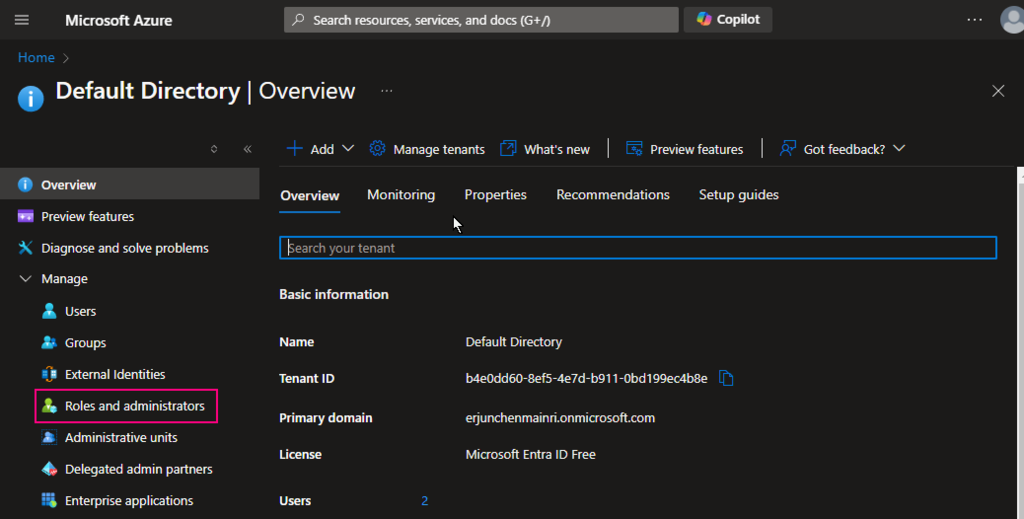
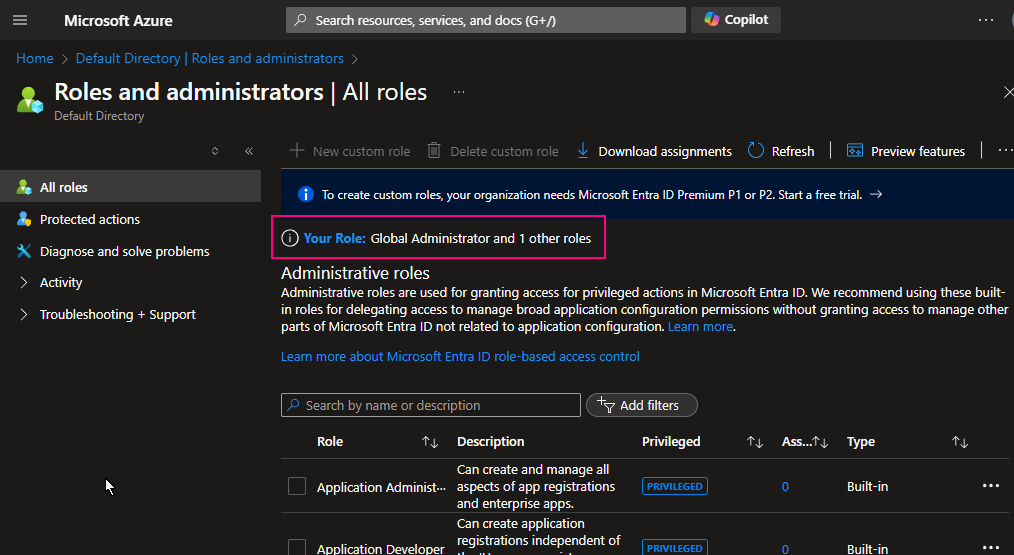
1. Check Entra ID role.
To check whether I am a Microsoft Entra ID Global Administrator role.
Azure Portal > Entra ID > Role and administrators
I am a Global Administrator
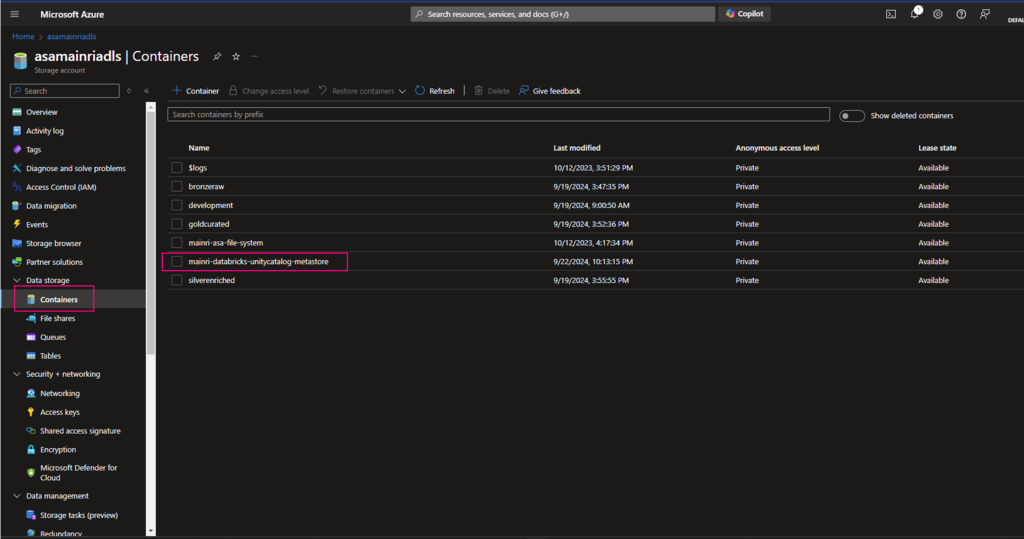
2. Create a container for saving metastore
Create a container at ROOT of ADLS Gen2
Since we have created an ADLS Gen2, directly move to create a container at root of ADLS.
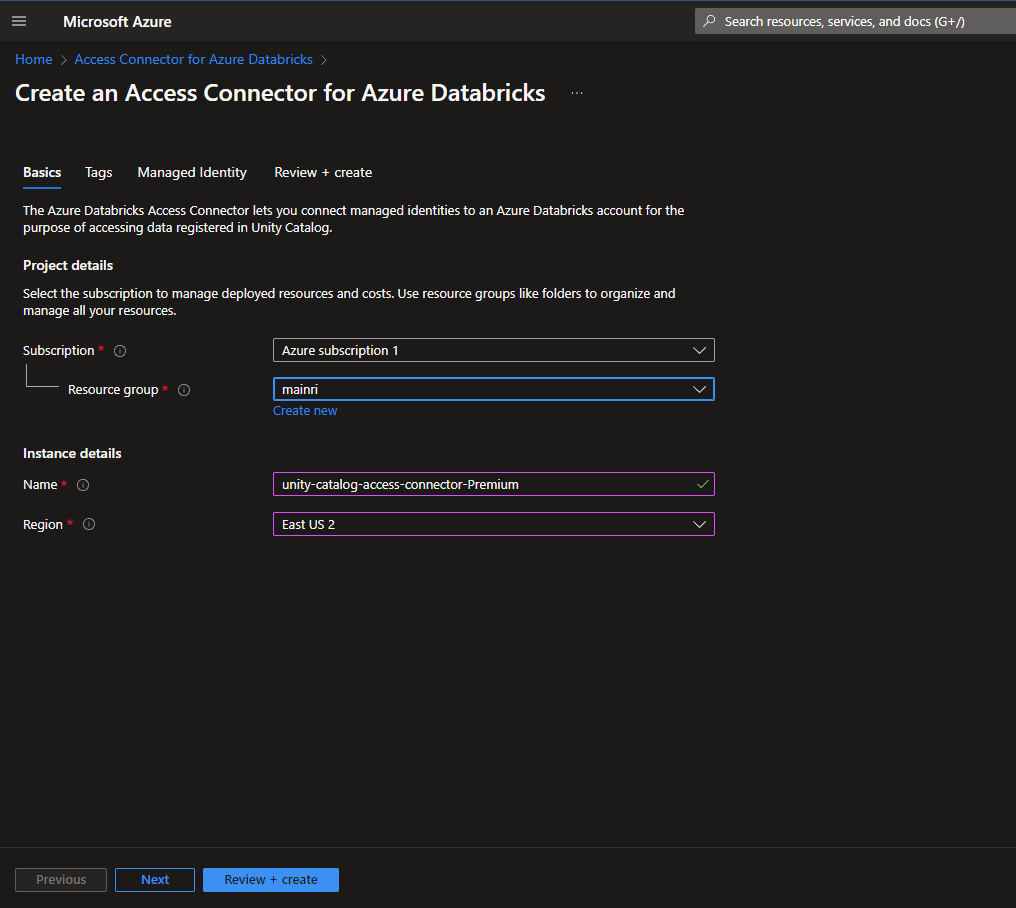
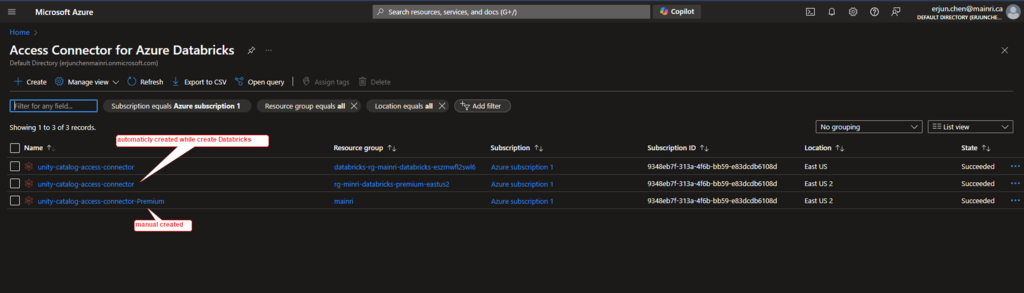
3. Create an Access Connector for Databricks
If it did not automatically create while you create Azure databricks service, manual create one.
Azure portal > Access Connector for Databricks
once all required fields filled, we can see a new access connector created.
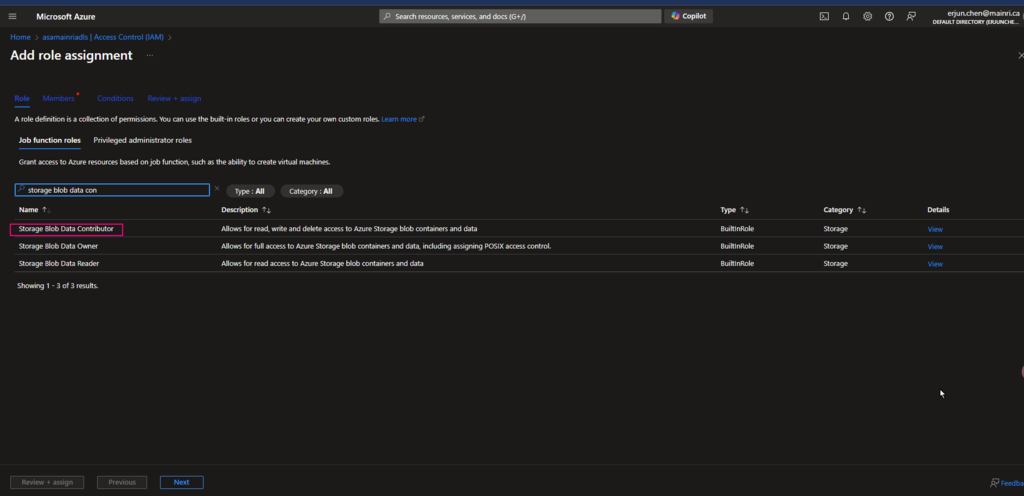
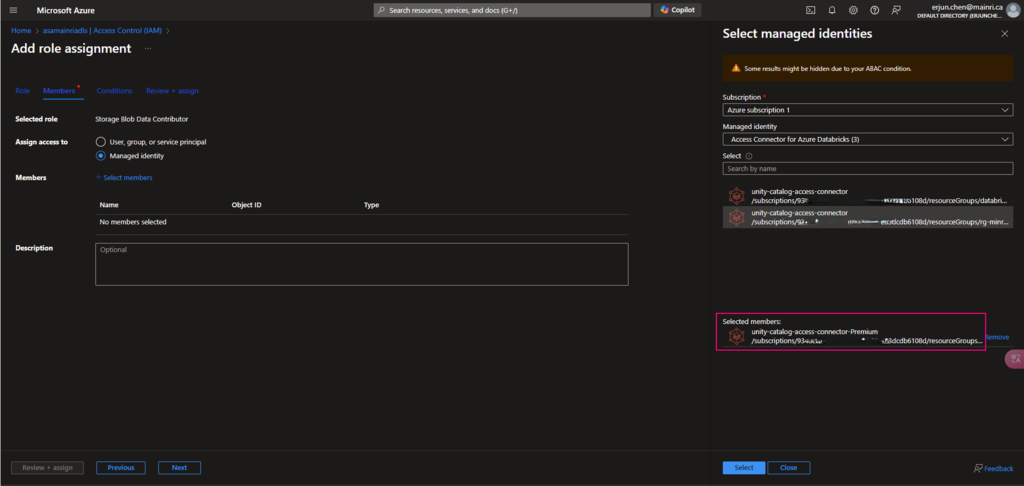
4. Grant Storage Blob Data Contributor to access Connector
Add “storage Blob data contributor” role assign to “access connector for Azure Databricks” I just created.
Azure Portal > ADLS Storage account > Access Control (IAM) > add role
Continue to add role assignment
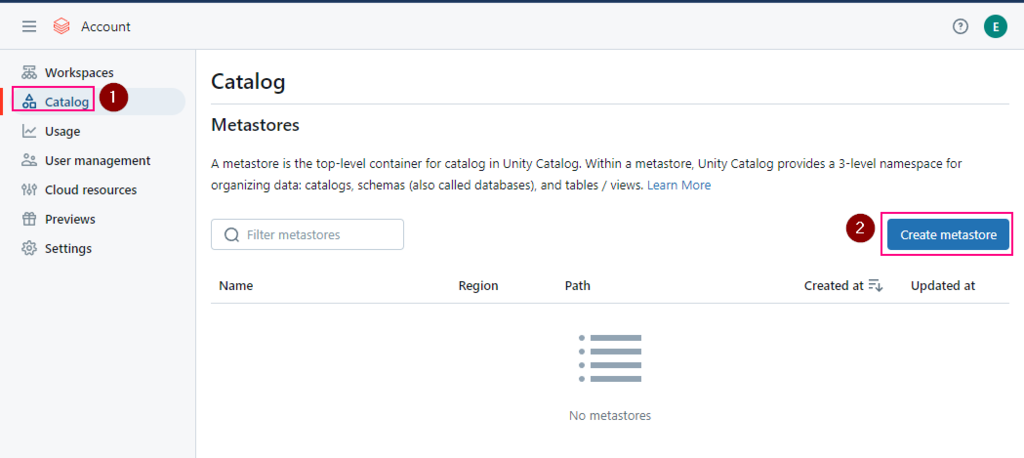
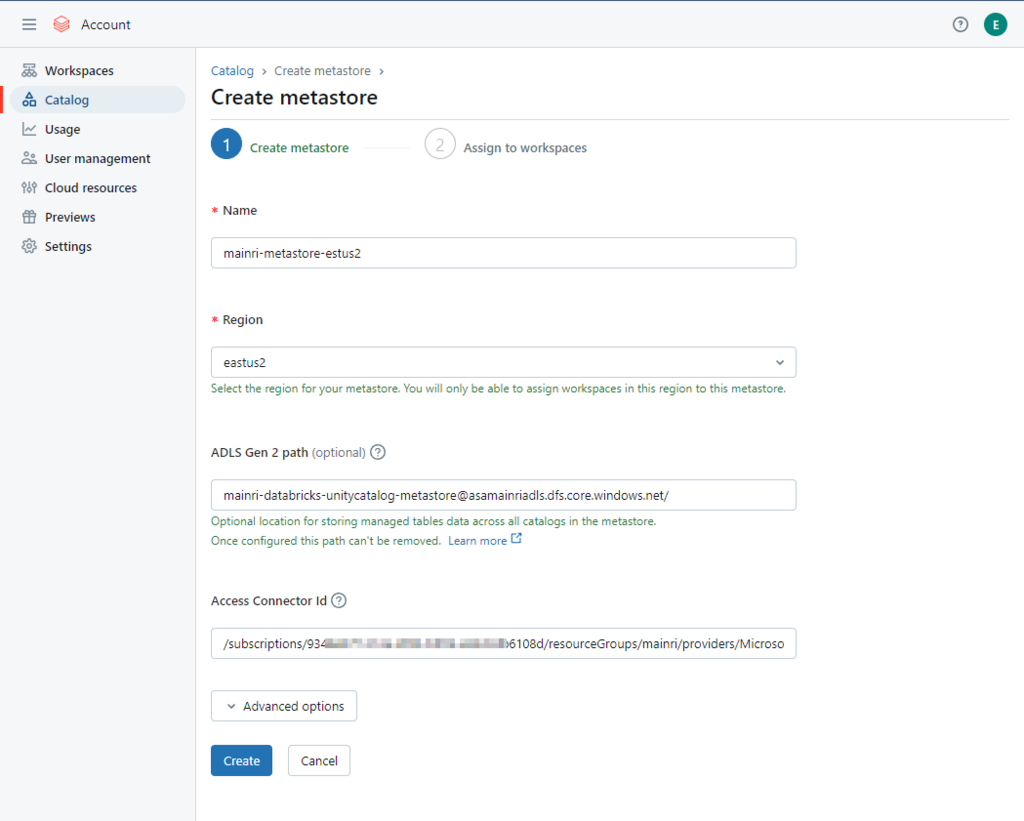
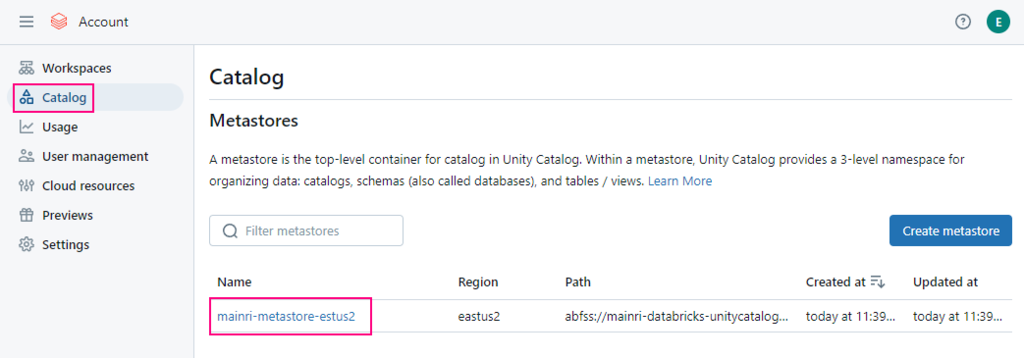
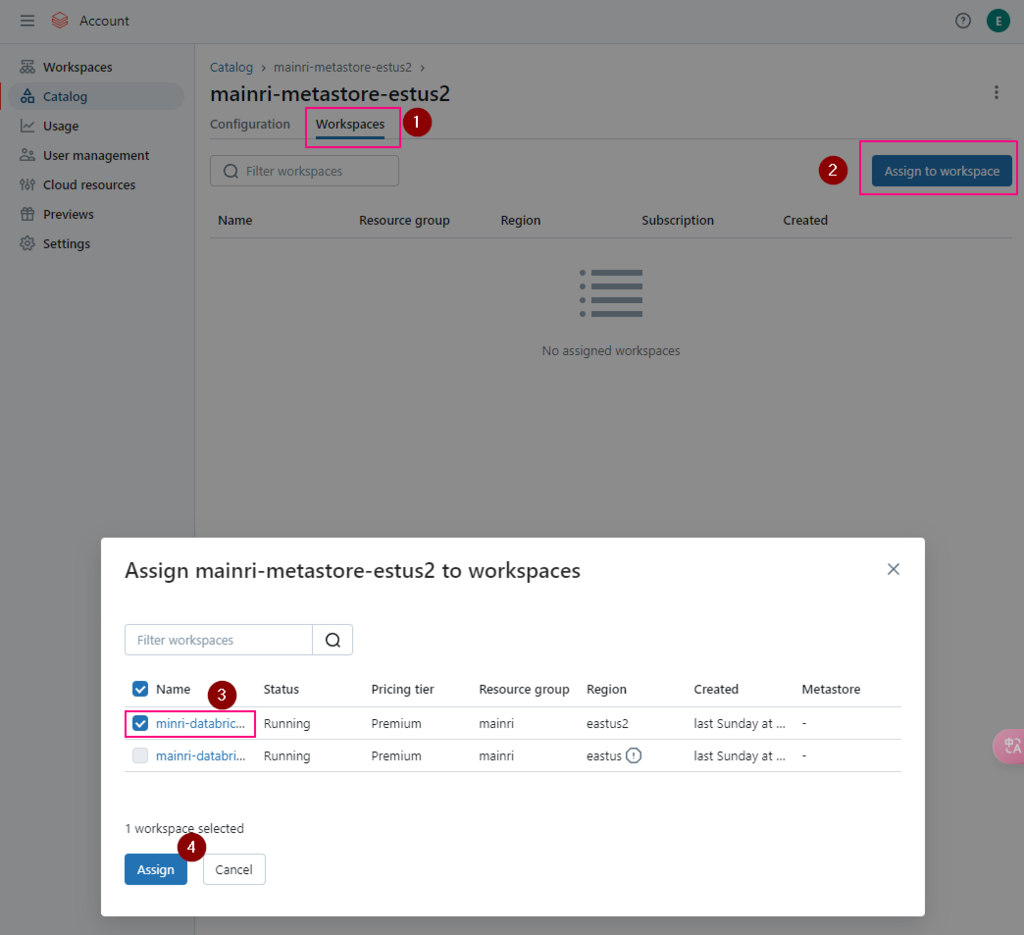
5. Create a metastore
If you are an account admin, you can login accounts console, otherwise, ask your account admin to help.
before you begin to create a metastore, make sure
You must be an Azure Databricks account admin. The first Azure Databricks account admin must be a Microsoft Entra ID Global Administrator at the time that they first log in to the Azure Databricks account console. Upon first login, that user becomes an Azure Databricks account admin and no longer needs the Microsoft Entra ID Global Administrator role to access the Azure Databricks account. The first account admin can assign users in the Microsoft Entra ID tenant as additional account admins (who can themselves assign more account admins). Additional account admins do not require specific roles in Microsoft Entra ID.
The workspaces that you attach to the metastore must be on the Azure Databricks Premium plan.
If you want to set up metastore-level root storage, you must have permission to create the following in your Azure tenant
Select the same region for your metastore. You will only be able to assign workspaces in this region to this metastore.
Container name and path The pattern is: <contain_name>@<storage_account_name>.dfs.core.windows.net/<path> For this demo I used this mainri-databricks-unitycatalog-metastore-eastus2@asamainriadls.dfs.core.windows.net/
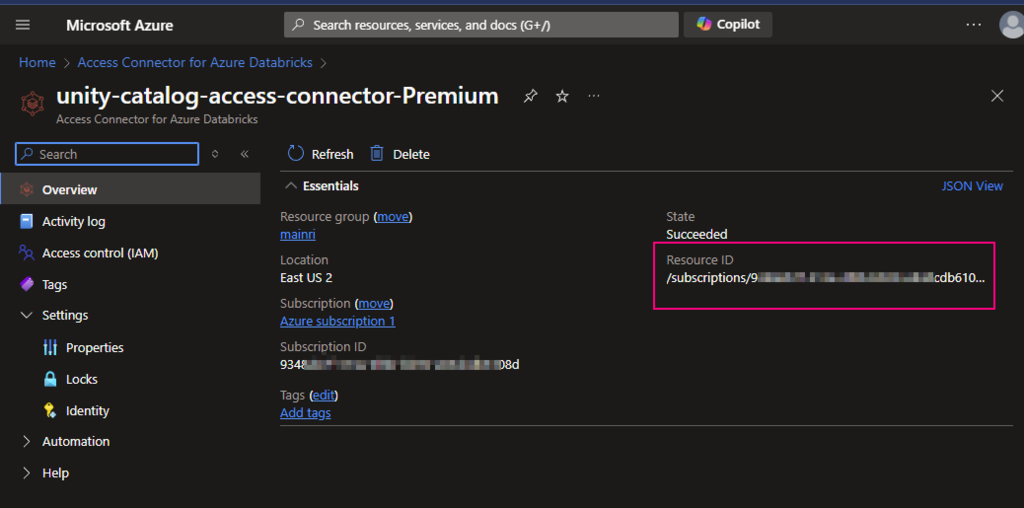
Access connector ID The pattern is: /subscriptions/{sub-id}/resourceGroups/{rg-name}/providers/Microsoft.databricks/accessconnects/<connector-name>
Find out the Access connector ID
Azure portal > Access Connector for Azure Databricks
For this demo I used this /subscriptions/9348XXXXXXXXXXX6108d/resourceGroups/mainri/providers/Microsoft.Databricks/accessConnectors/unity-catalog-access-connector-Premiu
Looks like this
Enable Unity catalog
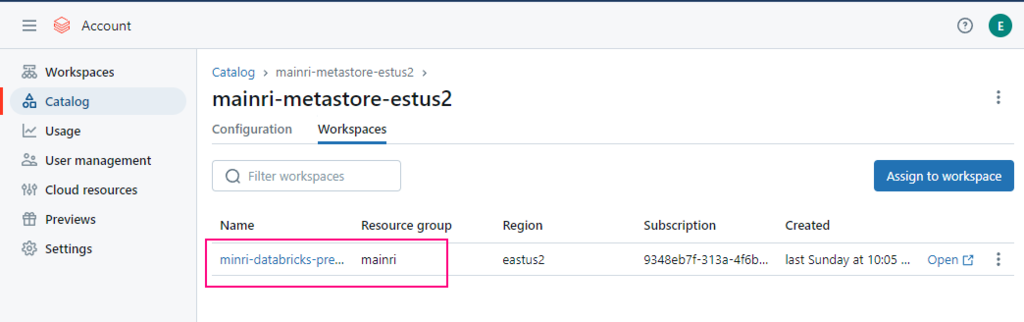
Assign to workspace
To enable an Azure Databricks workspace for Unity Catalog, you assign the workspace to a Unity Catalog metastore using the account console:
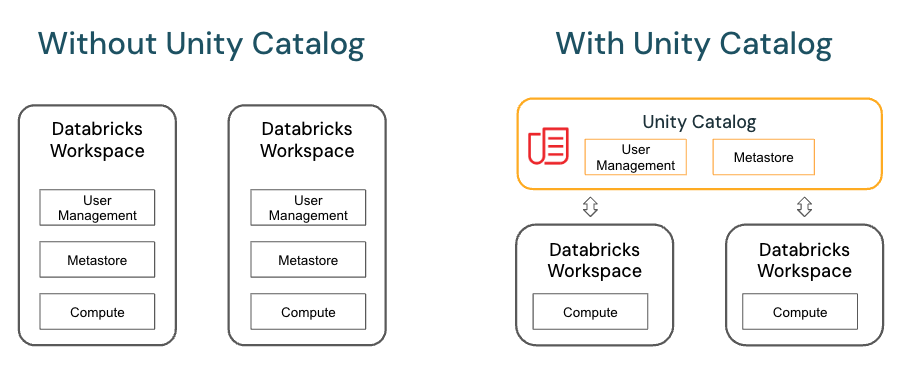
Unity Catalog is a fine-grained data governance solution for data present in a Data Lake for managing data governance, access control, and centralizing metadata across multiple workspaces. Unity Catalog provides centralized access control, auditing, lineage, and data discovery capabilities across Azure Databricks workspaces. It brings a new layer of data management and security to your Databricks environment
Unity Catalog provides centralized access control, auditing, lineage, and data discovery capabilities across Azure Databricks workspaces.
Key features of Unity Catalog include
Define once, secure everywhere: Unity Catalog offers a single place to administer data access policies that apply across all workspaces.
Standards-compliant security model: Unity Catalog’s security model is based on standard ANSI SQL and allows administrators to grant permissions in their existing data lake using familiar syntax, at the level of catalogs, schemas (also called databases), tables, and views.
Built-in auditing and lineage: Unity Catalog automatically captures user-level audit logs that record access to your data. Unity Catalog also captures lineage data that tracks how data assets are created and used across all languages.
Data discovery: Unity Catalog lets you tag and document data assets, and provides a search interface to help data consumers find data.
System tables (Public Preview): Unity Catalog lets you easily access and query your account’s operational data, including audit logs, billable usage, and lineage.
Unity Catalog object model
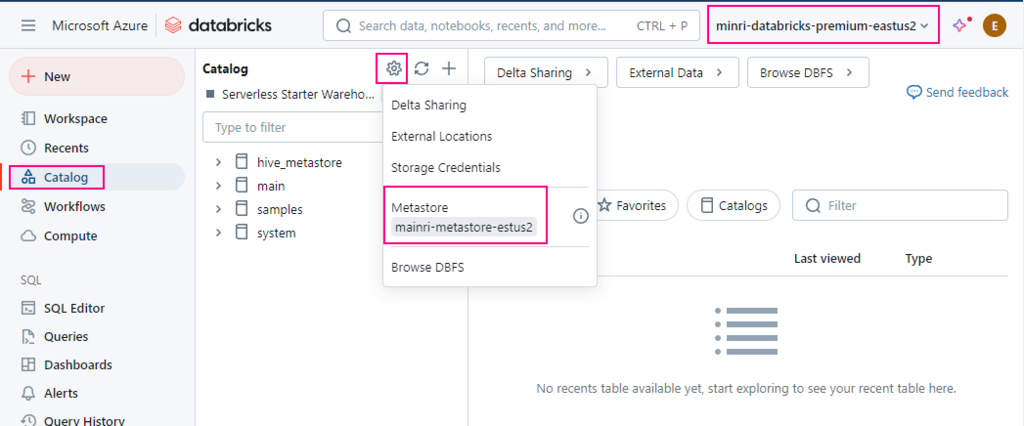
The hierarchy of database objects in any Unity Catalog metastore is divided into three levels, represented as a three-level namespace (catalog.schema.table-etc)
Metastore
The metastore is the top-level container for metadata in Unity Catalog. It registers metadata about data and AI assets and the permissions that govern access to them. For a workspace to use Unity Catalog, it must have a Unity Catalog metastore attached.
Object hierarchy in the metastore
In a Unity Catalog metastore, the three-level database object hierarchy consists of catalogs that contain schemas, which in turn contain data and AI objects, like tables and models.
Level one: Catalogs are used to organize your data assets and are typically used as the top level in your data isolation scheme.
Level two: Schemas (also known as databases) contain tables, views, volumes, AI models, and functions.
Working with database objects in Unity Catalog is very similar to working with database objects that are registered in a Hive metastore, with the exception that a Hive metastore doesn’t include catalogs in the object namespace. You can use familiar ANSI syntax to create database objects, manage database objects, manage permissions, and work with data in Unity Catalog. You can also create database objects, manage database objects, and manage permissions on database objects using the Catalog Explorer UI.
Granting and revoking access to database objects
You can grant and revoke access to securable objects at any level in the hierarchy, including the metastore itself. Access to an object implicitly grants the same access to all children of that object, unless access is revoked.
GRANT CREATE TABLE ON SCHEMA mycatalog.myschema TO `finance-team`;
Please do not hesitate to contact me if you have any questions at William . chen @ mainri.ca
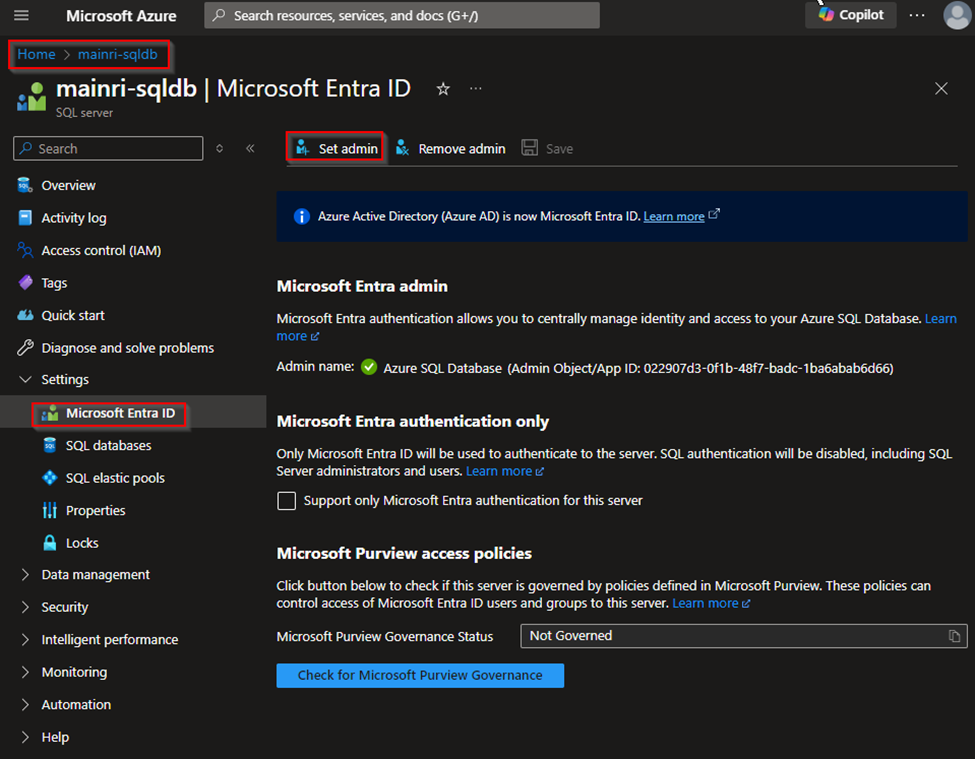
Azure SQL Database can be integrated with Azure Entra ID to provide identity and access management. With this integration, users can sign in to Azure SQL Database using their Azure Entra ID credentials, enabling a centralized and secure way to manage database access.
Register the SQL Server in Azure Entra ID
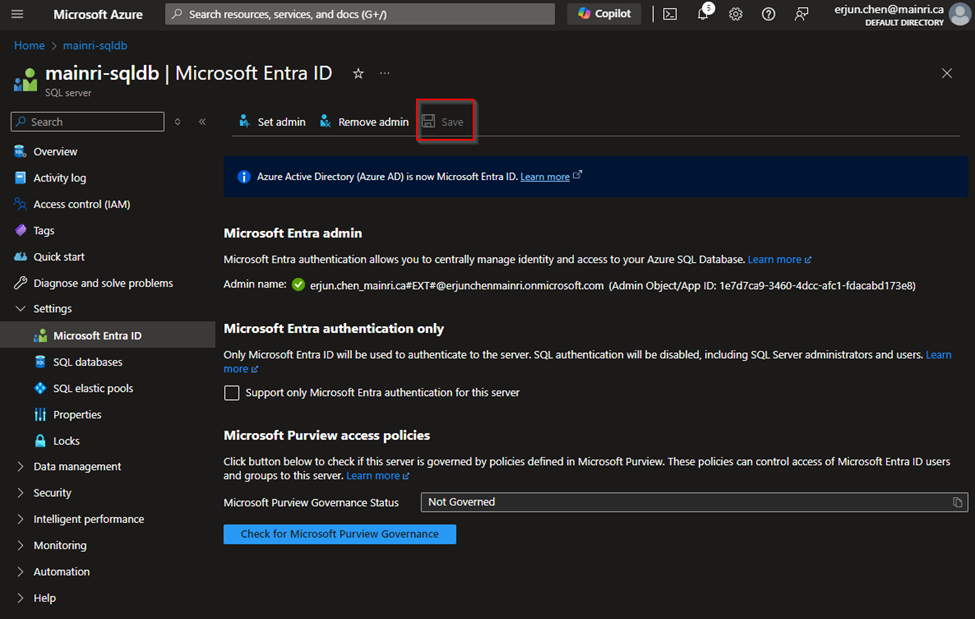
Enable Azure Entra ID Admin
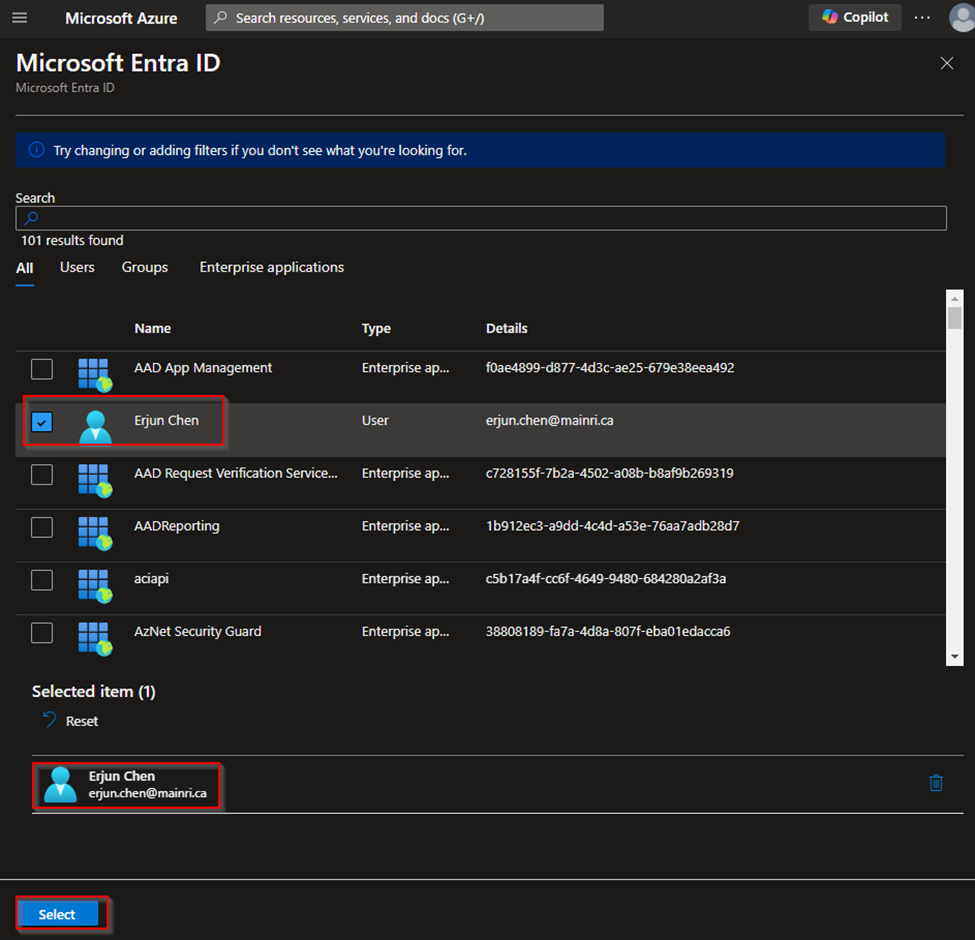
Register your SQL Server (or SQL Database) as an application in Azure Entra ID.
Azure Portal > find out the SQL Server that you want to register with Azure Entra ID >
Settings > Microsoft Entra ID (Active Directory Admin)
Assign Users/Groups
You can assign Azure Entra ID users or groups to specific roles within the SQL Database, such as db_owner, db_datareader, or db_datawriter.
Then, Click Save to apply the changes.
Configure Azure Entra ID Authentication in Azure SQL Database
Connect to SQL Database using Azure Entra ID
You can connect to your Azure SQL Database using Azure Entra ID by selecting the “Azure Active Directory – Universal with MFA support” authentication method in tools like SQL Server Management Studio (SSMS).
Assign Roles to Azure Entra ID Users
Use a SQL query to assign roles to Azure Entra ID users or groups. For example:
CREATE USER [your_username@yourdomain.com] FROM EXTERNAL PROVIDER; ALTER ROLE db_datareader ADD MEMBER [your_username@yourdomain.com];
This command creates an Azure Entra ID user in your SQL Database and adds them to the db_datareader role.
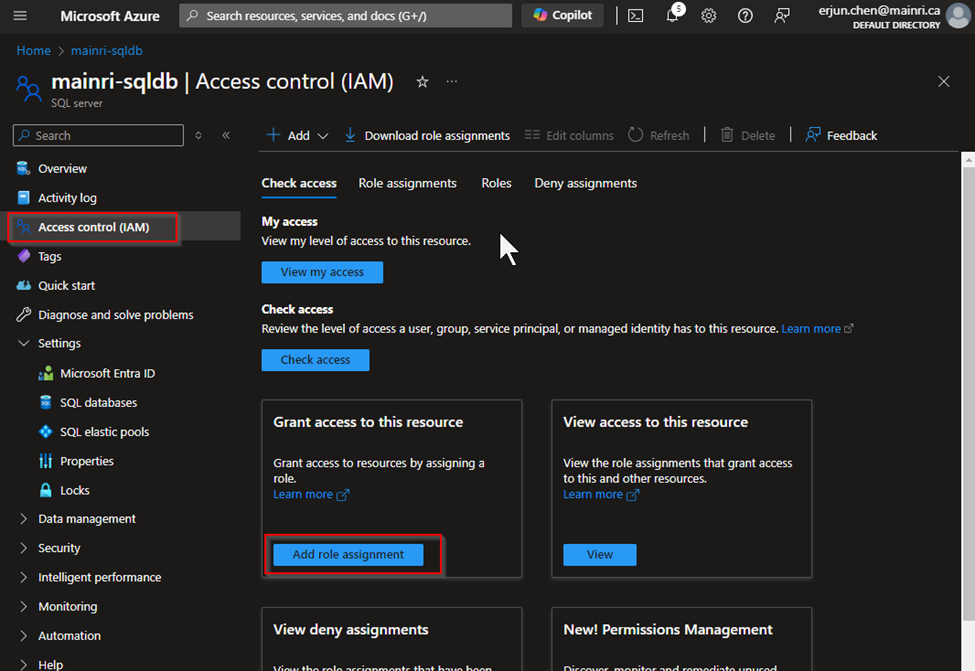
Set Up Role-Based Access Control (RBAC)
You can manage permissions through Azure Entra ID roles and assign these roles to your SQL Database resources.
Assign Roles via Azure Portal
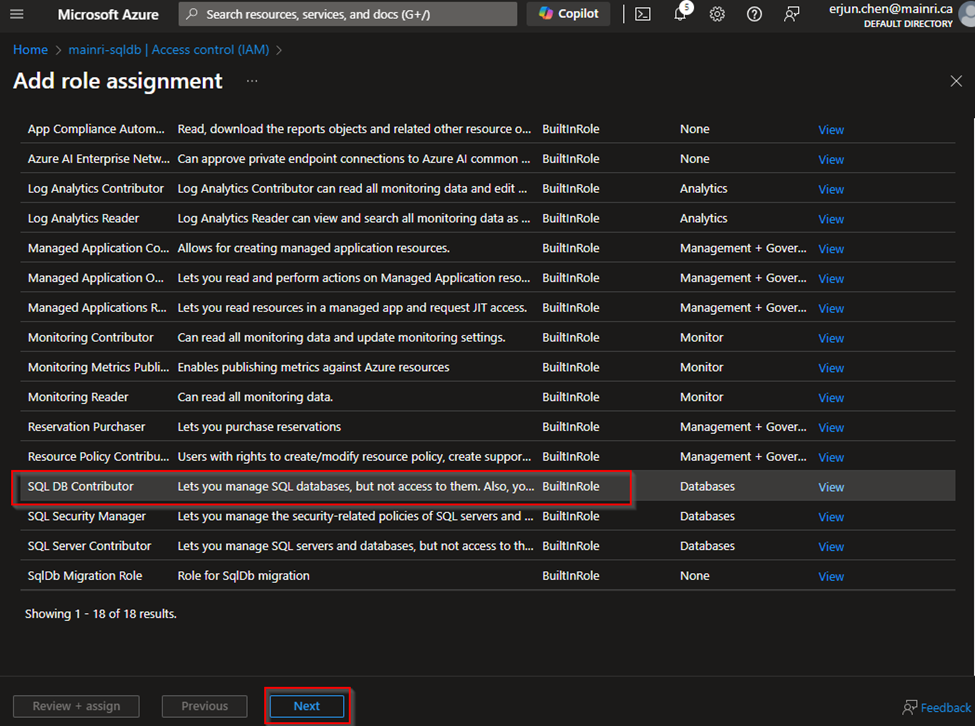
Azure portal > your SQL Database > Access control (IAM) > Add role assignment.
Choose the appropriate role, such as “SQL DB Contributor“.
and assign it to the desired Azure Entra ID user or group
Considerations
No Password Management: Since authentication is managed via Azure Entra ID, there’s no need to manage passwords directly within the database.
Integration with Conditional Access: This allows you to enforce compliance requirements, such as requiring MFA or ensuring connections only come from specific locations.
Please do not hesitate to contact me if you have any questions at William . chen @ mainri.ca
Azure Key Vault safeguards encryption keys and secrets like certificates, connection strings, and passwords.
Key vaults define security boundaries for stored secrets. It allows you to securely store service or application credentials like passwords and access keys as secrets. All secrets in your key vault are encrypted with a software key. When you use Key Vault, you no longer need to store security information in your applications. Not having to store security information in applications eliminates the need to make this information part of the code.
What is a secret in Key Vault?
In Key Vault, a secret is a name-value pair of strings. Secret names must be 1-127 characters long, contain only alphanumeric characters and dashes, and must be unique within a vault. A secret value can be any UTF-8 string up to 25 KB in size.
Vault authentication and permissions
Developers usually only need Get and List permissions to a development-environment vault. Some engineers need full permissions to change and add secrets, when necessary.
For apps, often only Get permissions are required. Some apps might require List depending on the way the app is implemented. The app in this module’s exercise requires the List permission because of the technique it uses to read secrets from the vault.
In this article, we will focus on 2 sections, set up secrets in Key Vault and application retrieves secrets that ware saved in Key vault.
Create a Key Vault and store secrets
Creating a vault requires no initial configuration. You can start adding secrets immediately. After you have a vault, you can add and manage secrets from any Azure administrative interface, including the Azure portal, the Azure CLI, and Azure PowerShell. When you set up your application to use the vault, you need to assign the correct permissions to it
Create a Key Vault service
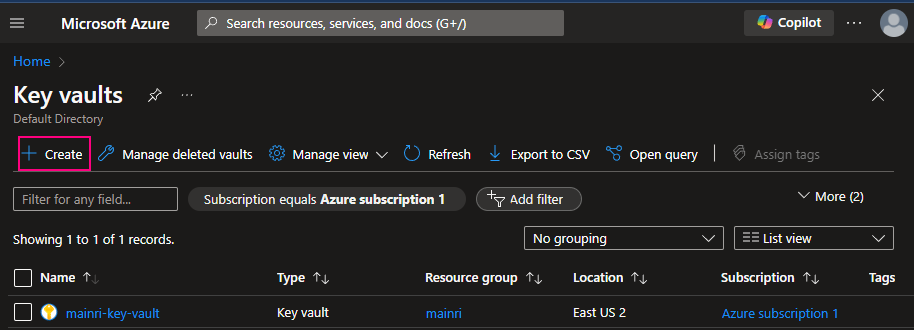
To create Azure Key Vault service, you can follow the steps.
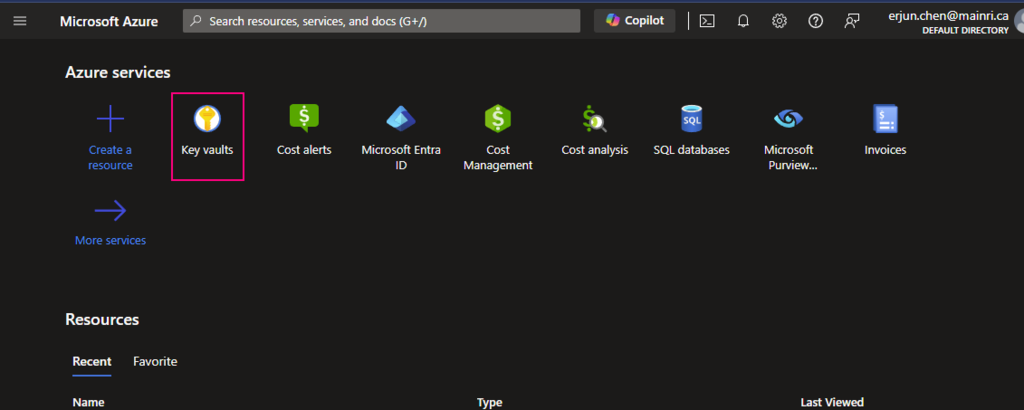
From Azure Portal, search “key Vault”
click “key Vault”
Fill in all properties
Click review + create. That’s all. Quite simple, right?
Create secrets and save in Key Vault
There are two ways to create secret and save in Key vault.
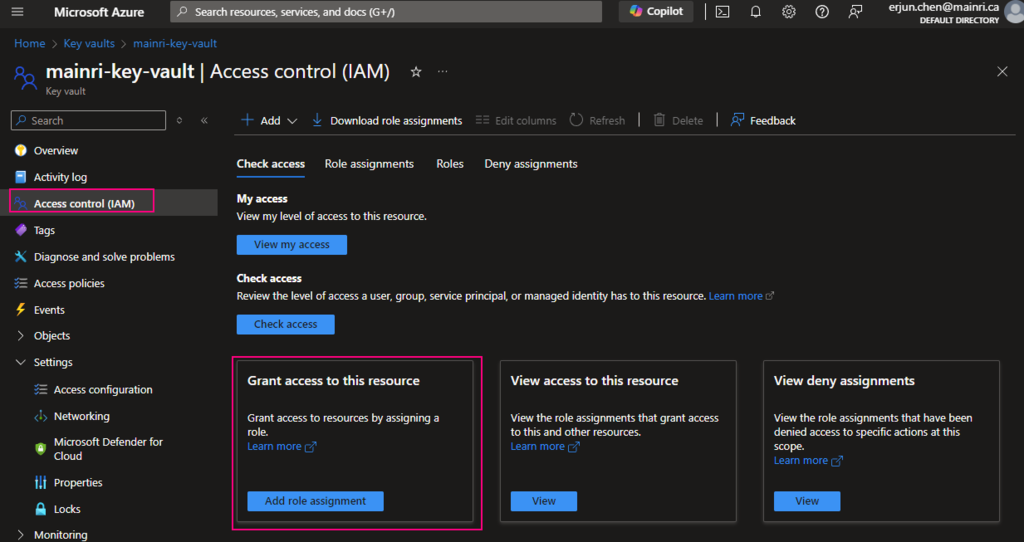
Access control, Identity and Access management (IAM)
Access Policies
Using Access Control (IAM) create a secret
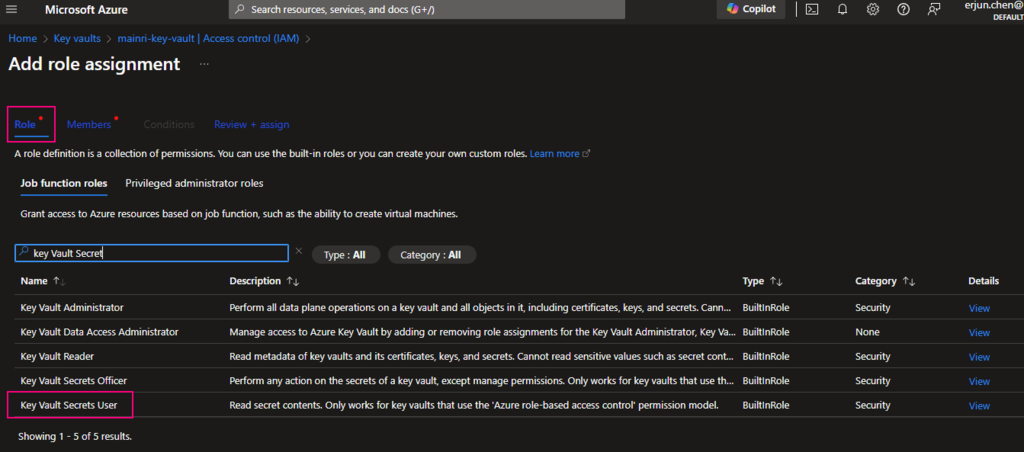
From Key Vault> Access Control (IAM) > Add role Assignment
In most cases, if you create and save secrets in key-vault for your users to use, you only need add the “Key vault secrets user” role assignment.
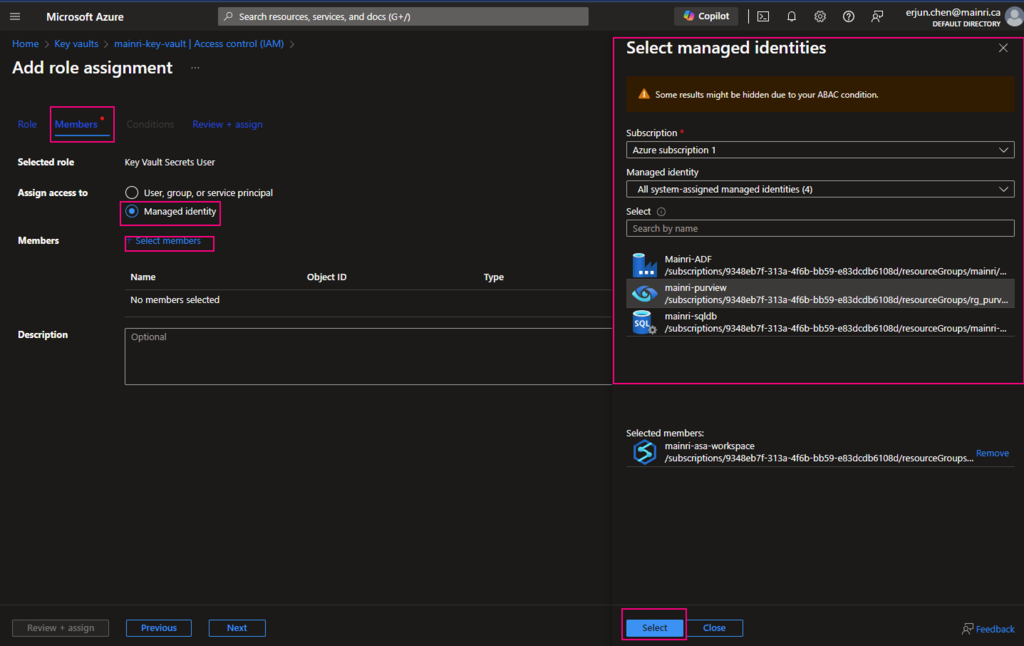
click “next” select a member or group
Pay attention to here, if your organization has multiple instances of the same services, for example, different teams are independently using different ADF instants, make sure you correctly, accurately add the right service instant to access policies.
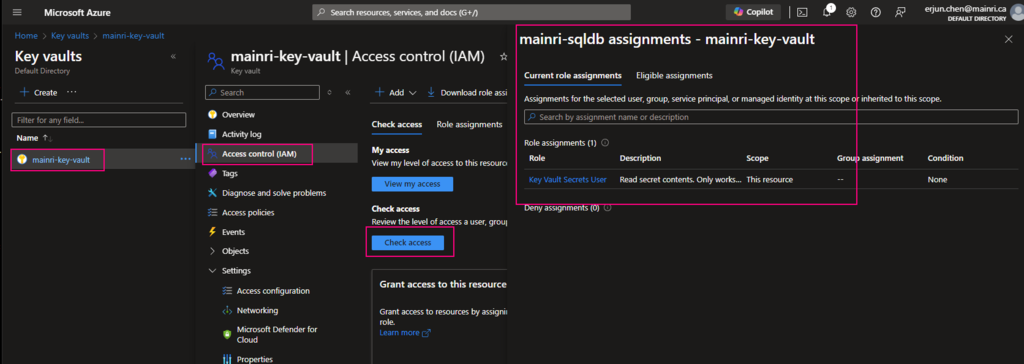
Once it’s down, check the access.
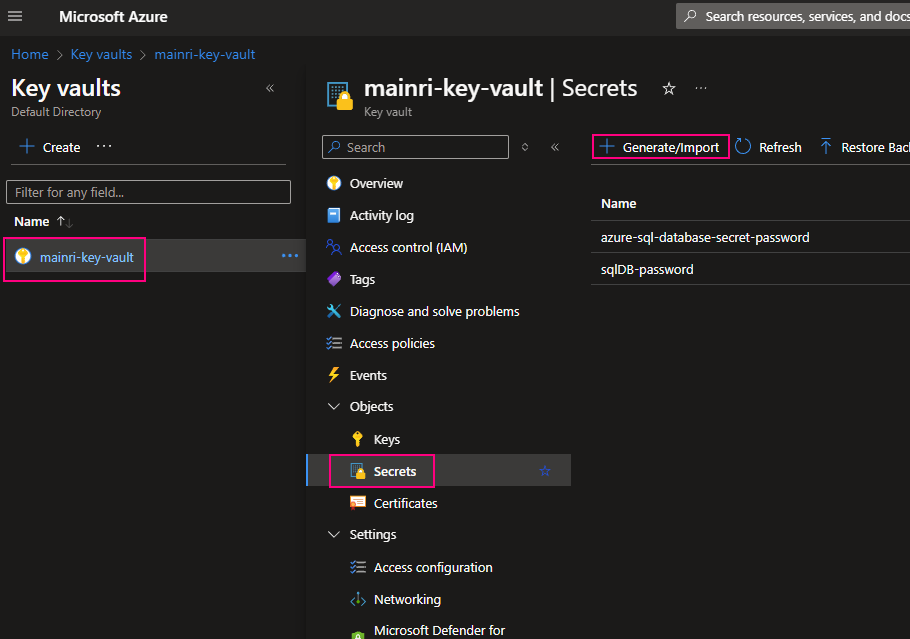
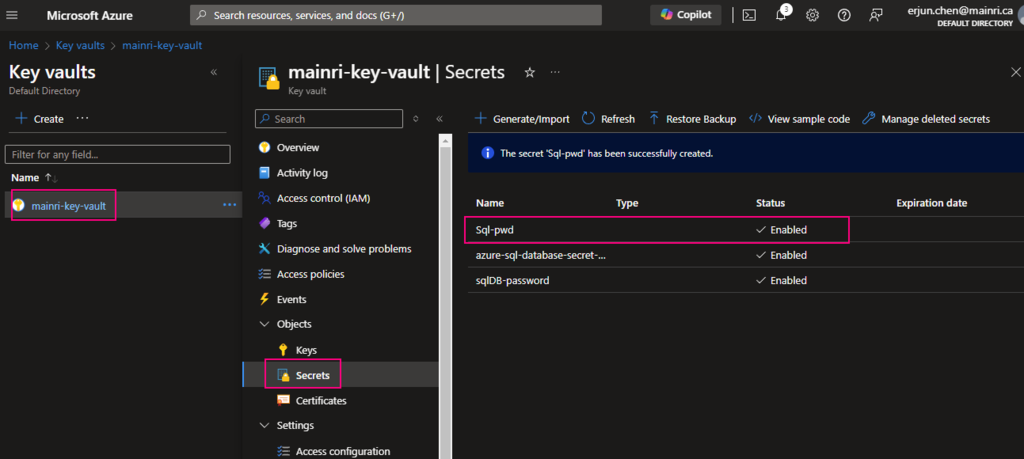
Create a Secret
From “Key Vault” > “Object” > “Secrets” > “+ Generate/Import”
Fill in all properties, :Create”
Secrets key and value created That’s all.
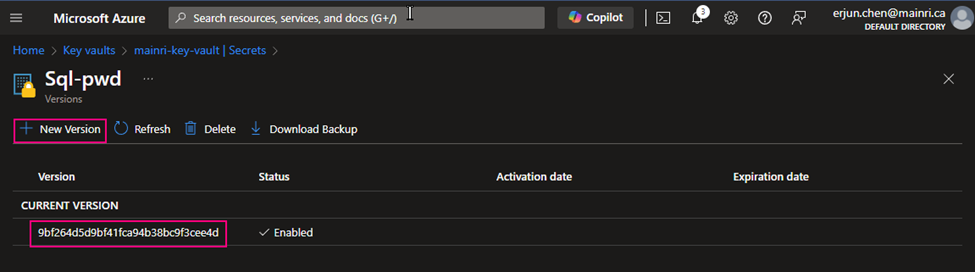
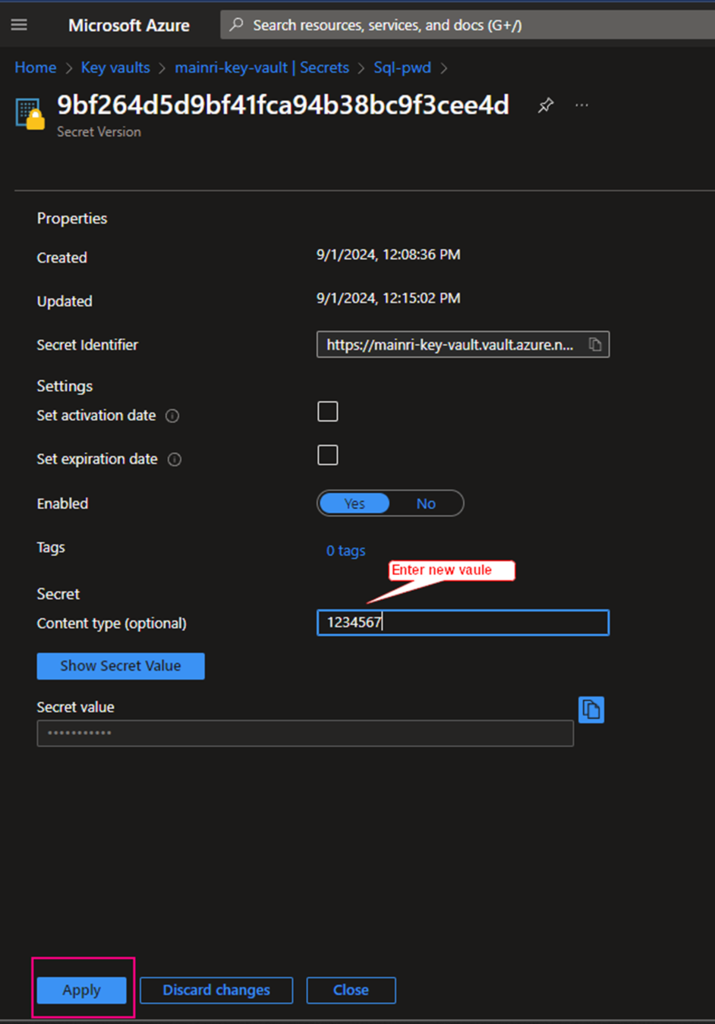
If you want to update the secret, simply click the key, follow the UI guide, you will not miss it.
Click the “version” that you want to update. Update the content > apply it.
That’s all.
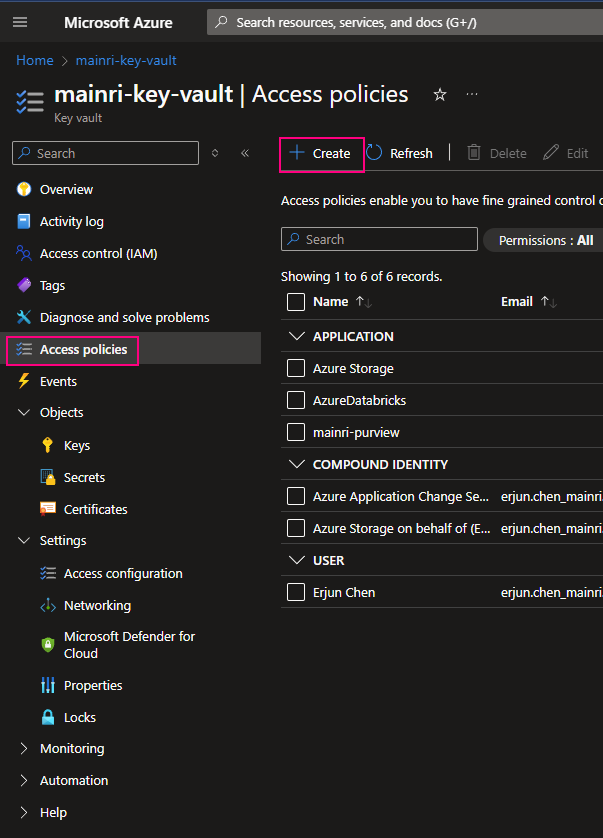
Using Access Policies create a secret
There is another way “Access Policies” to create a secret.
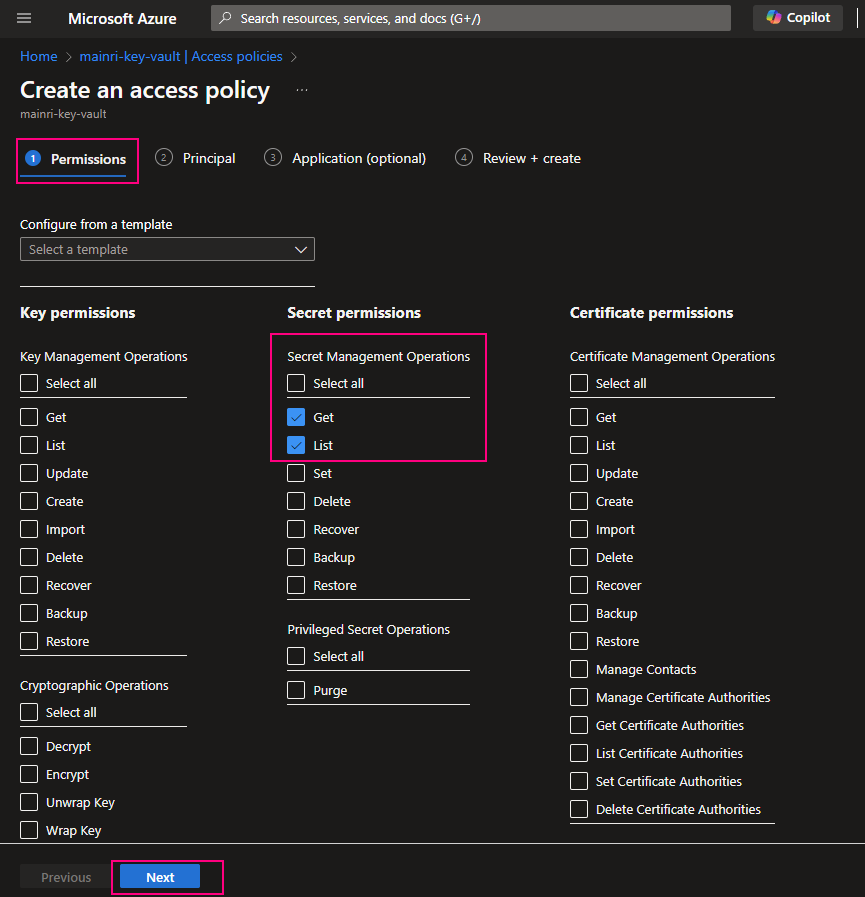
Select the permissions you want under Key permissions, Secret permissions, and Certificate permissions.
If you create a key secret for users to use in their application or other azure services, usually you give “get” and “list” in the “Secret permissions” enough. Otherwise, check Microsoft official documentation.
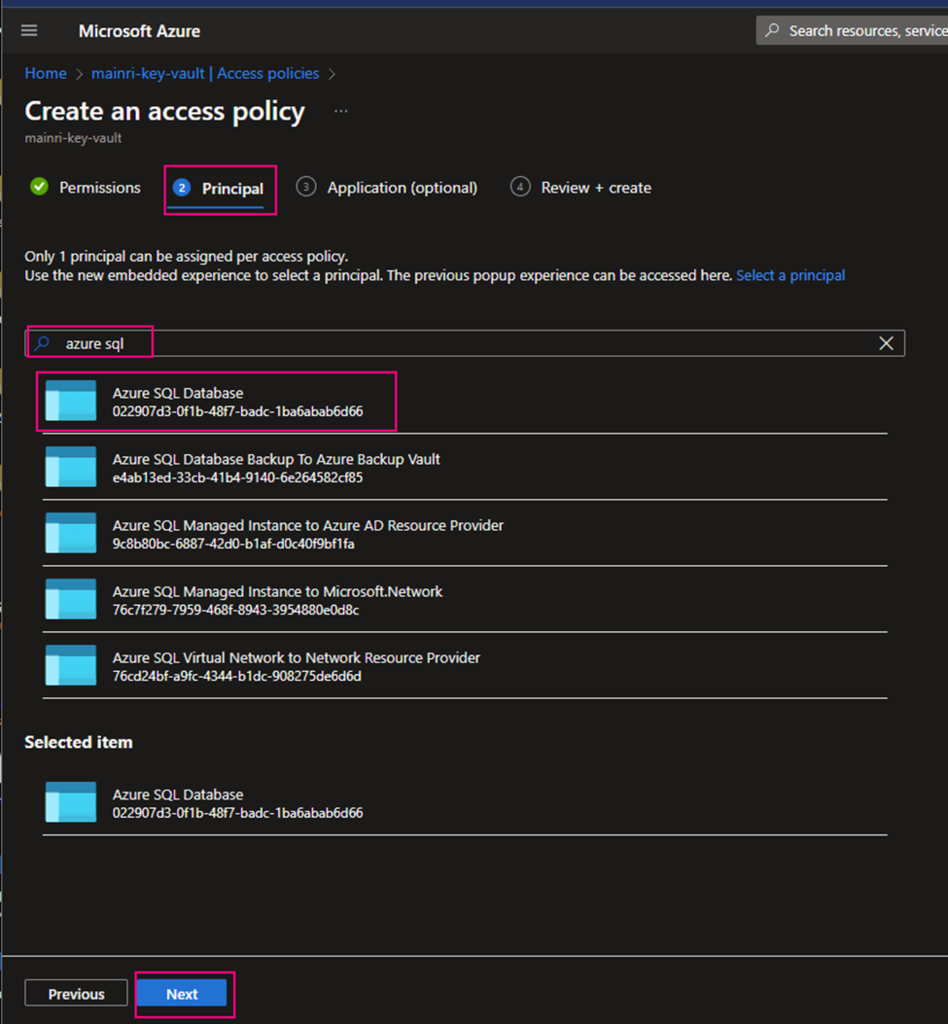
Under the Principal selection pane, enter the name of the user, app or service principal in the search field and select the appropriate result.
Using Azure SQL Database as an example
Caution: when you add principal, make sure you select right service instant. Especially you act as a infrastructure administer, your organization has multiple teams that they are independently using different service instants, e.g. different Synapse Workspace. select correct instant. I have been asked to help trouble shotting this scenario a few time. Azure admin says, he has added policies to key-vault, but the use cannot access there yet. that is a funny mistake made, he has added ADF to kay-vault policies, unfortunately, the ADF is NOT team A used, team B is using it. 🙂
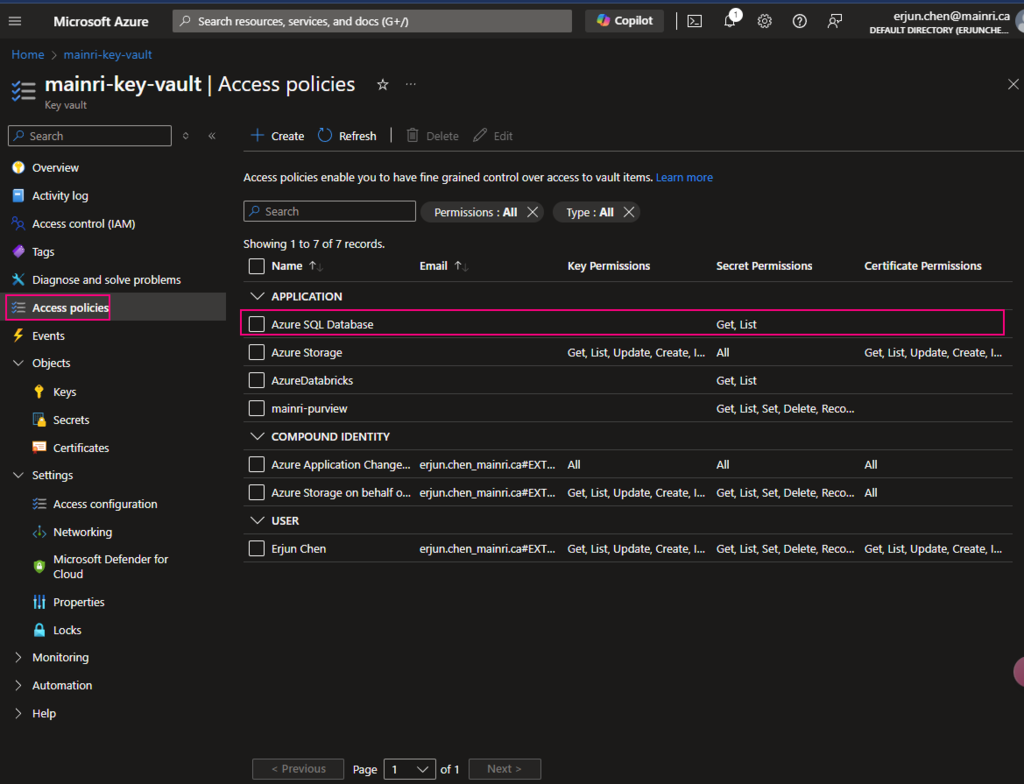
Back on the Access policies page, verify that your access policy is listed.
Create secret key and value
We have discussed it above. Need not verbose.
Done!
Using secrets that were saved in Key Vault
Using secrets usually have 2 major scenarios, directly use, or use REST API call to retrieve the saved secret value.
Let’s use Data Factory as an example to discuss.
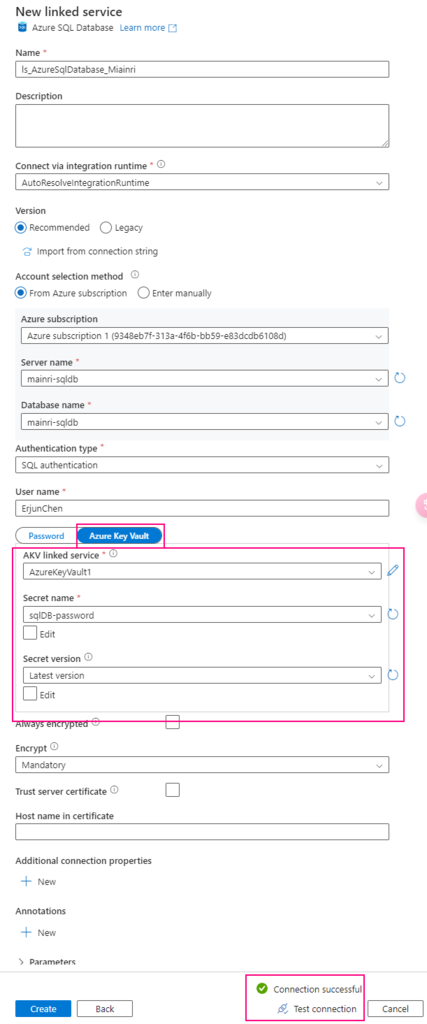
Scenario 1, directly use it
For example, when you create linked service to connect Azure Sql Database
You have to make sure that Key Vault’s access policies has this ADF access policies, get and list
one more example, System workspaces use key-vault.
Once again, make sure your Synapse Workspace has access policies, “Key Vault Secrets User“, “get” and “List”
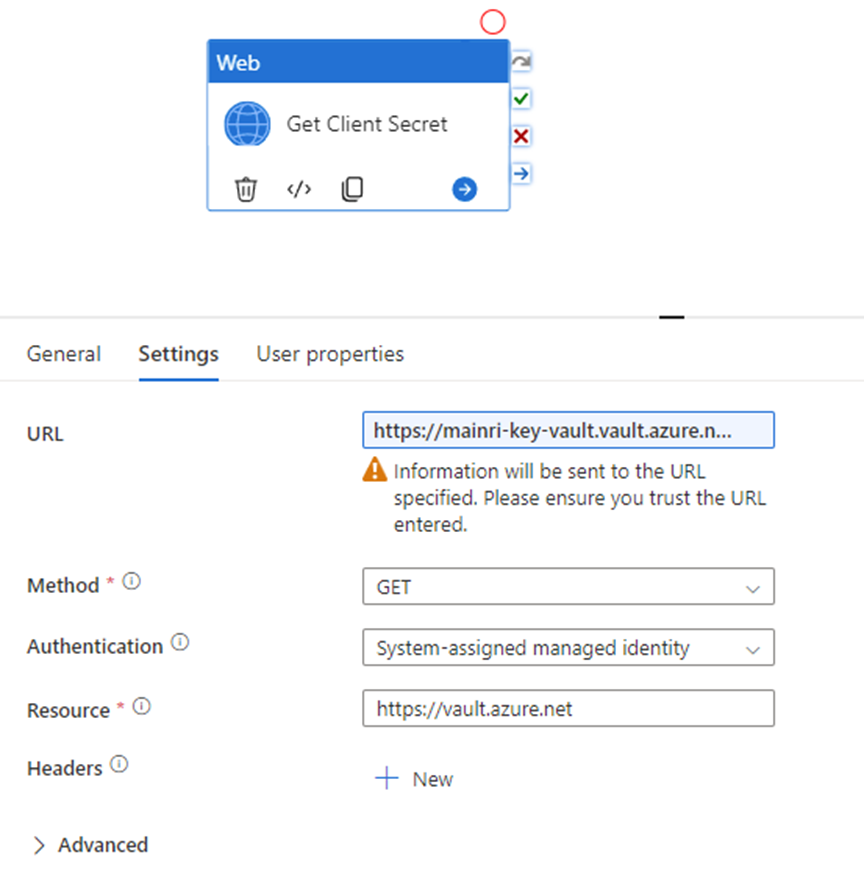
Scenario 2, REST API call Key Vault to use secret
Many engineers want to call the key Vault to retrieve the secret value for a certain purpose, e.g. Synapse pipeline to get SharePoint Online list or files that resident in SharePoint Library, you need an application secret value to build the query string. Normally, the application’s secret value is saved in Key Vault. In this case, you have to make a http call to Key value.
Get a specified secret from a given key vault. The GET operation is applicable to any secret stored in Azure Key Vault. This operation requires the secrets/get permission.
GET {vaultBaseUrl}/secrets/{secret-name}/{secret-version}?api-version=7.4
In Azure Purview, a workflow refers to a set of predefined, automated tasks that streamline and manage certain processes, such as approving data access requests or managing metadata curation.
Workflows in Azure Purview help automate data governance operations and improve collaboration across teams. They can include tasks like approving the registration of new data sources, assigning data stewards, or managing access to certain datasets.
Key Features of Workflows in Azure Purview:
Data Curation and Approval Processes Workflows can be used to automate the process of curating and approving metadata changes or lineage extraction requests.
Automated Notifications Users can receive notifications when tasks like data registration or classification have been completed or need approval.
Customizable Steps Workflows are customizable, allowing we to define multiple stages of approval or validation depending on the organization’s governance policies.
Access Management We can define workflows to manage how access requests are handled for sensitive data.
Approval Requests For example, if someone registers a new data source, the workflow might require approval from a Purview Collection Administrator before proceeding.
Next step: Day 11 –
Please do not hesitate to contact me if you have any questions at William . chen @ mainri.ca