delta: Schema Evolution

Schema Evolution in Databricks refers to the ability to automatically adapt and manage changes in the structure (schema) of a Delta Lake table over time. It allows users to modify the schema of an existing table (e.g., adding or updating columns) without the need for a complete rewrite of the data.

Key Features of Schema Evolution

  1. Automatic Adaptation: Delta Lake can automatically evolve the schema of a table when new columns are added to the incoming data, or when data types change, if certain configurations are enabled.
  2. Backward and Forward Compatibility: Delta Lake ensures that new data can be written to a table without breaking the existing schema. It also ensures that existing queries remain compatible, even if the schema changes.

Configuration for Schema Evolution

  • mergeSchema
    This option allows you to append new data with a schema that differs from the existing table schema. It merges the new schema into the table.
    Usage: Typically used when you are appending data.
  • overwriteSchema
    This option is used when you want to completely replace the schema of the table with the schema of the new data.
    Usage: Typically used when you are overwriting data

mergSchema

When new data has additional columns that aren’t present in the target Delta table, Delta Lake can automatically merge the new schema into the existing table schema.


# Append new data to the Delta table with automatic schema merging

df_new_data.write.format("delta").mode("append").option("mergeSchema", "true").save("/path/to/delta-table")


overwriteSchema

If you want to replace the entire schema (including removing existing columns), you can use the overwriteSchema option.


# Overwrite the existing Delta table schema with new data

df_new_data.write.format("delta").mode("overwrite").option("overwriteSchema", "true").save("/path/to/delta-table")


Configure spark.databricks.delta.schema.autoMerge

You can configure this setting at the following levels:

  • Session Level (applies to a specific session or job)
  • Cluster Level (applies to all jobs on the cluster)

Session-Level Configuration (Spark session level)

Once this is enabled, all write and merge operations in the session will automatically allow schema evolution.


# Enable auto schema merging for the session

spark.conf.set("spark.databricks.delta.schema.autoMerge.enabled", "true")

Cluster-Level Configuration

This enables automatic schema merging for all operations on the cluster without needing to set it in each job.

  1. Go to your Databricks Workspace.
  2. Navigate to Clusters and select your cluster.
  3. Go to the Configuration tab.
  4. Under Spark Config, add the following configuration:
    spark.databricks.delta.schema.autoMerge.enabled true

Please do not hesitate to contact me if you have any questions at William . chen @ mainri.ca

(remove all space from the email account 😊)

Delta: Time Travel of Delta Table

Time Travel in Delta Lake allows you to query, restore, or audit the historical versions of a Delta table. This feature is useful for various scenarios, including recovering from accidental deletions, debugging, auditing changes, or simply querying past versions of your data.

Delta Lake maintains a transaction log that records all changes (inserts, updates, deletes) made to the table. Using Time Travel, you can access a previous state of the table by specifying a version number or a timestamp.

By default, data file retention is 7 days, log file retention is 30 days. After 7 days, file will delete, but log file still there.

You can access historical versions of a Delta table using two methods:

  1. By Version Number
  2. By Timestamp

Viewing Table History

# sql
DESCRIBE HISTORY my_delta_table;

Query a certain version Table

You can query a Delta table based on a specific version number by using the VERSION AS OF clause. Or timestamp using the TIMESTAMP AS OF clause.


# sql
SELECT * FROM my_delta_table VERSION AS OF 5;


#Python
spark.sql("SELECT * FROM my_delta_table VERSION AS OF 5")

Restore the Delta Table to an Older Version

You can use the RESTORE command to revert the Delta table to a previous state permanently. This modifies the current state of the Delta table to match a past version or timestamp. Delta Lake maintains the transaction log retention period set for the Delta table (by default, 30 days)

#sql
--restore table to earlier version 4
-- by version
RESTORE TABLE delta.`abfss://container@adlsAccount.dfs.windows.net/myDeltaTable` TO VERSION OF 4;

-- by timestamp
RESTORE TABLE my_delta_table TO TIMESTAMP AS OF '2024-10-07T12:30:00';

#python
spark.sql("RESTORE TABLE my_delta_table TO VERSION AS OF 5")
spark.sql("RESTORE TABLE my_delta_table TO TIMESTAMP AS OF '2024-10-07T12:30:00'")

Vacuum Command

The VACUUM command in Delta Lake is used to remove old files that are no longer in use by the Delta table. When you make updates, deletes, or upserts (MERGE) to a Delta table, Delta Lake creates new versions of the data while keeping older versions for Time Travel and data recovery. Over time, these old files can accumulate, consuming storage. The VACUUM command helps clean up these files to reclaim storage space.

This command will remove all files older than 7 days (by Default)


# sql
VACUUM my_delta_table;

# python
spark.sql("VACUUM my_delta_table")

Retention Duration Check

The configuration property


%sql
SET spark.databricks.delta.retentionDurationCheck.enabled = false / true;

spark.databricks.delta.retentionDurationCheck.enable in Delta Lake controls whether Delta Lake enforces the retention period check for the VACUUM operation. By default, Delta Lake ensures that data files are only deleted after the default retention period (typically 7 days) to prevent accidentally deleting files that might still be required for Time Travel or recovery.

When VACUUM is called, Delta Lake checks if the specified retention period is shorter than the minimum default (7 days). If it is, the VACUUM command will fail unless this safety check is disabled.

You can disable this check by setting the property spark.databricks.delta.retentionDurationCheck.enable to false, which allows you to set a retention period of less than 7 days or even vacuum data immediately (0 hours).

Disable the Retention Duration Check


#sql
SET spark.databricks.delta.retentionDurationCheck.enabled = false;

#python
spark.conf.set("spark.databricks.delta.retentionDurationCheck.enabled", "false")

set log Retention Duration


#sql 
# Set the log retention duration to 7 days
SET spark.databricks.delta.logRetentionDuration = '7 days';

# python 
# Set the log retention duration to 7 days
spark.conf.set("spark.databricks.delta.logRetentionDuration", "7 days")


Custom Retention Period


# sql
VACUUM my_delta_table RETAIN 1 HOURS;

# python
spark.sql("VACUUM my_delta_table RETAIN 1 HOURS")

Force Vacuum (Dangerous)


# sql
VACUUM my_delta_table RETAIN 0 HOURS;

Conclusion:

Delta Lake’s Time Travel feature is highly beneficial for data recovery, auditing, and debugging by enabling access to historical data versions. It provides flexibility to query and restore previous versions of the Delta table, helping maintain the integrity of large-scale data operations.

Please do not hesitate to contact me if you have any questions at William . chen @ mainri.ca

(remove all space from the email account 😊)

Delta Table, Delta Lake

A Delta table is a type of table that builds on the Delta Lake storage layer and brings ACID (Atomicity, Consistency, Isolation, Durability) transactions, schema enforcement, and scalable metadata management to traditional data lakes. It is designed for large-scale, reliable data processing and analytics. Delta tables enable you to manage both batch and streaming data with ease, and they are ideal for environments where data integrity and consistency are critical, such as in data lakes, data warehouses, and machine learning pipelines.

What is Delta Lake

Delta lake is an open-source technology, we use Delta Lake to store data in Delta tables. Delta lake improves data storage by supporting ACID transactions, high-performance query optimizations, schema evolution, data versioning and many other features.

FeatureTraditional Data LakesDelta Lake
Transaction SupportNo ACID transactionsFull ACID support
Data ConsistencyWeak guaranteesStrong guarantees with serializable isolation
Schema EnforcementNoneEnforced and allows schema evolution
Handling StreamingRequires separate infrastructureUnified batch and streaming
Data ManagementProne to issues like data corruptionReliable with audit trails and versioning
key differences

There is detail information at “Data lake vs delta lake vs data lakehouse, and data warehouses comparison

Key Features of Delta Tables

  1. ACID Transactions: Delta Lake ensures that operations like reads, writes, and updates are atomic, consistent, isolated, and durable, eliminating issues of partial writes and data corruption.
  2. Schema Enforcement: When writing data, Delta ensures that it matches the table’s schema, preventing incorrect or incomplete data from being written.
  3. Time Travel: Delta tables store previous versions of the data, which allows you to query, rollback, and audit historical data (also known as data versioning).
  4. Unified Streaming and Batch Processing: Delta tables allow you to ingest both batch and streaming data, enabling you to work seamlessly with either approach without complex rewrites.
  5. Efficient Data Upserts: You can perform MERGE operations (UPSERTS) efficiently, which is especially useful in scenarios where you need to insert or update data based on certain conditions.
  6. Optimized Performance: Delta Lake supports optimizations such as data skipping, Z-order clustering, and auto-compaction, improving query performance.

Creating and Using Delta Tables in PySpark or SQL

create a Delta table by writing a DataFrame in PySpark or SQL.

Create or Write a DataFrame to a Delta table

If we directly query delta table from adls using SQL, always use

 
--back single quotation mark `
delta.`abfss://contain@account.dfs.windows.net/path_and_table`

# python
# Write a DataFrame to a Delta table
df.write.format("delta").save("/mnt/delta/my_delta_table")


# sql
-- Creating a Delta Table
CREATE TABLE my_delta_table
USING delta
LOCATION '/mnt/delta/my_delta_table';

# sql
-- Insert data
INSERT INTO my_delta_table VALUES (1, 'John Doe'), (2,
'Jane Doe');

Reading from a Delta table


#python
delta_df = spark.read.format("delta").load("/mnt/delta/my_delta_table")
delta_df.show()


#sql
-- Query Delta table
SELECT * FROM my_delta_table;

-- directly query delta table from adls.
-- use  ` back single quotation mark
SELECT * 
FROM 
delta.`abfss://adlsContainer@adlsAccount.dfs.windows.net/Path_and_TableName`
VERSION AS OF 4;

Managing Delta Tables

Optimizing Delta Tables

To improve performance, you can run an optimize operation to compact small files into larger ones.


# sql 
OPTIMIZE my_delta_table;

Z-order Clustering

Z-order clustering is used to improve query performance by colocating related data in the same set of files. it is a technique used in Delta Lake (and other databases) to optimize data layout for faster query performance.


# sql
OPTIMIZE my_delta_table ZORDER BY (date);

Upserts (Merge)

Delta Lake makes it easy to perform Upserts (MERGE operation), which allows you to insert or update data in your tables based on certain conditions.


# sql

MERGE INTO my_delta_table t
USING new_data n
ON t.id = n.id
WHEN MATCHED THEN UPDATE SET t.value = n.value
WHEN NOT MATCHED THEN INSERT (id, value) VALUES (n.id, n.value); 

Conclusion

Delta Lake is a powerful solution for building reliable, high-performance data pipelines on top of data lakes. It enables advanced data management and analytics capabilities with features like ACID transactions, time travel, and schema enforcement, making it an ideal choice for large-scale, data-driven applications.

Delta tables are essential for maintaining high-quality, reliable, and performant data processing pipelines. They provide a way to bring transactional integrity and powerful performance optimizations to large-scale data lakes, enabling unified data processing for both batch and streaming use cases.

Please do not hesitate to contact me if you have any questions at William . chen @ mainri.ca

(remove all space from the email account 😊)
Comparison Partitioning Strategies and Methods

In distributed computing frameworks like Apache Spark (and PySpark), different partitioning strategies are used to distribute and manage data across nodes in a cluster. These strategies influence how data is partitioned, which affects the performance of your jobs. Some common partitioning techniques include hash partitioning, range partitioning, and others like broadcast joins.

Key Differences Between Partitioning Methods

Partitioning MethodKey FeatureBest ForShufflingEffect on Data Layout
partitionBy()
General Partitioning
 Optimizing data layout on disk (file system)NoOrganizes data into folders by column values
Hash PartitioningEvenly distributes data based on hash function.Query, such as Joins, groupBy operations, when you need uniform distribution.yesRedistributes data across partitions evenly
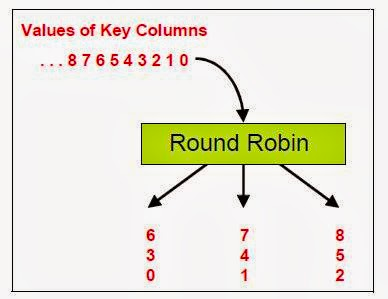
Round RobinSimple, even distribution of rows.Even row distribution without considering valuesYes   Distributes rows evenly across partitions
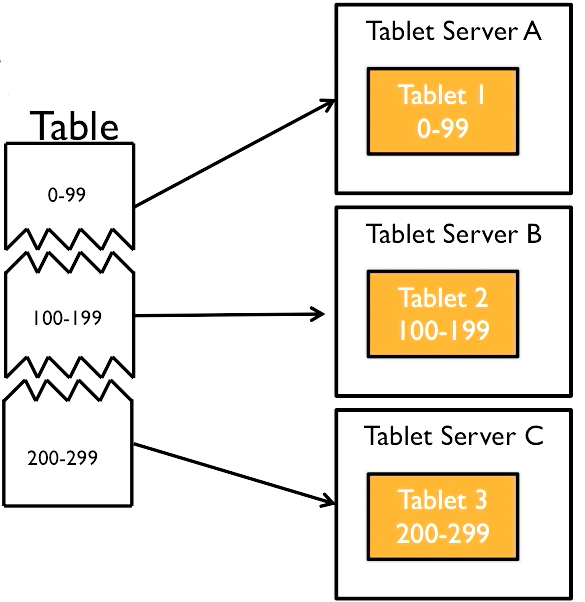
Range PartitioningData is divided based on sorted ranges.Queries based on ranges, such as time-series data.Yes (if internal)Data is sorted and divided into ranges across partitions
Custom PartitioningCustom logic for partitioning.When you have specific partitioning needs not covered by standard methods.Yes (if internal)Defined by custom function
Co-location of PartitionsPartition both datasets by the same key for optimized joins.Joining two datasets with the same key.No (if already co-located)Ensures both datasets are partitioned the same way
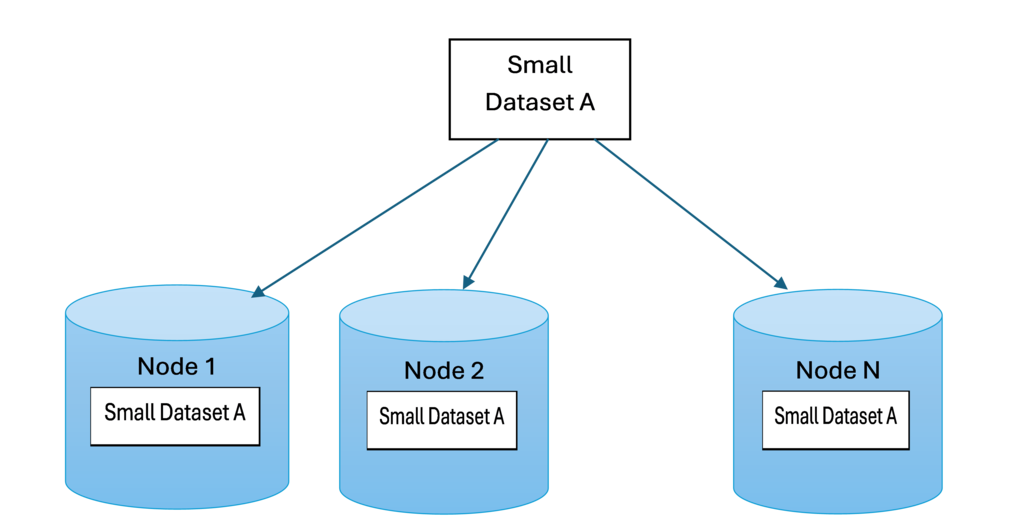
Broadcast JoinSends smaller datasets to all nodes to avoid shuffles.Joins where one dataset is much smaller than the other.No (avoids shuffle)Broadcasts small dataset across nodes for local join
Key Differences Between Partitioning Methods

Key Takeaways

  • partitionBy() is used for data organization on disk, especially when writing out data in formats like Parquet or ORC.
  • Hash Partitioning and Round Robin Partitioning are used for balancing data across Spark

General Partitioning

Distributing data within Spark jobs for processing. Use partitionBy() when writing data to disk to optimize data layout and enable efficient querying later.


df.write.format("delta").partitionBy("gender", "age").save("/mnt/delta/partitioned_data")

save in this way

Hash Partitioning


df = df.repartiton(10, 'class_id')

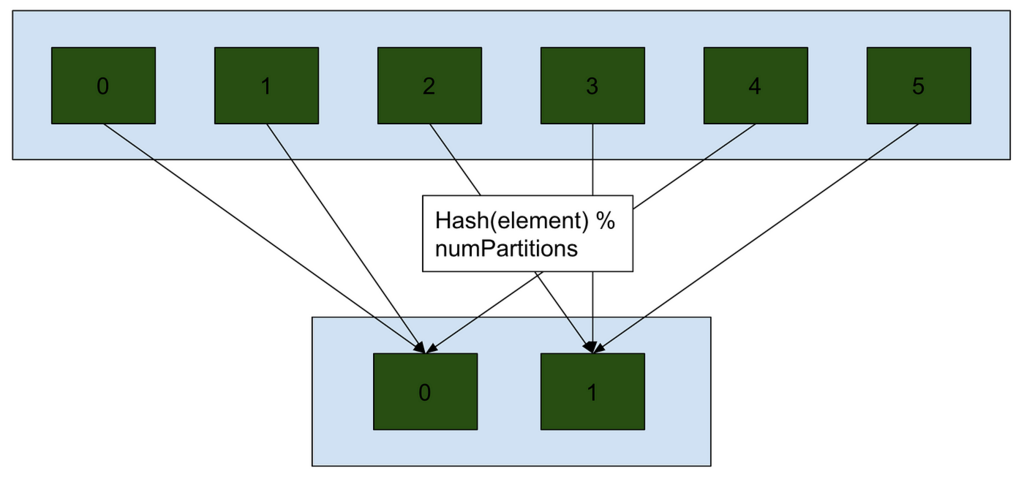
Hash partitioning is used internally within Spark’s distributed execution to split the data across multiple nodes for parallel processing. It Splits our data in such way that elements with the same hash (can be key, keys, or a function) will be in the same

Hash Partitioning Used during processing within Spark, it redistributes the data across partitions based on a hash of the column values, ensuring an even load distribution across nodes for tasks like joins and aggregations. Involves shuffling.

Round Robin Partitioning

Round robin partitioning evenly distributes records across partitions in a circular fashion, meaning each row is assigned to the next available partition.

Range Partitioning

only it’s based on a range of values.

Broadcast Join (replication Partitioning)

Broadcast joins (known as replication partition) in Spark involve sending a smaller dataset to all nodes in the cluster, that means all nodes have the same small dataset or says duplicated small dataset to all nodes. It is allowing each partition of the larger dataset to be joined with the smaller dataset locally without requiring a shuffle.

Detailed comparison of each partitioning methods

Partitioning MethodPurposeWhen UsedShufflingHow It Works
General Partitioning (partitionBy())Organizing data on disk (file partitioning)When writing data (e.g., Parquet, ORC)No shuffleData is partitioned into folders by column values when writing to disk
Hash Partitioning (repartition(column_name))Evenly distributing data for parallel processingDuring processing for joins, groupBy, etc.Yes (shuffle data across nodes)Applies a hash function to the column value to distribute data evenly across partitions
Round Robin PartitioningDistributes rows evenly without considering valuesWhen you want even distribution but don’t need value-based groupingYes (shuffle)Rows are evenly assigned to partitions in a circular manner, disregarding content
Range PartitioningDistribute data into partitions based on a range of valuesWhen processing or writing range-based data (e.g., dates)Yes (if used internally during processing)Data is sorted by the partitioning column and divided into ranges across partitions
Custom PartitioningApply custom logic to determine how data is partitionedFor complex partitioning logic in special use casesYes (depends on logic)User-defined partitioning function determines partition assignment
Co-location PartitioningEnsures two datasets are partitioned the same way (to avoid shuffling during joins)To optimize joins when both datasets have the same partitioning columnNo (if already partitioned the same way)Both datasets are partitioned by the same key (e.g., by user_id) to avoid shuffle during joins
Broadcast Join (Partitioning)Send a small dataset to all nodes for local joins without shuffleWhen joining a small dataset with a large oneNo shuffle (avoids shuffle by broadcasting)The smaller dataset is broadcast to each node, avoiding the need for shuffling large data

Please do not hesitate to contact me if you have any questions at William . chen @ mainri.ca

(remove all space from the email account 😊)
Partition in databricks

In Databricks, partitioning is a strategy used to organize and store large datasets into smaller, more manageable chunks based on specific column values. Partitioning can improve query performance and resource management when working with large datasets in Spark, especially in distributed environments like Databricks.

Key Concepts of Partitioning in Databricks

Partitioning in Tables:

When saving a DataFrame as a table or Parquet file in Databricks, you can specify partitioning columns to divide the data into separate directories. Each partition contains a subset of the data based on the values of the partitioning column(s).

Partitioning in DataFrames

Spark partitions data in-memory across nodes in the cluster to parallelize processing. Partitioning helps distribute the workload evenly across the cluster.

Types of Partitioning

Static Partitioning (Manual Partitioning)

When saving or writing data to a file or table, you can manually specify one or more columns to partition the data by. This helps when querying large tables, as Spark can scan only the relevant partitions instead of the entire dataset.

Dynamic Partitioning (Automatic Partitioning)

Spark automatically partitions a DataFrame based on the size of the data and available resources. The number of partitions is determined by Spark’s internal algorithm based on the data’s size and complexity.

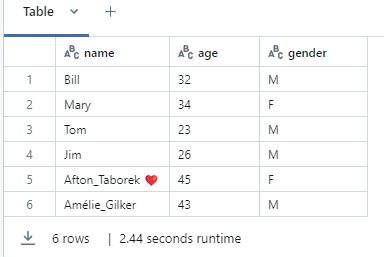
Let’s say, there is dataframe

Partitioning in Databricks File System (DBFS)

When writing data to files in Databricks (e.g., Parquet, Delta), you can specify partitioning columns to optimize reads and queries. For example, when you partition by a column, Databricks will store the data in different folders based on that column’s values.


# Example of saving a DataFrame with partitioning
df.write.partitionBy("year", "month").parquet("/mnt/data/name_partitioned")

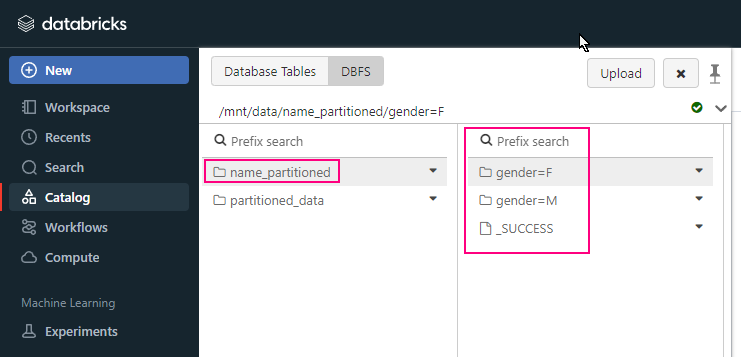
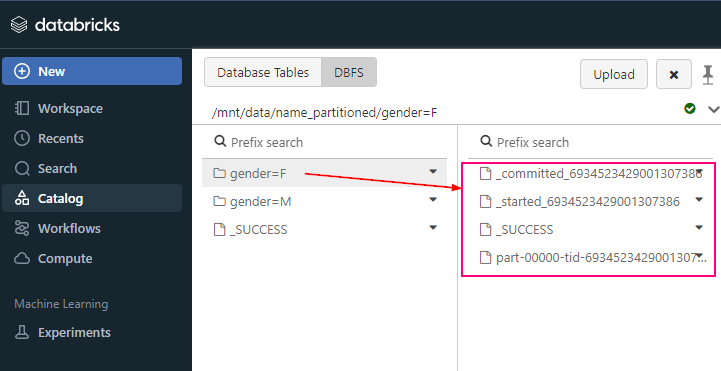
In this example, the data will be saved in a directory structure like:

/mnt/data/name_partitioned/gender=F
/mnt/data/name_partitioned/gender=M

Partitioning in Delta Tables

In Delta Lake (which is a storage layer on top of Databricks), partitioning is also a best practice to optimize data management and queries. When you define a Delta table, you can specify partitions to enable efficient query pruning, which results in faster reads and reduced I/O.


# Writing a Delta table with partitioning
df.write.format("delta").partitionBy("gender", "age").save("/mnt/delta/partitioned_data")

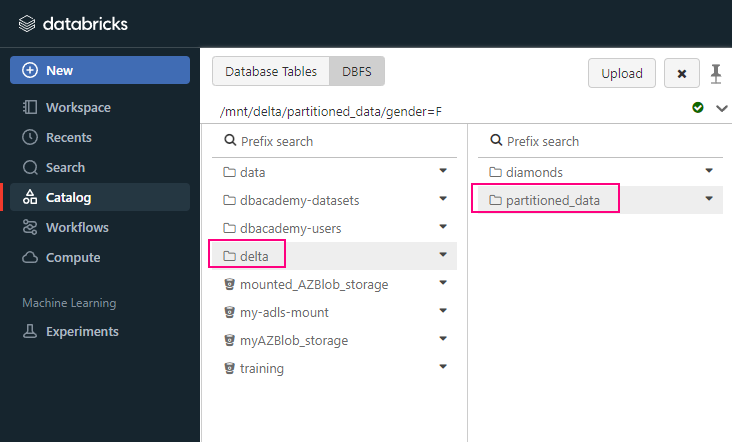
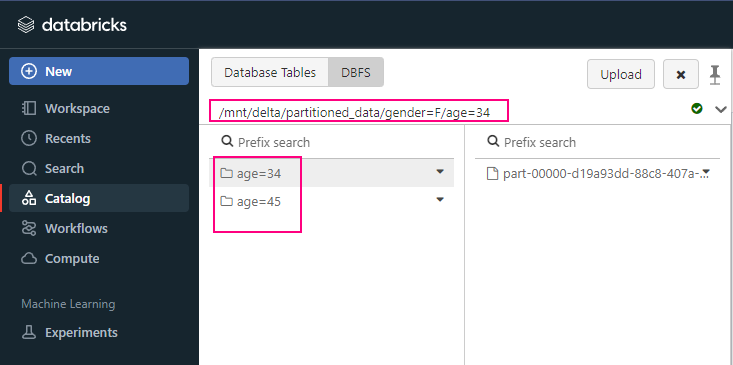
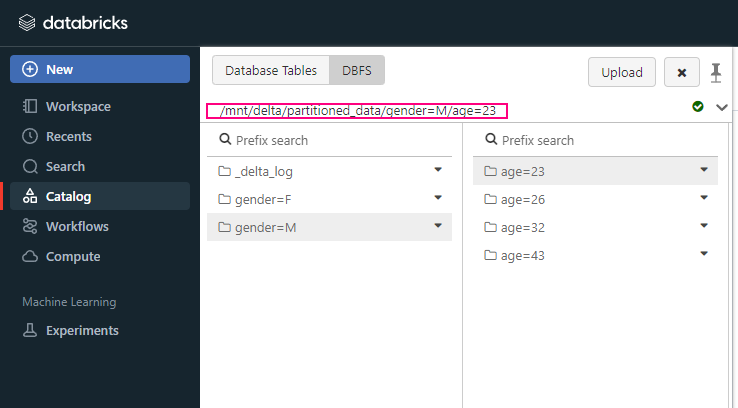
In this example, the data will be saved in a directory structure like:

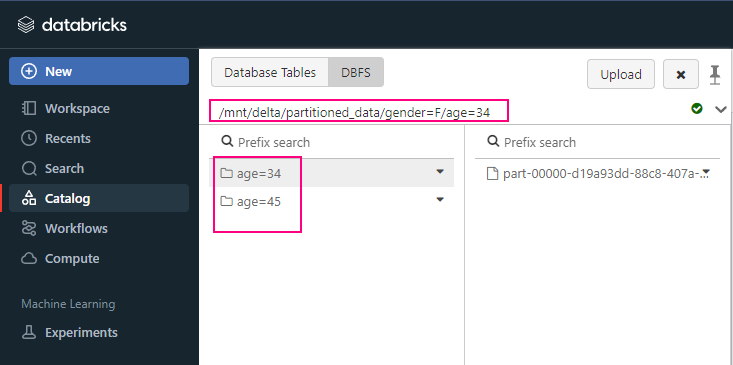
/mnt/delta/partitioned_data/gender=F/age=34
/mnt/delta/partitioned_data/gender=F/age=45
/mnt/delta/partitioned_data/gender=M/age=23
/mnt/delta/partitioned_data/gender=M/age=26
/mnt/delta/partitioned_data/gender=M/age=32
/mnt/delta/partitioned_data/gender=M/age=43

Optimizing Spark DataFrame Partitioning

When working with in-memory Spark DataFrames in Databricks, you can manually control the number of partitions to optimize performance.

Repartition

This increases or decreases the number of partitions.
This operation reshuffles the data, redistributing it into a new number of partitions.


df = df.repartition(10)  # repartition into 10 partitions

Coalesce

This reduces the number of partitions without triggering a shuffle operation (which is often more efficient than repartition).
This is a more efficient way to reduce the number of partitions without triggering a shuffle.


df = df.coalesce(5) # reduce partitions to 5

When to Use Partitioning

  • Partitioning works best when you frequently query the data using the columns you’re partitioning by. For example, partitioning by date (e.g., year, month, day) is a common use case when working with time-series data.
  • Don’t over-partition: Too many partitions can lead to small file sizes, which increases the overhead of managing the partitions.

Summary

  • Partitioning divides data into smaller, more manageable chunks.
  • It improves query performance by allowing Spark to read only relevant data.
  • You can control partitioning when saving DataFrames or Delta tables to optimize storage and query performance.
  • Use repartition() or coalesce() to manage in-memory partitions for better parallelization.
  • Use coalesce() to reduce partitions without shuffling.
  • Use repartition() when you need to rebalance data.

DBFS: Access ADLS or Blob using Service Principle with Oauth2

There are several ways to connect Azure Data Lake Storage (ADLS) Gen2 or Blob to Databricks. Each method offers different levels of security, flexibility, and complexity. Such as

  • Mount ADLS to DBFS
  • Service Principal with OAuth 2.0
  • Direct access with ABFS  URI (Azure Blob File System)
  • Azure Active Directory (AAD) Passthrough
  • SAS Token (Shared Access Signature)
  • Managed Identity (MSI)
  • Access Key Authentication

 We have discussed “mount”, Account Key, SAS token at dbutils: mount, using Account Key or SAS to access adls or blob

Today we focus on using Service principal with OAuth2.0 to access ADLS or Blob.

Access ADLS Gen2 using Service Principal with OAuth 2.0

To access Azure Data Lake Storage (ADLS) or Blob Storage using a service principal with OAuth2 in Azure Databricks, follow these steps. This approach involves authenticating using a service principal’s credentials, such as the client ID, tenant ID, and client secret.

Previously, we discussed how to create Service Principle, Register an application on Azure Entra ID (former Active Directory), generate client-secret-value. To get client.id and client-secret-value  please review this article.

if we have save the client-secret-value at databricks’ “secret-scopes”, please review the article “dbutils: Secrets and Secret Scopes“.

Define service principal credentials

# Define service principal credentials
client_id = "<your-client-id>"
tenant_id = "<your-tenant-id>"

# It's recommended to store the secret securely in a secret scope
client_secret = dbutils.secrets.get(scope = "<scope-name>", key = "<client-secret-key>")  

OAuth2 configuration for service principal

# OAuth2 configuration for service principal
configs = {
  "fs.azure.account.auth.type": "OAuth",
  "fs.azure.account.oauth.provider.type": "org.apache.hadoop.fs.azurebfs.oauth2.ClientCredsTokenProvider",
  "fs.azure.account.oauth2.client.id": "<client-id>",
  "fs.azure.account.oauth2.client.secret": "<client-secret>",
  "fs.azure.account.oauth2.client.endpoint": "https://login.microsoftonline.com/<tenant-id>/oauth2/token"
}

Mount ADLS to DBFS

#Mount ADLS to DBFS
dbutils.fs.mount(
  source = "abfss://<container-name>@<storage-account-name>.dfs.core.windows.net/",
  mount_point = "/mnt/adls",
  extra_configs = configs
)

full example here.

# define variable
TenantID="b4e0dd6XXXXXXXXXXXXXXXX99ec4b8e"
clientID="72baeXXXXXXXXXXXXXX659ea547"
Secret-scope-name="my_scopes"
secrets-key = "my_secret_key"
storage_account_name = "asamainriadls"
container = "mainri-asa-file-system"
my_mount_point = "/mnt/mainriadlsfilesystem"

#get secret
my_secret = dbutils.secrets.get(scope=Secret-scope-name, key=secrets-key)

# OAuth2 configuration for service principal
configs = {
"fs.azure.account.auth.type": "OAuth",
"fs.azure.account.oauth.provider.type": "org.apache.hadoop.fs.azurebfs.oauth2.ClientCredsTokenProvider",
"fs.azure.account.oauth2.client.id": f"{ClientID}",
"fs.azure.account.oauth2.client.secret": f"{my_secret}",
"fs.azure.account.oauth2.client.endpoint": f”https://login.microsoftonline.com/{TenantID}/oauth2/token”
}


In fact, we are able to directly access to ADLS/blob now.

# in fact,  we are able to directly access adls/blob now.
#adls
df = spark.read.csv(f"abfs://{container}@{storage_account_name }.dfs.windows.core.net/input/test.csv")

display(df)

# blob
display(spark.read.csv(f"abfs://{container}@{storage_account_name }.dfs.windows.core.net/input/test.csv"))

Of course, we are able to mount the ADLS to DBFS if we like; but it’s not necessary at this moment for demo.


# mount to DBFS
dbutils.fs.mount(
  source = f"abfss://{container} @{storage_account_name}.dfs.core.windows.net/",
  mount_point = my_mount_point,
  extra_configs = configs
)

#Mount Blob to DBFS
dbutils.fs.mount(
  source = "abfss://<container-name>@<storage-account-name>.blob.core.windows.net/",
  mount_point = "/mnt/adls",
  extra_configs = configs
)

Please do not hesitate to contact me if you have any questions at William . chen @ mainri.ca

(remove all space from the email account 😊)
dbutils: mount, using Account Key or SAS to access adls or blob

We can mount Azure Data Lake Storage (ADLS), Azure Blob Storage, or other compatible storage to Databricks using dbutils.fs.mount(), with either an account key or a SAS token for authentication.

mount()

dbutils.fs.help(“mount”)

Here’s the general syntax:


dbutils.fs.mount(
  source = "<storage-url>",
  mount_point = "/mnt/<mount-name>",
  extra_configs = {"<conf-key>":dbutils.secrets.get(scope="<scope-name>", key="<key-name>")})

<storage-url>


Blob: 
storage-url = f"wasbs://{container_name}@{ storage_account_name.blob.core.windows.net"


Adls:
storage-url = f"abfss://{container_name}@{storage_account_name}.dfs.core.windows.net/"

<conf-key>


Blob: 
conf-key = f"fs.azure.account.key.{storage_account_name}.blob.core.windows.net"


Adls:
conf-key = f"fs.azure.account.key.{storage_account_name}.dfs.core.windows.net"

List Mounts:

dbutils.fs.help(“mounts”)

To check all mounted points, you can use:


dbutils.fs.mounts()

unmount()

dbutils.fs.help(“unmount”)


dbutils.fs.unmount("/mnt/<mount-name>")

refreshMounts()

in cluster to refresh their mount cache ensuring they receive the most recent information.

dbutils.fs.help(“refreshMounts”)


dbutils.fs.refreshMounts()

updateMount()


dbutils.fs.updateMount(
  source = "<new-storage-url>",
  mount_point = "/mnt/<existing-mount-point>",
  extra_configs = {"<conf-key>":dbutils.secrets.get(scope="<scope-name>",
key="<key-name>")})

Mount storage

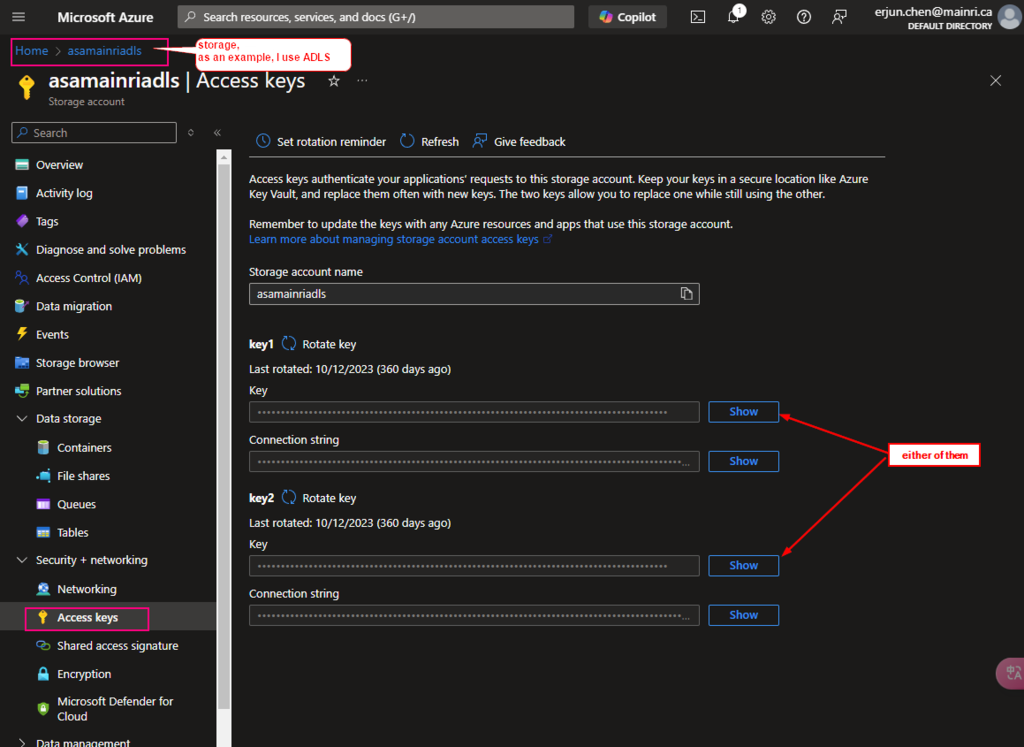
You can get the access key from

Azure Portal > storage > security + networking

e.g.

Mounting an Azure Data Lake (adls) Gen2 Storage to DBFS

Set up your storage account details:

  • Storage URL: Use the appropriate URL for your data, e.g.,
    abfss://<file-system>@<storage-account>.dfs.core.windows.net/ for ADLS Gen2.
  • Mount point: Choose a directory in the Databricks file system /mnt/ to mount the storage.
  • Extra configs: You usually provide your credentials here, often through a secret scope.

Mount the ADLS storage:


storage_account_name = "<your-storage-account-name>"
container_name = "<your-container-name>"
mount_point = "/mnt/<your-mount-name>"

# Use a secret scope to retrieve the account key
configs = {"fs.azure.account.key." + storage_account_name + ".dfs.core.windows.net": dbutils.secrets.get(scope = "<scope-name>", key = "<key-name>")}

# Perform the mount
dbutils.fs.mount(
  source = f"abfss://{container_name}@{storage_account_name}.dfs.core.windows.net/",
  mount_point = mount_point,
  extra_configs = configs)

 Mount Azure Blob Storage to DBFS

We can mount Azure Blob Storage either by Account Key or SAS key.


dbutils.fs.mount(
Source=”wasbs://<contain-name>@<storage-account-name>.blob.core.windows.net”,
Mount_point = “/mnt/<mount-name>”,
Extra_configs = {“<conf-key>”:” account-key”}
)

In Case of account key, <conf-key> is
fs.azure.account.key.<storage-account-name>.blob.vore.windows.net

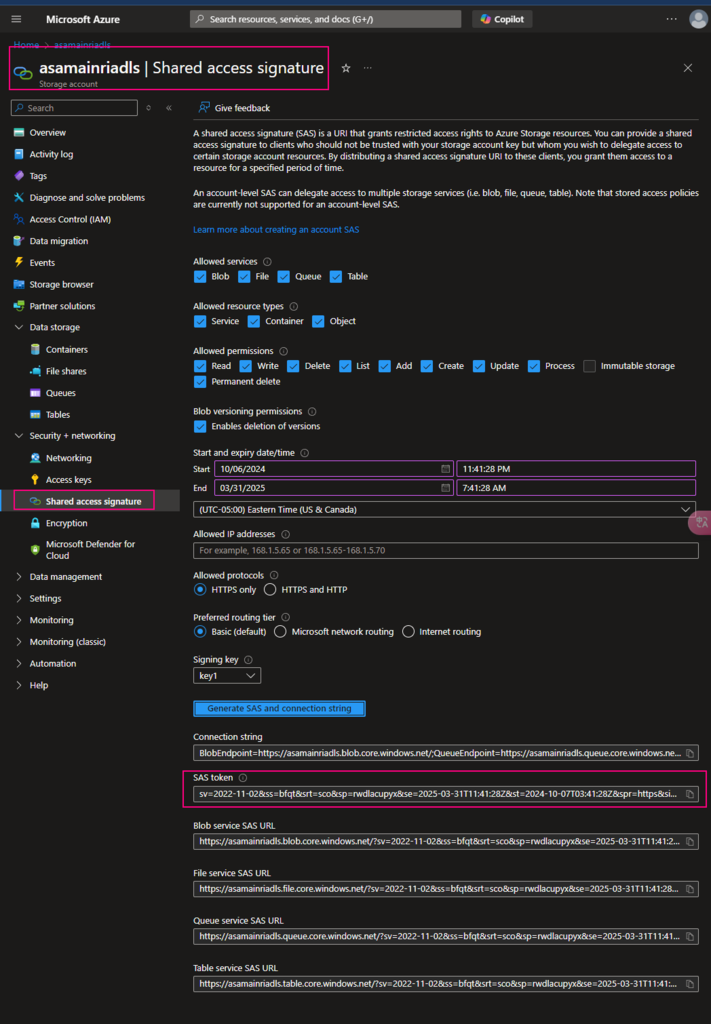
In case of SAS (shared access signature) key , <conf-key>  is
fs.azure.sas.<container-name>.<storage-account-name>.blob.core.windows.net

Please do not hesitate to contact me if you have any questions at William . chen @ mainri.ca

(remove all space from the email account 😊)
dbutils: Secrets and Secret Scopes

Secret Scopes:

A secret scope is a boundary within which secrets are stored. We can create secret scopes to securely manage access to sensitive data and credentials.

Each scope can contain multiple secrets (key-value pairs) like tokens or passwords.

Secrets:

Secrets are the actual values you want to store securely (e.g., API tokens, connection strings). You can store secrets in specific scopes.

Types of Secret Scopes in Databricks

  • Databricks-Backed Secret Scopes: Stored directly in Databricks and managed entirely within the platform.
  • Azure Key Vault-Backed Secret Scopes: Secrets are stored in Azure Key Vault and managed externally but accessed from within Databricks.

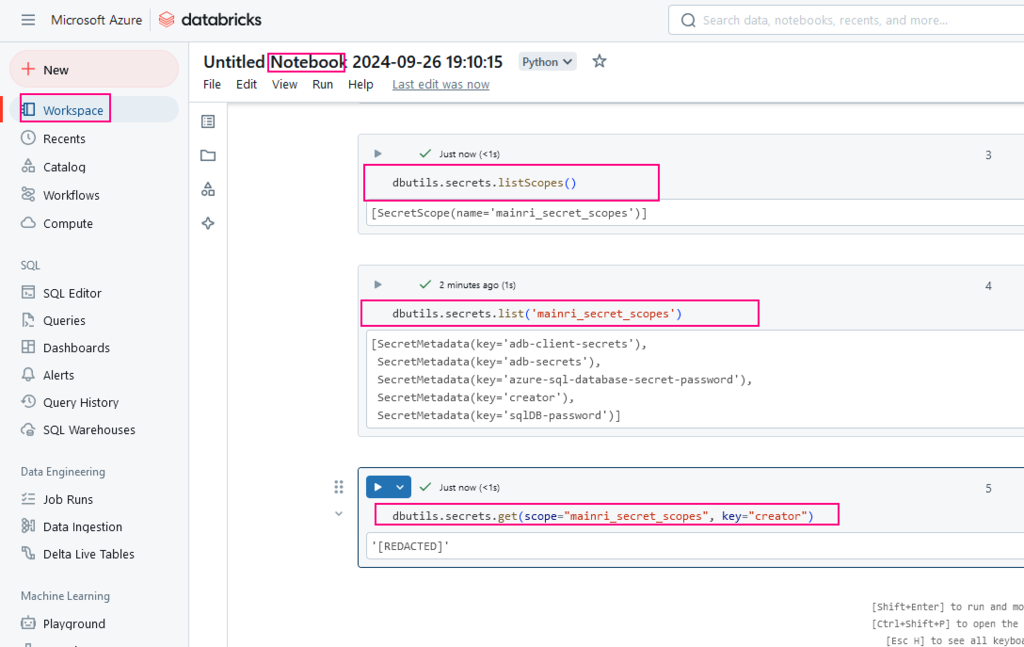
Common dbutils.secrets Commands:

  • dbutils.secrets.listScopes(): Lists all the available secret scopes.
  • dbutils.secrets.list(“scope-name”): Lists all the secrets within a given scope.
  • dbutils.secrets.get(“scope-name”, “key”): Retrieves the secret for the given scope and key.

#Lists all the available secret scopes
dbutils.secrets.listScopes()

#Lists all the secrets within a given scope
dbutils.secrets.list("scope-name")

# Retrieves the secret for the given scope and key
my_secret = dbutils.secrets.get(scope="my_scope", key="my_secret_key")

example in notebooks and response are shown later.

Creating and Managing Secret Scopes

To create and manage secret scopes, you can either use the Databricks CLI or Databricks UI, depending on the permissions and environment you’re working with.

Create an Azure Key Vault-backed secret scope

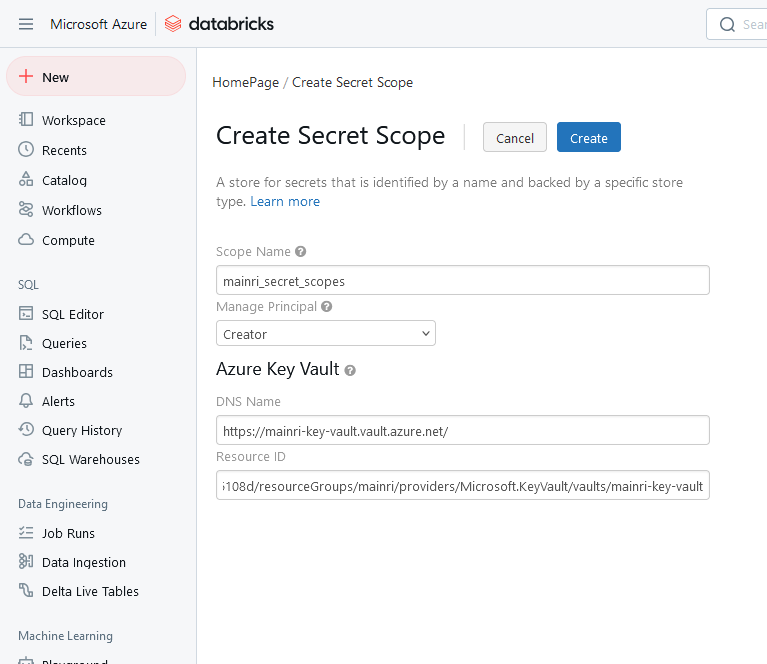
1: Go to https://<databricks-instance>/#secrets/createScope.

Replace <databricks-instance> with the workspace URL of your Azure Databricks deployment. This URL is case sensitive (scope in createScope must be uppercase).

e.g. https://adb-44260********40553.13.azuredatabricks.net/#secrets/createScope

2: Enter the name of the secret scope.

Secret scope names are case insensitive

3. Manage Principal 

Use the Manage Principal drop-down to specify whether All Users have MANAGE permission for this secret scope or only the Creator of the secret scope (that is to say, you).

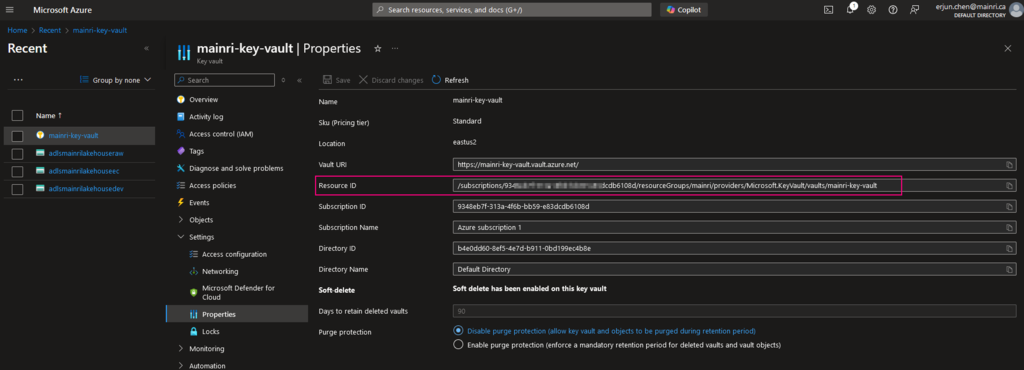
4. DNS Name and Resource ID

DNS Name, for example, https://mainri-key-vault.vault.azure.net/  

These properties are available from the Settings > Properties tab of an Azure Key Vault in your Azure portal.

 5. Click the Create button.

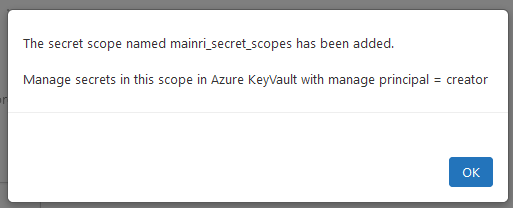
The secret scope named mainri_secret_scopes has been added.

Manage secrets in this scope in Azure KeyVault with manage principal = creator

Create an Azure Key Vault-backed secret

Nothing special, the normal proceed to create secret in azure key vault, omitting.

If you need, please review my previous article “Create and Using Key Vault in Azure Ecosystem”.

Create Secret scopes using Databricks CLI


#Python
# create Secret scopes
databricks secrets create-scope --initial-manage-principal users

#bash
%bash
databricks secrets put --scope <existing-scope-name> --key <secret-key>

Use Secrets


dbutils.secrets.listScopes()
dbutils.secrets.list('mainri_secret_scopes')
dbutils.secrets.get(scope="mainri_secret_scopes", key="creator")

Please do not hesitate to contact me if you have any questions at William . chen @ mainri.ca

(remove all space from the email account 😊)
Appendix

Using Key Vault services in Azure Ecosystem

Azure Data Factory or Synapse lookup Delta table in Databricks Unity Catalog

Using Azure Data Factory (ADF) to look up data from a Delta table in Databricks’ Unity Catalog involves several steps. Here’s a high-level overview of how you can accomplish this:

Step 1: Set Up Your Environment

  1. Azure Databricks Workspace: Ensure you have an Azure Databricks workspace set up and that your Delta table is registered in the Unity Catalog.
  2. Azure Data Factory Instance: Create or use an existing Azure Data Factory instance.

Step 2: Create an Azure Databricks Delta Lake Linked Service

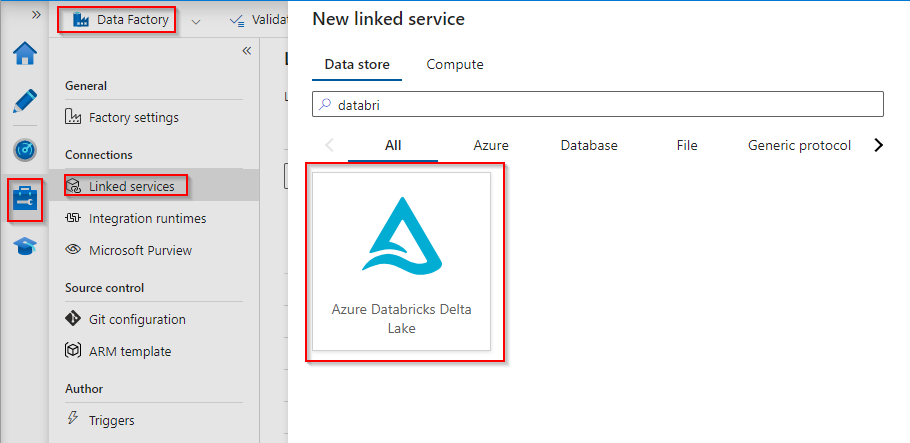
Management > Linked Services > Azure Databricks Delta Lake

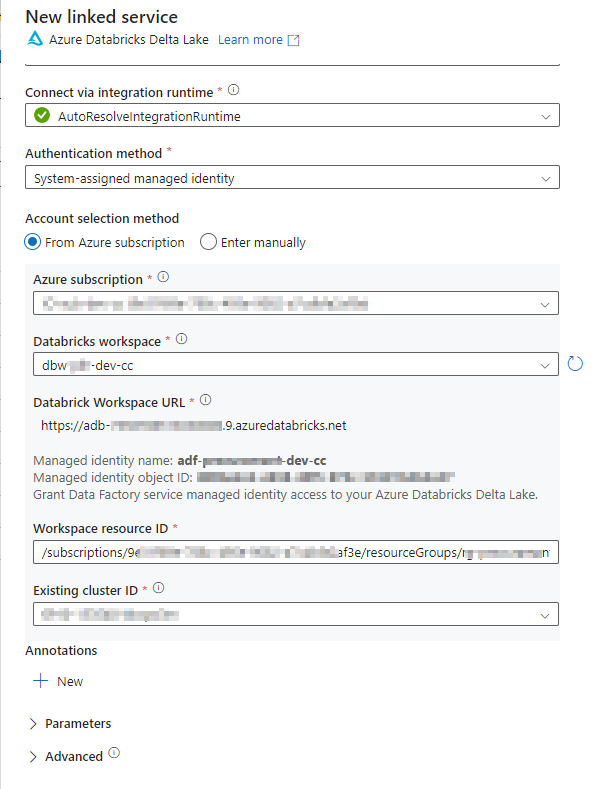
There are 3 sort of Authentication method. Choose either of them.

  • Access token
  • System- assigned managed Identity
  • User-assigned managed identity

There are some required information have to fill in .

Fill in information

subscription, Databricks workspace, workspace resource ID, Cluster ID etc. Depend on what you chosen

subscription ID, Databricks workspace name, Databricks Workspace URL, Databricks resource ID, those information can be find out from

Azure Portal > Databricks > overview

Workspace resource ID Patten

/subscriptions/<your Subscription ID>/resourceGroups/<Your Managed Resource Group>/providers/Microsoft.Databricks/workspaces/<your Databricks service name>

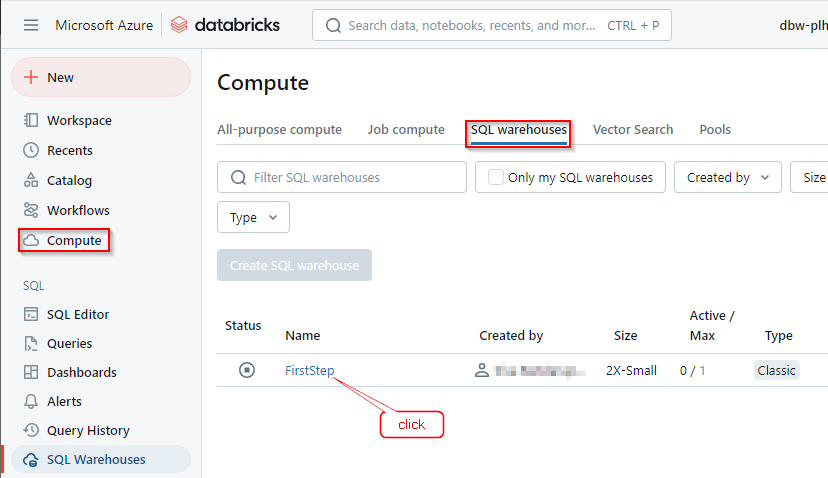
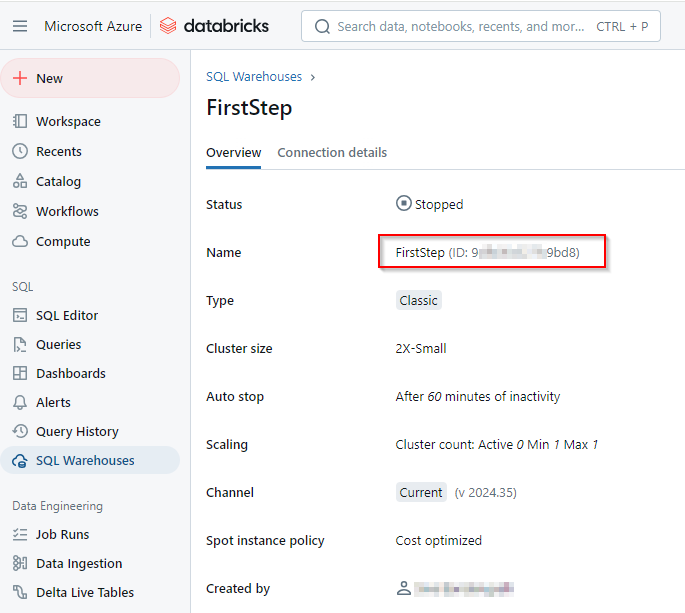
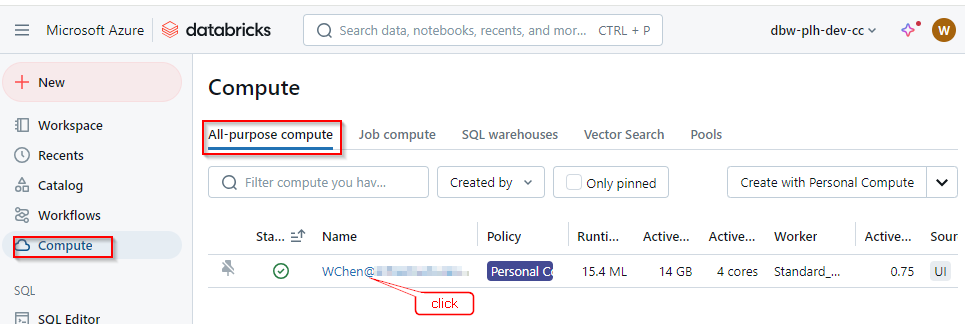
To find out “Existing cluster ID”

databricks workspace > compute >
find out which cluster/computer you are using. e.g.

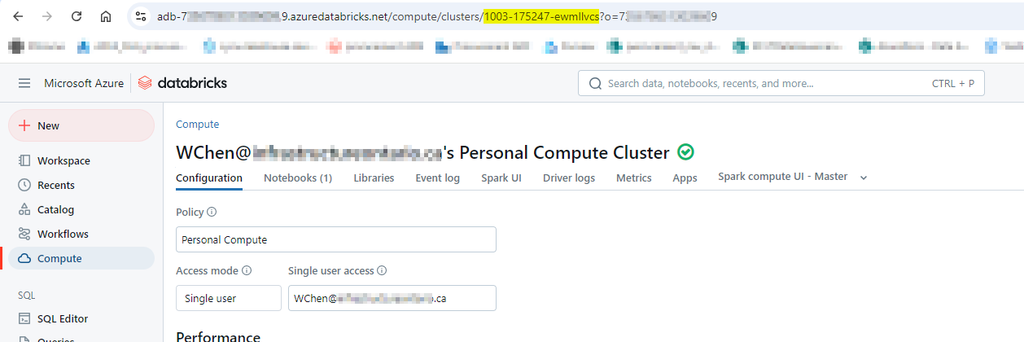
if you are using other type clusters, such as all-purpose cluster, you can

open your databricks workspace >

look at the workspace URL, the URL paten looks this

https://<your ADB workspace>.azuredatabricks.net/compute/clusters/1003-175247-ewmllvcs?o=...........

after ../clusters/ <here is your cluster ID> . (highlight)

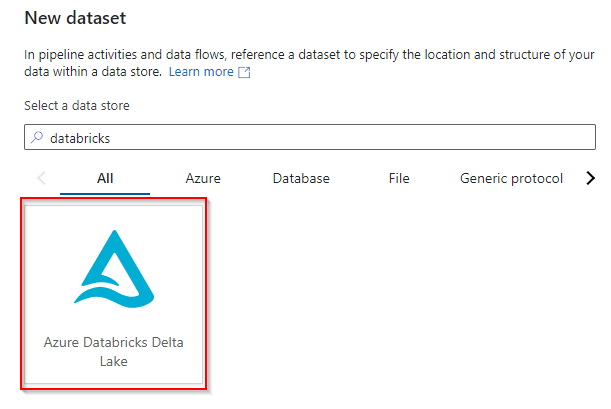
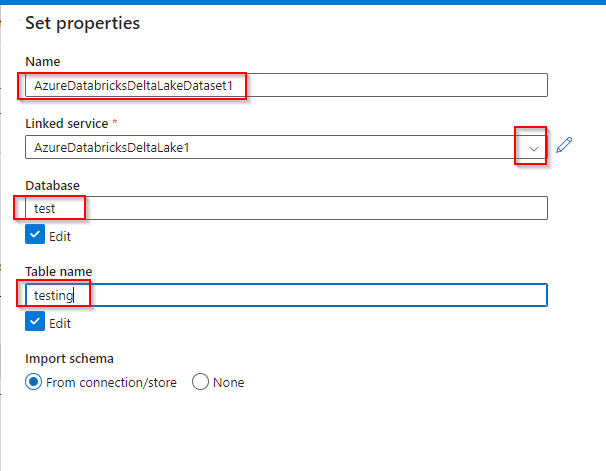
Step 3: Create a Dataset for the Delta Table

We have:

  • Unity catalog called “dev”;
  • Schema (Database) called test;
  • Table name is testing

Using above created Databricks delta lake linkedservices –

Step 4: Use the Lookup Activity

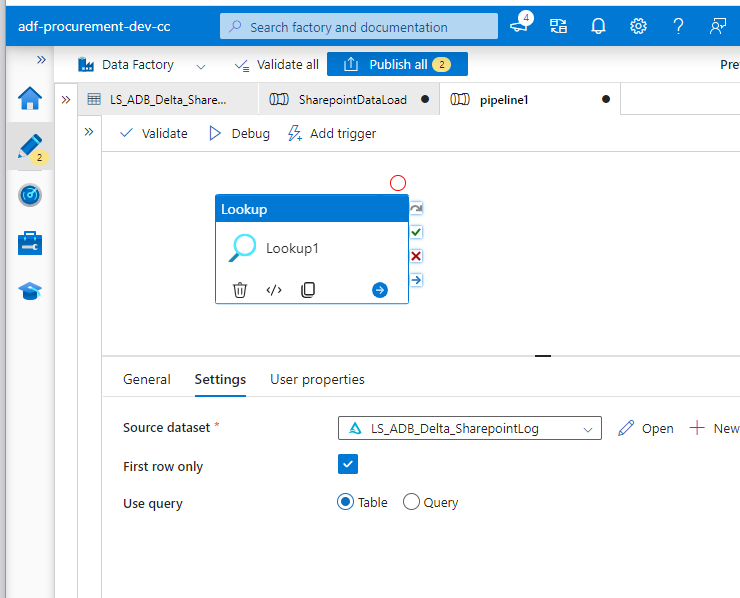
In Azure Data Factory or Synapse, choose “Lookup” activity, using the azure databricks delta lake dataset above created.

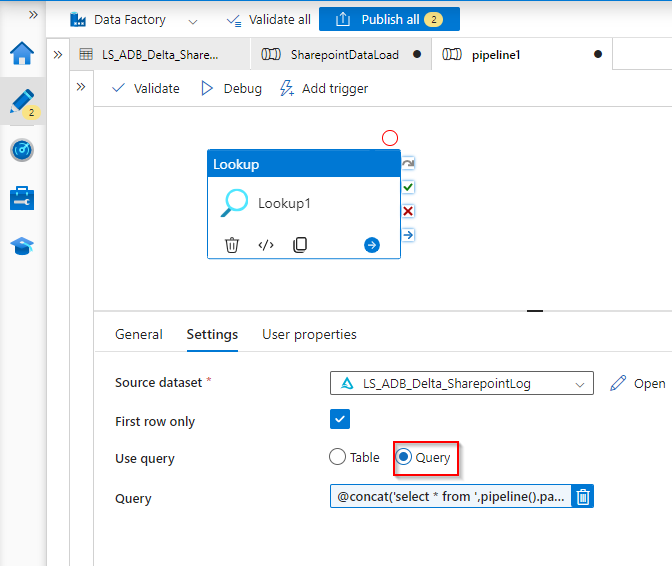
we can use “table” or “query“.

if we use “query”, we are able to dynamically generate the query script. for example,

query: SELECT * FROM my_database.my_table WHERE condition = ‘value’

Dynamic content

@concat('select * from '
, pipeline().parameters.Environment
, '.twedi.sharepointlog'
)

Step 5: Use the Lookup Output

You can reference the output of the Lookup activity in subsequent activities within the pipeline. For example, you might want to use it in a conditional activity or to pass parameters to another activity.

Conclusion

Following these steps will allow you to successfully use Azure Data Factory’s Lookup activity to query a Delta table from Databricks Unity Catalog. If you run into specific issues or have further questions, feel free to ask!

Comparison between All-Purpose Cluster, Job Cluster, SQL Warehouse and Instance Pools

side-by-side comparison of “All-Purpose Cluster”, “Job Cluster”, “SQL Warehouse” and Instance Pools in Azure Databricks, covering their key features, use cases, and differences:

Key Differences

  • All-Purpose Cluster: Best for interactive workloads, collaborative notebooks, and exploration. It stays running until you manually stop it or it hits the idle timeout. Not as cost-effective for long-running or scheduled tasks.
  • Job Cluster: Best for scheduled and automated jobs. It starts automatically when the job begins and shuts down after the job finishes, which makes it cost-efficient and ideal for production ETL or data processing jobs.
  • SQL Warehouse: Best for SQL analytics and BI tool integration. It is specifically optimized for SQL queries, offering auto-scaling based on query load and cost-efficient SQL query execution on Delta Lake tables.
  • Instance Pools: Reducing startup times for frequently created clusters. Sharing resources among multiple teams or clusters.

Side by side comparison

All-Purpose ClusterJob ClusterSQL Warehouse (formerly SQL Endpoints)Instance Pools
PurposeGeneral-purpose compute environment for interactive workloads.Dedicated to run a specific job or task. Automatically terminates after the job.Optimized for running SQL queries, dashboards, and BI analytics on Delta Lake.resource management feature that pre-allocate virtual machines (VMs) to reduce cluster startup times and optimize costs.
UsageFor interactive development in notebooks, collaboration, and ad-hoc analysis.For scheduled or automated jobs (e.g., ETL tasks) that need to run Spark-based processing.For SQL-based workloads, querying data in Delta Lake, and BI tools (e.g., Power BI, Tableau).Supporting clusters
Primary WorkloadInteractive development (notebooks, data exploration, ad-hoc queries).Automated Spark jobs with dedicated, isolated clusters for each job.SQL analytics and dashboards, running SQL queries against Delta Lake tables.Resource optimization
Cluster LifecycleRemains active until manually terminated or idle timeout is reached.Created automatically when a job is triggered, and terminated when the job is done.SQL Warehouses scale up/down based on query demand; remain active based on usage settings.Pre-warmed VMs (idle terminate)
Resource AllocationConfigurable resources, manual start/stop, and autoscaling available.Dynamically allocated resources based on job requirements, with autoscaling.Autoscaling based on SQL query demand; optimized for SQL workloads.
CostAlways running unless manually stopped or auto-terminated, can be expensive if left running.More cost-efficient for scheduled jobs, as the cluster runs only during the job execution.Efficient for SQL queries with autoscaling; cost based on query execution.Optimizes cluster creation
PerformanceGood for interactive, collaborative workloads but may incur higher costs if not optimized.Highly performant for running isolated, parallel jobs without interference from other workloads.Optimized for low-latency SQL query performance and concurrent query execution.
ScalingCan scale automatically based on workload demand (within limits set by the user).Scales based on the job’s needs; new clusters can be created for each job.Scales automatically to accommodate concurrent SQL queries.
IsolationNot isolated — multiple users can share the cluster, which may impact performance.Fully isolated — each job runs on a separate cluster.Isolated SQL queries but shared resources for concurrent workloads.Shared resource pool
Ideal ForData exploration, notebook development, machine learning experiments, ad-hoc queries.Scheduled ETL/ELT jobs, production jobs, or one-time data processing tasks.SQL analytics, dashboards, and BI tool integration for querying Delta Lake.Supporting clusters
Supported LanguagesPython, Scala, R, SQL, and more via notebooks.Python, Scala, R, SQL (job-specific).SQL only.
ManagementRequires manual monitoring and termination.Automatic termination after job completion.Automatically managed scaling and uptime based on usage.Faster cluster launches
Example Use CaseRunning notebooks to explore and analyze data, performing machine learning experiments.Running a scheduled Spark job that processes data in a pipeline or transformation.Running SQL queries on Delta Lake, powering dashboards, or connecting to BI tools.
Restart BehaviorCan be manually stopped and restarted; the Cluster ID remains the same.Automatically created and terminated for each job run; new Cluster ID for each job.SQL Warehouse remains active based on usage, auto-scaling handles load; Warehouse ID remains the same.Faster cluster launches
Side by side clusters comparisons.

Summary:

  • All-Purpose Clusters are ideal for interactive data exploration and multi-user environments, but they can be costly if left running for too long.
  • Job Clusters are used for single, isolated tasks (like scheduled ETL jobs) and are cost-effective since they are automatically created and terminated.
  • SQL Warehouses are specialized for SQL queries and business intelligence reporting, offering cost efficiency through on-demand scaling for SQL analytics.