arrayType, mapType column and functions

In PySpark, ArrayType and MapType are used to define complex data structures within a DataFrame schema.

ArrayType column, and functions,

ArrayType allows you to store and work with arrays, which can hold multiple values of the same data type.

sample dataframe:
id, numbers|
1, [1, 2, 3]
2, [4, 5, 6]
3, [7, 8, 9]

explode ()

“explode” a given array into individual new rows using the explode function, Offen use it to flatten JSON.

from pyspark.sql.functions import explode

# Explode the 'numbers' array into separate rows
exploded_df = df.withColumn("number", explode(df.numbers))
display(explode_df)
==output==
id	numbers	number
1	[1,2,3]	1
1	[1,2,3]	2
1	[1,2,3]	3
2	[4,5,6]	4
2	[4,5,6]	5
2	[4,5,6]	6
3	[7,8,9]	7
3	[7,8,9]	8
3	[7,8,9]	9
split ()

Split strings based on a specified delimiter, return a array type.

from pyspark.sql.functions import split
df.withColumn(“Name_Split”, split(df[“Name”], “,”))

sample dataframe
+————–+
| Name |
+————–+
| John,Doe |
| Jane,Smith |
| Alice,Cooper |
+————–+

from pyspark.sql.functions import split
# Split the 'Name' column by comma
df_split = df.withColumn("Name_Split", split(df["Name"], ","))

==output==
+-------------+----------------+
| Name        | Name_Split     |
+-------------+----------------+
| John,Doe    | [John, Doe]    |
| Jane,Smith  | [Jane, Smith]  |
| Alice,Cooper| [Alice, Cooper]|
+-------------+----------------+
array ()

Creates an array column.

from pyspark.sql.functions import array, col
data=[(1,2,3),(4,5,6)]
schema=['num1','num2','num3']
df1=spark.createDataFrame(data,schema)
df1.show()
# create a new column - numbers, array type. elements use num1,num2,num3   
df1.withColumn("numbers",array(col("num1"),col("num2"),col("num3"))).show()

==output==
+----+----+----+
|num1|num2|num3|
+----+----+----+
|   1|   2|   3|
|   4|   5|   6|
+----+----+----+

#new array column "numbers" created
+----+----+----+-----------+
|num1|num2|num3| numbers   |
+----+----+----+-----------+
|   1|   2|   3| [1, 2, 3] |
|   4|   5|   6| [4, 5, 6] |
+----+----+----+-----------+
array_contains ()

Checks if an array contains a specific element.

from pyspark.sql.functions import array_contains
array_contains(array, value)

sample dataframe
+—+———————–+
|id |fruits |
+—+———————–+
|1 |[apple, banana, cherry]|
|2 |[orange, apple, grape] |
|3 |[pear, peach, plum] |
+—+———————–+

from pyspark.sql.functions import array_contains

# Using array_contains to check if the array contains 'apple'
df.select("id", array_contains("fruits", "apple").alias("has_apple")).show()

==output==
+---+----------+
| id|has_apple |
+---+----------+
|  1|      true|
|  2|      true|
|  3|     false|
+---+----------+
getItem()

Access individual elements of an array by their index using the getItem() method

# Select the second element (index start from 0) of the 'numbers' array
df1 = df.withColumn("item_1_value",   df.numbers.getItem(1))
display(df1)
==output==
id	numbers	      item_1_value
1	[1,2,3]	       2
2	[4,5,6]	       5
3	[7,8,9]	       8
size ()

Returns the size of the array.

from pyspark.sql.functions import size

# Get the size of the 'numbers' array
df.select(size(df.numbers)).show()

==output==
+-------------+
|size(numbers)|
+-------------+
|            3|
|            3|
|            3|
+-------------+
sort_array()

Sorts the array elements.

sort_array(col: ‘ColumnOrName’, asc: bool = True)

If `asc` is True (default) then ascending and if False then descending. if asc=True, can be omitted.

from pyspark.sql.functions import sort_array
df.withColumn("numbers", sort_array("numbers")).show()
==output==
ascending 
+---+---------+
| id|  numbers|
+---+---------+
|  1|[1, 2, 3]|
|  2|[4, 5, 6]|
|  3|[7, 8, 9]|
+---+---------+
df.select(sort_array("numbers", asc=False).alias("sorted_desc")).show()
==output==
descending 
+-----------+
|sorted_desc|
+-----------+
|  [3, 2, 1]|
|  [6, 5, 4]|
|  [9, 8, 7]|
+-----------+
concat ()

concat() is used to concatenate arrays (or strings) into a single array (or string). When dealing with ArrayType, concat() is typically used to combine two or more arrays into one.

from pyspark.sql.functions import concat
concat(*cols)

sample DataFrames
+—+——+——+
|id |array1|array2|
+—+——+——+
|1 | [a, b] | [x, y]|
|2 | [c] | [z] |
|3 | [d, e] | null |
+—+——-+——+

from pyspark.sql.functions import concat

# Concatenating array columns
df_concat = df.withColumn("concatenated_array", concat(col("array1"), col("array2")))
df_concat.show(truncate=False)

==output==
+---+------+------+------------------+
|id |array1|array2|concatenated_array|
+---+------+------+------------------+
|1  |[a, b]|[x, y]|[a, b, x, y]      |
|2  |[c]   |[z]   |[c, z]            |
|3  |[d, e]|null  |null              |
+---+------+------+------------------+

Handling null Values

If any of the input columns are null, the entire result can become null. This is why you’re seeing null instead of just the non-null array.

To handle this, you can use coalesce() to substitute null with an empty array before performing the concat(). coalesce() returns the first non-null argument. Here’s how you can modify your code:

from pyspark.sql.functions import concat, coalesce, lit

# Define an empty array for the same type
empty_array = array()

# Concatenate with null handling using coalesce
df_concat = df.withColumn(
    "concatenated_array",
    concat(coalesce(col("array1"), empty_array), coalesce(col("array2"), empty_array))
)

df_concat.show(truncate=False)

==output==
+---+------+------+------------------+
|id |array1|array2|concatenated_array|
+---+------+------+------------------+
|1  |[a, b]|[x, y]|[a, b, x, y]      |
|2  |[c]   |[z]   |[c, z]            |
|3  |[d, e]|null  |[d, e]            |
+---+------+------+------------------+
array_zip ()

Combines arrays into a single array of structs.


☰ MapType column, and functions

MapType is used to represent map key-value pair similar to python Dictionary (Dic)

from pyspark.sql.types import MapType, StringType, IntegerType
# Define a MapType
my_map = MapType(StringType(), IntegerType(), valueContainsNull=True)

Parameters:

  • keyType: Data type of the keys in the map. You can use PySpark data types like StringType(), IntegerType(), DoubleType(), etc.
  • valueType: Data type of the values in the map. It can be any valid PySpark data type
  • valueContainsNull: Boolean flag (optional). It indicates whether null values are allowed in the map. Default is True.

sample dataset
# Sample dataset (Product ID and prices in various currencies)
data = [
(1, {“USD”: 100, “EUR”: 85, “GBP”: 75}),
(2, {“USD”: 150, “EUR”: 130, “GBP”: 110}),
(3, {“USD”: 200, “EUR”: 170, “GBP”: 150}),
]


sample dataframe
+———-+————————————+
|product_id|prices |
+———-+————————————+
|1 |{EUR -> 85, GBP -> 75, USD -> 100} |
|2 |{EUR -> 130, GBP -> 110, USD -> 150}|
|3 |{EUR -> 170, GBP -> 150, USD -> 200}|
+———-+————————————+

Accessing map_keys (), map_values ()

Extract keys (currency codes) and values (prices):

from pyspark.sql.functions import col, map_keys, map_values
# Extract map keys and values
df.select(
    col("product_id"),
    map_keys(col("prices")).alias("currencies"),
    map_values(col("prices")).alias("prices_in_currencies")
).show(truncate=False)

==output==
+----------+---------------+--------------------+
|product_id|currencies     |prices_in_currencies|
+----------+---------------+--------------------+
|1         |[EUR, GBP, USD]|[85, 75, 100]       |
|2         |[EUR, GBP, USD]|[130, 110, 150]     |
|3         |[EUR, GBP, USD]|[170, 150, 200]     |
+----------+---------------+--------------------+
exploder ()

Use explode () to flatten the map into multiple rows, where each key-value pair from the map becomes a separate row.

from pyspark.sql.functions import explode
# Use explode to flatten the map
df_exploded = df.select("product_id", explode("prices").alias("currency", "price")).show()

==output==
+----------+--------+-----+
|product_id|currency|price|
+----------+--------+-----+
|         1|     EUR|   85|
|         1|     GBP|   75|
|         1|     USD|  100|
|         2|     EUR|  130|
|         2|     GBP|  110|
|         2|     USD|  150|
|         3|     EUR|  170|
|         3|     GBP|  150|
|         3|     USD|  200|
+----------+--------+-----+
Accessing specific elements in the map

To get the price for a specific currency (e.g., USD) for each product:

from pyspark.sql.functions import col, map_keys, map_values
# Access the value for a specific key in the map 
df.select(
    col("product_id"),
    col("prices").getItem("USD").alias("price_in_usd")
).show(truncate=False)

==output==
+----------+------------+
|product_id|price_in_usd|
+----------+------------+
|1         |100         |
|2         |150         |
|3         |200         |
+----------+------------+
filtering

filter the rows based on conditions involving the map values

from pyspark.sql.functions import col, map_keys, map_values
# Filter rows where price in USD is greater than 150
df.filter(col("prices").getItem("USD") > 150).show(truncate=False)

==output==
+----------+------------------------------------+
|product_id|prices                              |
+----------+------------------------------------+
|3         |{EUR -> 170, GBP -> 150, USD -> 200}|
+----------+------------------------------------+
map_concat ()

Combines two or more map columns by merging their key-value pairs.

from pyspark.sql.functions import map_concat, create_map, lit

# Define the additional currency as a new map using create_map()
additional_currency = create_map(lit("CAD"), lit(120))

# Add a new currency (e.g., CAD) with a fixed price to all rows
df.withColumn(
    "updated_prices",
    map_concat(col("prices"), additional_currency)
).show(truncate=False)

==output==
+----------+------------------------------------+
|product_id|prices                              |
+----------+------------------------------------+
|3         |{EUR -> 170, GBP -> 150, USD -> 200}|
+----------+------------------------------------+
Pyspark: read and write a parquet file

Reading Parquet Files

Syntax

help(spark.read.parquet)


df = spark.read \
    .format("parquet") \
    .option("mergeSchema", "true") \  # Merges schemas of all files (useful when reading from multiple files with different schemas)
    .option("pathGlobFilter", "*.parquet") \  # Read only specific files based on file name patterns
    .option("recursiveFileLookup", "true") \  # Recursively read files from directories and subdirectories
.load("/path/to/parquet/file/or/directory")

Options

  • mergeSchema: When reading Parquet files with different schemas, merge them into a single schema.
    • true (default: false)
  • pathGlobFilter: Allows specifying a file pattern to filter which files to read (e.g., “*.parquet”).
  • recursiveFileLookup: Reads files recursively from subdirectories.
    • true (default: false)
  • modifiedBefore/modifiedAfter: Filter files by modification time. For example:
    .option(“modifiedBefore”, “2023-10-01T12:00:00”)
    .option(“modifiedAfter”, “2023-01-01T12:00:00”)
  • maxFilesPerTrigger: Limits the number of files processed in a single trigger, useful for streaming jobs.
  • schema: Provides the schema of the Parquet file (useful when reading files without inferring schema).

from pyspark.sql.types import StructType, StructField, IntegerType, StringTypeschema = StructType([StructField("id", IntegerType(), True),  StructField("name", StringType(), True)]) 

df = spark.read.schema(schema).parquet("/path/to/parquet")

Path
  • Load All Files in a Directory
    df = spark.read.parquet(“/path/to/directory/”)
  • Load Multiple Files Using Comma-Separated Paths
    df = spark.read.parquet(“/path/to/file1.parquet”, “/path/to/file2.parquet”, “/path/to/file3.parquet”)
  • Using Wildcards (Glob Patterns)
    df = spark.read.parquet(“/path/to/directory/*.parquet”)
  • Using Recursive Lookup for Nested Directories
    df = spark.read.option(“recursiveFileLookup”, “true”).parquet(“/path/to/top/directory”)
  • Load Multiple Parquet Files Based on Conditions
    df = spark.read .option(“modifiedAfter”, “2023-01-01T00:00:00”) .parquet(“/path/to/directory/”)
  • Programmatically Load Multiple Files
    file_paths = [“/path/to/file1.parquet”, “/path/to/file2.parquet”, “/path/to/file3.parquet”]
    df = spark.read.parquet(*file_paths)
  • Load Files from External Storage (e.g., S3, ADLS, etc.)
    df = spark.read.parquet(“s3a://bucket-name/path/to/files/”)

Example


# Reading Parquet files with options
df = spark.read \
    .format("parquet") \
    .option("mergeSchema", "true") \
    .option("recursiveFileLookup", "true") \
    .load("/path/to/parquet/files")

Conclusion

To load multiple Parquet files at once, you can:

  • Load an entire directory.
  • Use wildcard patterns to match multiple files.
  • Recursively load from subdirectories.
  • Programmatically pass a list of file paths. These options help streamline your data ingestion process when dealing with multiple Parquet files in Databricks.

Write to parquet

Syntax


# Writing a Parquet file
df.write \
    .format("parquet") \
    .mode("overwrite") \  # Options: "overwrite", "append", "ignore", "error"
    .option("compression", "snappy") \  # Compression options: none, snappy, gzip, lzo, brotli, etc.
    .option("maxRecordsPerFile", 100000) \  # Max number of records per file
    .option("path", "/path/to/output/directory") \
    .partitionBy("year", "month") \  # Partition the output by specific columns
.save()

Options

compression: .option(“compression”, “snappy”)

Specifies the compression codec to use when writing files.
Options: none, snappy (default), gzip, lzo, brotli, lz4, zstd, etc.

maxRecordsPerFile: .option(“maxRecordsPerFile”, 100000)

Controls the number of records per file when writing.
Default: None (no limit).

saveAsTable: saveAsTable(“parquet_table”)

Saves the DataFrame as a table in the catalog.

Save: save()
path:

Defines the output directory or file path.

mode: mode(“overwrite”)

Specifies the behavior if the output path already exists.

  • overwrite: Overwrites existing data.
  • append: Appends to existing data.
  • ignore: Ignores the write operation if data already exists.
  • error or errorifexists: Throws an error if data already exists (default).
Partition: partitionBy(“year”, “month”)

Partitions the output by specified columns

bucketBy: .bucketBy(10, “id”)

Distributes the data into a fixed number of buckets

df.write \
    .bucketBy(10, "id") \
    .sortBy("name") \
.saveAsTable("parquet_table")

Example


# Writing Parquet files with options
df.write \
    .format("parquet") \
    .mode("overwrite") \
    .option("compression", "gzip") \
    .option("maxRecordsPerFile", 50000) \
    .partitionBy("year", "month") \
    .save("/path/to/output/directory")

writing key considerations:

  • Use mergeSchema if the Parquet files have different schemas, but it may increase overhead.
  • Compression can significantly reduce file size, but it can add some processing time during read and write operations.
  • Partitioning by columns is useful for organizing large datasets and improving query performance.

Pyspark: read and write a csv file

In PySpark, we can read from and write to CSV files using DataFrameReader and DataFrameWriter with the csv method. Here’s a guide on how to work with CSV files in PySpark:

Reading CSV Files in PySpark

Syntax

df = spark.read.format(“csv”).options(options).load(ffile_location).schema(schema_df)

format
  • csv
  • Parquet
  • ORC
  • JSON
  • AVRO
option
  • header = “True”; “False”
  • inferSchema = “True”; ”False”
  • sep=”,” … whatever
file_location
  • load(path1)
  • load(path1,path2……)
  • load(folder)
Schema
  • define a schema
  • Schema
  • my_schema

define a schema


from pyspark.sql.types import StructType, StructField, StringType, IntegerType
# Define the schema
schema = StructType([
    StructField("column1", IntegerType(), True),   # Column1 is Integer, nullable
    StructField("column2", StringType(), True),    # Column2 is String, nullable
    StructField("column3", StringType(), False)    # Column3 is String, non-nullable
])

#or simple format
schema="col1 INTEGER, col2 STRING, col3 STRING, col4 INTEGER"

Example

Read CSV file with header, infer schema, and specify null value


# Read a CSV file with header, infer schema, and specify null value
df = spark.read.format("csv") \
    .option("header", "true") \    # Use the first row as the header
    .option("inferSchema", "true")\ # Automatically infer the schema
    .option("sep", ",") \           # Specify the delimiter
    .load("path/to/input_file.csv")\ # Load the file
    .option("nullValue", "NULL" # Define a string representation of null


# Read multiple CSV files with header, infer schema, and specify null value
df = spark.read.format("csv") \ 
.option("inferSchema", "true")\     
.option("sep", ",") \             
.load("path/file1.csv", "path/file2.csv", "path/file3.csv")\   
.option("nullValue", "NULL")


# Read folder all CSV files with header, infer schema, and specify null value
df = spark.read.format("csv") \ 
.option("inferSchema", "true")\     
.option("sep", ",") \             
.load("/path_folder/)\   
.option("nullValue", "NULL")

When you want to read multiple files into a single Dataframe, if schemas are different, load files into Separate DataFrames, then take additional process to merge them together.

Writing CSV Files in PySpark

Syntax


df.write.format("csv").options(options).save("path/to/output_directory")

Example


# Write the result DataFrame to a new CSV file
result_df.write.format("csv") \
    .option("header", "true") \
    .mode("overwrite") \
    .save("path/to/output_directory")


# Write DataFrame to a CSV file with header, partitioning, and compression

df.write.format("csv") \
  .option("header", "true") \         # Write the header
  .option("compression", "gzip") \    # Use gzip compression
  .partitionBy("year", "month") \ # Partition the output by specified columns
  .mode("overwrite") \                # Overwrite existing data
  .save("path/to/output_directory")   # Specify output directory

dbutls: notebook run(), exit() and pass parameters

In Databricks, dbutils.notebook provides a set of utilities that allow you to interact with notebooks programmatically. This includes running other notebooks, exiting a notebook with a result, and managing notebook workflows.

Parent Notebook pass parameters to child notebook

run()

dbutils.notebook.run()

run(path: String, timeoutSeconds: int, arguments: Map): String -> This method runs a notebook and returns its exit value

The dbutils.notebook.run() function allows you to run another notebook from your current notebook. It also allows you to pass parameters to the called child notebook and capture the result of the execution.

  • notebook_path: The path to the notebook you want to run. This can be a relative or absolute path.
  • timeout_seconds: How long to wait before timing out. If the notebook does not complete within this time, an error will occur.

    In other words, if the notebook completes before the timeout, it proceeds as normal, returning the result. However, if the notebook exceeds the specified timeout duration, the notebook run is terminated, and an error is raised.

  • arguments: A dictionary of parameters to pass to the called notebook. The called notebook can access these parameters via dbutils.widgets.get().
Parent notebooks
# Define parameters to pass to the child notebook
params = {
  "param1": "value1",
  "param2": "value2"
}


# Run the child notebook and capture its result

result =
dbutils.notebook.run("/Users/your-email@domain.com/child_notebook",
60, params)

 
# Print the result returned from the child notebook

print(f"Child notebook result:
{result}")


Parent notebook calls/runs his child notebook in python only, cannot use SQL

In the child notebook, you can retrieve the passed parameters using dbutils.widgets.get():

Child notebook
param1 = dbutils.widgets.get("param1")
param2 = dbutils.widgets.get("param2")

print(f"Received param1: {param1}")
print(f"Received param2: {param2}")

#SQL

— Use the widget values in a query
SELECT * FROM my_table WHERE column1 = ‘${getArgument(‘param1′)}’ AND column2 = ‘${getArgument(‘param2′)}’;

Child notebook returns values to parent notebook

When parent notebook run/call a child notebook using dbutils.notebook.run(), the child notebook can return a single value (usually a string) using dbutils.notebook.exit() return value to parent notebook. The parent notebook can capture this return value for further processing.

Key Points:

  • The value returned by dbutils.notebook.exit() must be a string.
  • The parent notebook captures this return value when calling dbutils.notebook.run().

exit()

dbutils.notebook.help() get help.

dbutils.notebook.exit(value: String): void 

dbutils.notebook.exit() Exit a notebook with a result.

The dbutils.notebook.exit() function is used to terminate the execution of a notebook and return a value to the calling notebook.

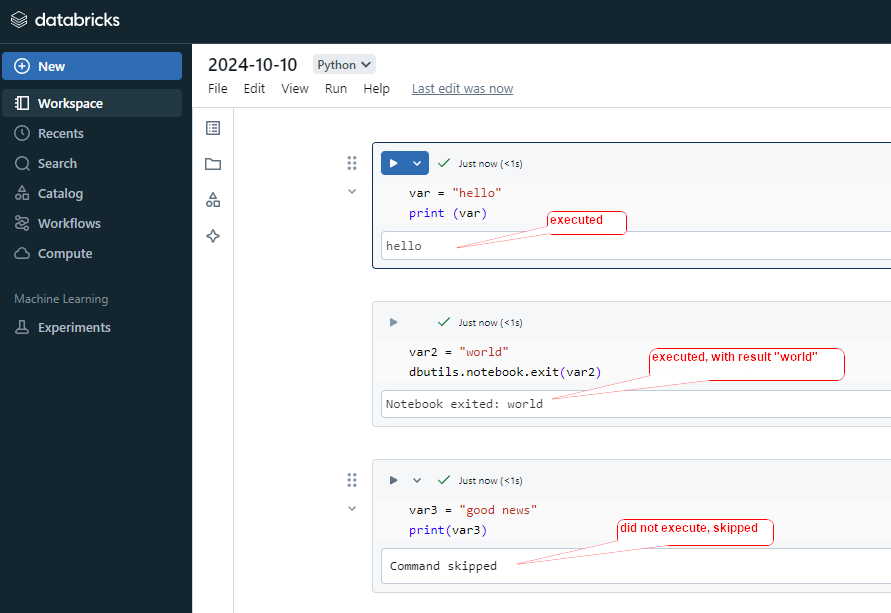
After this executed, all below cells commend will skipped, will not execute.

#cell1
var = "hello"
print (var)

#cell2
var2 = "world"
dbutils.notebook.exit(var2)

#cell3
var3 = "good news"
print(var3)

Parent notebook uses child notebook returned value

Parent Notebook
#parent notebook
# Call the child notebook and pass any necessary parameters 
result = dbutils.notebook.run("/Notebooks/child_notebook", 60, {"param1": "some_value"})

#use the child notebook returned value 
print(f"I use the Returned result: {result}")


# Use the result for further logic 
if result == "Success": 
     print("The child notebook completed successfully!") 
else: 
     print("The child notebook encountered an issue.")

child Notebook
#child Notebook
# Simulate some processing (e.g., a query result or a status) 
result_value = "Success" 

# Return the result to the parent notebook 
dbutils.notebook.exit(result_value)

Handling Complex Return Values

Since dbutils.notebook.exit() only returns a string, if you need to return a more complex object (like a dictionary or a list), you need to serialize it to a string format (like JSON) and then deserialize it in the parent notebook.

Child Notebook:

import json

# Simulate a complex return value (a dictionary)
result = {"status": "Success", "rows_processed": 1234}

# Convert the dictionary to a JSON string and exit
dbutils.notebook.exit(json.dumps(result))

Parent Notebook:

import json

# Run the child notebook
result_str = dbutils.notebook.run("/Notebooks/child_notebook", 60, {"param1": "some_value"})

# Convert the returned JSON string back into a dictionary
result = json.loads(result_str)

# Use the values from the result
print(f"Status: {result['status']}")
print(f"Rows Processed: {result['rows_processed']}")

Summary:

  • You can call child notebooks from a parent notebook using Python (dbutils.notebook.run()), but not with SQL directly.
  • You can pass parameters using widgets in the child notebook.
  • Python recommend to use dbutils.get(“parameterName”), still can use getArgument(“parameterName”)
  • SQL use getArgument(“parameterName”) in child notebook only.
  • Results can be returned to the parent notebook using dbutils.notebook.exit().

Please do not hesitate to contact me if you have any questions at William . chen @ mainri.ca

(remove all space from the email account 😊)

dbutils: widgets

In Databricks notebooks, dbutils.widgets provide a way to create interactive controls like dropdowns, text inputs, and multi-selects. These widgets make your notebooks more interactive by allowing users to input parameters that can drive the notebook’s behavior without editing the code itself.

Types of Widgets

  • Text Box (dbutils.widgets.text): Allows users to input free-form text.
  • Dropdown (dbutils.widgets.dropdown): Presents a dropdown menu with predefined options.
  • Combobox (dbutils.widgets.combobox): A combination of a text box and a dropdown, allowing users to either select from a list or enter a new value.
  • Multi-Select (dbutils.widgets.multiselect): Allows users to select multiple options from a dropdown list.

Common dbutils.widgets Commands

Create a Text Box

dbutils.widgets.text(“input_text”, “default_value”, “Text Input”)

#SQL

CREATE WIDGET TEXT tableName DEFAULT ‘customers’

  • “input_text”: The name of the widget (used to retrieve the value).
  • “default_value”: Default value shown when the widget is created.
  • “Text Input”: Label shown next to the widget in the notebook UI.

Create a Dropdown

dbutils.widgets.dropdown(“dropdown”, “option1”, [“option1”, “option2”, “option3”], “Dropdown Label”)

#SQL

CREATE WIDGET DROPDOWN country DEFAULT ‘USA’ CHOICES [‘USA’, ‘UK’, ‘India’]

  • "dropdown": The name of the widget.
  • "option1": Default selected option.
  • ["option1", "option2", "option3"]: List of options.
  • "Dropdown Label": Label for the dropdown.

Create a Combobox

dbutils.widgets.combobox(“combobox”, “option1”, [“option1”, “option2”, “option3”], “Combobox Label”)

Create a Multi-Select

dbutils.widgets.multiselect(“multi_select”, “option1”, [“option1”, “option2”, “option3”], “Multi-Select Label”)

#SQL

CREATE WIDGET MULTISELECT status DEFAULT ‘active’ CHOICES [‘active’, ‘inactive’, ‘pending’]

Retrieving Widget Values

value = dbutils.widgets.get(“widget_name”)
print(f”Selected value: {value}”)

#SQL

SELECT * FROM ${getArgument(‘tableName’)}
WHERE country = ‘${getArgument(‘country’)}’
AND status IN (${getArgument(‘status’)})

Cation, In sql, use getArgument.

Removing Widgets

Remove a Single Widget

dbutils.widgets.remove(“widget_name”)

#SQL

— Remove widgets when no longer needed
REMOVE WIDGET widget_name

Remove All Widgets

dbutils.widgets.removeAll()

Please do not hesitate to contact me if you have any questions at William . chen @ mainri.ca

(remove all space from the email account 😊)

DBFS: Databricks File System (DBFS)

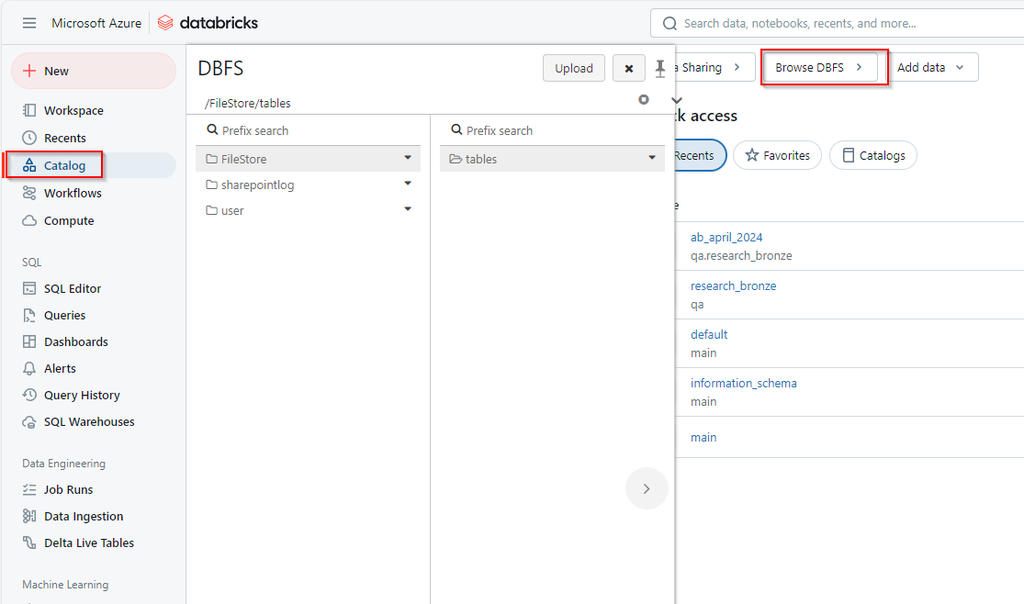
The Databricks File System (DBFS) is a distributed file system integrated with Databricks that allows users to interact with object storage systems like Azure Blob Storage, Amazon S3, and Google Cloud Storage. DBFS enables seamless access to these cloud storage systems within Databricks notebooks and clusters, appearing like a local file system.

Databricks recommends that you store data in mounted object storage rather than in the DBFS root. The DBFS root is not intended for production customer data.

DBFS root is the default file system location provisioned for a Databricks workspace when the workspace is created. It resides in the cloud storage account associated with the Databricks workspace.

Key Features of DBFS

  • Unified Storage Access: DBFS provides a unified interface to interact with various cloud storage platforms (Azure Blob, S3, etc.)
  • Mounting External Storage: DBFS allows you to mount cloud storage containers or buckets so that they are accessible from your Databricks environment like a directory.
  • Persistence: Files written to DBFS in certain directories are persistent and accessible across clusters, ensuring that data is stored and available even when clusters are shut down
  • Interoperability: DBFS integrates with Databricks’ Spark engine, meaning you can read and write data directly into Spark DataFrames,

Structure of DBFS

The Databricks File System is structured similarly to a Unix-like file system. It has the following key components:

  • /FileStore: This is the default directory where you can upload and store small files, such as libraries, scripts, and other assets.
  • /databricks-datasets: This directory contains sample datasets provided by Databricks for learning purposes.
  • /mnt: This is the mount point for external cloud storage, where you can mount and interact with cloud storage services like Azure Blob, AWS S3, or GCS (Google Cloud Storage).

Working with DBFS

List Files in DBFS

dbutils.fs.ls(“/FileStore/”)

Upload Files

dbutils.fs.put(“/FileStore/my_file.txt”, “Hello, DBFS!”, overwrite=True)

Reading Files

df = spark.read.csv(“/FileStore/my_file.csv”, header=True, inferSchema=True)

Writing Files

df.write.csv(“/FileStore/my_output.csv”, mode=”overwrite”)

Mounting External Storage

dbutils.fs.mount(
  source = "wasbs://<container>@<storage-account-name>.blob.core.windows.net",
  mount_point = "/mnt/myblobstorage",
  extra_configs = {"<storage-account-name>.blob.core.windows.net":dbutils.secrets.get(scope = "<scope-name>", key = "<storage-access-key>")})

Unmounting Storage

dbutils.fs.unmount(“/mnt/myblobstorage”)

Conclusion

The Databricks File System (DBFS) is a crucial feature in Databricks that provides seamless, scalable file storage and cloud integration. It abstracts away the complexity of working with distributed storage systems, making it easy to manage and process data. With capabilities like mounting external storage, integration with Spark, and support for various file formats, DBFS is an essential tool for any data engineering or analytics workflow within Databricks.

delta: Schema Evolution

Schema Evolution in Databricks refers to the ability to automatically adapt and manage changes in the structure (schema) of a Delta Lake table over time. It allows users to modify the schema of an existing table (e.g., adding or updating columns) without the need for a complete rewrite of the data.

Key Features of Schema Evolution

  1. Automatic Adaptation: Delta Lake can automatically evolve the schema of a table when new columns are added to the incoming data, or when data types change, if certain configurations are enabled.
  2. Backward and Forward Compatibility: Delta Lake ensures that new data can be written to a table without breaking the existing schema. It also ensures that existing queries remain compatible, even if the schema changes.

Configuration for Schema Evolution

  • mergeSchema
    This option allows you to append new data with a schema that differs from the existing table schema. It merges the new schema into the table.
    Usage: Typically used when you are appending data.
  • overwriteSchema
    This option is used when you want to completely replace the schema of the table with the schema of the new data.
    Usage: Typically used when you are overwriting data

mergSchema

When new data has additional columns that aren’t present in the target Delta table, Delta Lake can automatically merge the new schema into the existing table schema.


# Append new data to the Delta table with automatic schema merging

df_new_data.write.format("delta").mode("append").option("mergeSchema", "true").save("/path/to/delta-table")


overwriteSchema

If you want to replace the entire schema (including removing existing columns), you can use the overwriteSchema option.


# Overwrite the existing Delta table schema with new data

df_new_data.write.format("delta").mode("overwrite").option("overwriteSchema", "true").save("/path/to/delta-table")


Configure spark.databricks.delta.schema.autoMerge

You can configure this setting at the following levels:

  • Session Level (applies to a specific session or job)
  • Cluster Level (applies to all jobs on the cluster)

Session-Level Configuration (Spark session level)

Once this is enabled, all write and merge operations in the session will automatically allow schema evolution.


# Enable auto schema merging for the session

spark.conf.set("spark.databricks.delta.schema.autoMerge.enabled", "true")

Cluster-Level Configuration

This enables automatic schema merging for all operations on the cluster without needing to set it in each job.

  1. Go to your Databricks Workspace.
  2. Navigate to Clusters and select your cluster.
  3. Go to the Configuration tab.
  4. Under Spark Config, add the following configuration:
    spark.databricks.delta.schema.autoMerge.enabled true

Please do not hesitate to contact me if you have any questions at William . chen @ mainri.ca

(remove all space from the email account 😊)

Delta: Time Travel of Delta Table

Time Travel in Delta Lake allows you to query, restore, or audit the historical versions of a Delta table. This feature is useful for various scenarios, including recovering from accidental deletions, debugging, auditing changes, or simply querying past versions of your data.

Delta Lake maintains a transaction log that records all changes (inserts, updates, deletes) made to the table. Using Time Travel, you can access a previous state of the table by specifying a version number or a timestamp.

By default, data file retention is 7 days, log file retention is 30 days. After 7 days, file will delete, but log file still there.

You can access historical versions of a Delta table using two methods:

  1. By Version Number
  2. By Timestamp

Viewing Table History

# sql
DESCRIBE HISTORY my_delta_table;

Query a certain version Table

You can query a Delta table based on a specific version number by using the VERSION AS OF clause. Or timestamp using the TIMESTAMP AS OF clause.


# sql
SELECT * FROM my_delta_table VERSION AS OF 5;


#Python
spark.sql("SELECT * FROM my_delta_table VERSION AS OF 5")

Restore the Delta Table to an Older Version

You can use the RESTORE command to revert the Delta table to a previous state permanently. This modifies the current state of the Delta table to match a past version or timestamp. Delta Lake maintains the transaction log retention period set for the Delta table (by default, 30 days)

#sql
--restore table to earlier version 4
-- by version
RESTORE TABLE delta.`abfss://container@adlsAccount.dfs.windows.net/myDeltaTable` TO VERSION OF 4;

-- by timestamp
RESTORE TABLE my_delta_table TO TIMESTAMP AS OF '2024-10-07T12:30:00';

#python
spark.sql("RESTORE TABLE my_delta_table TO VERSION AS OF 5")
spark.sql("RESTORE TABLE my_delta_table TO TIMESTAMP AS OF '2024-10-07T12:30:00'")

Vacuum Command

The VACUUM command in Delta Lake is used to remove old files that are no longer in use by the Delta table. When you make updates, deletes, or upserts (MERGE) to a Delta table, Delta Lake creates new versions of the data while keeping older versions for Time Travel and data recovery. Over time, these old files can accumulate, consuming storage. The VACUUM command helps clean up these files to reclaim storage space.

This command will remove all files older than 7 days (by Default)


# sql
VACUUM my_delta_table;

# python
spark.sql("VACUUM my_delta_table")

Retention Duration Check

The configuration property


%sql
SET spark.databricks.delta.retentionDurationCheck.enabled = false / true;

spark.databricks.delta.retentionDurationCheck.enable in Delta Lake controls whether Delta Lake enforces the retention period check for the VACUUM operation. By default, Delta Lake ensures that data files are only deleted after the default retention period (typically 7 days) to prevent accidentally deleting files that might still be required for Time Travel or recovery.

When VACUUM is called, Delta Lake checks if the specified retention period is shorter than the minimum default (7 days). If it is, the VACUUM command will fail unless this safety check is disabled.

You can disable this check by setting the property spark.databricks.delta.retentionDurationCheck.enable to false, which allows you to set a retention period of less than 7 days or even vacuum data immediately (0 hours).

Disable the Retention Duration Check


#sql
SET spark.databricks.delta.retentionDurationCheck.enabled = false;

#python
spark.conf.set("spark.databricks.delta.retentionDurationCheck.enabled", "false")

set log Retention Duration


#sql 
# Set the log retention duration to 7 days
SET spark.databricks.delta.logRetentionDuration = '7 days';

# python 
# Set the log retention duration to 7 days
spark.conf.set("spark.databricks.delta.logRetentionDuration", "7 days")


Custom Retention Period


# sql
VACUUM my_delta_table RETAIN 1 HOURS;

# python
spark.sql("VACUUM my_delta_table RETAIN 1 HOURS")

Force Vacuum (Dangerous)


# sql
VACUUM my_delta_table RETAIN 0 HOURS;

Conclusion:

Delta Lake’s Time Travel feature is highly beneficial for data recovery, auditing, and debugging by enabling access to historical data versions. It provides flexibility to query and restore previous versions of the Delta table, helping maintain the integrity of large-scale data operations.

Please do not hesitate to contact me if you have any questions at William . chen @ mainri.ca

(remove all space from the email account 😊)

Delta Table, Delta Lake

A Delta table is a type of table that builds on the Delta Lake storage layer and brings ACID (Atomicity, Consistency, Isolation, Durability) transactions, schema enforcement, and scalable metadata management to traditional data lakes. It is designed for large-scale, reliable data processing and analytics. Delta tables enable you to manage both batch and streaming data with ease, and they are ideal for environments where data integrity and consistency are critical, such as in data lakes, data warehouses, and machine learning pipelines.

What is Delta Lake

Delta lake is an open-source technology, we use Delta Lake to store data in Delta tables. Delta lake improves data storage by supporting ACID transactions, high-performance query optimizations, schema evolution, data versioning and many other features.

FeatureTraditional Data LakesDelta Lake
Transaction SupportNo ACID transactionsFull ACID support
Data ConsistencyWeak guaranteesStrong guarantees with serializable isolation
Schema EnforcementNoneEnforced and allows schema evolution
Handling StreamingRequires separate infrastructureUnified batch and streaming
Data ManagementProne to issues like data corruptionReliable with audit trails and versioning
key differences

There is detail information at “Data lake vs delta lake vs data lakehouse, and data warehouses comparison

Key Features of Delta Tables

  1. ACID Transactions: Delta Lake ensures that operations like reads, writes, and updates are atomic, consistent, isolated, and durable, eliminating issues of partial writes and data corruption.
  2. Schema Enforcement: When writing data, Delta ensures that it matches the table’s schema, preventing incorrect or incomplete data from being written.
  3. Time Travel: Delta tables store previous versions of the data, which allows you to query, rollback, and audit historical data (also known as data versioning).
  4. Unified Streaming and Batch Processing: Delta tables allow you to ingest both batch and streaming data, enabling you to work seamlessly with either approach without complex rewrites.
  5. Efficient Data Upserts: You can perform MERGE operations (UPSERTS) efficiently, which is especially useful in scenarios where you need to insert or update data based on certain conditions.
  6. Optimized Performance: Delta Lake supports optimizations such as data skipping, Z-order clustering, and auto-compaction, improving query performance.

Creating and Using Delta Tables in PySpark or SQL

create a Delta table by writing a DataFrame in PySpark or SQL.

Create or Write a DataFrame to a Delta table

If we directly query delta table from adls using SQL, always use

 
--back single quotation mark `
delta.`abfss://contain@account.dfs.windows.net/path_and_table`

# python
# Write a DataFrame to a Delta table
df.write.format("delta").save("/mnt/delta/my_delta_table")


# sql
-- Creating a Delta Table
CREATE TABLE my_delta_table
USING delta
LOCATION '/mnt/delta/my_delta_table';

# sql
-- Insert data
INSERT INTO my_delta_table VALUES (1, 'John Doe'), (2,
'Jane Doe');

Reading from a Delta table


#python
delta_df = spark.read.format("delta").load("/mnt/delta/my_delta_table")
delta_df.show()


#sql
-- Query Delta table
SELECT * FROM my_delta_table;

-- directly query delta table from adls.
-- use  ` back single quotation mark
SELECT * 
FROM 
delta.`abfss://adlsContainer@adlsAccount.dfs.windows.net/Path_and_TableName`
VERSION AS OF 4;

Managing Delta Tables

Optimizing Delta Tables

To improve performance, you can run an optimize operation to compact small files into larger ones.


# sql 
OPTIMIZE my_delta_table;

Z-order Clustering

Z-order clustering is used to improve query performance by colocating related data in the same set of files. it is a technique used in Delta Lake (and other databases) to optimize data layout for faster query performance.


# sql
OPTIMIZE my_delta_table ZORDER BY (date);

Upserts (Merge)

Delta Lake makes it easy to perform Upserts (MERGE operation), which allows you to insert or update data in your tables based on certain conditions.


# sql

MERGE INTO my_delta_table t
USING new_data n
ON t.id = n.id
WHEN MATCHED THEN UPDATE SET t.value = n.value
WHEN NOT MATCHED THEN INSERT (id, value) VALUES (n.id, n.value); 

Conclusion

Delta Lake is a powerful solution for building reliable, high-performance data pipelines on top of data lakes. It enables advanced data management and analytics capabilities with features like ACID transactions, time travel, and schema enforcement, making it an ideal choice for large-scale, data-driven applications.

Delta tables are essential for maintaining high-quality, reliable, and performant data processing pipelines. They provide a way to bring transactional integrity and powerful performance optimizations to large-scale data lakes, enabling unified data processing for both batch and streaming use cases.

Please do not hesitate to contact me if you have any questions at William . chen @ mainri.ca

(remove all space from the email account 😊)

Comparison Partitioning Strategies and Methods

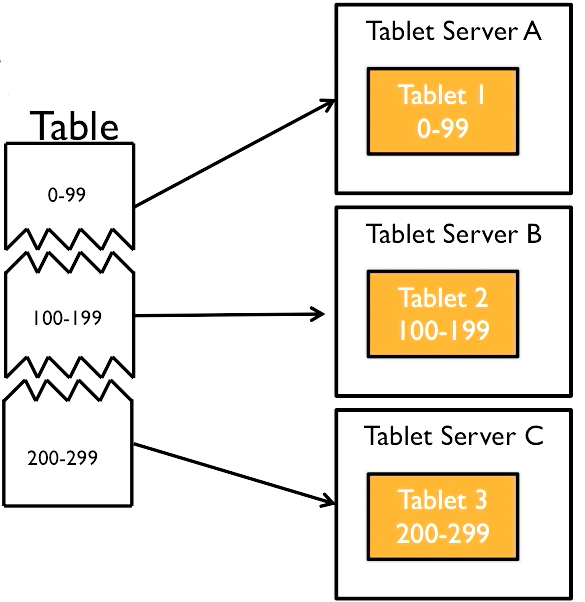
In distributed computing frameworks like Apache Spark (and PySpark), different partitioning strategies are used to distribute and manage data across nodes in a cluster. These strategies influence how data is partitioned, which affects the performance of your jobs. Some common partitioning techniques include hash partitioning, range partitioning, and others like broadcast joins.

Key Differences Between Partitioning Methods

Partitioning MethodKey FeatureBest ForShufflingEffect on Data Layout
partitionBy()
General Partitioning
 Optimizing data layout on disk (file system)NoOrganizes data into folders by column values
Hash PartitioningEvenly distributes data based on hash function.Query, such as Joins, groupBy operations, when you need uniform distribution.yesRedistributes data across partitions evenly
Round RobinSimple, even distribution of rows.Even row distribution without considering valuesYes   Distributes rows evenly across partitions
Range PartitioningData is divided based on sorted ranges.Queries based on ranges, such as time-series data.Yes (if internal)Data is sorted and divided into ranges across partitions
Custom PartitioningCustom logic for partitioning.When you have specific partitioning needs not covered by standard methods.Yes (if internal)Defined by custom function
Co-location of PartitionsPartition both datasets by the same key for optimized joins.Joining two datasets with the same key.No (if already co-located)Ensures both datasets are partitioned the same way
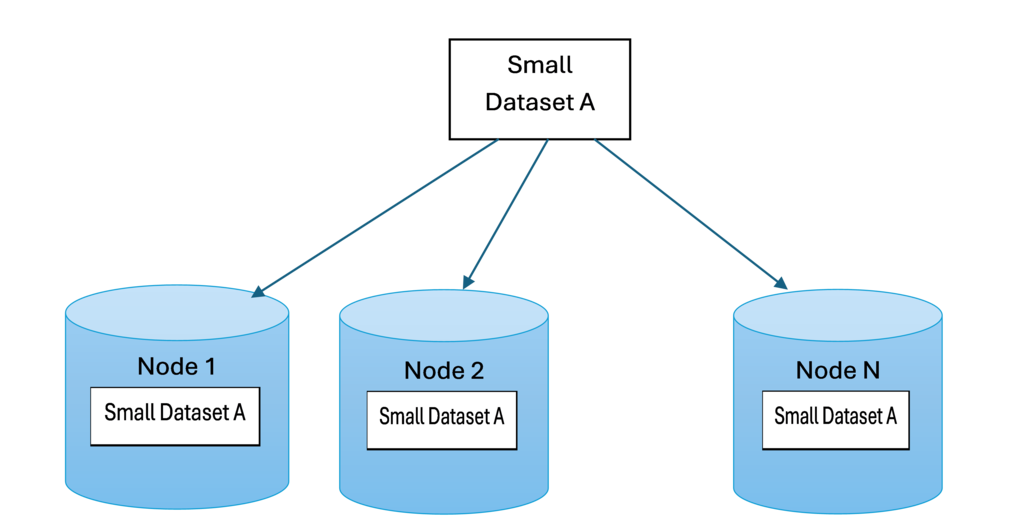
Broadcast JoinSends smaller datasets to all nodes to avoid shuffles.Joins where one dataset is much smaller than the other.No (avoids shuffle)Broadcasts small dataset across nodes for local join
Key Differences Between Partitioning Methods

Key Takeaways

  • partitionBy() is used for data organization on disk, especially when writing out data in formats like Parquet or ORC.
  • Hash Partitioning and Round Robin Partitioning are used for balancing data across Spark

General Partitioning

Distributing data within Spark jobs for processing. Use partitionBy() when writing data to disk to optimize data layout and enable efficient querying later.


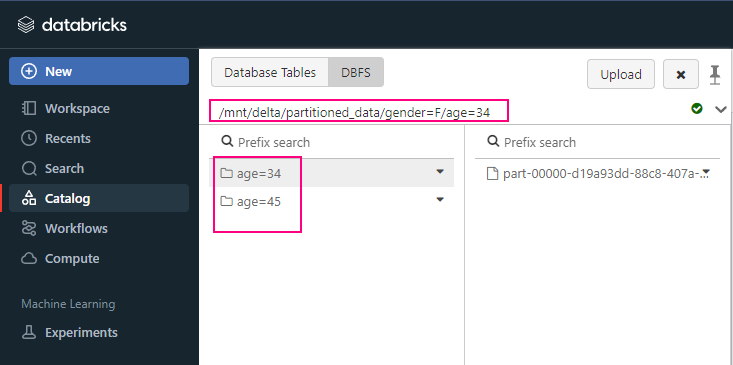
df.write.format("delta").partitionBy("gender", "age").save("/mnt/delta/partitioned_data")

save in this way

Hash Partitioning


df = df.repartiton(10, 'class_id')

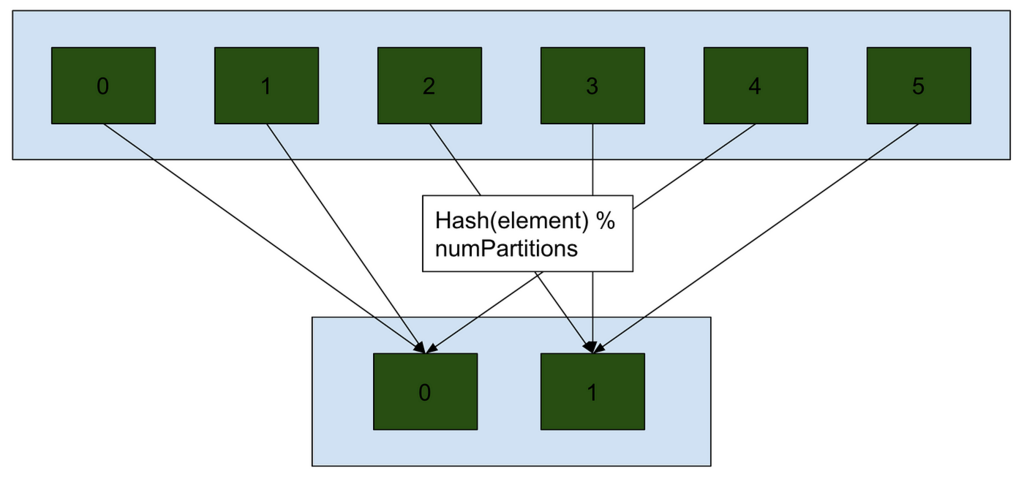
Hash partitioning is used internally within Spark’s distributed execution to split the data across multiple nodes for parallel processing. It Splits our data in such way that elements with the same hash (can be key, keys, or a function) will be in the same

Hash Partitioning Used during processing within Spark, it redistributes the data across partitions based on a hash of the column values, ensuring an even load distribution across nodes for tasks like joins and aggregations. Involves shuffling.

Round Robin Partitioning

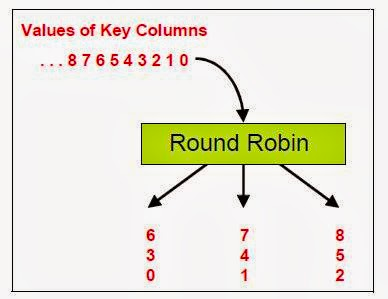
Round robin partitioning evenly distributes records across partitions in a circular fashion, meaning each row is assigned to the next available partition.

Range Partitioning

only it’s based on a range of values.

Broadcast Join (replication Partitioning)

Broadcast joins (known as replication partition) in Spark involve sending a smaller dataset to all nodes in the cluster, that means all nodes have the same small dataset or says duplicated small dataset to all nodes. It is allowing each partition of the larger dataset to be joined with the smaller dataset locally without requiring a shuffle.

Detailed comparison of each partitioning methods

Partitioning MethodPurposeWhen UsedShufflingHow It Works
General Partitioning (partitionBy())Organizing data on disk (file partitioning)When writing data (e.g., Parquet, ORC)No shuffleData is partitioned into folders by column values when writing to disk
Hash Partitioning (repartition(column_name))Evenly distributing data for parallel processingDuring processing for joins, groupBy, etc.Yes (shuffle data across nodes)Applies a hash function to the column value to distribute data evenly across partitions
Round Robin PartitioningDistributes rows evenly without considering valuesWhen you want even distribution but don’t need value-based groupingYes (shuffle)Rows are evenly assigned to partitions in a circular manner, disregarding content
Range PartitioningDistribute data into partitions based on a range of valuesWhen processing or writing range-based data (e.g., dates)Yes (if used internally during processing)Data is sorted by the partitioning column and divided into ranges across partitions
Custom PartitioningApply custom logic to determine how data is partitionedFor complex partitioning logic in special use casesYes (depends on logic)User-defined partitioning function determines partition assignment
Co-location PartitioningEnsures two datasets are partitioned the same way (to avoid shuffling during joins)To optimize joins when both datasets have the same partitioning columnNo (if already partitioned the same way)Both datasets are partitioned by the same key (e.g., by user_id) to avoid shuffle during joins
Broadcast Join (Partitioning)Send a small dataset to all nodes for local joins without shuffleWhen joining a small dataset with a large oneNo shuffle (avoids shuffle by broadcasting)The smaller dataset is broadcast to each node, avoiding the need for shuffling large data

Please do not hesitate to contact me if you have any questions at William . chen @ mainri.ca

(remove all space from the email account 😊)